In most cases, users export contacts from Mailchimp in order to upload this data to another tool or app. You can also export this data to create a backup copy of your contacts. Another possible purpose is to share Mailchimp contacts with stakeholders, of course, providing this is in compliance with GDPR or other rules for personal data protection.
How can you do this? In this article, we’ll answer the most important questions about Mailchimp export contacts. Let’s go then!
Export contacts from Mailchimp – which options are available?
Option 1: Manual export in Mailchimp
Mailchimp Audience is where all your contacts are collected and managed. It’s also where you can export contact data as CSV files and download them to your device. Contact groups are separated by default (unsubscribed, subscribed, etc.), meaning every export generates multiple files.
The method works well, but it’s a manual option. You’ll have to repeat the above process every single time you need to update your records.
Option 2: Automated export with Coupler.io
Coupler.io is a reporting automation solution designed to turn raw data into actionable reports. It allows you to schedule data flow from Mailchimp (and other platforms) into Google Sheets, Excel, BigQuery, Looker Studio, and Power BI.
By using Coupler.io for Mailchimp contacts export, you can:
- Automate the workflow with a few clicks – no need for regular downloads and uploads.
- Set up scheduled data exports, such as every day, week, hour, 15 minutes, etc.
- Apply filters or other data transformations to export the data you actually need. For example, unsubscribed contacts only, contacts added in 2025, from Canada, etc.
We’ll discuss both methods in detail. However, if you already know which option suits you best, feel free to jump right to it.
How to export contacts from Mailchimp on a schedule with Coupler.io
Suppose you want to automate the export of contacts from Mailchimp to Google Sheets. We’ll show you how to do it in three simple steps with Coupler.io.
Click Proceed in the form below with the preselected source and destination apps, Mailchimp and Google Sheets respectively. If you need another destination, feel free to change it right away. Coupler.io allows you to export data from Mailchimp to Excel, BI tools like Looker Studio, and data warehouses like BigQuery.
You’ll be prompted to sign up for Coupler.io for free. No credit card is required.
Step 1. Extract data from Mailchimp
- Connect your Mailchimp account. Select Audience (list of contacts) as the data entity and specify the audience to import data for.
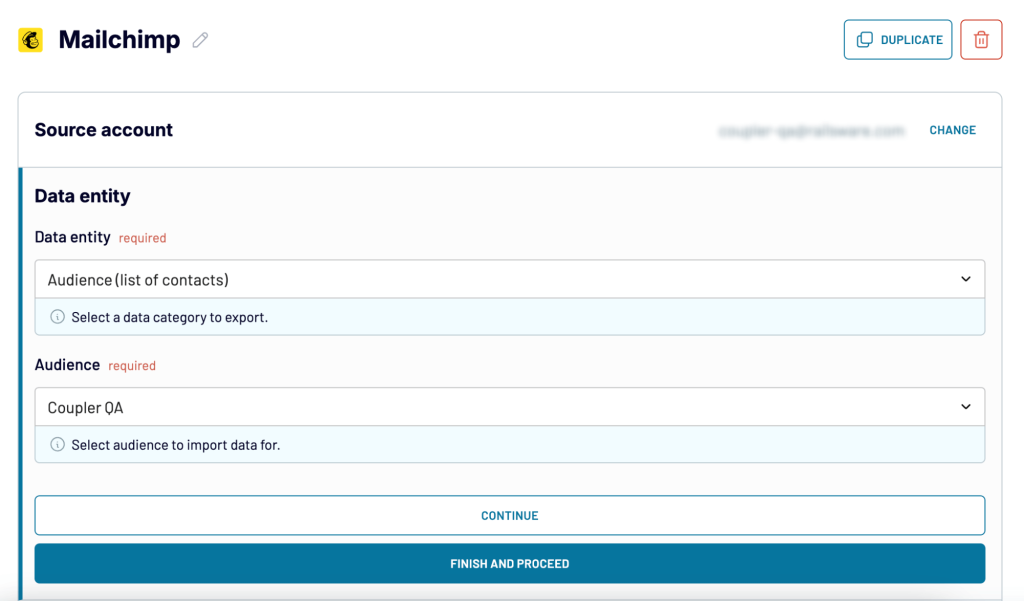
Optionally, you can filter the data to be fetched in the Advanced settings and Columns blocks. Once you’re happy with the configuration, click Finish and Proceed.
Keep in mind, the list of contacts is not the only data entity you can export with Coupler.io. The platform allows you to get information about Audience clients, growth history, and many others.
Step 2. Transform data from Mailchimp
Before your contacts data lands in Google Sheets (or another destination), you can make some refinements and strategic changes. For example:
- Hide, rename, and reorder columns, change/specify their data type, and add new columns using supported calculation formulas.
- Sort and filter data based on the selected criteria and specified values.
- Make aggregations on your contacts data (e.g., total count of unique email addresses).
- Combine contacts and customer data from other sources, such as Klaviyo, Google Sheets, Pipedrive, HubSpot, etc. Use Append to merge columns and prevent duplication.
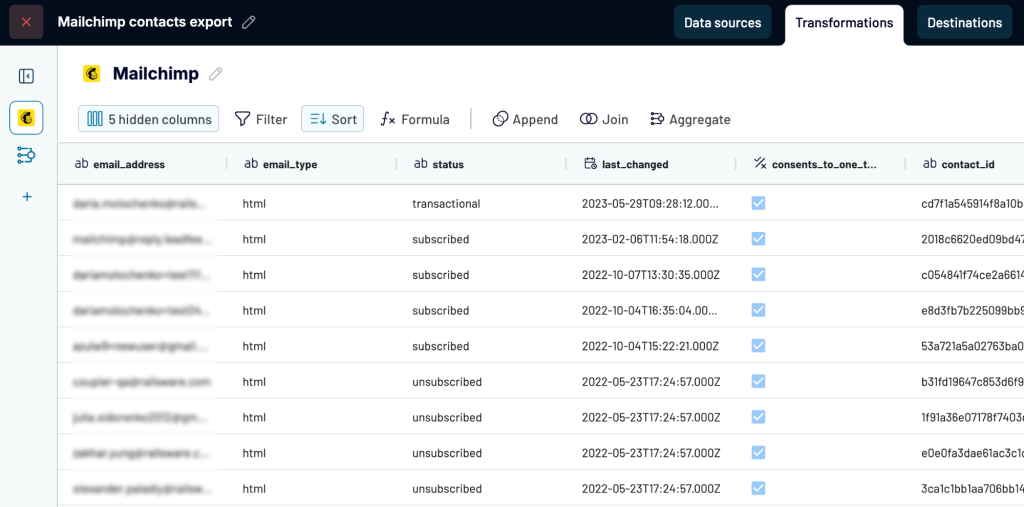
Review the finished result – or do nothing, if you have no changes to make – and proceed to the Destinations step.
Step 3. Load data and schedule regular updates
The last step is to actually connect the destination app. In the case of Google Sheets, you need to:
- Connect your Google account
- Select a Google Sheets document on your Google Drive and specify a sheet to load data to. You can create a new sheet by typing a new name.

You may also want to configure the sheet’s cell range or adjust the data import mode before proceeding to the scheduling step. Read the full Google Sheets set-up guide to learn more about the optional features.
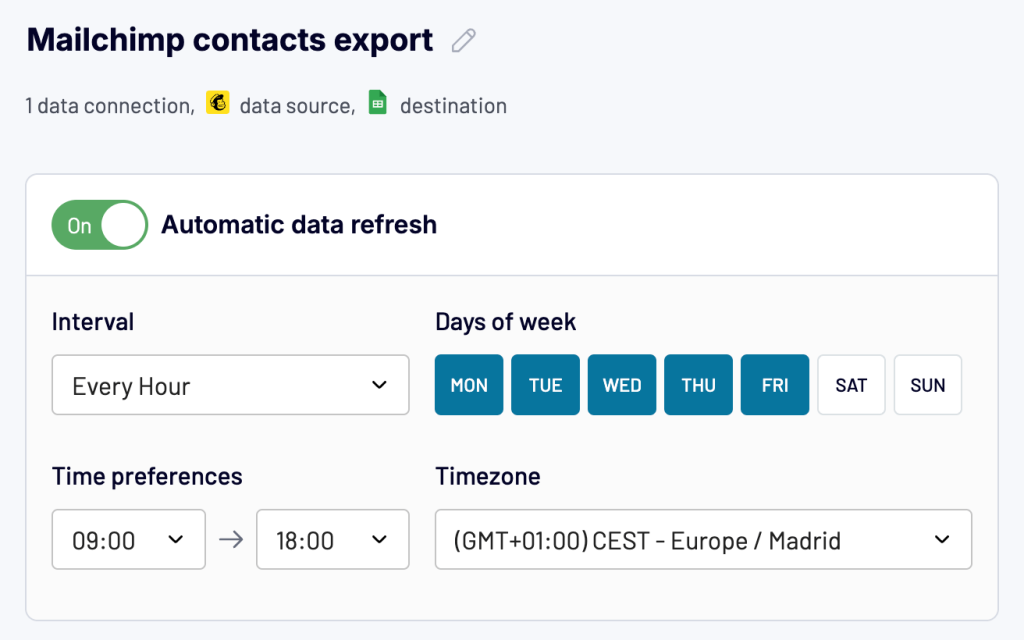
If you regularly export contact data from Mailchimp, it’s a good idea to schedule them in advance. That way, you won’t have to perform manual updates or repeat these steps in the future. At the final stage – Flow Settings – simply toggle on the Automatic data refresh button. You can then:
- Change the update frequency (every hour, day, month, etc.) and the number of days a week.
- Configure the preferred timezone and time preference for hourly and daily updates.
- Click Save and Run to make it work. That’s it, you’ve now automated the export of contacts from Mailchimp!
The raw data will appear in Google Sheets where you can build a report and share it with stakeholders. Meanwhile, you can rest assured that the data will be updated automatically according to your chosen schedule.
Note block: It’s important to emphasize that you’ll get much more insights compared to the CSV export. With Coupler.io, your contacts data includes stats and metrics, for example, average click rate and total revenue, location details, last note records, and many more.
Visualize your Mailchimp data with ready-to-use dashboards
In addition to exporting Mailchimp contacts, Coupler.io offers ready-to-use solutions for instant and efficient data analysis. These are pre-built dashboard templates that work seamlessly with your exported Mailchimp data.
Mailchimp analytics dashboard
The Mailchimp analytics dashboard provides an overview of your email marketing performance across all campaigns and audiences. It brings together key metrics in one place. This way, you can track subscriber engagement, campaign effectiveness, and overall strategy performance on one dashboard.
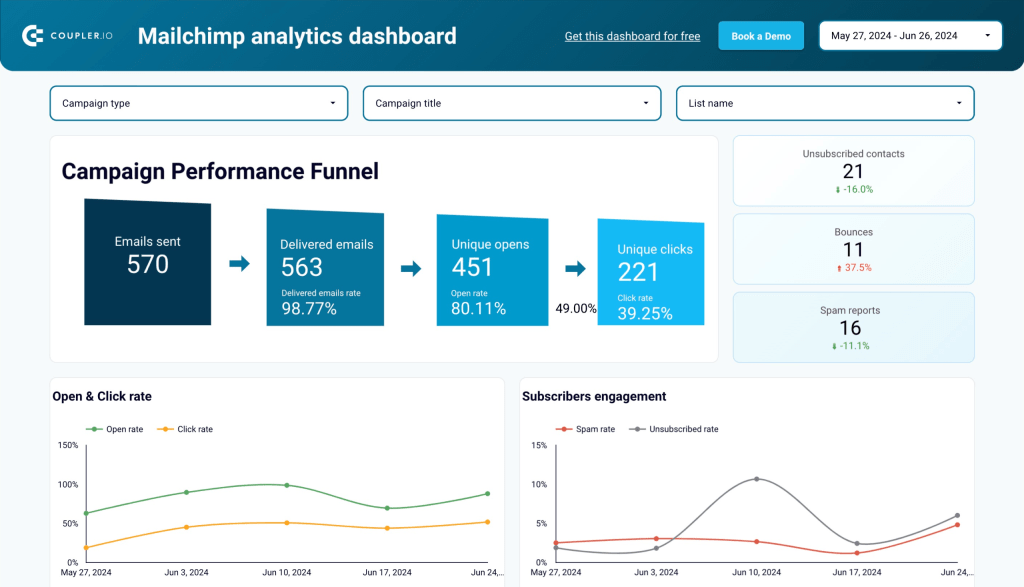
What insights you can get:
- Comprehensive overview of your email marketing performance with key metrics like open rates, click rates, and revenue generation
- Campaign comparison analysis to identify your most successful email content and subject lines
- Subscriber growth tracking with visualization of list growth and engagement over time
- Geographic distribution of your audience with engagement metrics by location
- Deliverability metrics to monitor and improve your sender reputation and email performance
How to use this dashboard: The dashboard template is designed in Looker Studio and comes with a Readme tab containing clear instructions. Connect your Mailchimp account using Coupler.io’s integration, select which audience(s) you want to analyze, and the dashboard will automatically populate with your email marketing analytics data.
Email marketing analytics dashboard for Mailchimp
This specialized dashboard combines data from Mailchimp and Google Analytics 4 to provide insights into how your email campaigns impact website traffic and conversions. It helps you understand the customer journey from email open to purchase completion.
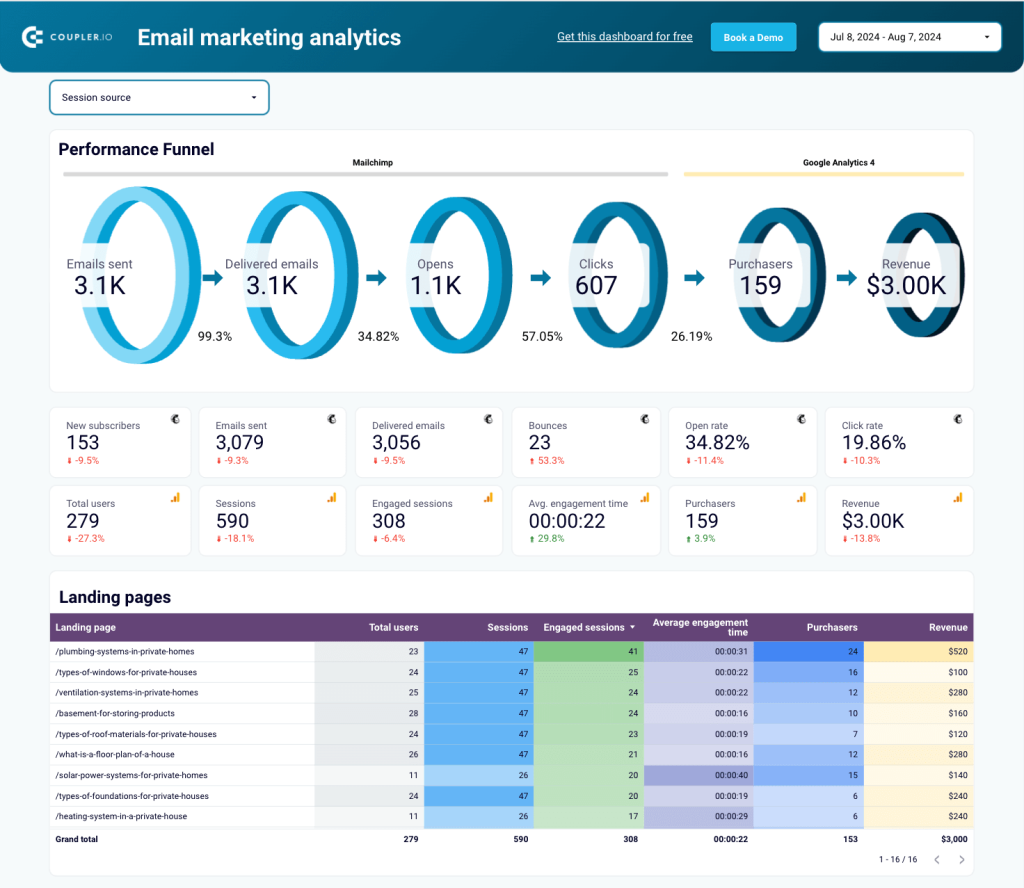
What insights you can get:
- Visual representation of your email performance funnel showing delivery, open, click, and conversion rates
- Performance overview with key metrics clearly labeled by source (Mailchimp vs GA4)
- Landing page performance metrics to identify your most successful pages
- Email campaign traffic performance breakdown by engagement metrics
- Email campaign engagement analysis with positive and negative interaction metrics
How to use this dashboard: Simply connect your Mailchimp account to the Looker Studio template using Coupler.io’s connector. The Readme tab provides step-by-step instructions to get you started quickly.
Mailchimp email campaign performance dashboard for Shopify store
This report can be simply called Mailchimp & Shopify dashboard as it bridges the gap between your email marketing efforts and e-commerce performance. It shows you exactly how your Mailchimp campaigns translate into Shopify sales and revenue, providing a clear ROI picture of your email marketing.
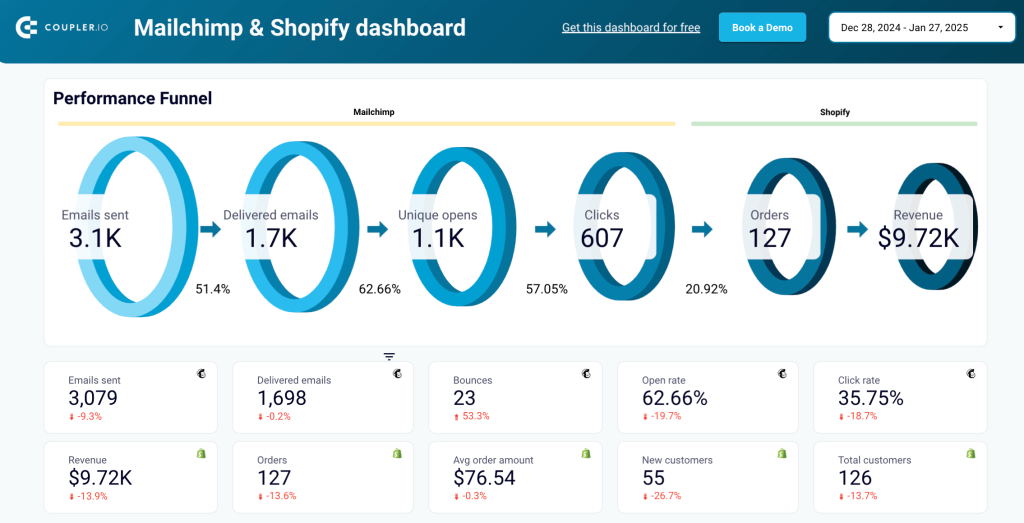
What insights you can get:
- Email-to-revenue funnel tracking from emails sent to actual revenue generated
- Quick overview of key email metrics including deliveries, opens, clicks, and revenue
- Daily performance trends to identify optimal email timing and customer behavior patterns
- Top-selling products driven by your email campaigns
- Detailed comparison of key metrics like clicks vs. revenue and open rates vs. click rates
How to use this dashboard: Follow the instructions in the Readme tab to connect both your Mailchimp and Shopify accounts. The dashboard template in Looker Studio will automatically populate with your integrated data.
These dashboard templates provide valuable visualizations that go far beyond what’s possible with basic CSV exports. They offer a comprehensive view of your email marketing performance and integrate perfectly with the automated data export methods described in this article.
How to export all contacts from Mailchimp manually
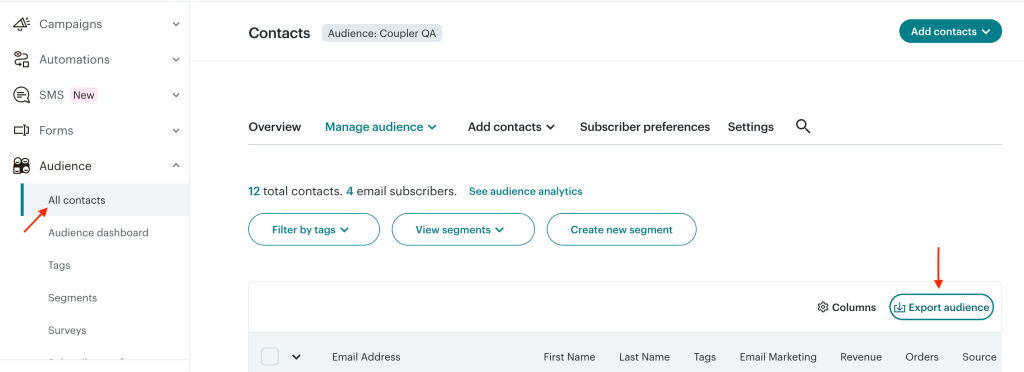
- Go to the Audience tab in the left-hand menu, select All Contacts, and click Export Audience.
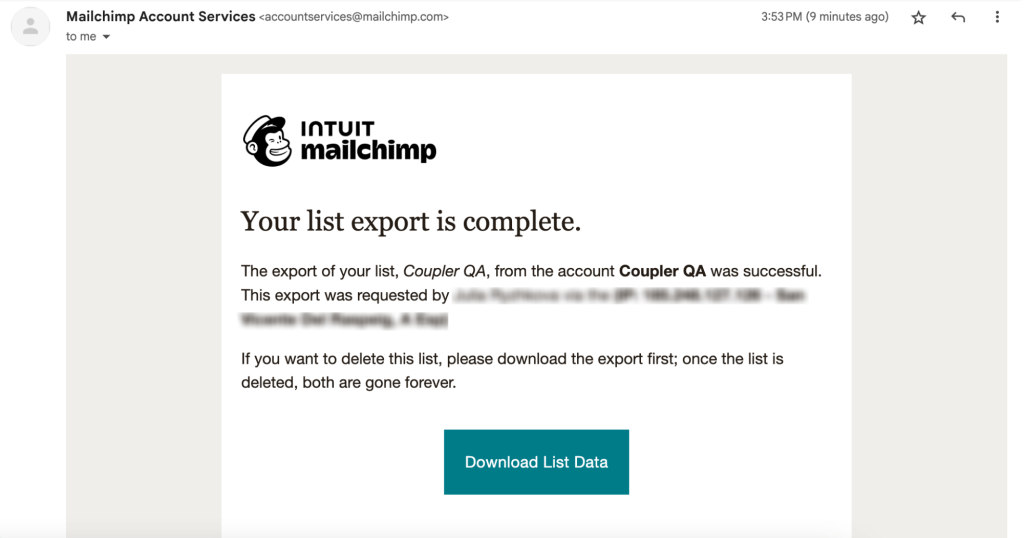
- Confirm the export in the pop-up window. This will automatically send an email to the address associated with your account.
- Open the email and click Download List Data to access the ZIP file. You must be logged in to Mailchimp for the download to start.
Why is it a ZIP file with multiple CSVs? Because Mailchimp’s export ‘all contacts’ option groups data by the email marketing status: Subscribed, Nonsubscribed, Unsubscribed, and Cleaned.
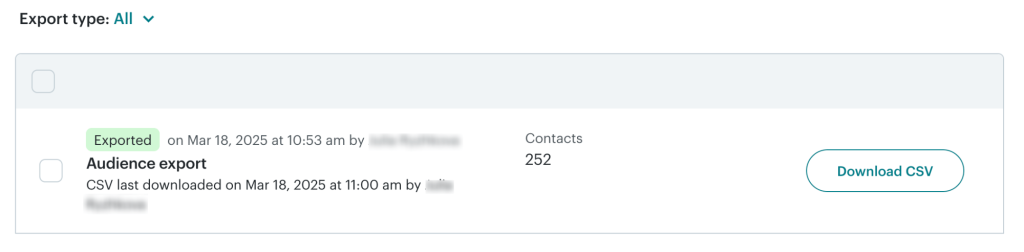
If you’d rather download the ZIP file without logging in to your email, go to the Manage Audience drop-down menu on the All Contacts page.
- Select Export History from the list of options. This will open the audience exports page where you’ll see a Download CSV button. Again, this will download a ZIP file to your device containing 4 CSVs.
Mailchimp export group contacts
If you want to export Mailchimp contacts of a specific group, you can do the following:
- Go to Manage audience on the All contacts page and select Groups from the drop-down menu.
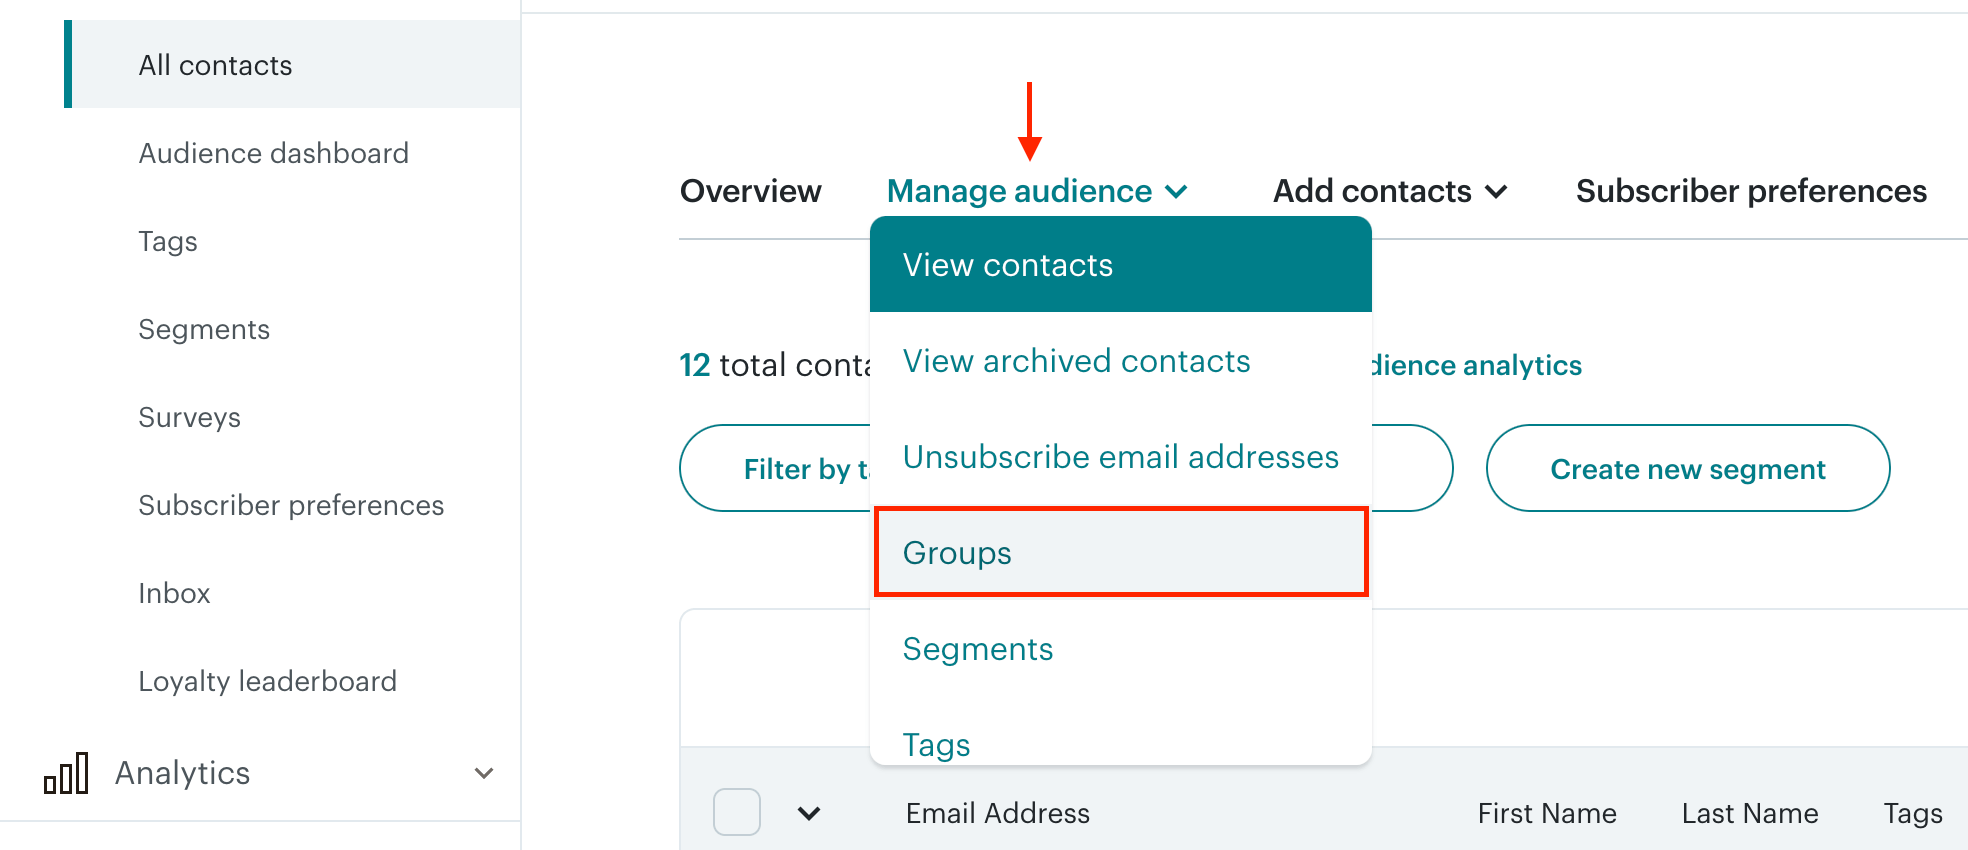
- Choose a category and a group in this category from which you want to export Mailchimp contacts.
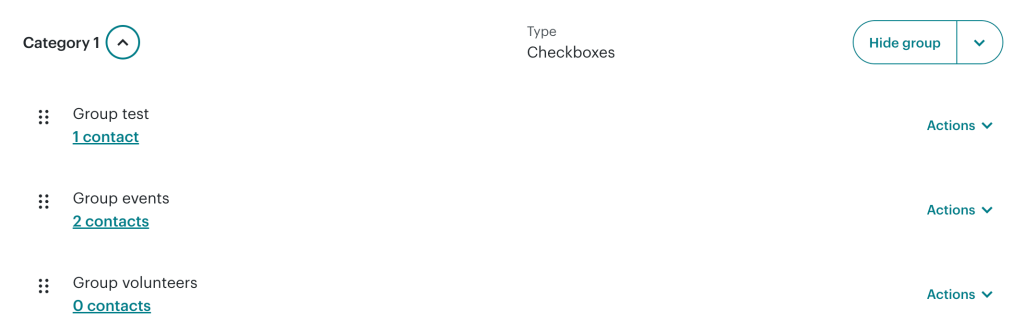
Note: The number of contacts displayed for each group on this page corresponds to the number of contacts with the Subscribed status.
- Once you’ve opened a group, click the Export Segment button
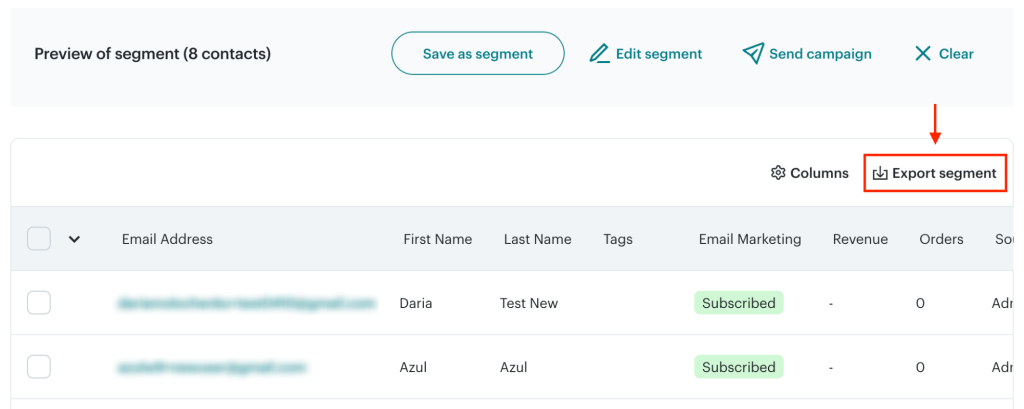
- Confirm the download in the pop-up window. Once again, you’ll receive an email with a Download List Data button. Click the button to download a ZIP file containing 2 CSV files – Cleaned and Subscribed segment data – to your device.
Limitations of exporting contacts as CSV from Mailchimp
The manual method for the Mailchimp export contacts is a good solution if you need to load Mailchimp contacts to another app. However, you should be aware of certain limitations or drawbacks associated with this method:
- You won’t get a single CSV file with all the data but several files with contact records grouped by status.
- Campaign engagement metrics are not included along with other valuable data such as email client, sign-up source, etc.
- You’ll have to repeat the exporting workflow every time you need to refresh your contact data.
It’s not the ideal option if you need to export data on a regular basis, for example, for reporting or analytics. Besides, you can’t change the file format to export Mailchimp contacts to Excel. This is why we recommend you automate this workflow on a schedule with Coupler.io.
Export contacts in Mailchimp: subscribed, unsubscribed, and cleaned
You might be looking for the best way to export Mailchimp contacts grouped by their email marketing status: subscribed, unsubscribed, and cleaned.
It’s easy to do when using Coupler.io for Mailchimp data export. At the Transform step of the data flow set-up, filter contacts by their status. Here’s how it looks in practice:

The native manual functionality also provides this sort of grouping by default. However, without Coupler.io, you’ll have to specify the group each time you want to export contact data.
How to export unsubscribed contacts from Mailchimp manually
First, follow all the steps we’ve covered in the section: How to export all contacts from Mailchimp manually. The final action is to download a ZIP file to your device, which will contain several CSVs with Mailchimp contacts data grouped by status – including the unsubscribed contacts.
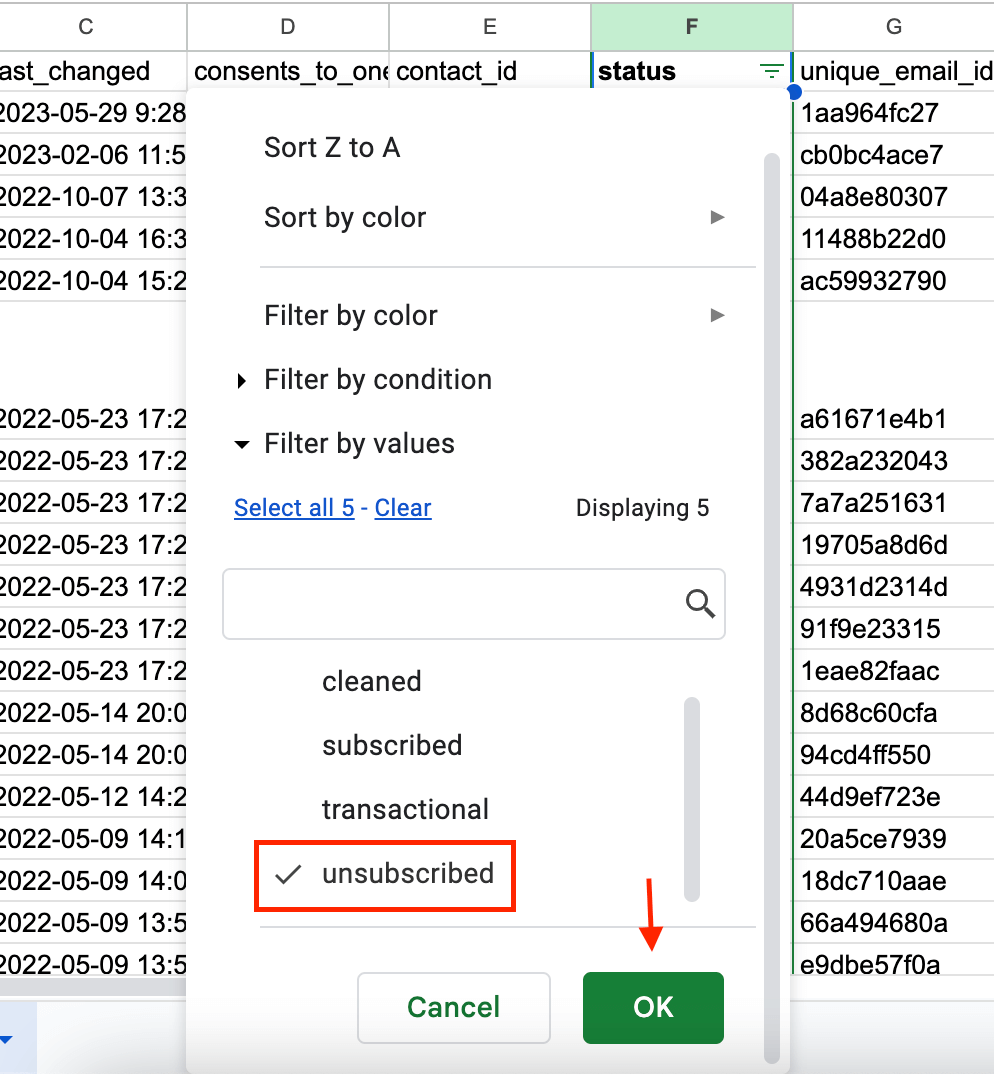
If you export contacts from Mailchimp using Coupler.io, then you can just filter the data by the status Unsubscribed. For example, if you used Google Sheets as a data destination:
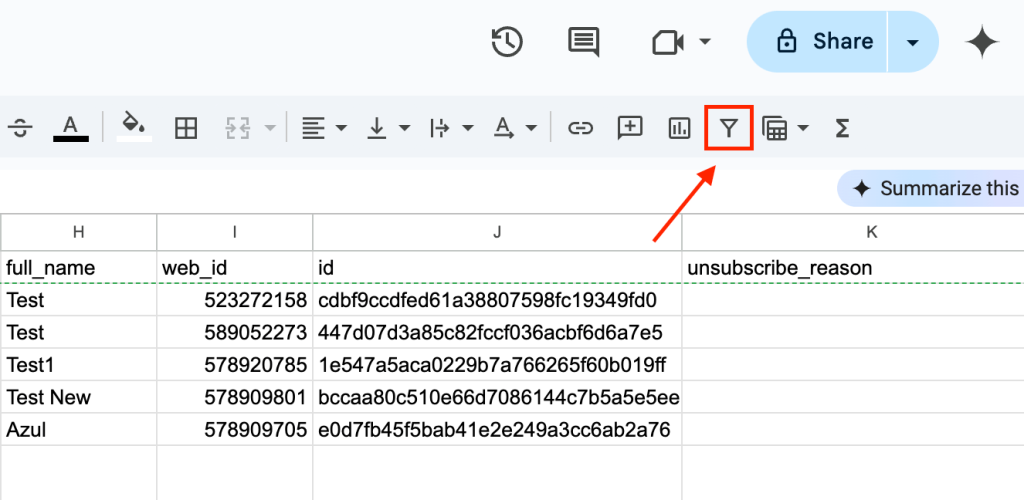
- Click on the Status column in the sheet with the exported data.
- Press the Create a Filter button in the menu bar (the funnel icon).
Filter the status column by the value Unsubscribed and click OK to save changes.
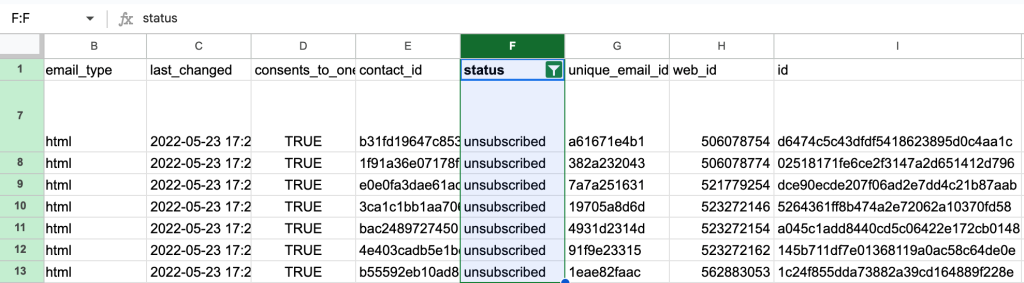
Here’s what the sheet will look once filtered:
How to export subscribed contacts from Mailchimp manually
If you manually export Mailchimp contacts, you’ll get subscribed contacts grouped into a separate CSV file as described above. If you use Coupler.io, filter your exported records by the status ‘Subscribed‘ similar to how we did this in the previous section.
How to do the Mailchimp export of cleaned contacts
If you manually export contacts as CSV, you’ll get a separate CSV file containing data about the cleaned contacts. With Coupler.io, you can simply filter the necessary records.
What else can you export from Mailchimp?
So, we’ve introduced two methods to export contacts from Mailchimp: manual and automated ones. Now you can decide which of these is the best fit for your needs. And if you choose to go with Coupler.io, you’ll be pleasantly surprised.
The thing is that as well as contacts, Coupler.io also allows you to export data about campaigns, clients, activities, and other entities. This can be extremely useful for your analytical or reporting purposes, especially if you need to export your data from Mailchimp to BigQuery. We hope you found this useful and good luck with your data!

Automate Mailchimp data export with Coupler.io
Get started for free