The value of connecting APIs to Power BI lies in automation. APIs enable a direct data flow and eliminate the need for repetitive tasks like manual imports. As a result, users can automate workflows to create dynamic Power BI reports and dashboards that always contain fresh data for accurate and efficient decision-making.
This guide breaks down three proven ways to connect API to Power BI so you can choose the best one for your business.
Comparing the best methods to connect API to Power BI
When it comes to connecting API data to Power BI, there are three main approaches. Each offers distinct advantages, catering to various preferences and skill levels. Let’s break them down:
| Method | Description | Ease of Use | Automation | Customization |
|---|---|---|---|---|
| Coupler.io | A no-code automation tool that imports API data to Power BI on a set schedule for real-time updates | Very Easy | Scheduled refresh | High: – Data transformation – Data aggregation – Support for 60+ app sources and 10+ destinations – Pre-built Microsoft Power BI templates for marketing, sales, finance, etc. |
| Power BI Query Editor | Use Power BI’s built-in tool to manually connect and transform API data for integration | Moderate | No (manual refresh) | Moderate: Customizable within Power BI |
| Custom API Integration | Use scripts or APIs to connect directly to Power BI, offering advanced options for data manipulation | Complex | Triggered or scheduled | High: Fully customizable for specific needs |
Connect API to Power BI with Coupler.io
Coupler.io offers over 60 ready-to-use Power BI connectors built on APIs. They let businesses automate workflows with ease. For custom requirements, Coupler.io offers a JSON importer. This enables users to connect any API to Power BI for accurate reports and live dashboards.
Follow these steps to create your API connection with Coupler.io:
Step 1: Set up your API data source
Click Proceed in the form below to get started. You’ll be offered to sign up for Coupler.io for free with no credit card required.
Then, set up the API connection:
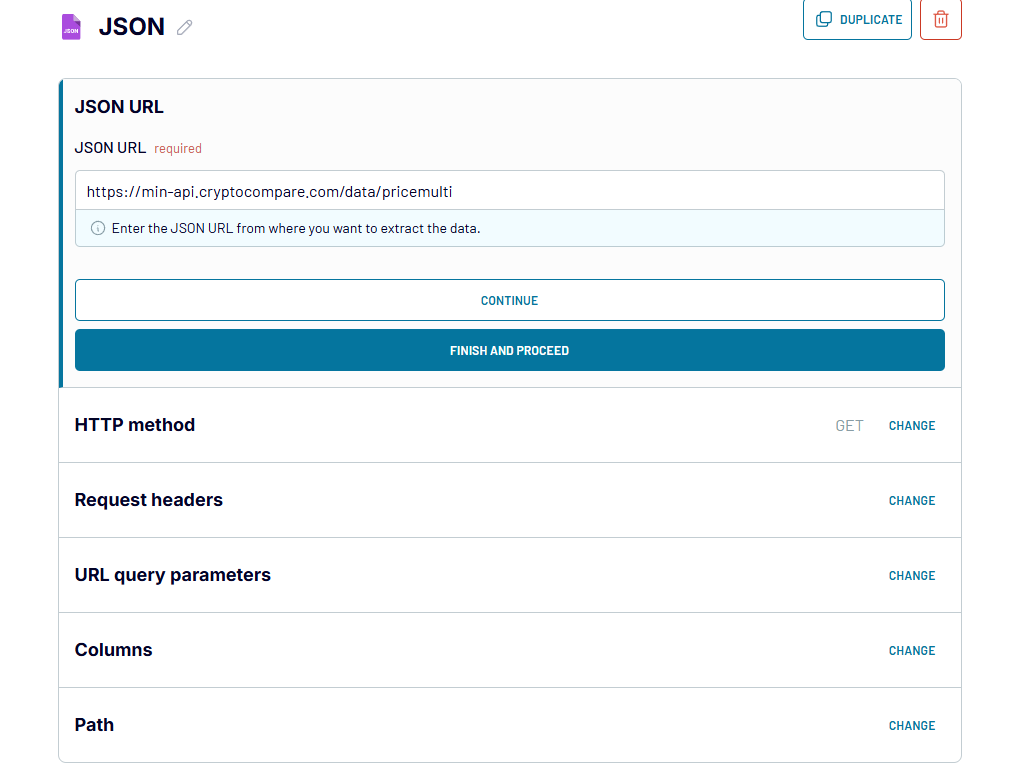
- Insert the JSON URL: This includes the API URL and endpoint. You can find this in the RESTful API documentation of your data source. For example:
https://api.example.com/v1/data - HTTP Method: Choose the method your API uses, such as GET or POST (default is GET).
- Request Headers: Add any required headers, like:
Authorization: Bearer {API-token} - URL Query Parameters: Filter data by adding parameters specific to your API, such as date_range or status=open.
- Columns: Specify which fields you want to import (e.g., user_name, hours_logged, status).
- Path: Select nested objects from the JSON response to exclude unnecessary data.
Refer to your API documentation for details on these parameters.
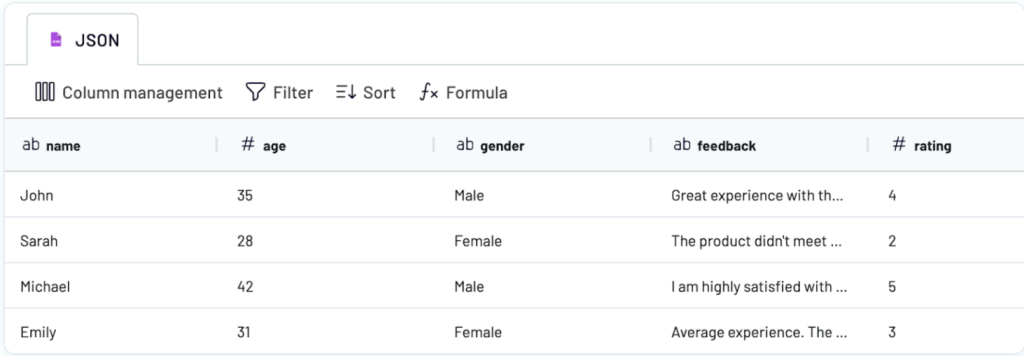
Example: If you’re connecting to a customer feedback API, you can configure your query parameters to fetch relevant data fields like name, age, gender, feedback, and rating. Use the preview in Coupler.io to review and adjust the data.
Step 2: Organize and transform data
Preview your data in Coupler.io before loading it from API to Power BI. Use the following options to organize and refine your data:
- Rearrange or rename columns to suit your reporting needs.
- Filter and sort the data to focus on specific metrics.
- Add new columns with custom formulas for calculated fields.
This step ensures the data is clean and ready for visualization in Power BI.
Step 3: Load data to Power BI and automate updates
Once your data is set, generate an integration URL in Coupler.io under the destination settings.
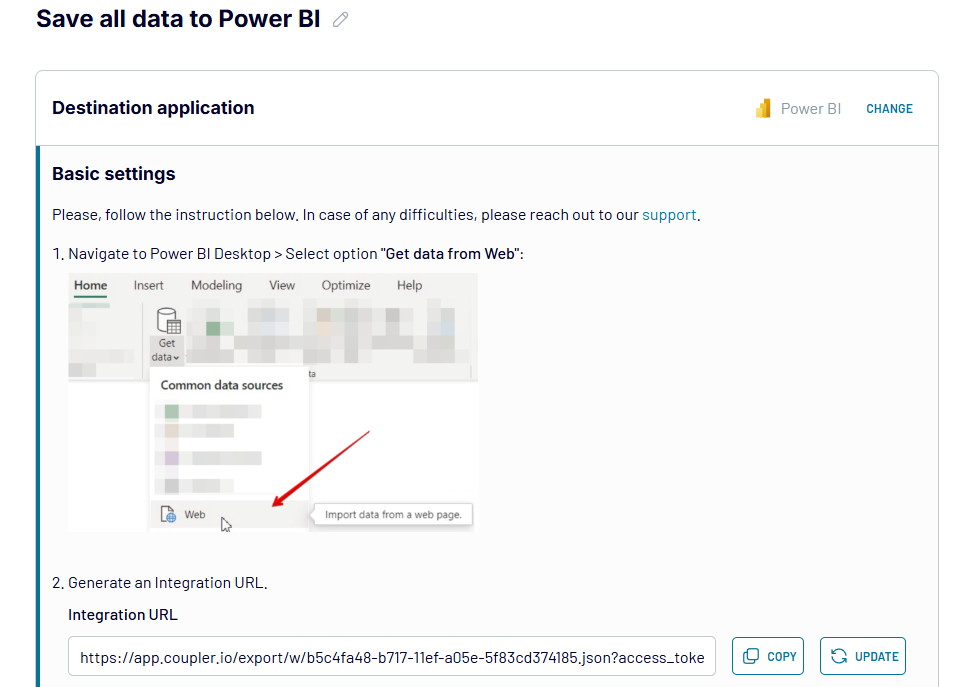
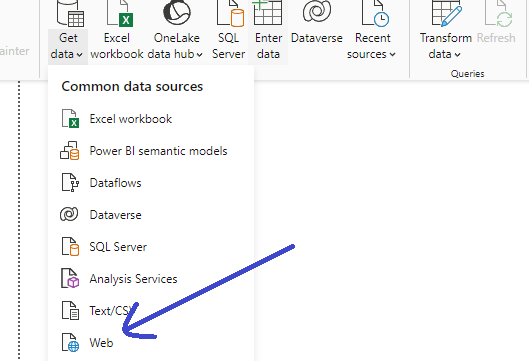
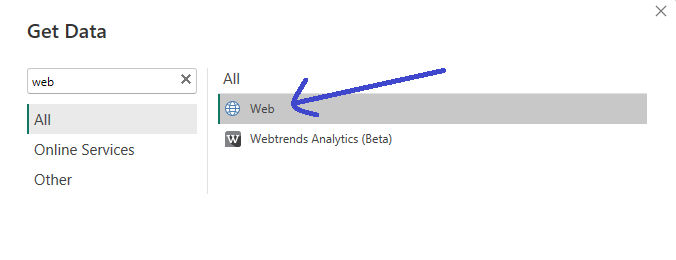
Open Power BI and go to Get Data > Web.
- Paste the URL to load your dataset and press OK.
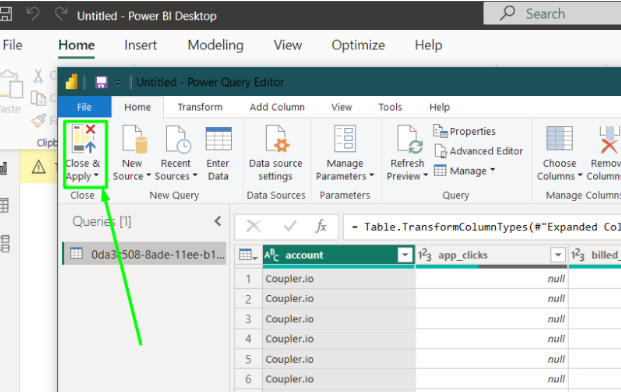
Your data will first appear in Power Query Editor, where you can review it and make any necessary transformations. Once finalized, select Close & Apply to load the dataset from API to Power BI.
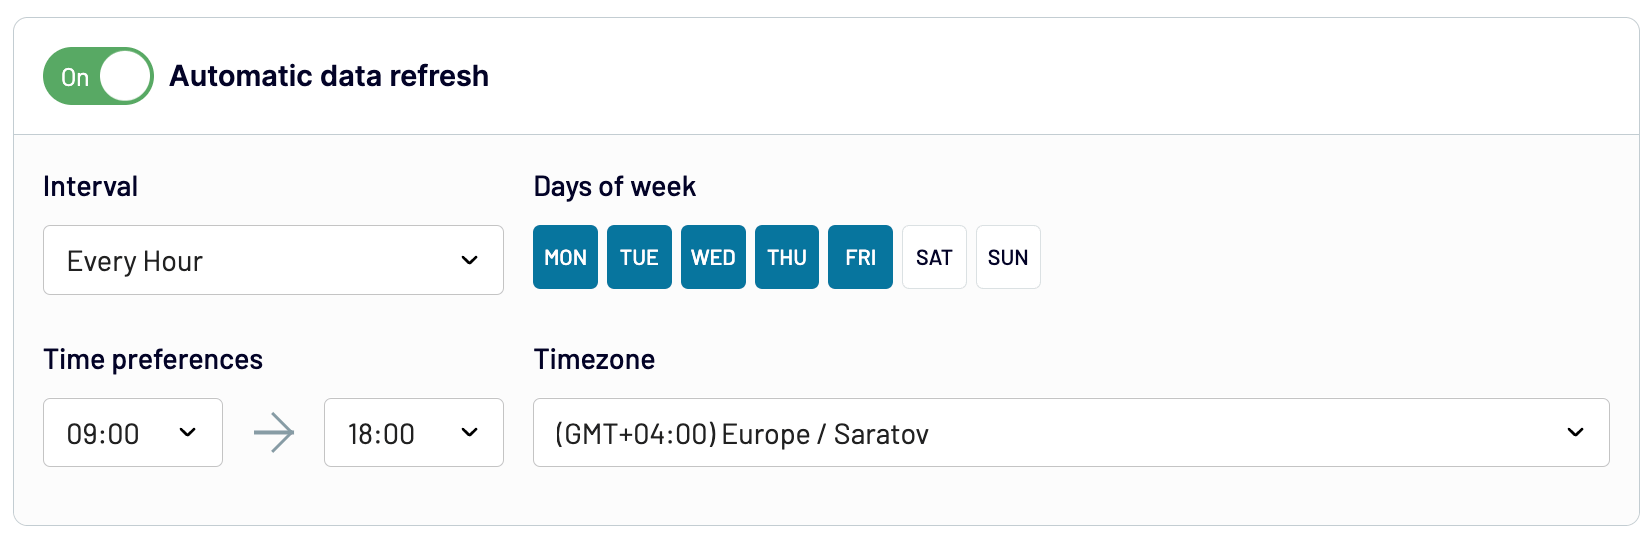
Set up a refresh schedule in Coupler.io. You can choose daily, weekly, or even hourly updates to ensure your Power BI dashboards always display the latest data.
Once you save and run the importer, your API data will load into Power BI and refresh based on the schedule you set.
Coupler.io offers a no-code solution for connecting APIs, making it accessible for users without technical expertise. It supports webhooks for real-time updates and provides pre-built Power BI dashboard examples for quick and actionable insights.
Use Power Query to load data from APIs
Power Query is a tool within Power BI that helps users connect, clean, and organize data from different sources. It simplifies data preparation by transforming raw information into a usable format without requiring advanced coding.
One of its key features is the ability to connect API to Power BI. This enables users to pull data from external systems directly into Power BI and create custom reports and dashboards tailored to specific needs.
Here is how you can use Power Query Editor in Power BI to load API data without third-party tools or automation. This method provides full control over the data and enables tailored transformations for your reporting needs.
Step 1: Open Power Query in Power BI
- Launch Power BI Desktop.
- Go to the Home tab on the ribbon, then click Get Data and select Web from the dropdown.
This will allow you to connect to the API endpoint where your data is hosted.
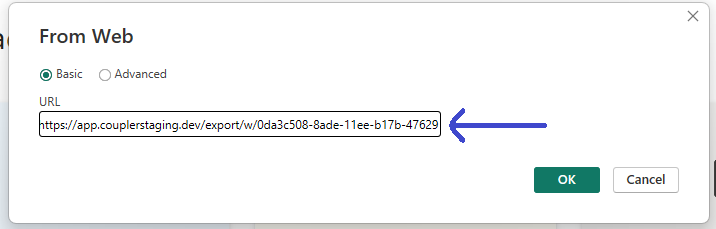
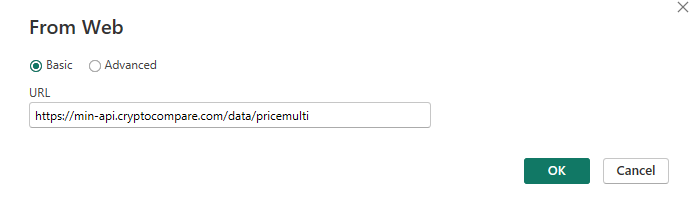
Step 2: Enter the API URL
- In the From Web dialog box, paste the API URL in the URL field and click OK to proceed.
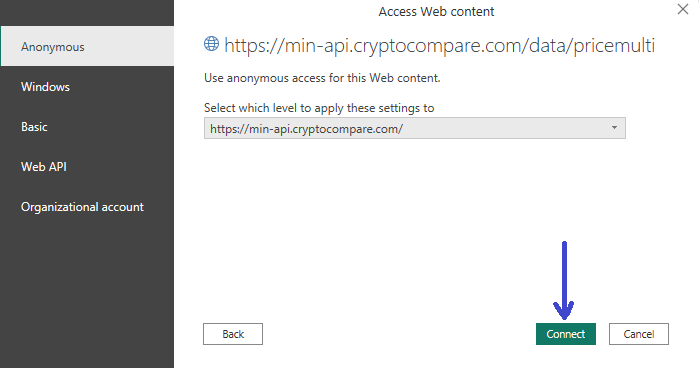
Step 3: Configure API access
- If the API requires authentication, you’ll be prompted to select the access level. Choose the correct option, such as Basic or Anonymous, depending on your API.
- Provide your credentials or access token if required, then click Connect.
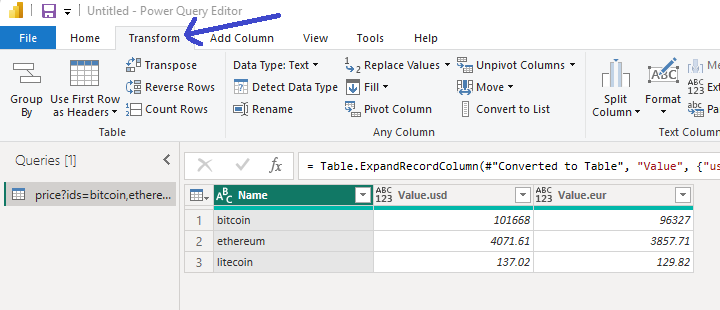
Step 4: Transform the data
- The Power Query Editor will open, displaying the raw data fetched from the API.
- To make the data usable, follow these steps:
- Click the Transform Data button to modify the structure as needed.
- Rename, filter, or sort columns to prepare the data for your report.
Step 5: Load the data into Power BI
Once you’re satisfied with the data, click Yes to close and apply in the Power Query Editor. The processed data will now load into Power BI as a dataset.

This method provides flexibility and is a great choice if you don’t require automated updates. It allows you to connect APIs for marketing and sales directly to Power BI and refresh data as needed from the API source. While it is a straightforward integration, it won’t refresh your data automatically like Coupler.io does.
Advanced API integration with custom scripts
When integrating API data with Power BI, one effective approach is to fetch data from the API and load it into a database. Power BI then connects directly to the database to retrieve the data for analysis.
This method ensures a centralized data source, allows handling larger datasets, and provides flexibility for querying and transforming data as needed. It creates a reliable connection between your API and Power BI without relying on intermediate steps or manual processes.
Step 1: Select your database
Choose a database that works with Power BI. Popular databases like SQL Server, MySQL, and PostgreSQL are widely used with Power BI because they offer strong compatibility, scalability, and reliable performance. These databases support seamless integration with Power BI’s connectors, making it easy to extract and transform data.
You must ensure the database is set up and ready to receive data from your script.
Step 2: Fetch data from the API
Here’s an example of a Python script to pull data from an API. This script serves as a boilerplate and will need adjustments based on your specific API endpoints, database configuration, and data requirements. It provides a starting point, but users must create and customize their own scripts to fit their unique use case and ensure proper integration.
import requests
import mysql.connector

# API endpoint and headers
api_url = 'https://api.example.com/data'
headers = {'Authorization': 'Bearer YOUR_API_KEY'}

# Fetch data from the API
response = requests.get(api_url, headers=headers)

if response.status_code == 200:
    data = response.json()  # Convert response to JSON format
else:
    print(f"API request failed with status code {response.status_code}")
    exit()
Step 3: Load data into the database
Expand the script to connect to your database and insert the data:
# Connect to the database
db_connection = mysql.connector.connect(
    host="your-database-host",
    user="your-username",
    password="your-password",
    database="your-database-name"
)

cursor = db_connection.cursor()

# Create a table if it doesn't exist
cursor.execute("""
CREATE TABLE IF NOT EXISTS api_data (
    id INT AUTO_INCREMENT PRIMARY KEY,
    key1 VARCHAR(255),
    key2 INT,
    key3 DATE
)
""")

# Insert data into the table
for item in data:
    cursor.execute("""
    INSERT INTO api_data (key1, key2, key3)
    VALUES (%s, %s, %s)
    """, (item['key1'], item['key2'], item['key3']))

db_connection.commit()
cursor.close()
db_connection.close()
print("Data successfully loaded into the database.")
Replace key1, key2, and key3 with actual fields from your API response.
Step 4: Connect Power BI to the database
- Open Power BI Desktop.
- Choose Get Data ? Database ? Select your database type (e.g., MySQL).
- Enter the server details and credentials for your database.
- Select the table or write a custom SQL query to fetch the data.
- Transform the data in Power Query Editor and load it into Power BI.
Step 5: Automate the process
To run a Python script regularly, you can schedule it using tools like cron for Linux/Mac or Task Scheduler for Windows. Here is an example:
Linux/Mac with cron:
Use crontab to schedule the script. For instance, the following entry runs the script daily at 3 AM:
0 3 * * * /usr/bin/python3 /path/to/your_script.py
Windows with Task Scheduler:
Set up a task to run the script at a specific time. For example, configure the action to:
C:\Python39\python.exe C:\Path\to\your_script.py
This approach works, but it comes with downsides. Setting up and maintaining a database requires technical expertise and ongoing effort. Costs for hosting and managing the database can add up, especially for smaller teams or businesses. For non-technical users, the complexity of configuring the integration and ensuring proper functionality may make this approach challenging. Thankfully, tools like Coupler.io offer a simpler alternative with less overhead.
What is the best way to set up an API data integration with Power BI?
Power BI is a top choice for turning data into meaningful insights. However, integrating API data through custom scripts requires technical expertise and can be time-intensive. Without proper automation, there is also a risk of delays in data updates, which can affect the accuracy of your reports. While Power BI is excellent for creating visualizations, keeping your reports current with real-time API data can be tricky.
Coupler.io solves this problem by offering a simple, code-free way to connect API to Power BI. It automates the process and ensures your data stays up-to-date without requiring constant maintenance or manual effort.
Rather than struggling with outdated reports or complex setups, you can focus on analyzing trends and driving smarter decisions. Coupler.io streamlines the process, making the connection seamless and efficient.
Want to see it in action? Book a demo and discover how to simplify your API data integration while maximizing your productivity.

Automate reporting with Coupler.io
Book a demo