How to Export Data from Google Calendar to JSON: Your Guide to No-code and Pro-code Methods

Calendar data is a popular data type you’re likely to work with, whether you’re a professional coder, business owner, data analyst, or someone else. To effectively process and transport it, you might need a universal carrier that will also fit a custom toolset. A perfect candidate is JSON (JavaScript Object Notation), an open, highly popular, and language-agnostic format. You can use it, for example, to exchange event properties between the frontend and backend of your app, store calendar data to MongoDB databases / other data warehouses, and more.
So, if you work with calendar data, particularly Google Calendar data, in the context of programming, databases, etc., explore what options you have to export data from Google Calendar to JSON and discover which ones are the most convenient and automated.
What are the methods to get data from Google Calendar to a JSON file?
There are both automated and manual options to choose from, with some of them requiring you to code:
- Coupler.io — an online data integration and automation platform that lets you load data from 60+ sources, including Google Calendar, transform it, and bring it to JSON, data warehouses, and more in a few easy steps, with no coding required. You can also set up a scheduler to auto-sync your data as frequently as 15 minutes. So, without much effort, you get a JSON file that includes clean and meaningful data that’s updated in near real-time.
- Google Calendar API — similar to Coupler.io, this approach uses the official Google Calendar API and can offer you automation. However, coding and an initial multistep configuration are required to connect Google Calendar and set up integration.
- Indirect conversion with an online tool (no-code) — this process involves two steps:
- Exporting a calendar into an ICS file.
- Then using one of the online converters to format the file contents to conform to the JSON data structure.
Obviously, the method is not automated, and will suffice if your calendar data doesn’t need frequent updates. On the upside, it’s much simpler than API and doesn’t require any coding.
- Indirect conversion with JavaScript/Python script packages — this method is listed as the last one because it includes the disadvantages of the two previous methods: coding skills requirement and no automation. However, if you’re a ninja coder and your Google Calendar data is rather static, you can go for it!
Use Coupler.io to export Google Calendar data to JSON in an automated & no-code way
Creating workflows (data connections) with Coupler.io is simple and involves just 3 steps you can find below:
Step 1: Collect data from Google Calendar
We’ve pre-configured the data source and target in the form below for you, so it’s enough to click Proceed to start.
Log in to Coupler.io or create an account for free, if you haven’t done it yet (no credit card is required).
Next, sign in to your Google account and choose what data type you’d like to export from Google Calendar:
- List of calendars
- List of Google Calendar events
- Busy times
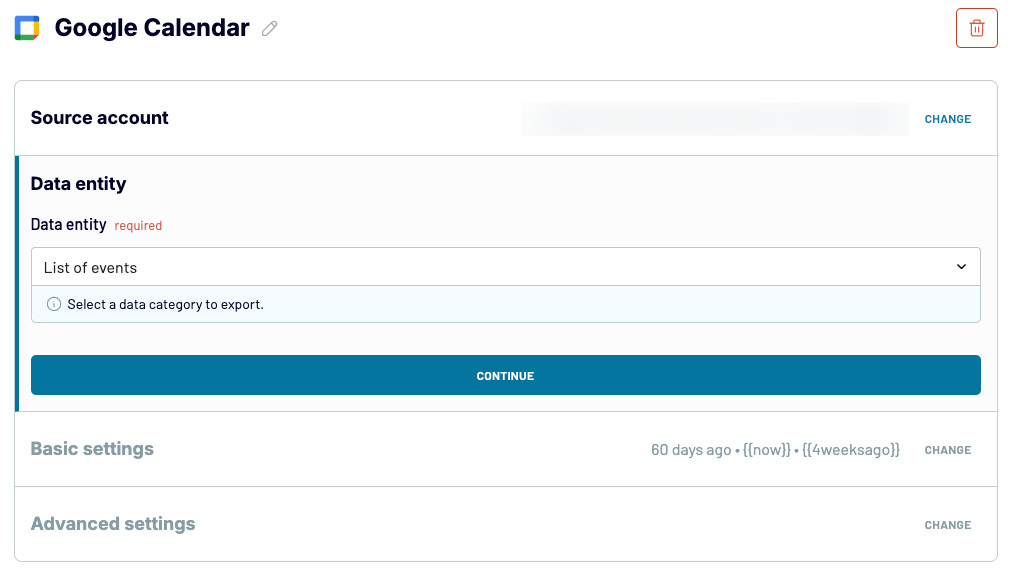
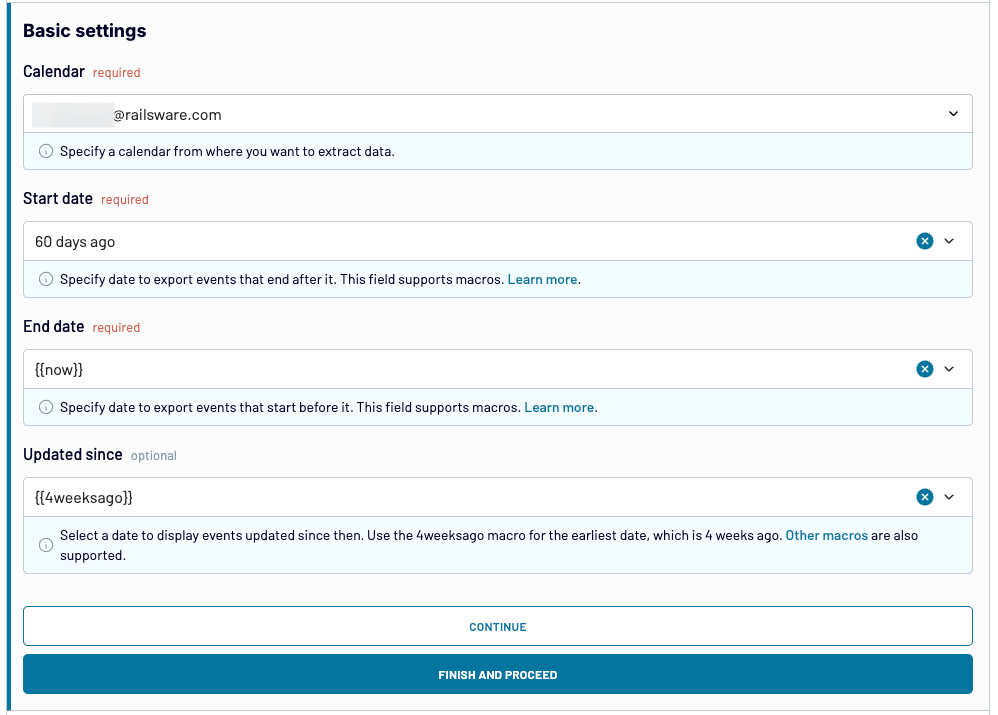
Depending on the selected data type, set up some mandatory options. For example, choose the calendar, specify the start date and end date, etc. Optionally, you might use advanced filters to narrow down your data.
Just to remind you, Coupler.io supports 60+ integrations. So, for example, you can freely blend your Google Calendar data with other sources (e.g., Calendly, PostgreSQL) to feed your app with additional valuable information. This can open up possibilities to implement additional features in your app and make it more attractive to your audience.
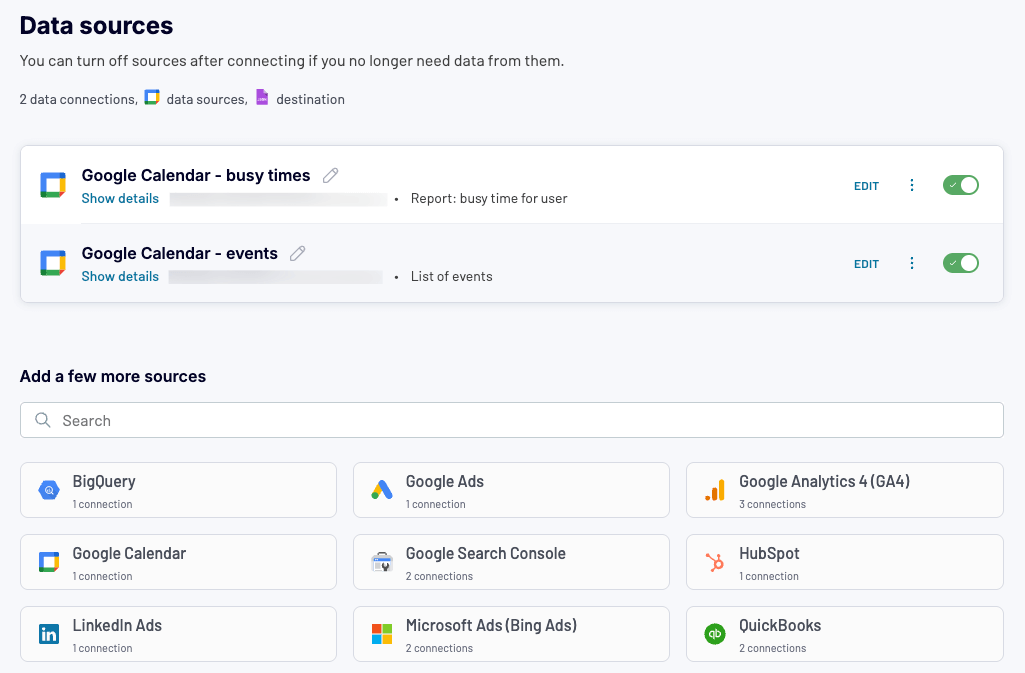
Apart from adding other data sources, you can duplicate the Google Calendar source to import:
- Data from Google calendars in other Google Workspace accounts (e.g., for HR management use cases).
- Different data types from the same calendar at once (e.g., events and busy times), as shown below.
To add another source, just choose it below Add a few more sources and configure as needed.
When your source or sources are ready, proceed to organizing your data.
Step 2: Transform and clean up the input
Coupler.io is not just about running data workflows. In fact, it gives you robust data transformation features, so that the final data you bring to your app or a database is accurate and clean. Here’s what you can do:
- Remove columns with the data you won’t need — even a single Google Calendar might include lots of information that can be cleaned up.
- Reorder columns — this way, you can ensure that the resulting JSON will always have the structure that best fits your use case or app requirements.
- Filter data items — if you want to ignore certain objects, for example, recurring Google Calendar events, use this feature to skip them.
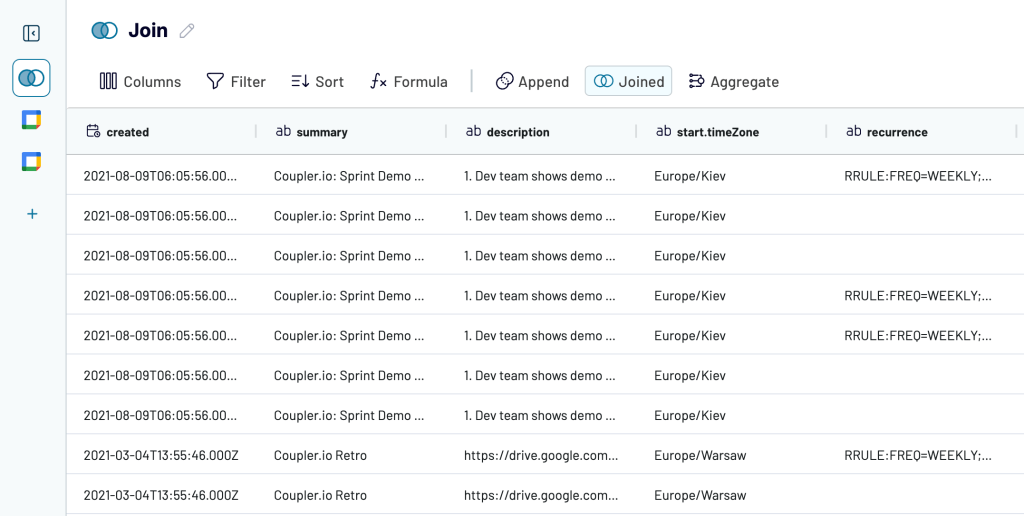
- Blend data sources (Append, Join) — you can combine data sources to output an information-rich dataset for your app, database, etc.
- Aggregate data — you can summarize information through grouping it or using mathematical functions (e.g., average) to reveal aerial-view patterns and insights.
While the above-mentioned operations seem the most useful in preparing a JSON file, Coupler.io’s possibilities extend far beyond that. For a power-user experience, be sure to explore all the data transformation features of the tool, including data item sorting, calculable columns, and more.
Step 3: Generate JSON file & schedule data sync
Generating an output JSON is really simple—just click Generate, and Coupler.io will do all the magic for you, behind the scenes.
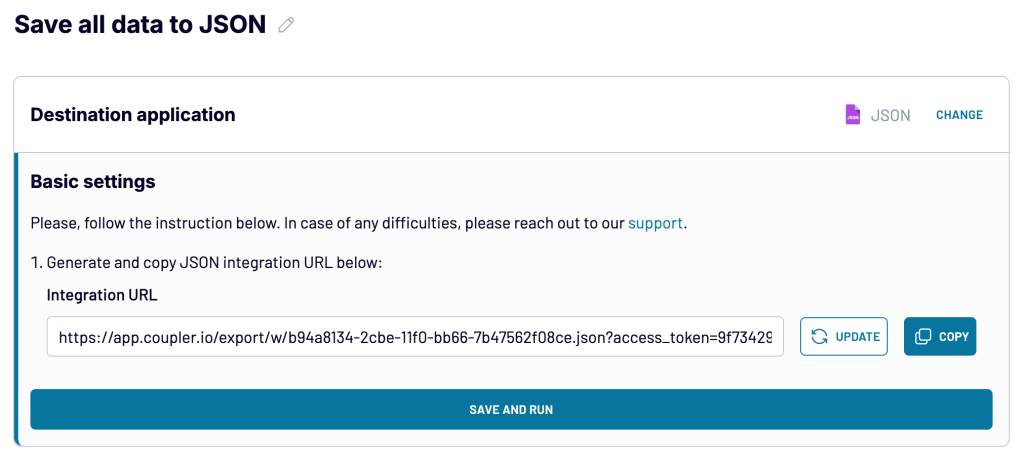
With the JSON file ready, you can use it in the following ways:
- Download it by copying its link and navigating to it in a browser. Then, you can use the contents however you want, for example, load it into your database.
- Even better, copy the link and, for example, use it in your app’s code to programmatically access the data from the JSON file.
Regarding the latter use case, you can make the integration even more functional by using the scheduler feature of Coupler.io. That way, the resulting JSON file can get updated automatically with Google Calendar data at a preset interval.
To achieve this, go to the last step of the dataflow wizard, enable Automatic data refresh, and specify time and date settings according to your liking.
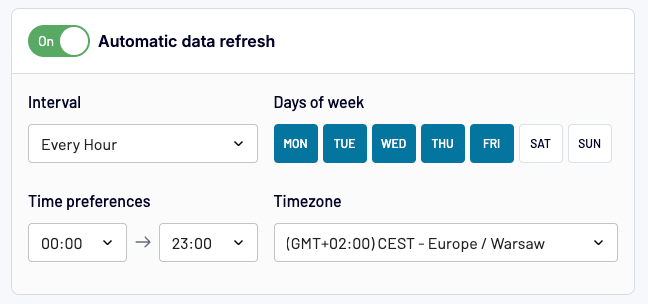
That’s it! You now have an auto-updating JSON file with Google Calendar data. If you wish, you can use Coupler.io to create more automated workflows like that to support your app or use-case.
And if you get hooked on the tools’ data reporting capabilities, you might want to use it with 10+ other destinations like spreadsheets (Google Sheets, Microsoft Excel), business intelligence (BI) platforms (Looker Studio, Power BI, Tableau), and more. Whatever you’re going to do with it is up to you!
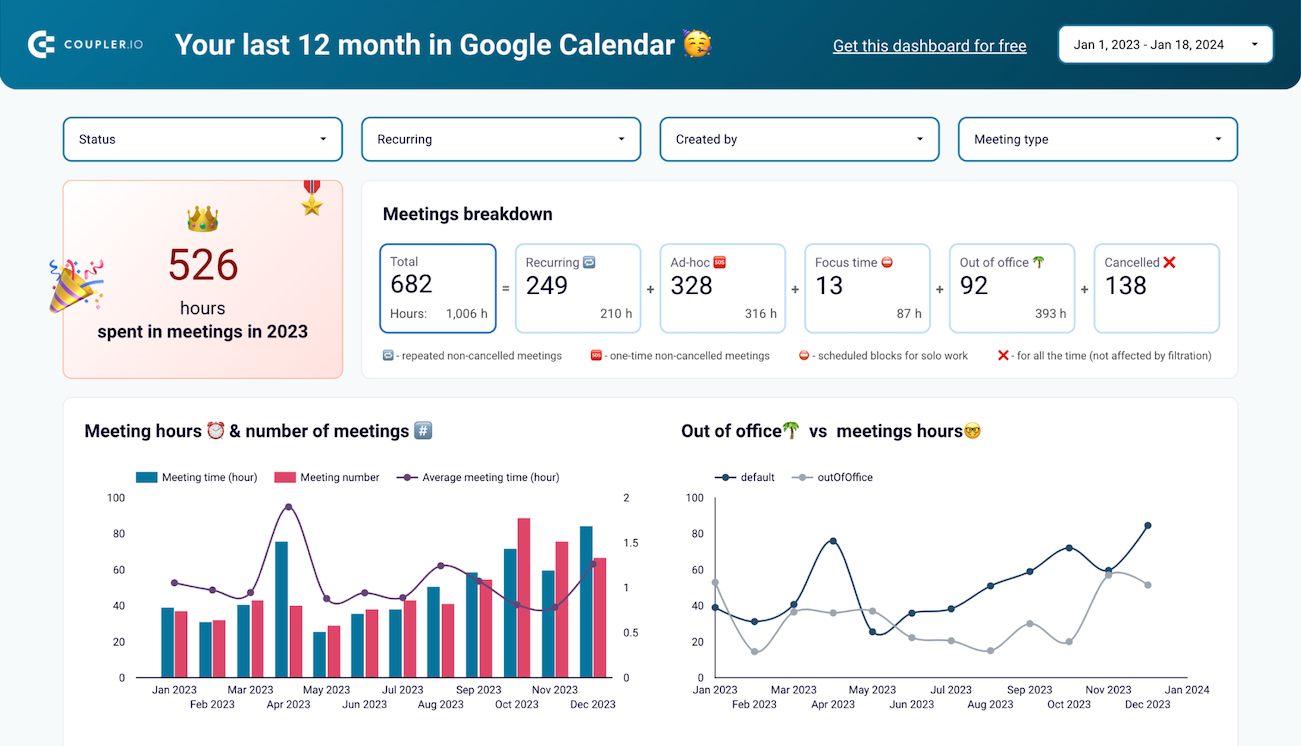
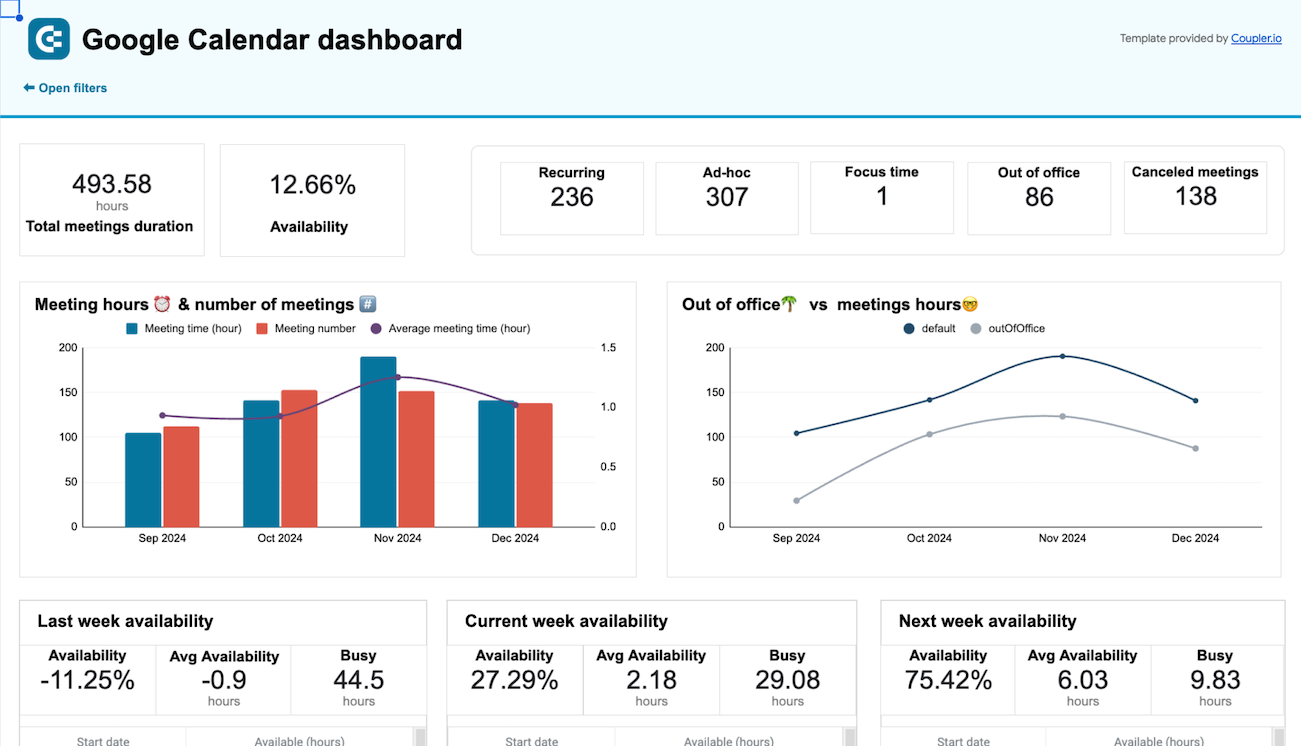
Bonus: If you want to boost your Google Calendar analytics and gain instant and meaningful insights into your activities, for example, total hours in meetings, availability breakdown, etc., be sure to try out our pre-made data visualisation dashboards:
- Google Calendar dashboard — this one summarizes the last 12 months of your calendar activity, enabling you to analyze and optimize your time management. For instance, you can better balance meetings and deep work, and plan more effectively by understanding your peak and low workload periods.
- Google Calendar availability & meeting hours dashboard — this dashboard helps improve productivity by allowing you to visualize meeting patterns and identify optimization opportunities. You can discover your busiest workdays, better manage recurring commitments, and more.
To easily set up each Google Calendar dashboard, head to its Readme tab.


Are there other ways to transfer data from Google Calendar to the JSON format?
Going from GC to JSON is not that simple when you don’t use a data integration and automation tool like Coupler.io. If you visit the Google Workspace Marketplace, you can see that the list of Google Calendar integrations is pretty small. So, unfortunately, you can’t rely on add-ons like in the case of Google Sheets, for example.
Google Calendar API (the native pro-code approach)
This is the native approach that requires multistep configuration in Google Workspace and writing code for your app. The code will let you connect to your calendar(s) via Google Calendar API and fetch the requested data. You can optionally automate the process by using scheduling libraries.
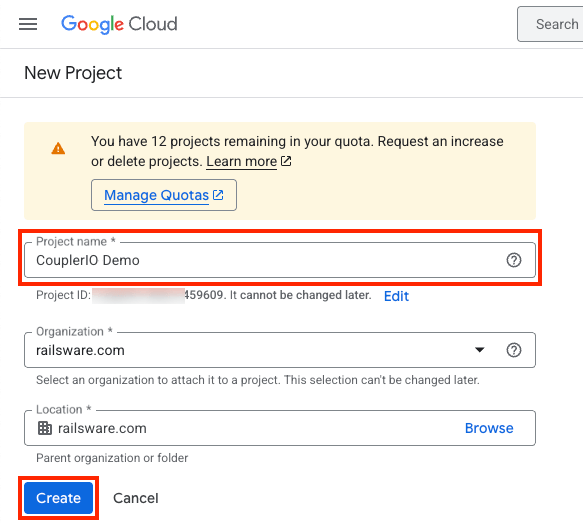
Create a Google Cloud project
Having a project in Google Workspace is a necessary prerequisite for working with the Google Calendar API, service accounts, scopes, and so on. If you have already created a dedicated project, proceed to the next section. If you haven’t, complete the following steps:
- Click this link to access the project creation form.
- Name your project as you wish, select organization & location, and click Create.
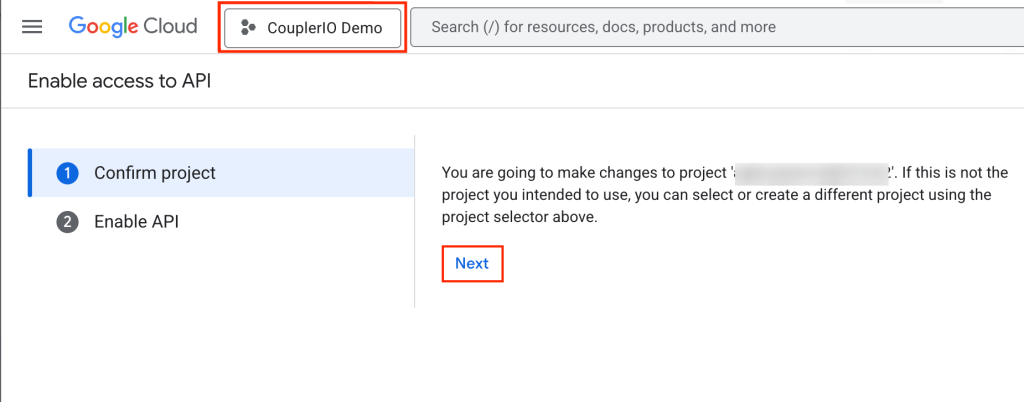
Enable Google Calendar API
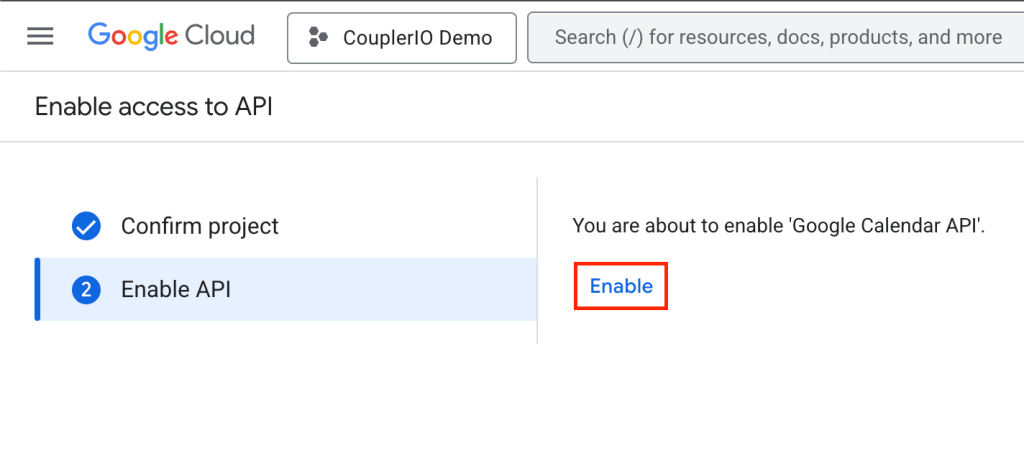
Enable Google Calendar API so your solution can interact with calendar(s) on your Google account. If you’ve already enabled Google Calendar API, go to the next section. Otherwise, click this link and proceed as follows:
- Confirm your choice of Google Cloud project by clicking Next. If you want to use a different project, click the button at the top and choose it from the list.
- In the next step, click Enable and, after a few seconds, you’re ready to go!
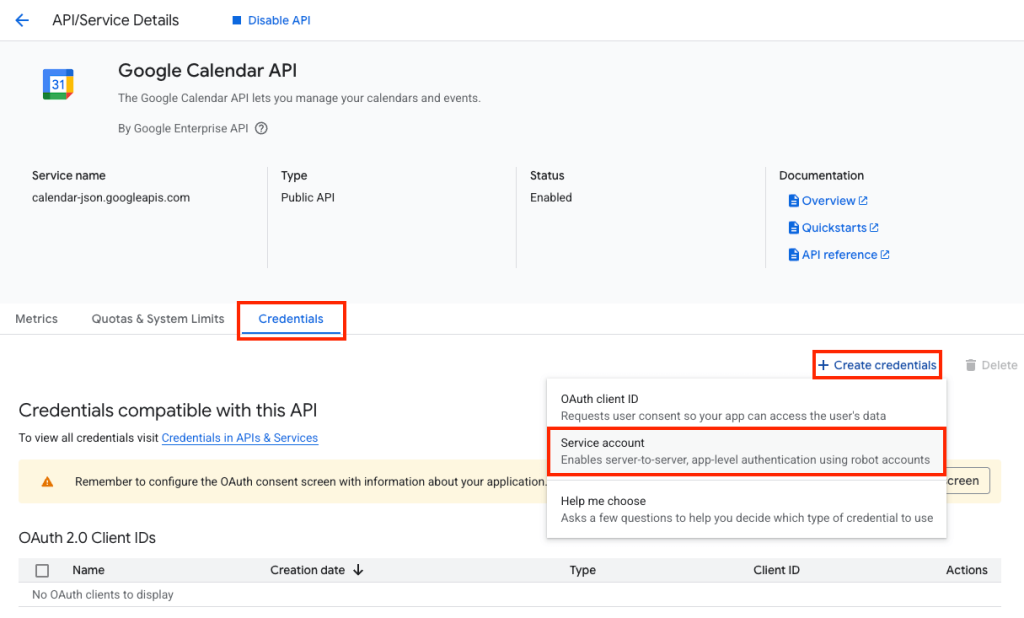
Create a service account
A service account is necessary to authenticate the Google Calendar service and access data in it continuously as a non-human user (for example, your app). Here’s how to create the account:
- Click this link to open the Enabled APIs & Services settings page. Scroll down the list, locate Google Calendar API, and click it.
- Go to the Credentials tab, click +Create credentials, and choose Service account.
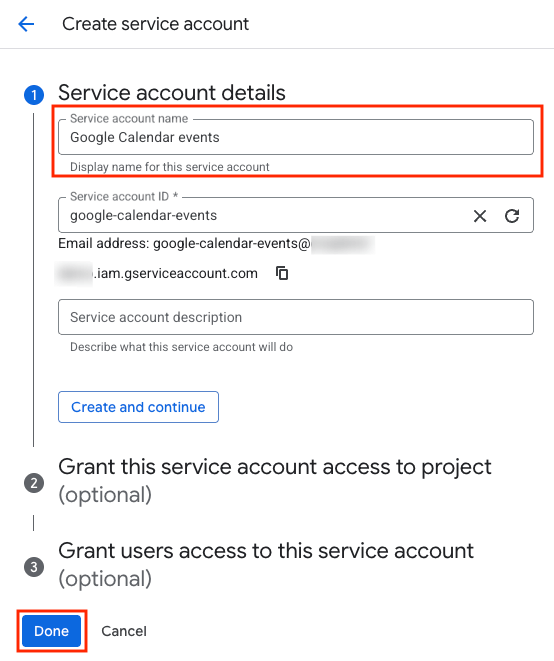
- Provide a name for your service account—this will automatically generate a Service account ID. Then, click Done—no need to configure optional settings.
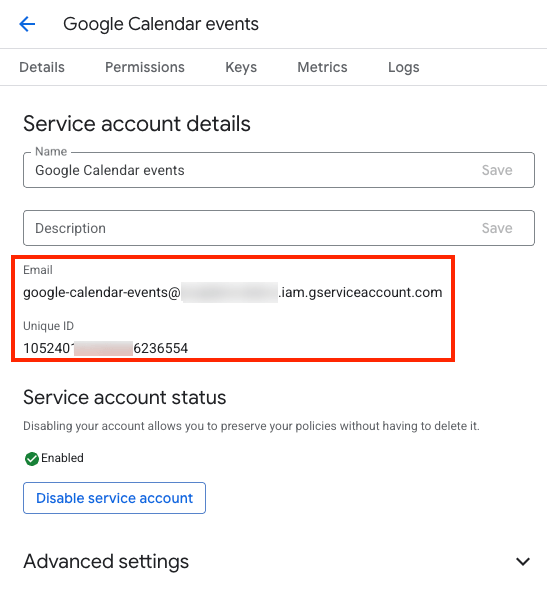
- Locate your newly created service account on the list and click it to open.
- On the Details tab, copy and note down your service account’s email address and unique ID, as you’ll need these details later.
Do not leave the service account settings page, since the procedure continues there.
Generate a Service Account key
Now, it’s time to create a service account key that you’ll use to authenticate the account when interacting with the Google Calendar service from your code. Here are the steps:
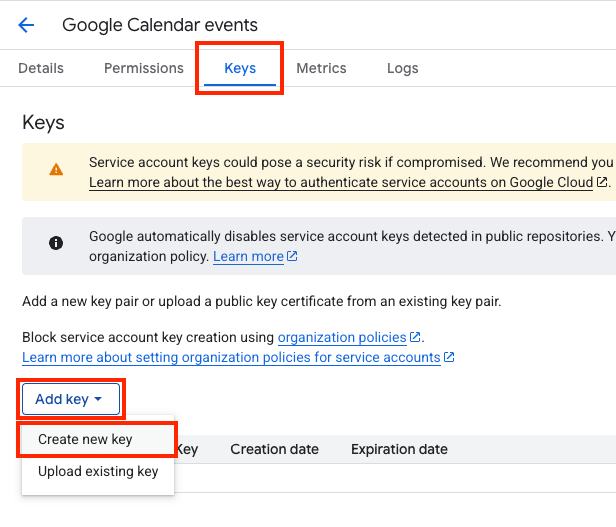
- Go to the Keys tab and click Add key > Create new key.
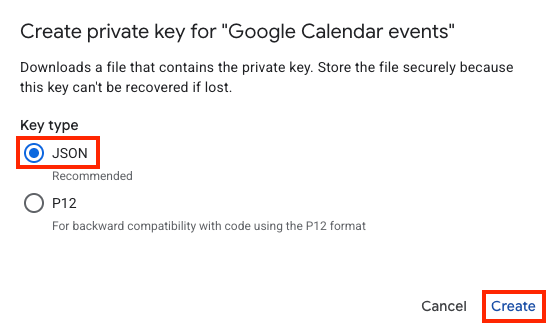
- Choose JSON for Key type and click Create. The key will be automatically downloaded to your computer as a JSON file. Store it securely, as it allows access to your Google Workspace resources.
Grant Service Account permissions to Google calendar(s)
If you connect to your own Google calendar(s), you don’t need to grant your service account domain-wide delegation. This is only required if you wish your app to access calendars of other users in a Google Workspace organization (learn more). For personal calendars (free Google account), you just need to share your calendar(s) with the email address of the service account.
To do so, follow these steps for each calendar you want to use with your app/solution:
- Open the Google Calendar web app and sign in (if necessary).
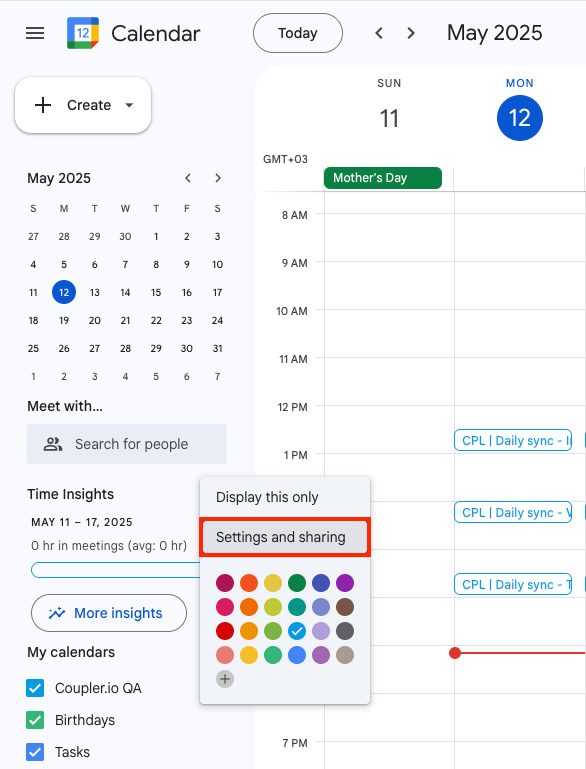
- Hover your cursor over a calendar listed under My calendars in the left-hand pane. When the menu button (three dots) appears to the right of the calendar’s name, click it and choose Settings and sharing.
- Scroll down to the Shared with section and click Add people and groups.
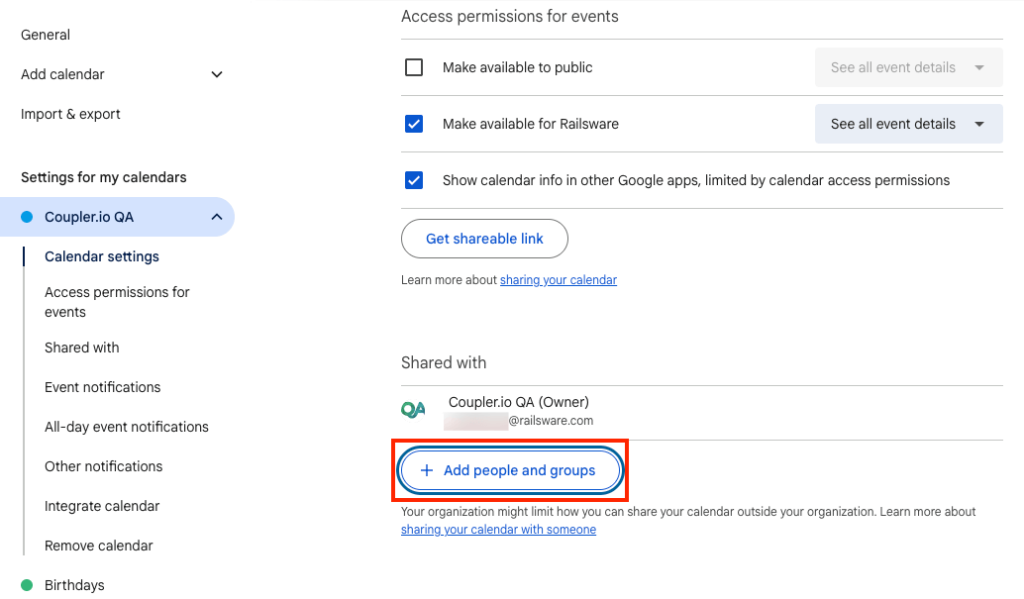
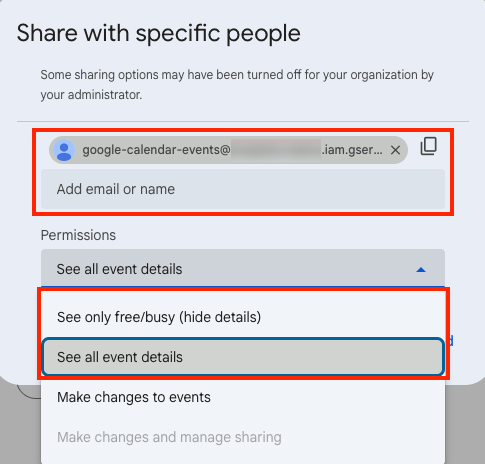
- Paste the service account’s email address in the Add email or name textbox and press Enter to add it. Next, set the level of permissions, depending on what data you want to access: free/busy statuses or events with all details. Finally, click Send in the bottom right corner.
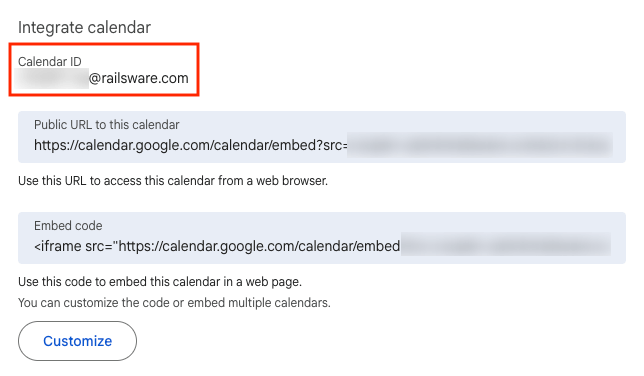
One more thing, you should also copy and note down the calendar ID, as you’ll need it in your code later on. To do so, scroll further down to the Integrate calendar section, where you’ll see the ID:
Write the code to authenticate, fetch calendar data, and save it to JSON
Now, it’s time to write the code for your app to connect with your Google calendar(s), load data from it/them, and save to JSON. Below, you can find a sample Python code. For details, see the intra-code comments:
from google.oauth2.service_account import Credentials
from googleapiclient.discovery import build
import json
from datetime import datetime, timedelta, timezone

# --- Configuration ---
# Path to your downloaded Service Account JSON key file
KEY_FILE_PATH = 'path/to/your/service_account.json'

# The scope for reading Google Calendar events
SCOPES = ['https://www.googleapis.com/auth/calendar.readonly']

# The ID of the calendar you shared with the service account.
# For your primary calendar, it's usually your email address, not 'primary'
CALENDAR_ID = 'CALENDAR_ID'

# Output JSON filename
OUTPUT_FILENAME = 'calendar_events.json'

def fetch_calendar_events(calendar_id):
   """Fetches events from the last week from a specified Google Calendar."""
   try:
       creds = Credentials.from_service_account_file(
           KEY_FILE_PATH, scopes=SCOPES)

       service = build('calendar', 'v3', credentials=creds)

       now = datetime.now(timezone.utc)
       one_week_ago = now - timedelta(days=7)

       time_min = one_week_ago.isoformat()
       time_max = now.isoformat()

       print(f"Fetching events from calendar: {calendar_id}")
       print(f"Time range: {time_min} to {time_max}")

       events_result = service.events().list(
           calendarId=calendar_id,
           singleEvents=True,
           orderBy='startTime',
           timeMin=time_min,
           timeMax=time_max
       ).execute()

       events = events_result.get('items', [])
       print(f"Found {len(events)} events in the last week.")
       return events

   except Exception as e:
       print(f'An error occurred while fetching events for {calendar_id}: {e}')
       return None

def save_to_json(data, filename):
   """Saves the given data to a JSON file."""
   try:
       with open(filename, 'w') as f:
           json.dump(data, f, indent=4)
       print(f"Data saved to {filename} at {datetime.now().isoformat()}")
   except Exception as e:
       print(f'An error occurred while saving to JSON: {e}')

if __name__ == '__main__':

   events = fetch_calendar_events(CALENDAR_ID)
   if events:
       save_to_json(events, OUTPUT_FILENAME)
And here’re sample contents in the JSON format returned by the code:
{
       "kind": "calendar#event",
       "etag": "\"3494612253350590\"",
       "id": "5q15gu79t5v7nd6u9mpcjqsnfm",
       "status": "confirmed",
       "htmlLink": "https://www.google.com/calendar/event?eid=NXExNWd1Nz20NXY3bmQ4dTltcGNqcXNuZm0gcHBwaW90cm1hbGVrQG0",
       "created": "2025-05-15T10:48:46.000Z",
       "updated": "2025-05-15T10:48:46.675Z",
       "summary": "sync with team",
       "creator": {
           "email": "demo@coupler.io",
           "self": true
       },
       "organizer": {
           "email": "demo@coupler.io",
           "self": true
       },
       "start": {
           "dateTime": "2025-05-12T02:00:00+02:00",
           "timeZone": "Europe/Warsaw"
       },
       "end": {
           "dateTime": "2025-05-12T03:00:00+02:00",
           "timeZone": "Europe/Warsaw"
       },
       "iCalUID": "5q15gu79t4v7nd6u9npcjqsnfm@google.com",
       "sequence": 0,
       "reminders": {
           "useDefault": true
       },
       "eventType": "default"
   }
If you want the code to run automatically, you need to additionally play with scheduling libraries for Python, like schedule (learn more) or APScheduler (learn more).
Indirect conversion with online tools (the no-code approach)
This manual process involves two main phases:
- Native export of Google Calendar data to the ICS format.
- Import the data to the JSON format with an online tool of your choice.
Export Google Calendar to the ICS file
- Open the Google Calendar web app.
- Hover your mouse over a calendar listed under My calendars in the left-hand pane. Once the menu button (three dots) appears to the right of the calendar’s name, click it and choose Settings and sharing.

- Scroll down to Calendar settings and click the Export calendar button—the zipped ICS file will automatically start downloading to your disk.
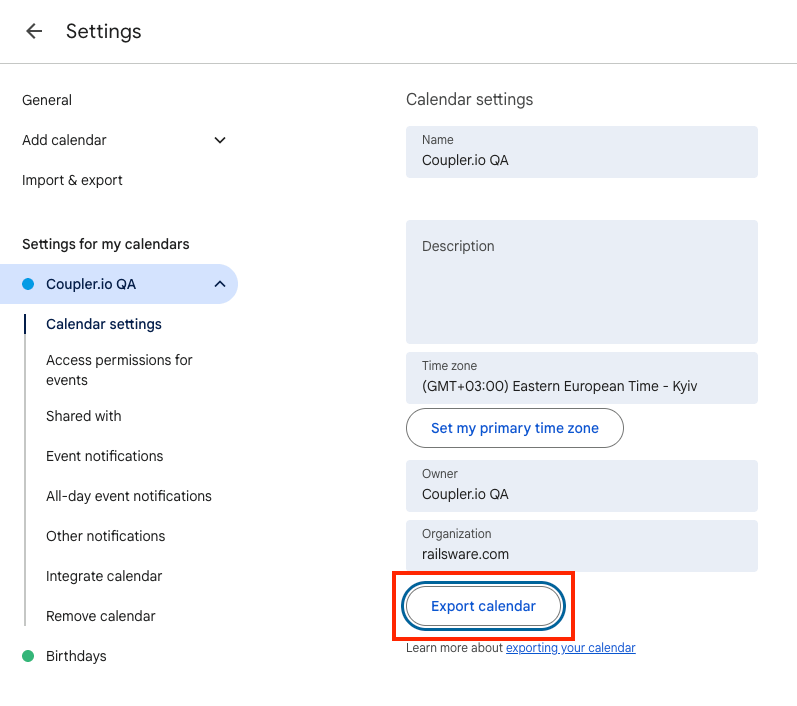
- Once you’ve saved the file, unzip it for further processing.
Import calendar data to JSON
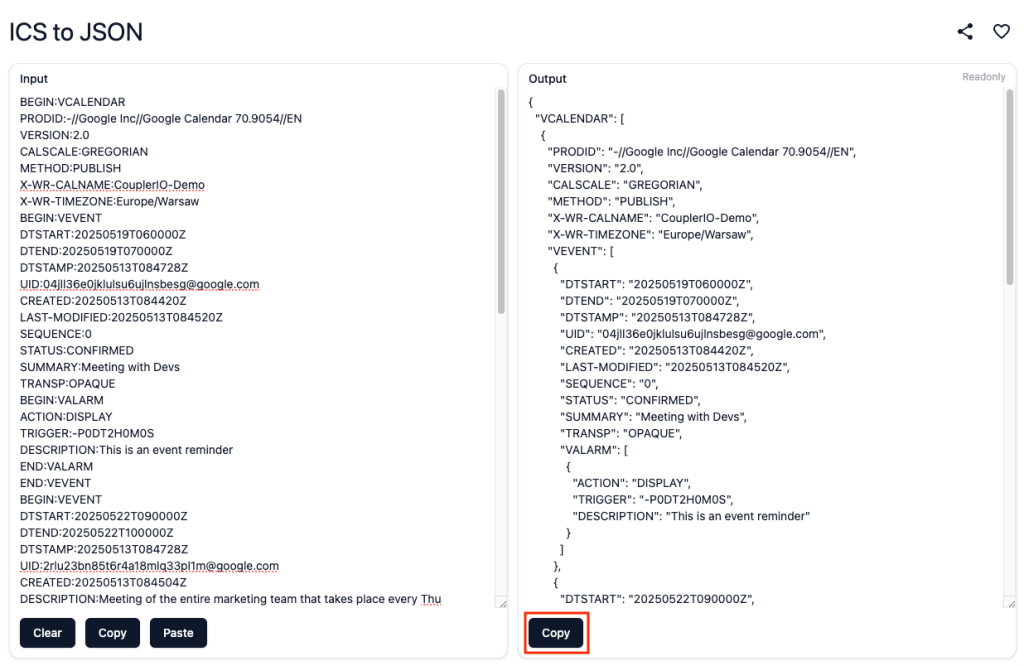
Now, use one of the online tools to convert ICS to JSON. We’ll use Utilities (cew.sh) as an example. The tool doesn’t allow you to upload the ICS file, so you need to open it locally, copy its contents, and paste them into the tool to start the conversion. Here’s how:
- If you double-click the ICS file, it will most likely open in the default calendar app. We don’t want that. Instead, right-click the file, click Open With or similar option, and choose, for example, a simple text editor like Notepad or TextEdit.
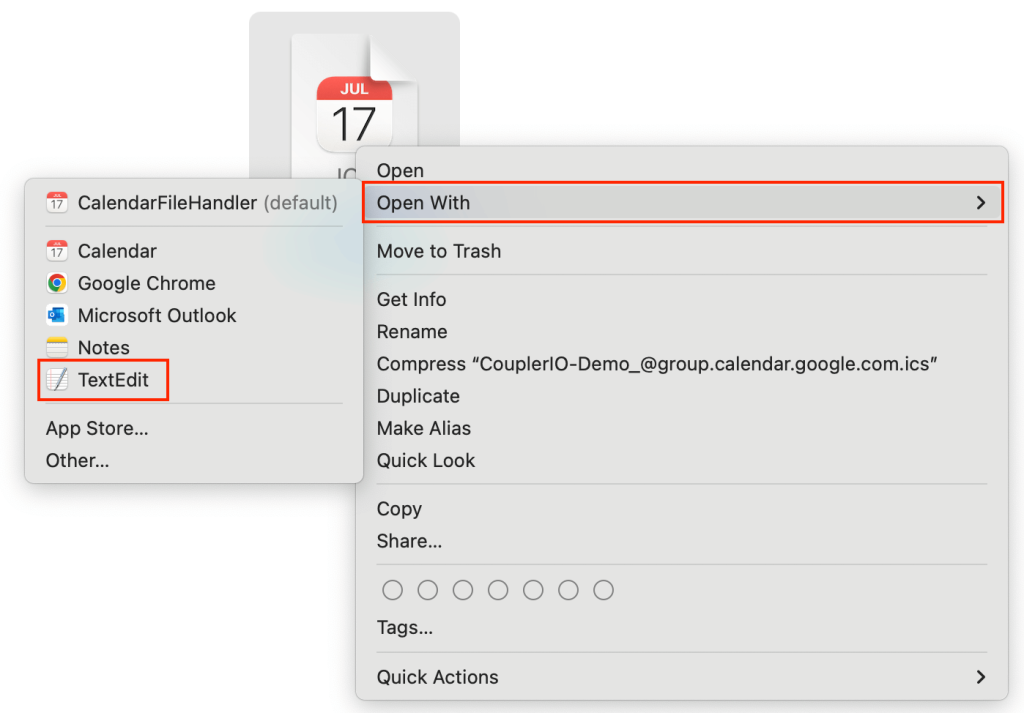
- Once the file opens, select all the content and copy it.
- Now, open your browser, go to Utilities (cew.sh) and paste the content in the Input area (on the left). You can use the Paste button below.
- The formatted JSON data will automatically appear in the Output area on the right. Use the Copy button just below to copy it.
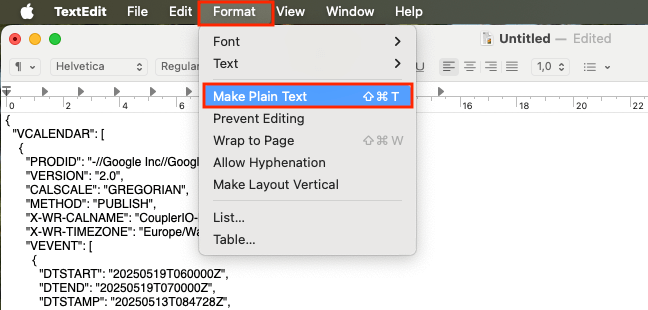
- Create a new file in your text editor (Ctrl+N or Command+N).
- Paste the copied content.
- (MacOS only) Set file format to plain text by choosing Format > Make Plain Text in TextEdit.
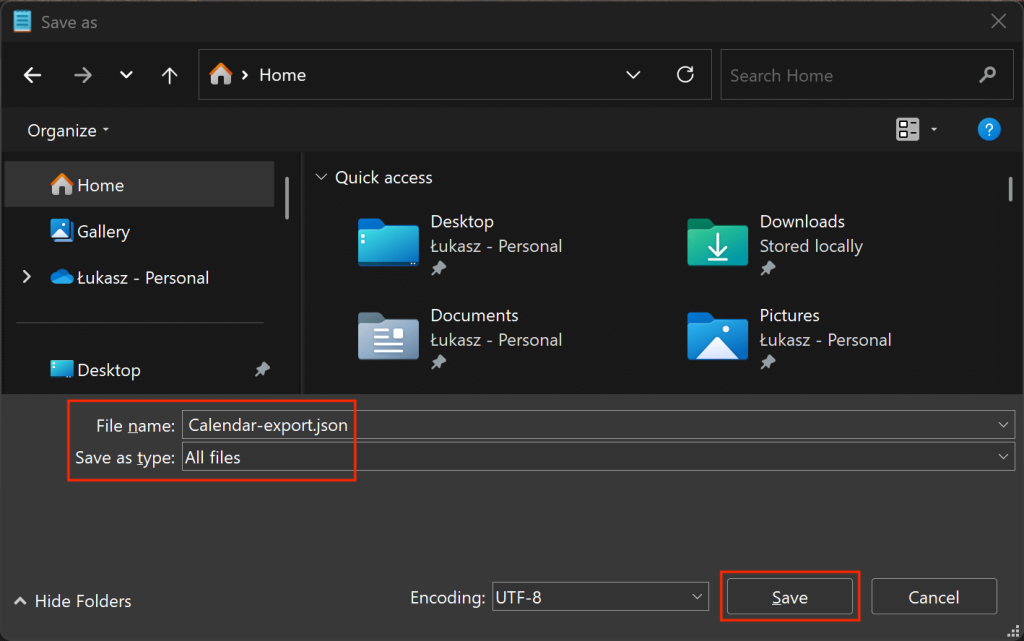
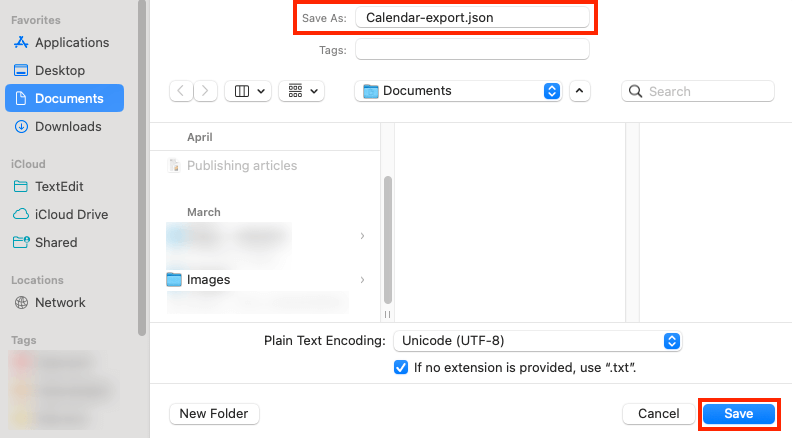
- Save the file with the JSON extension:
- Windows: In the Notepad’s Save as window, choose All files for file type and provide the file name along with the extension, for example Calendar-export.json. Then click Save.
- MacOS: In the Save As text box, provide the file name and the extension, for example Calendar-export.json, and click Save.
Indirect conversion revisited: Script package
Another way to indirectly convert Google Calendar data to the JSON format is by using a dedicated script package. The first stage of the process is similar to what we’ve shown in the previous section—you need to export calendar data to an ICS file. Then, you need to use a script to turn ICS into JSON. We’ve decided to show you script packages for two popular programming languages: JavaScript and Python.
JavaScript package: ical2json
The JavaScript package called ical2json lets you directly convert ICS data into the JSON format. For more information about the package, visit the package GitHub repository.
Note: To be able to use the package, you need to first install:
-
- A node version manager (nvm) of your choice.
-
- npm, the popular package manager/installer.
-
- Node.js runtime environment (version 14+ is required).
For installation instructions, go here. Also, make sure your operating system policies allow you to run scripts.
When ready, proceed as follows:
- Launch a desired command line interface (CLI) and install the
ical2jsonpackage, executing the following command:
npm install -g ical2json
- Staying in CLI, launch the
ical2jsonpackage with the NPX package launcher that comes with npm:
npx ical2json
- Navigate to the directory with your ICS file using the cd command.
- Convert your ICS file to JSON by running the script below. Be sure to replace
calendar_file_namewith the exact name of your ICS file:
ical2json ./calendar_file_name.ics
- The resulting JSON file will be saved to the same directory.
Python package (ics) + custom script
The ics package for Python allows for reading ICS files. You can supplement it with a simple Python script to enable conversion to JSON. For more info on the package, go here.
Note: To be able to use the package, you need to first install:
-
- Python programming language. Learn more here.
-
- pip, the package installer for Python (this should install automatically with Python).
Complete these steps to convert ICS to JSON:
- Launch the command line and install the
icspackage, executing the following command:
pip install ics
- With
icsin place, run the following script to turn your ICS file into JSON. Be sure to replacepath/to/input/file.icswith the actual path to your ICS file along with the filename. Optionally, you might rename the resulting JSON file, too.
from ics import Calendar
import json

with open("path/to/input/file.ics", "r") as f:
   c = Calendar(f.read())

events = []

for event in c.events:
   event_data = {}
   for key, value in vars(event).items():
       if hasattr(value, "isoformat"):
           event_data[key] = value.isoformat()
       elif isinstance(value, set):
           event_data[key] = list(value)
       else:
           event_data[key] = value
   events.append(event_data)

with open("output_file.json", "w") as f:
   json.dump(events, f, indent=2, default=str)
- The resulting JSON file will be saved to the directory where you’re running your script from. To save it in the same location as the ICS file, provide the full path with the .json filename.
How to export data from Google Calendar to JSON in the most convenient way?
As you can see, most of the methods presented are not very convenient, requiring you to copy values (e.g., Google calendar ID, service account email), install dependencies, complete multiple configuration steps, and so on. To make matters worse, some methods don’t provide automation, which is crucial if you intend to work with non-static data.
It seems the only solution that provides both convenience and automation is Coupler.io. With this tool, you simply connect your Google account, and you can jump right into generating a JSON file with Google Calendar events, busy/free statuses, etc. If you want to experience more possibilities, connect other data sources and use transformation features to make your dataset data-rich and clean. Last but not least, enable the in-built scheduler to bring live data to your application, database, data warehouse, etc., and make it a modern solution that you and/or users will love.
Automate your Google Calendar to JSON data flow today without coding. Start your free trial and test Coupler.io inside-out—no credit card required.

Automate your Google Calendar data pipeline with Coupler.io
Get started for free