Airtable undoubtedly comes with a range of strong built-in features and functionalities, such as customizable fields, pre-made templates, hundreds of integrations, and custom views. However, exporting data from Airtable to Excel can be useful in many scenarios. For example, you can perform advanced data visualization, analysis, and manipulation, access data offline, create custom reports, and more.
If you are wondering how to connect Airtable to Excel and export data, follow this step-by-step tutorial.
Methods to export data from Airtable to Excel
Although Airtable does not provide a direct, official integration with Microsoft Excel, there are multiple methods available to connect Airtable and Excel and enable data exports. Let’s discuss them briefly:
- Connect Airtable to Excel using Coupler.io: To easily export data from Airtable to Excel, you can use Coupler.io – a no-code reporting automation and analytics platform. It requires no technical expertise; you can rapidly schedule a data refresh without any difficulty and build custom reports in spreadsheets using the data from Airtable.
- Export Airtable to Excel manually: You can download your Airtable base as a CSV file and then open it in Excel. This is an effortless process but it’s not automatic.
- Export Airtable data to Excel via Google Sheets (workaround): In this method, you use Google Sheets as an intermediary tool between Airtable and Excel. First, you need to connect your Airtable account with Google Sheets and synchronize data using Airtable’s automation feature. Once you have the data in GSheets, download it as an Excel file.
- Airtable to Excel integration using Airtable’s API: You can create a custom integration by writing a script in a programming language, such as Python. This will allow you to extract data using Airtable’s API and then load it to Excel. Although reliable, this Airtable automation method requires you to have deep technical knowledge and skills.
- Export data from Airtable to Excel using Zapier: You can use a third-party tool like Zapier to enable easy data exports from Airtable to Excel. It comes with basic automation capabilities, thus, it is suitable for simpler tasks and lighter data loading.
Method 1: Connect Airtable to Excel using Coupler.io
Coupler.io is an advanced reporting and analytics platform that allows you to connect Airtable to Excel and export data efficiently. This no-code platform easily collects, transforms, and manages data in just a few minutes and transforms your raw data into actionable insights that enable data-driven decision-making.
The best part is that using Coupler.io does not need technical expertise, such as coding or knowledge of programming languages. Here’s how to connect Airtable to Excel to automate data export:
Step 1: Collect data from Airtable
Click Proceed in the form below. You’ll be offered to get started with Coupler.io for free.

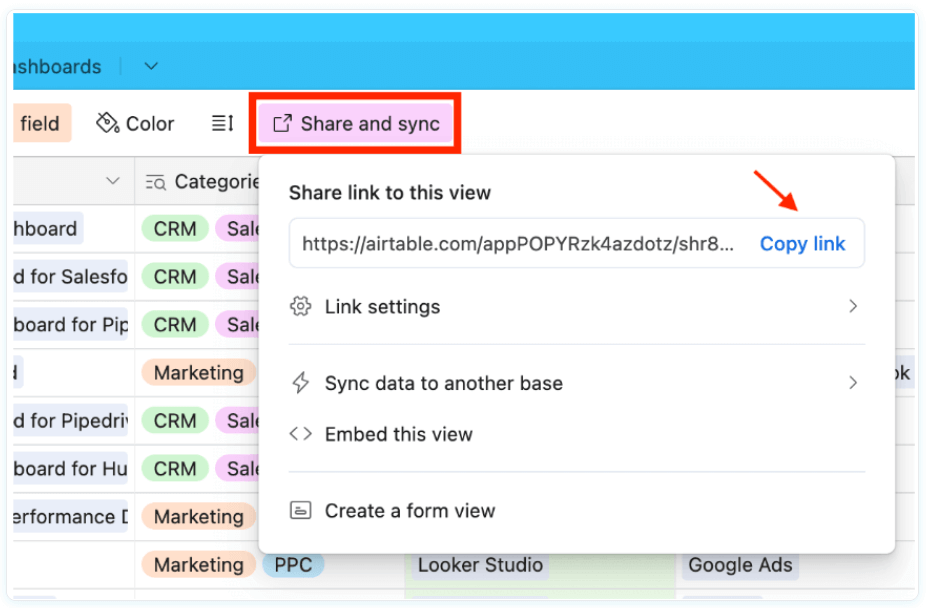
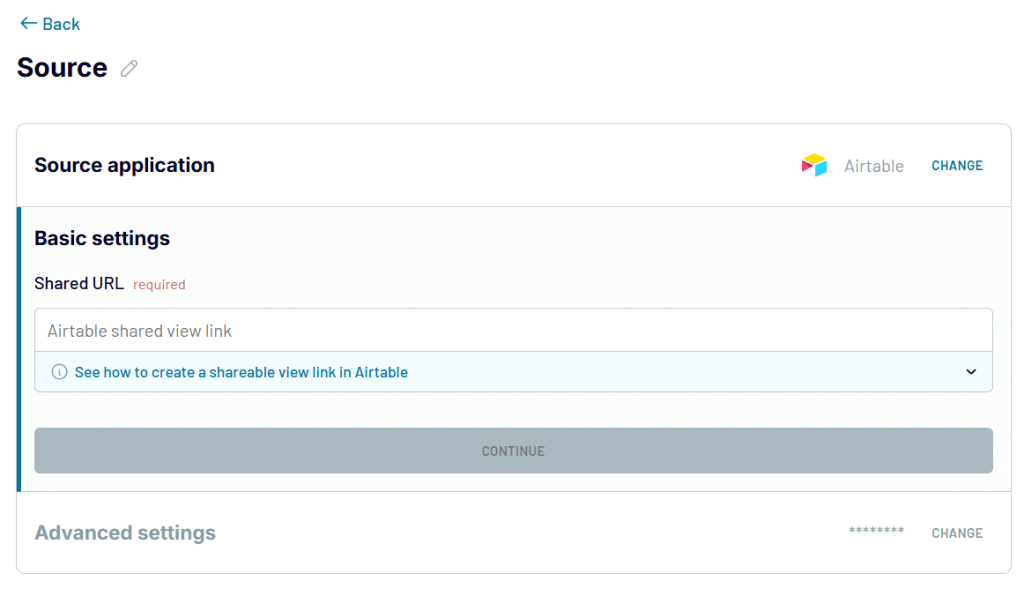
Next, you need to obtain a shared view link for the Airtable view or table you need to export data from. Go to your Airtable base view and click Share and sync > Create link to view. You will get a shareable link. Copy and paste the link into the Shared URL area inside Coupler.io’s source application window.

If you have protected your Airtable views with a password, enter it and proceed by clicking FINISH AND PROCEED. This way, you can collect your desired data from your Airtable account.

Step 2: Organize and transform data
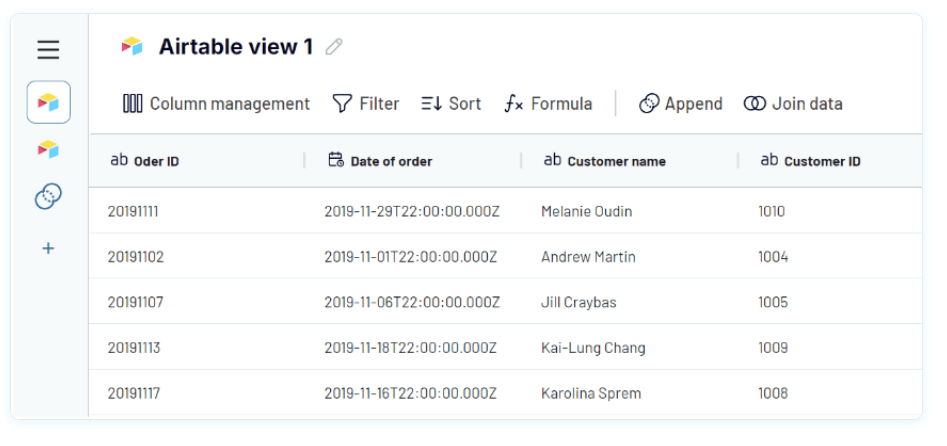
Before you load your Airtable data to Excel, Coupler.io enables you to preview, organize, and transform your data directly from its interface. Here are the various options you will get:
- Preview: This lets you check if the data is loaded correctly.
- Filter and sort data: If you want to extract specific data, you can apply filters or sort the table by specific criteria, such as date or alphabetical order.
- Manage columns: You can reorder, rename, or hide columns, add calculable columns using the applicable formula, and change the data types of the columns for effective data management.
- Merge data: If you have consolidated data from multiple Airtable views or data sources, you can combine or merge data into a single table.

Step 3: Load data and schedule automatic data refresh
Once you have the data ready, add your Microsoft account where you want to export the data and connect it to the Coupler.io platform. Just sign in to your Microsoft account and then enable access permissions for Coupler.io.

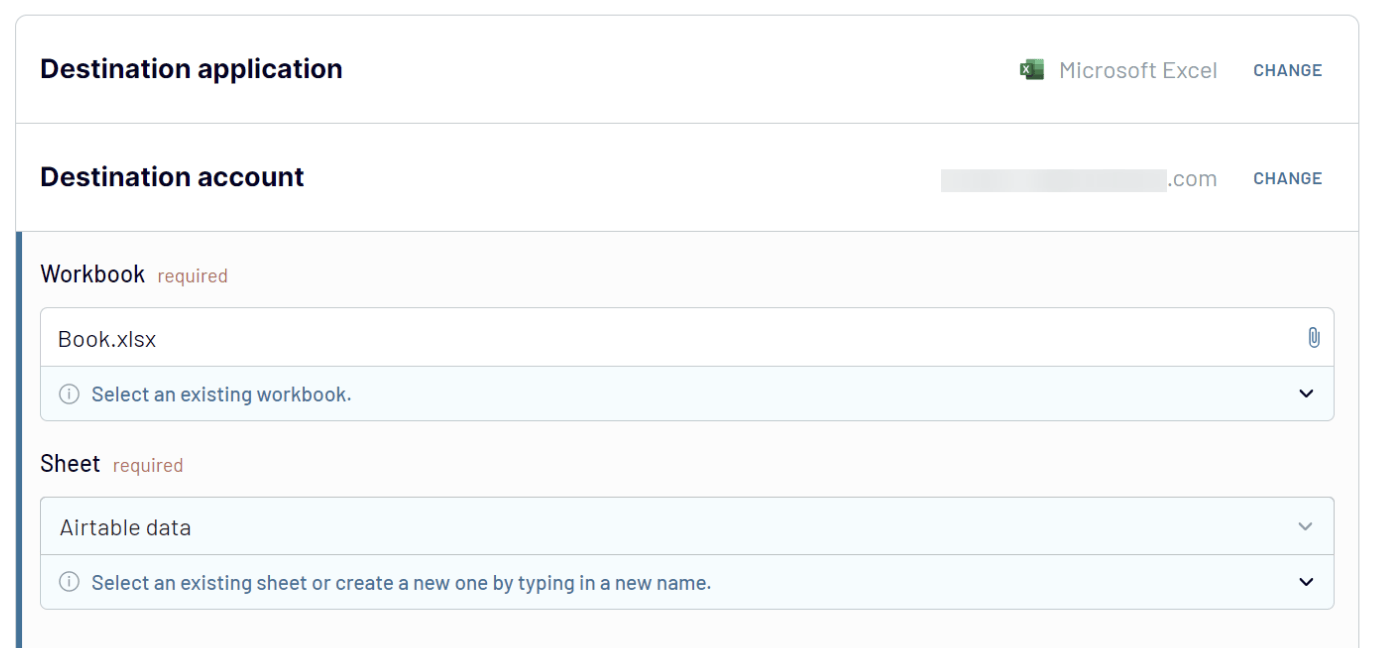
Now, select the Excel workbook and sheet where you want to load the Airtable data. You can use an existing worksheet or even create a fresh sheet by typing in a new name. This allows Copuler.io to create the sheet in the chosen Excel workbook.

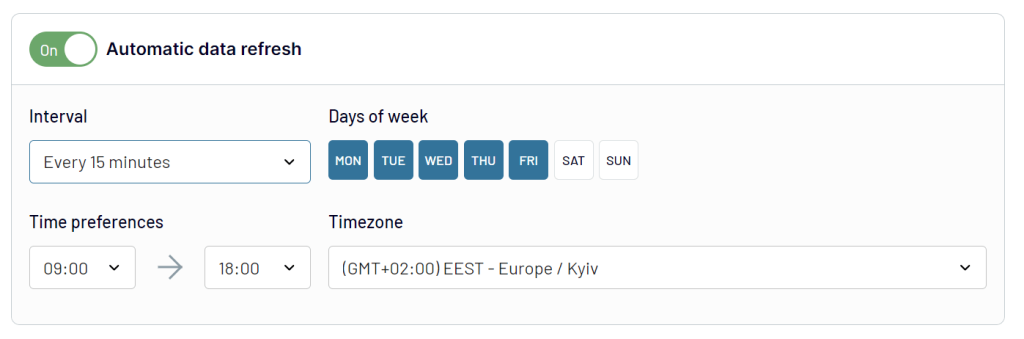
To get up-to-date Airtable data in Excel, schedule automatic data refresh by configuring the specific:
- Time zone
- Export time
- Particular days of the week
- Time interval (from every 15 minutes to monthly)
By default, this feature is turned off, so toggle it on to enable it. You can enable or disable this feature at any time. Once done, click the Run Importer button to complete the data loading process. View the data by clicking View Results.
Benefits of using Coupler.io
- Coupler.io is a user-friendly tool that is easy to set up. You can use it to rapidly export data from one application to another (like Airtable to Excel) without any hassles or technical expertise.
- The platform allows you to customize fields and tables before you export data.
- It frees you from tedious manual exports; it synchronizes data based on the schedule you prefer with its automatic data refresh feature.
The platform automates the data export process and connects over 60 applications to BI tools, data warehouses, and spreadsheets. The type of data you can export includes:
- CRM (sales history, interactions, analytics, etc.)
- Project management (assignments, timelines, progress, etc.)
- Event planning (guest list, budgeting, venue, etc.)
- Inventory management (stock levels, orders, etc.)
- Marketing (conversions, campaigns, etc.)
- Content (types, deadlines, writers, etc.)
- HR (performance reviews, recruitment activities, etc.)
- Product planning and development (timelines, development stages, etc.)
You can enable automatic data refreshes based on your preferred schedule to ensure your Airtable data in Excel is always up-to-date. Choose a suitable interval (from every 15 minutes to monthly), days of the week, or time zone for scheduling data exports.
Method 2: Export Airtable to Excel manually
Another way to export data from Airtable to Excel is by downloading your Airtable base as a CSV file and then opening the file in Microsoft Excel. If you are looking for one-time data exports or have fewer data exporting needs, you can go for this straightforward method.
Let’s understand how you can do it with this step-by-step guide:
- Go to your Airtable account. Locate the table or view you want to extract data from.
- Select the Grid view button. Click on the drop-down menu. You’ll see a list of options.
- Find and click Download CSV to download the file to your system.

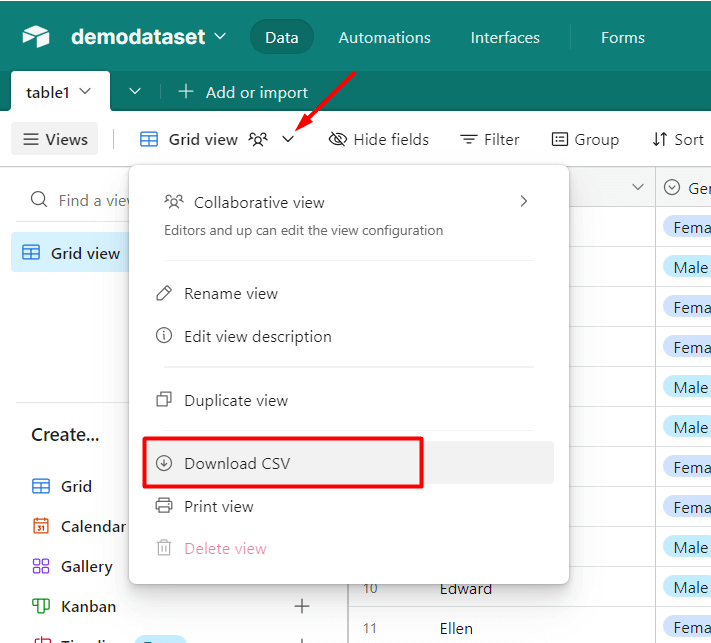
Once the file is downloaded, open it in Microsoft Excel and perform your task.
Benefits
This is probably the easiest method to export data from Airtable to Excel without any hassles, whether you possess technical expertise or not.
Limitations
For larger volumes of data exports or ongoing data exporting needs, this manual option is slow, time-consuming, and tedious. Besides lacking automation, it can also lead to data loss and errors in data transfer.
Method 3: Export Airtable data to Excel via Google Sheets
If you don’t want to use a third-party tool but still wish to automate the data export process, you can use Google Sheets as a bridge to connect Airtable to Excel.
This method is a two-step process that requires you to first connect your Airtable account with Google Sheets and then use Airtable’s automation feature to synchronize data between two applications. Once the file is in GSheets, download it as an Excel file.
Here is the step-by-step process to export data from Airtable to Excel via Google Sheets:
Step 1: Use automation to sync Airtable to Google Sheets
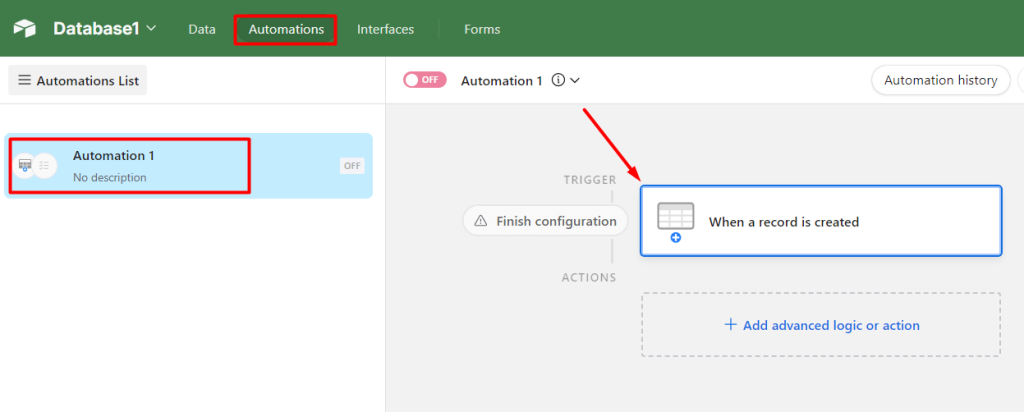
- Open an Airtable base in your Airtable account. Locate the Automations tab from the upper bar next to Data and click on it. Select New Automation and assign it a name, such as Automation 1. You can rename, delete, and duplicate the automation and even add a description to it.
- On the right side of the window, you will see multiple trigger types to choose from. Set it to When a record is created or When a record is updated to ensure the data stays synchronized between the source and destination app.

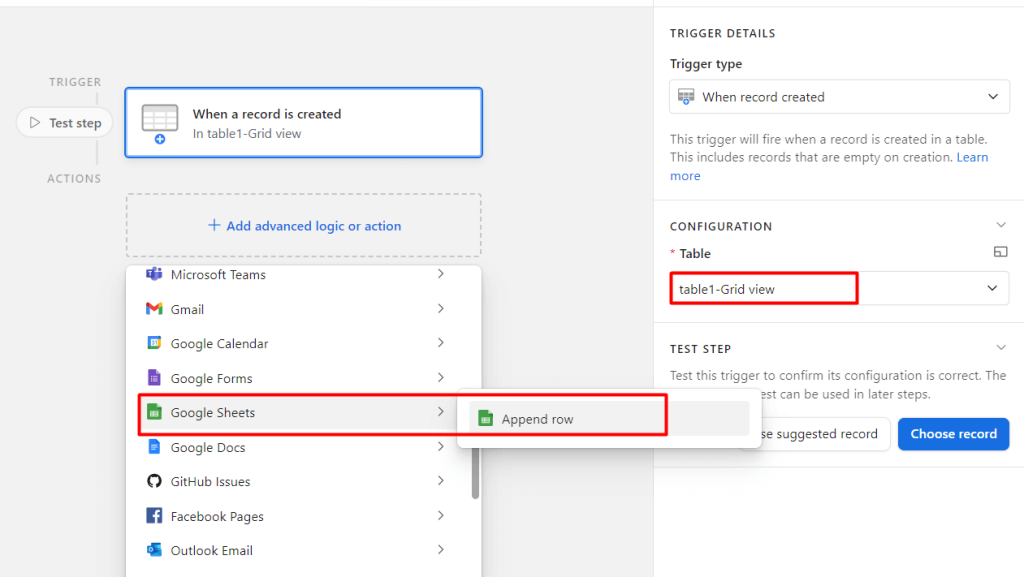
- Once you have selected the trigger type, configure its details by choosing the dataset table you want to export.
- Beneath the trigger, you will see this button: +Add advanced logic or action. Click on it, then select Google Sheets > Append row.

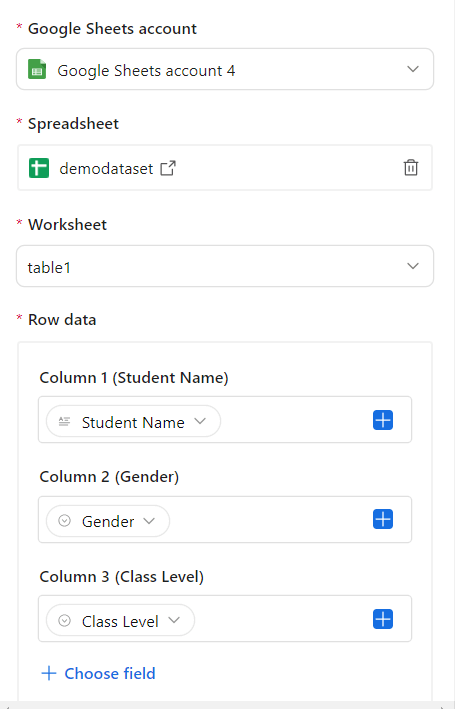
- Go to your Google Sheets account and select the worksheet and spreadsheet to sync the data.
- Select the column you want to synchronize with row data in order to map Airtable columns with spreadsheet columns.

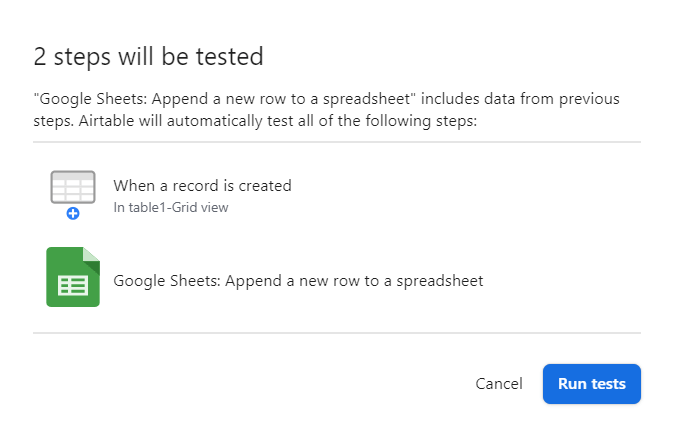
- Test whether the configuration is correct or not by running a test. Click Test action > Run tests.

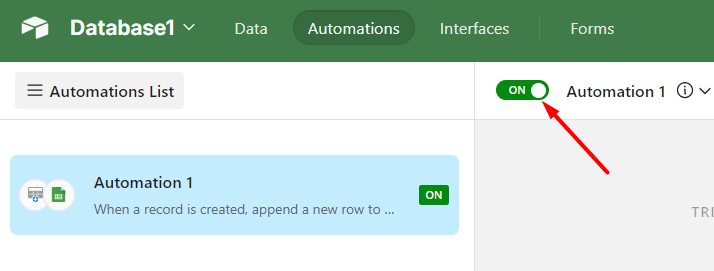
- Make sure the automation is turned ON to sync the Airtable database and Sheets automatically.

Step 2: Upload the Google Sheet file to Excel
Now that you have the Airtable data in Google Sheets, you can easily download it as a Microsoft Excel file.
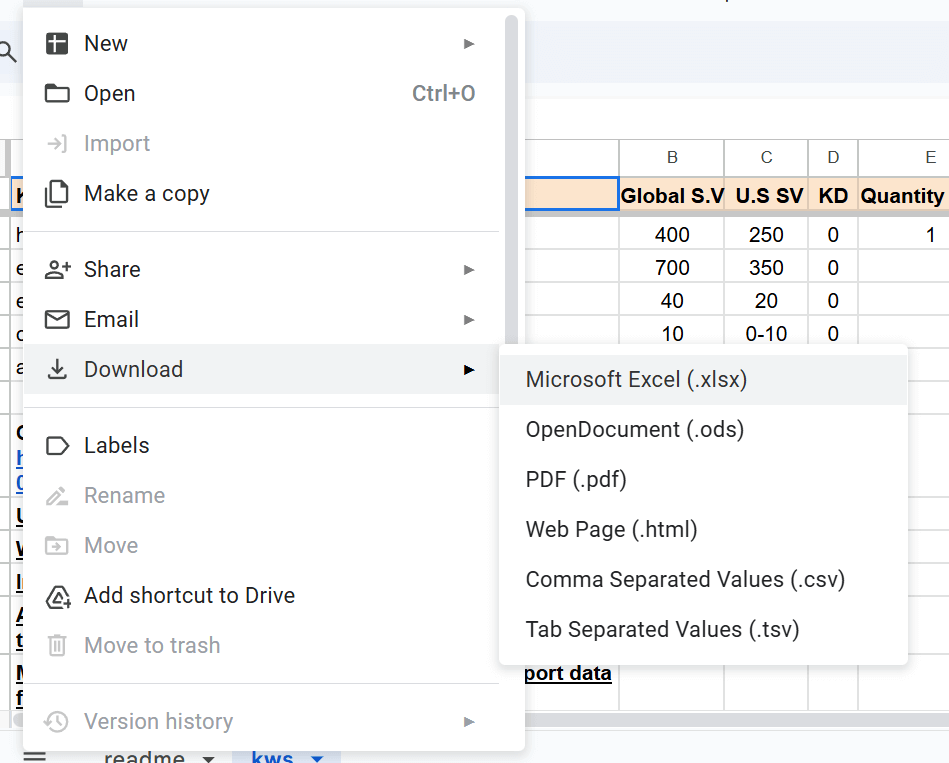
- Open Google Sheets
- Click File > Download > Microsoft Excel (.xlsx) to download the file in Excel.

Benefits
If you are looking to automate data export from Airtable to Excel for free, this Google Sheets workaround will be useful to you. It also doesn’t need you to be a tech expert, basic tech skills will do fine.
Limitations
Although this is a free and simple solution, it requires you to perform an extra step. The first part of the process is automated, but you still need to manually download the data as an Excel file in the second step. Furthermore, the process can become tedious if you want to export multiple tables.
Method 4: Airtable to Excel integration using Airtable’s API
There are two ways you can use Airtable’s API for data exports:
- Creating a custom Python script (or any other programming language) to extract data from Airtable and save it as a CSV file.
- Using Power Query (From Web), which requires no script creation as users only need to access the Airtable API.
The first method is useful if you possess technical skills like coding and working with APIs. Airtable gives you the option to create a custom integration between Airtable and Excel to enable data export.
For this, you will need to write a script in a programming language, such as Python using Airtable API to extract data and load it to Microsoft Excel. The method also requires you to have extensive knowledge of authentication, API rate limiting, error handling, etc., as well as related skills like data transformations, monitoring, automation, and more.
Benefits
This method is reliable and secure as it uses token-based authentication. It also offers customizability, and you can manipulate and transform data before exporting.
Limitations
This method only works for people with strong technical skills in coding, APIs, authentication, and related skills. So, if you are not familiar with these concepts, it’s better to skip this method and go for alternative ones, like automated data exports using Coupler.io.
Method 5: Export data from Airtable to Excel using Zapier
Zapier is another third-party tool that lets you integrate Airtable with Excel and export data automatically. This method is suitable for you if you are looking to automate data exports for simpler tasks or have lighter data transfer requirements.
This no-code platform is easy to set up and use and comes with basic automation capabilities. It allows you to extract, transform, and summarize your data with AI models, such as Anthropic, OpenAI, and more. It lets you integrate a variety of data, from simple data entry to complex end-to-end processes and workflows, such as lead management, marketing campaigns, customer support, and more.
You can choose triggers (when to begin an action) and actions (tasks) to start the workflow automation. In Zapier, each workflow is called a Zap. Zapier also provides a template to integrate Airtable to Excel quickly. Unlike Coupler.io, which allows you to refresh data every hour or every day, Zapier works on triggered automation. For instance, if you set the trigger to New Record, the Excel workbook will be updated when a new record or data is added to the connected Airtable view.
Setting up Airtable to Excel integration in Zapier:
Step 1: Create your Zapier account
- Create a new Zapier account or log in if you already have one for free. The free plan comes with limited options and usage. For more features, you will need to purchase a paid plan.
- Create a new workflow or Zap and name it, for example, Zap 1 or Airtable to Excel data export based on the task.
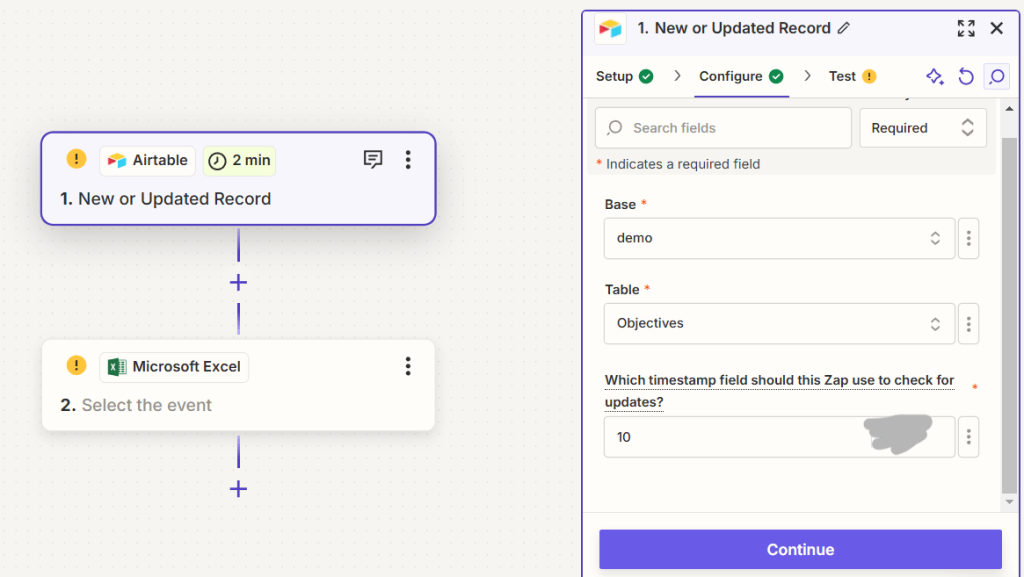
Step 2: Select the trigger

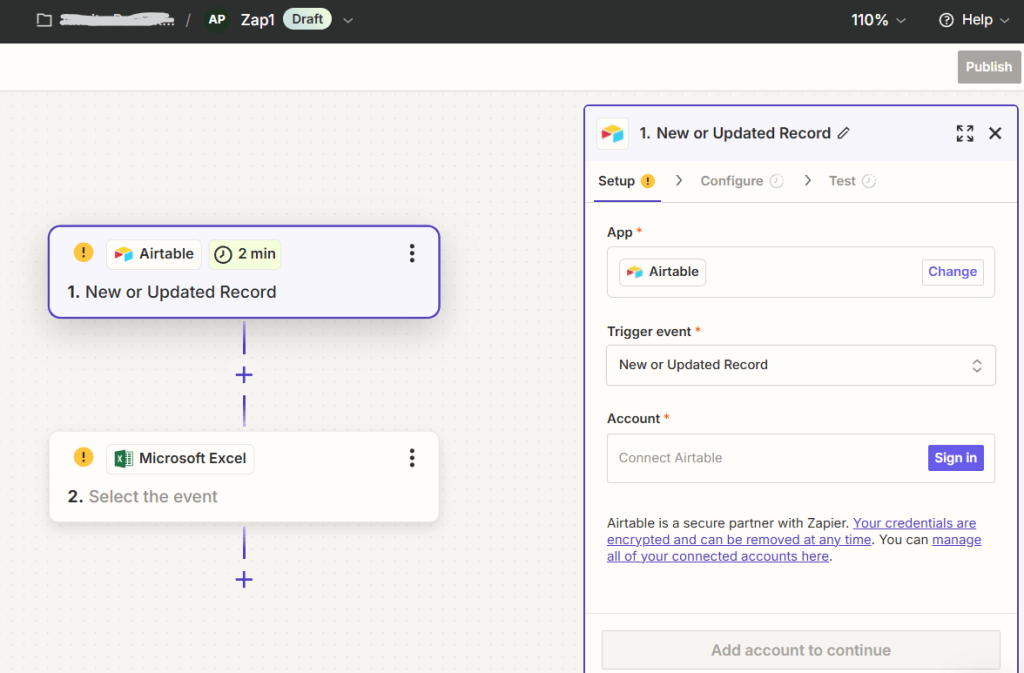
- Choose Airtable as your source app.
- Choose New or Updated Record or New Record as your trigger event.
Step 3: Connect Airtable to Zapier
- Login to your Airtable account.
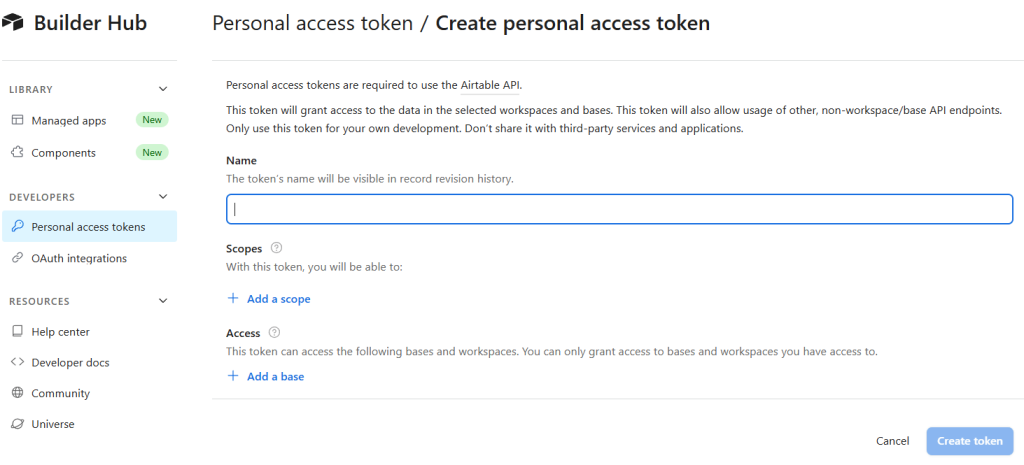
- Create a personal access token to enable safer connections. Go to Airtable account settings > API > Personal access tokens > Create token.

- Paste the token into Zapier to connect Airtable to Zapier and allow Zapier to access Airtable views and bases with greater security.
Step 4: Choose data
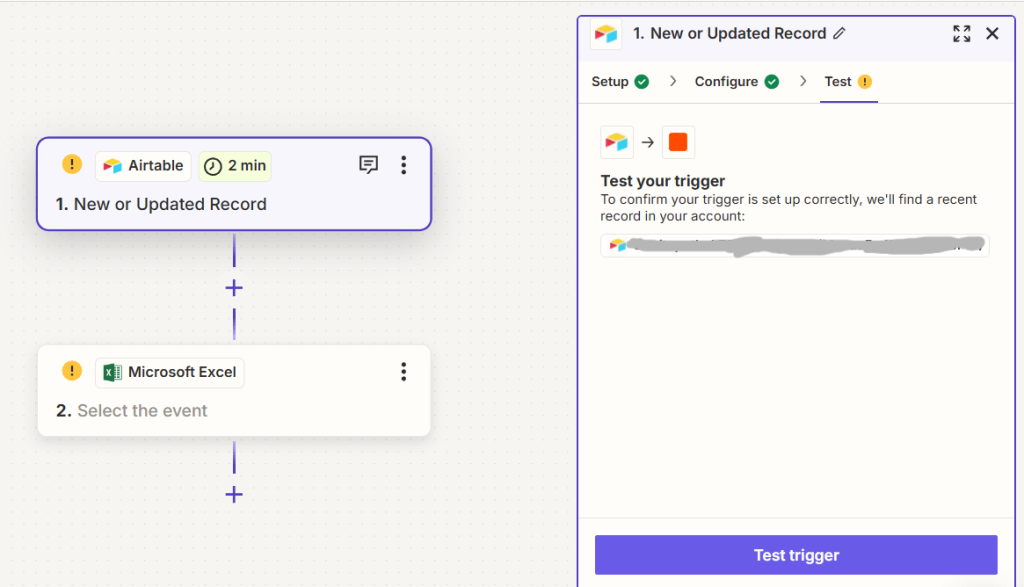
Select the Airtable view you want to export. You can also apply filters to select specific data. You can test if the automation is working fine or not.

Step 5: Select the Action

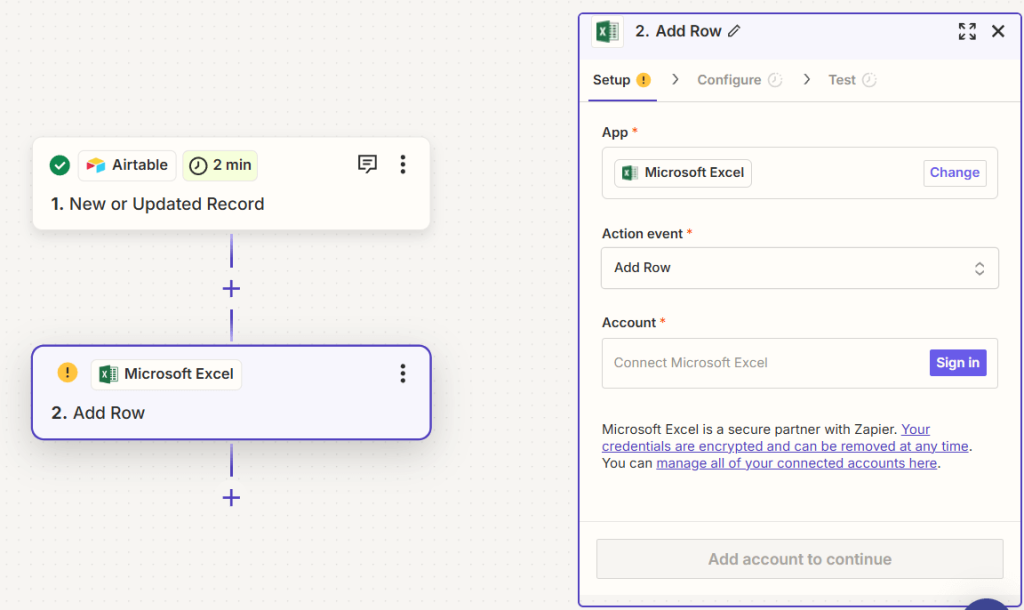
- Choose Microsoft Excel as the Action to receive data.
- Select Add Row as the action event to add data from Airtable into a new row inside an Excel file.
Step 6: Connect Zapier to Excel
- Login to your Microsoft account and allow Zapier to access Excel files.
- Choose files to export.
- Map fields from Airtable to those on the Excel sheet to ensure correct data flow between the two apps.
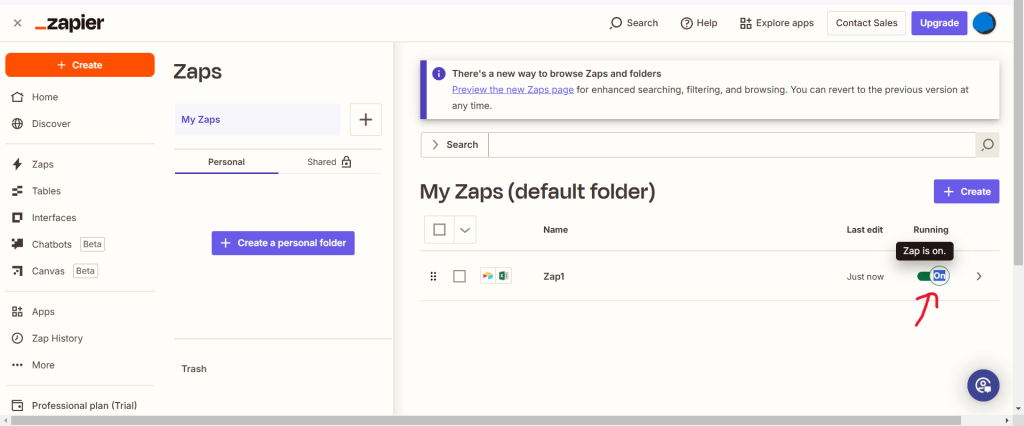
Step 7: Finish
Finish the automation by clicking the Turn on Zap button on your Zapier dashboard.

Benefits
Getting started with Zapier is easy, even for beginners. It’s reliable and secure with token-based authentication.
Limitations
Zapier’s free solution has limited automation constraints and data limits.
Other third-party tools:
Apart from Zapier, there are other third-party tools available, like Microsoft Power Automate, integrate.io, and more, to enable automatic data exports from Airtable to Excel.
Which is the best way to export data from Airtable to Excel?
Modern businesses rely on data, and this reliance increases as a business grows. Exporting data from Airtable to Microsoft Excel is a great way to visualize your data offline, leverage advanced analytics for reporting, and collaborate with your team.
There are multiple ways to export Airtable to Excel, including manual and automated. If your data export requirements are lighter, you can go for these methods – exporting data via CSV downloads or by using Google Sheets workaround.
If you have a way with coding and APIs, you can create custom integrations, but it’s time-consuming.
If you regularly export data from Airtable to Excel and want to save time and effort, use third-party automation tools, such as Coupler.io and Zapier. While Zapier is a great option, it updates data based on triggered automation. In contrast, Coupler.io allows you to schedule data refresh every hour or every day. It provides a user-friendly interface so you can easily export data from Airtable to Excel, irrespective of your technical expertise. Moreover, the platform supports other destinations for your data, e.g., you can export Airtable to Power BI, Tableau, BigQuery, and other apps.
Automate Airtable data export with Coupler.io
Get started for free