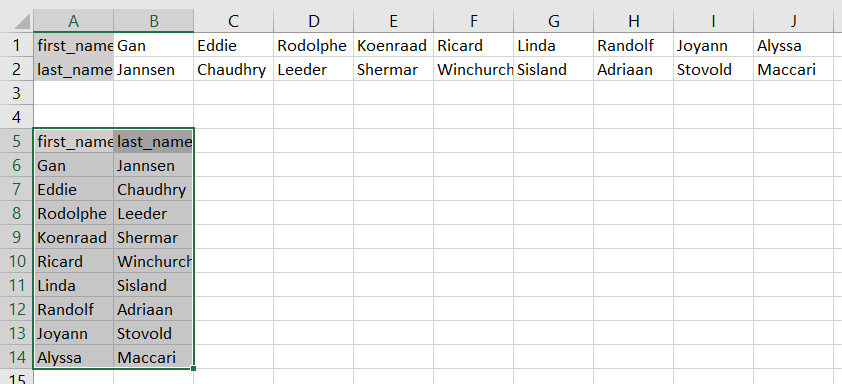
Do you have some values arranged as rows in your workbook, and do you want to convert text in rows to columns in Excel like this?
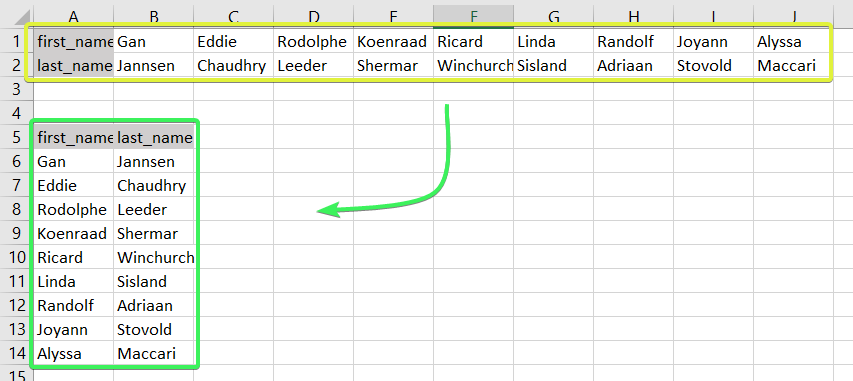
In Excel, you can do this manually or automatically in multiple ways depending on your purpose. Read on to get all the details and choose the best solution for yourself.
What are the key options to switch rows and columns in Excel
There are a few options to convert rows to columns in Excel:
- Manual copy and paste. The easiest way is to copy the needed rows or columns and paste them by selecting the Transpose option. This way you can easily switch columns and rows in Excel.
- TRANSPOSE function and alternatives. Formulas are a great way to convert rows and columns in dynamic datasets. TRANSPOSE is your number one option but there is also an alternative represented by the combination of INDIRECT and ADDRESS functions.
- Power Query. This business intelligence tool in Excel also allows you to transpose columns to rows and vice versa. It’s a go-to solution when you load data from external sources to Excel.
- VBA. It is a superb option if you want to customize some function or functionality. However, VBA is only code-based. In the article, we provide a script that allows you to change rows to columns in Excel automatically.
Let’s check out each option so you can choose the one that suits you.
How to convert rows into columns in Excel manually
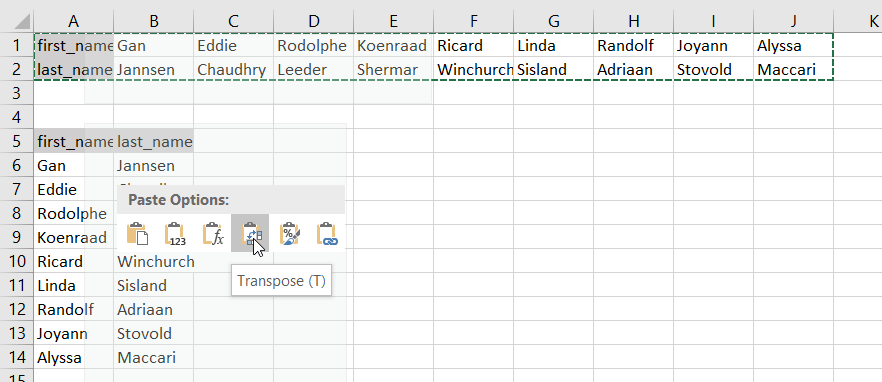
- Select and copy the needed range
- Right-click on a cell where you want to convert rows to columns
- Select the Paste Transpose option to rotate rows to columns
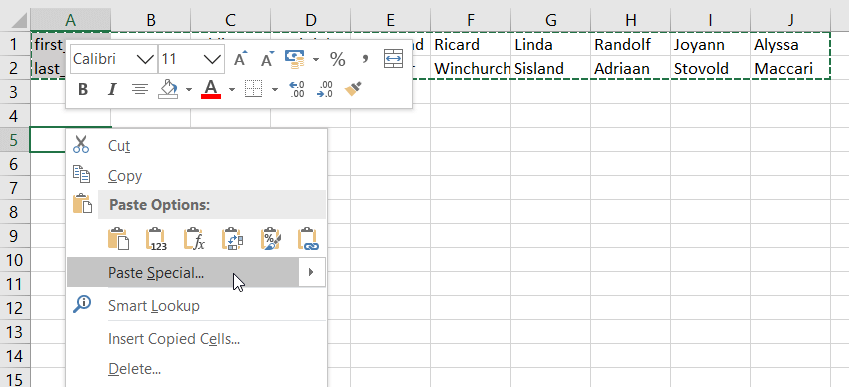
As an alternative, you can use the Paste Special option and mark Transpose using its menu.
It works the same if you need to convert columns to rows in Excel.
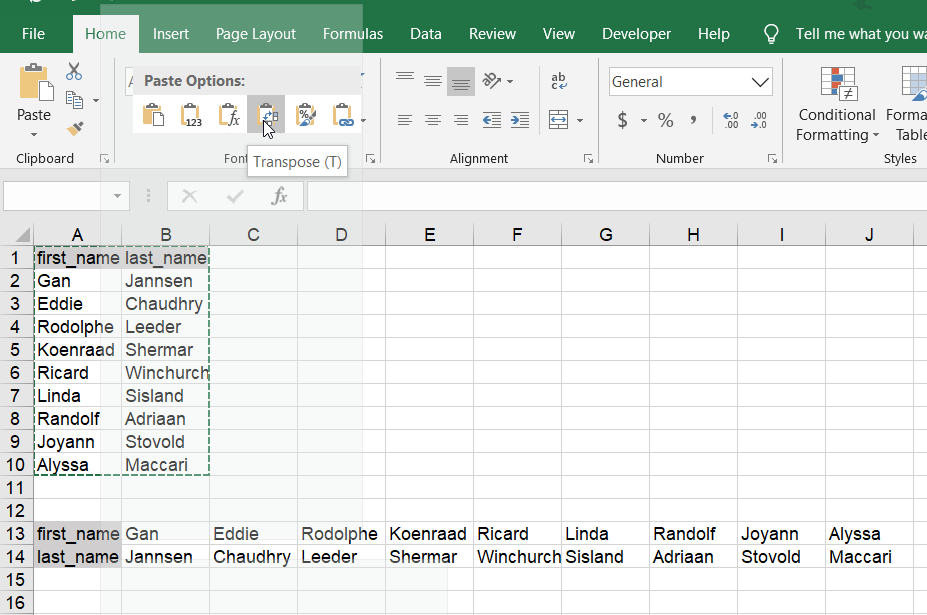
Excel Transpose pasting is the best way to convert rows to columns or columns to rows. However, it’s only good for a one-time conversion of small to medium numbers of rows both on the Excel desktop and online.
Can I convert multiple rows to columns in Excel from another workbook?
The method above will work well if you want to convert rows to columns in Excel between different workbooks using Excel desktop. You need to have both spreadsheets open and do the copying and pasting as described.
However, in Excel Online, this won’t work for different workbooks. The Paste Transpose option is not available.
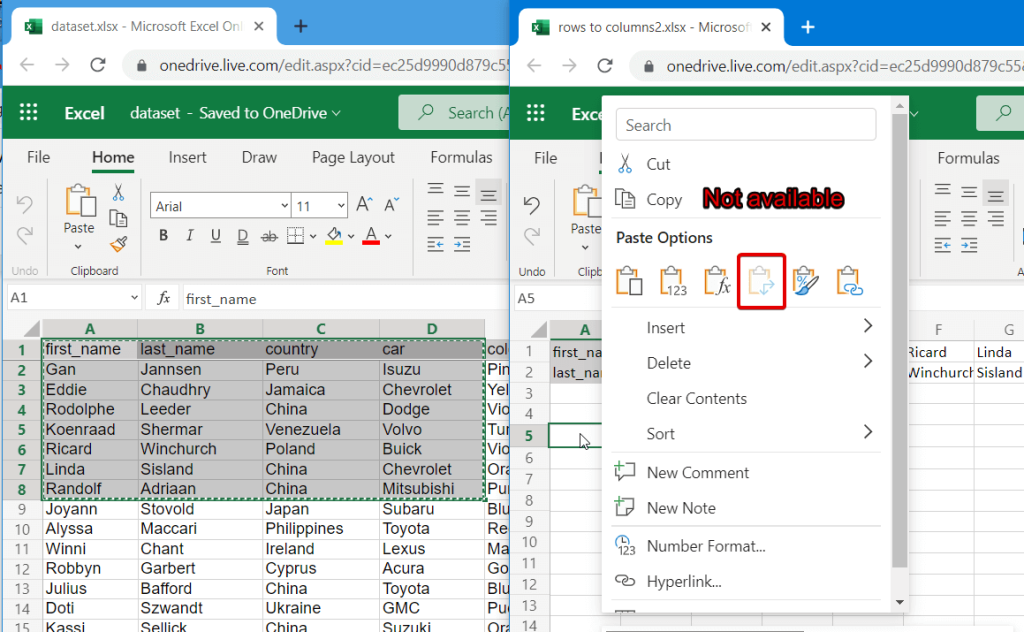
Therefore, in this case, it’s better to use the Excel TRANSPOSE function to turn columns to rows and vice versa.
How to convert columns to rows in Excel with TRANSPOSE
TRANSPOSE is the Excel function that allows you to switch rows and columns in Excel. Here is its syntax:
=TRANSPOSE(array)array– an array of columns or rows to transpose
One of the main benefits of TRANSPOSE is that it links the converted columns/rows with the source rows/columns. So, if the values in the rows change, the same changes will be made in the converted columns.
Let’s check out a few examples of how you can convert a row to column in Excel.
Example of TRANSPOSE formula to convert multiple rows to columns in Excel desktop
TRANSPOSE is an array formula, which means that you’ll need to select a number of cells in the columns that correspond to the number of cells in the rows to be converted. Once you do this, press Ctrl+Shift+Enter to get Excel rows to columns.
=TRANSPOSE(A1:J2)
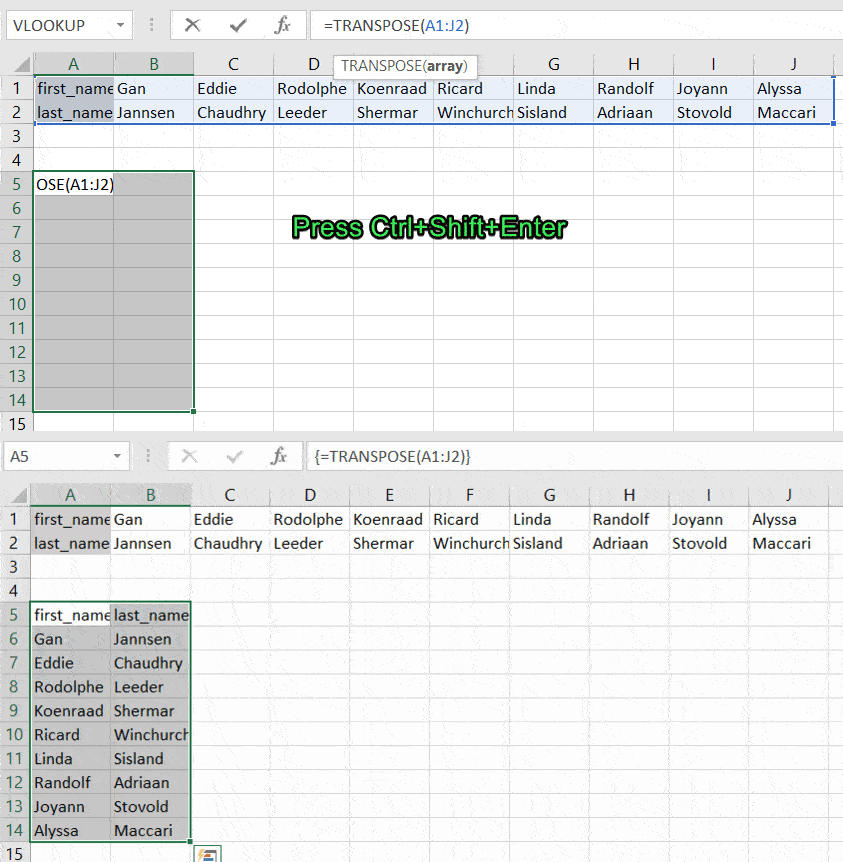
Fortunately, you don’t have to go through this procedure in Excel Online if you need to rotate Excel columns to rows and backward.
Formula example to rotate row to column in Excel Online
You can simply insert your TRANSPOSE formula in a cell and hit enter. This will turn Excel rows to columns right away without any additional button combinations.
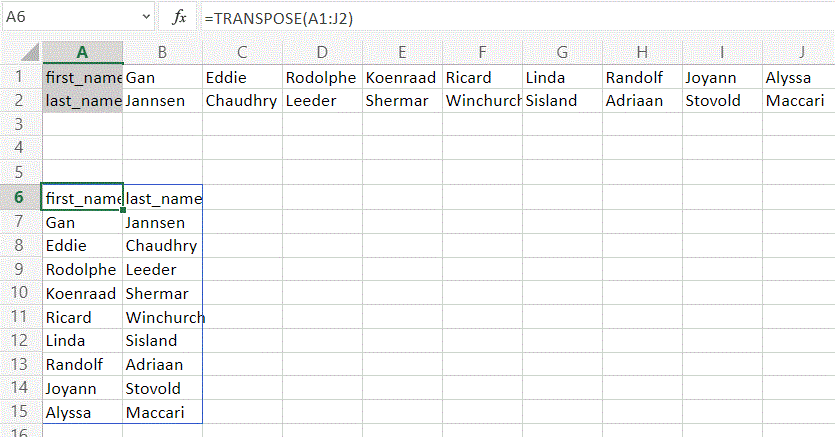
Excel TRANSPOSE multiple rows in a group to columns between different workbooks
We promised to demonstrate how you can use TRANSPOSE to rotate column to row in Excel between different workbooks. In Excel Online, you need to do the following:
- Copy a range of columns to rotate from one spreadsheet and paste it as a link to another spreadsheet.
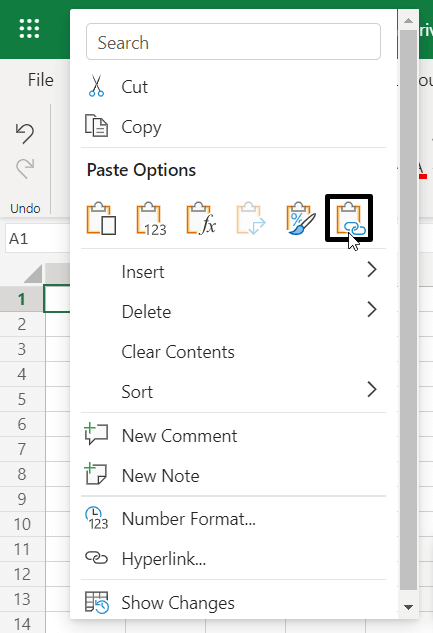
- We need this URL path to use in the TRANSPOSE formula, so copy it.
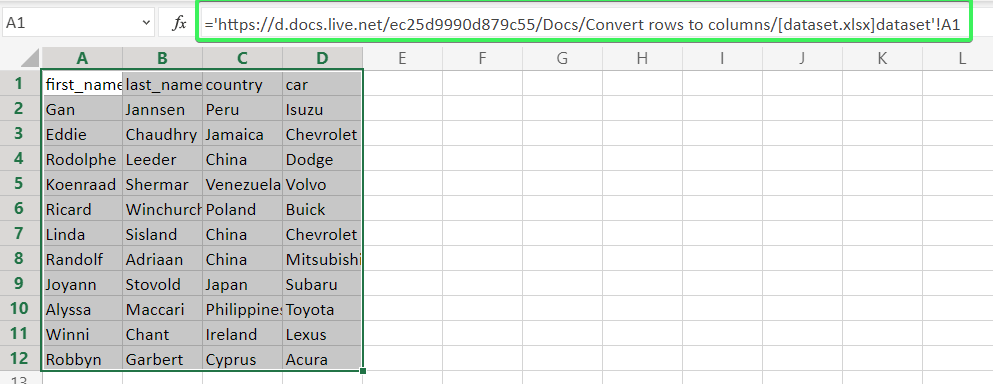
- The URL path above is for a cell, not for an array. So, you’ll need to slightly update it to an array to use in your TRANSPOSE formula. Here is what it should look like:
=TRANSPOSE('https://d.docs.live.net/ec25d9990d879c55/Docs/Convert rows to columns/[dataset.xlsx]dataset'!A1:D12)

You can follow the same logic for rotating Excel rows to columns between workbooks in Excel desktop.
TRANSPOSE alternative to change row to column in Excel
TRANSPOSE is not the only function you can use to change rows to columns in Excel. A combination of INDIRECT and ADDRESS functions can be considered as an alternative. However, the flow to convert Excel columns to rows using this formula is much trickier. Let’s check it out in the following example.
Convert text in columns to rows in Excel
If you have a set of columns with the first cell A1, the following formula will allow you to convert columns to rows in Excel.
=INDIRECT(ADDRESS(COLUMN(A1),ROW(A1)))
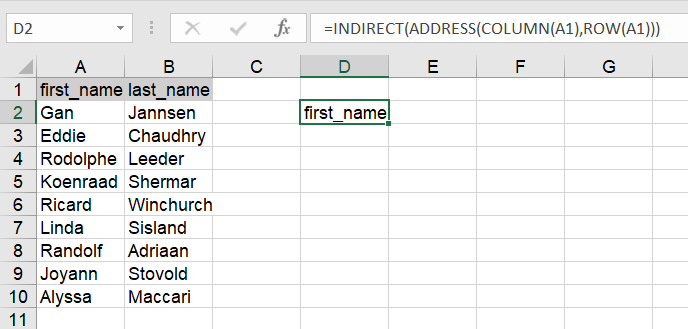
But where are the rows, you may ask! Well, first you need to drag this formula down if you are converting multiple columns to rows. Then drag it to the right – you’ll get a converted column to row in Excel.

NOTE: Use this Excel formula only to convert data in Excel columns to rows starting with A1 cell. If your columns start from another cell, check out the next section.
Excel data in columns to rows using INDIRECT+ADDRESS from other cells
To convert columns to rows in Excel with INDIRECT+ADDRESS formulas from not A1 cell only, use the following formula:
=INDIRECT(ADDRESS(COLUMN(first_cell) - COLUMN($first_cell) + ROW($first_cell), ROW(first_cell) - ROW($first_cell) + COLUMN($first_cell)))
- first_cell – enter the first cell of your columns
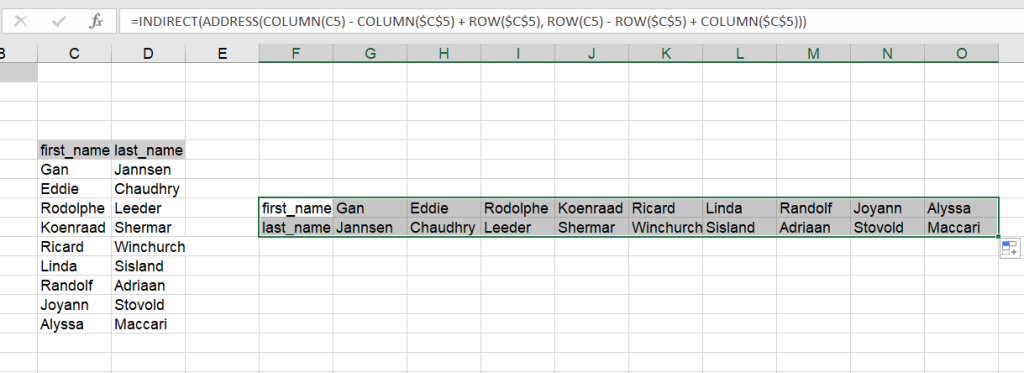
Here is an example of how to convert Excel data in columns to rows:
=INDIRECT(ADDRESS(COLUMN(C5) - COLUMN($C$5) + ROW($C$5), ROW(C5) - ROW($C$5) + COLUMN($C$5)))
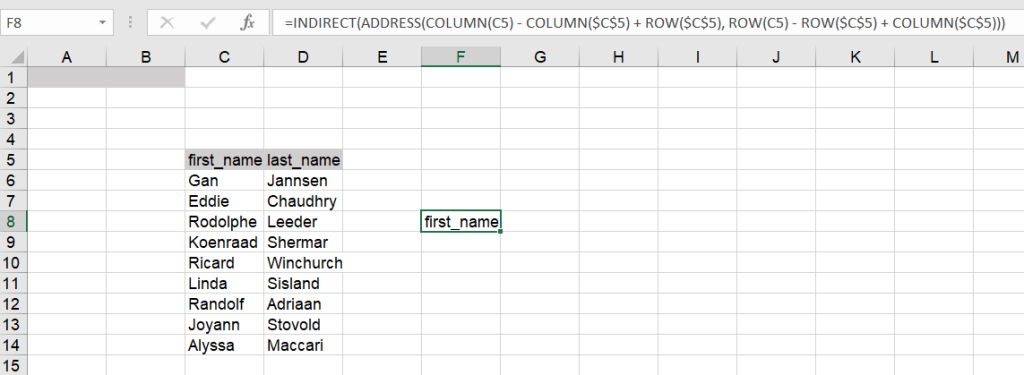
Again, you’ll need to drag the formula down and to the right to populate the rest of the cells.
Convert Excel columns to rows using Power Query
Power Query is another powerful tool available for Excel users. We wrote a separate Power Query Tutorial, so feel free to check it out.
Meanwhile, you can use Power Query to transpose rows to columns. To do this, go to the Data tab, and create a query from table.
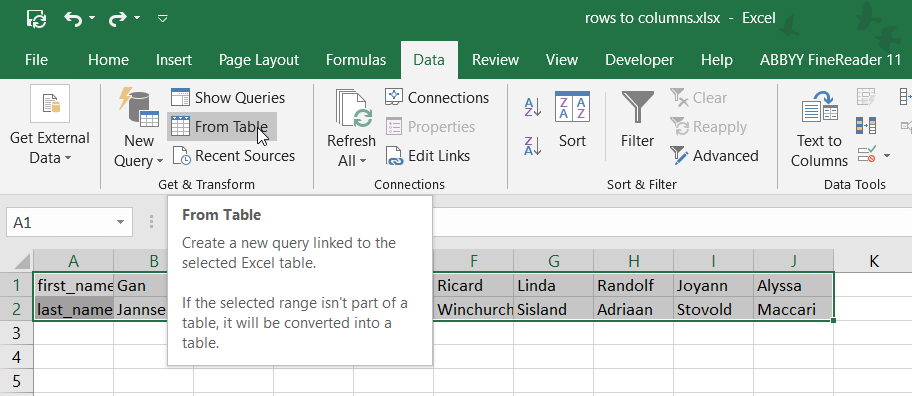
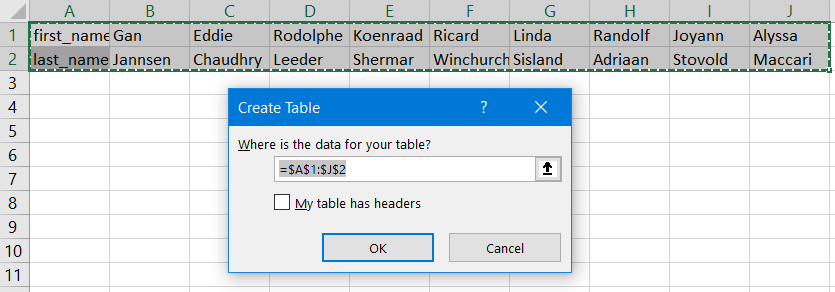
- Then select a range of cells to convert rows to columns in Excel. Click OK to open the Power Query Editor.
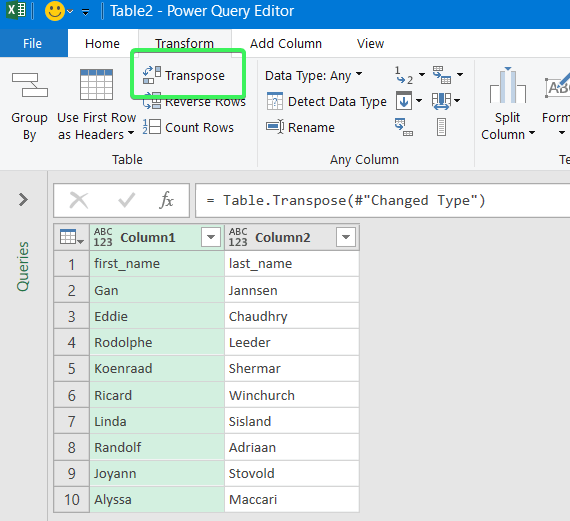
- In the Power Query Editor, go to the Transform tab and click Transpose. The rows will be rotated to columns.
- If you want to keep the headers for your columns, click the Use First Row as Headers button.
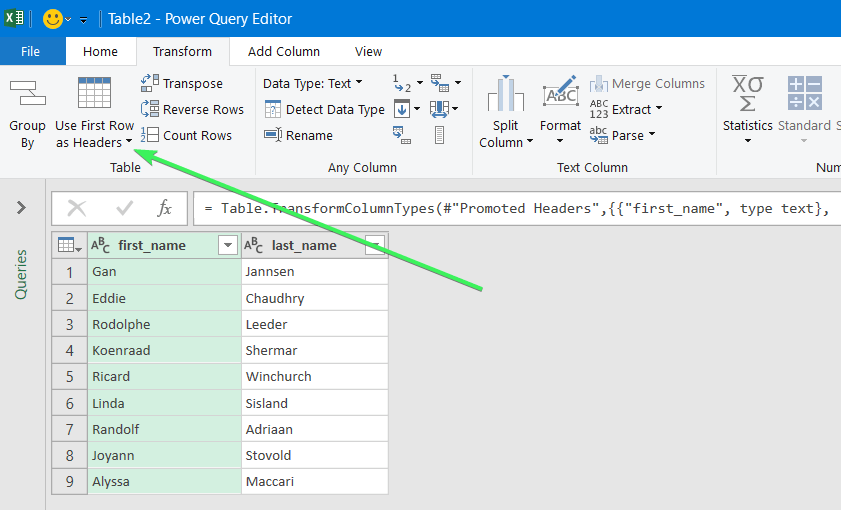
- That’s it. You can Close & Load your dataset – the rows will be converted to columns.

Power Query alternative to load data to Excel from cloud sources
With Power Query, you can extract, transform, and load data from databases and specific sources to Excel. However, the number of these sources is limited. So, you’ll need to search for alternative connectors or add-ins to pull data from Google Analytics, Facebook Ads, QuickBooks, and many other apps. Fortunately, there is Coupler.io!
It is a reporting automation platform to turn raw data into simple reports. Coupler.io supports 60+ Excel integrations, including marketing apps, project management tools, accounting software, data warehouses, etc. Here’s a quick overview of how it works:
1. Connect a data source you want to load data from. Choose your source app right away and click Proceed to get started for free with no credit card required.
2. Transform your data before loading it to Excel. You can rename columns, apply filters, and add additional columns using formulas.
3. Choose the Excel workbook to load your data and set up automatic data refresh. This will automate data exports on a schedule.
In addition to data exports, Coupler.io offers ready-to-use dashboard templates designed in Power BI, Looker Studio, Google Sheets, and Tableau.
Import data to Excel with Coupler.io
Get started for freeConvert rows to columns in Excel VBA
VBA is another method to switch rows and columns in Excel automatically or dynamically.
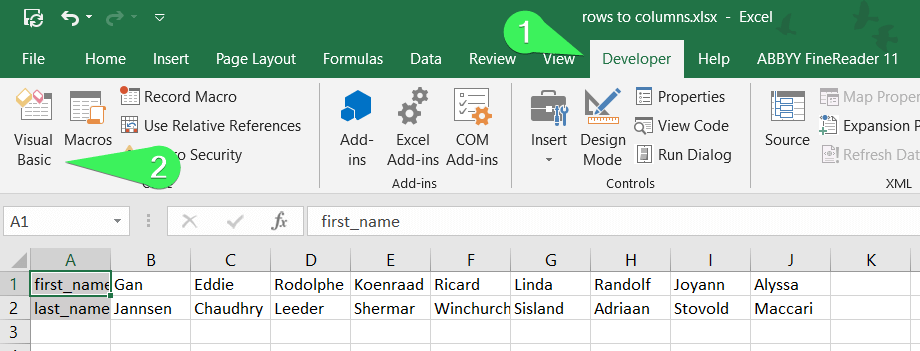
- Go to the Visual Basic Editor (VBE). Click Alt+F11 or you can go to the Developer tab => Visual Basic.
- In VBE, go to Insert => Module.
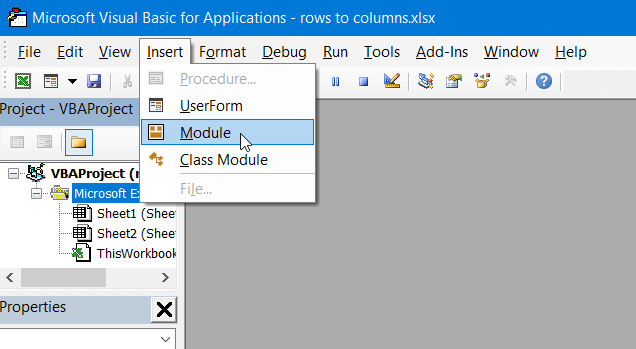
- Copy and paste the script into the window. You’ll find the script in the next section.

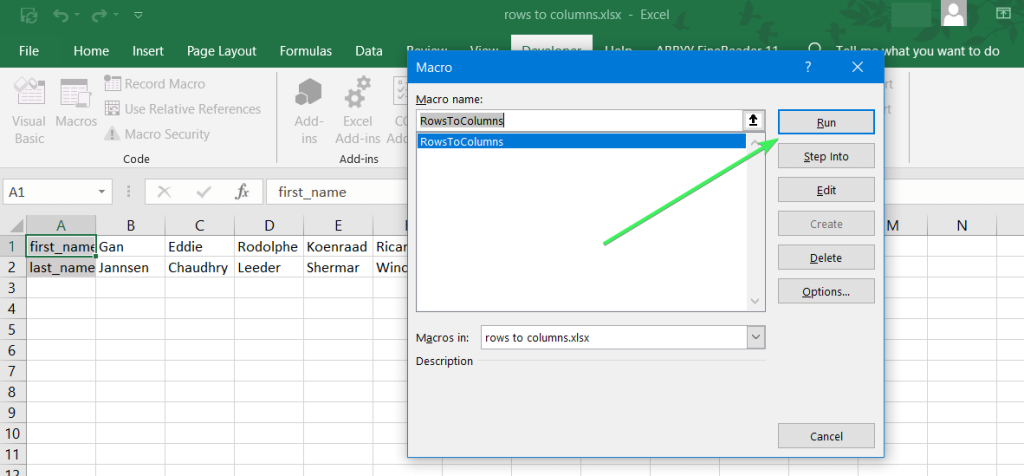
- Now you can close the VBE. Go to Developer => Macros and you’ll see your RowsToColumns macro. Click Run.
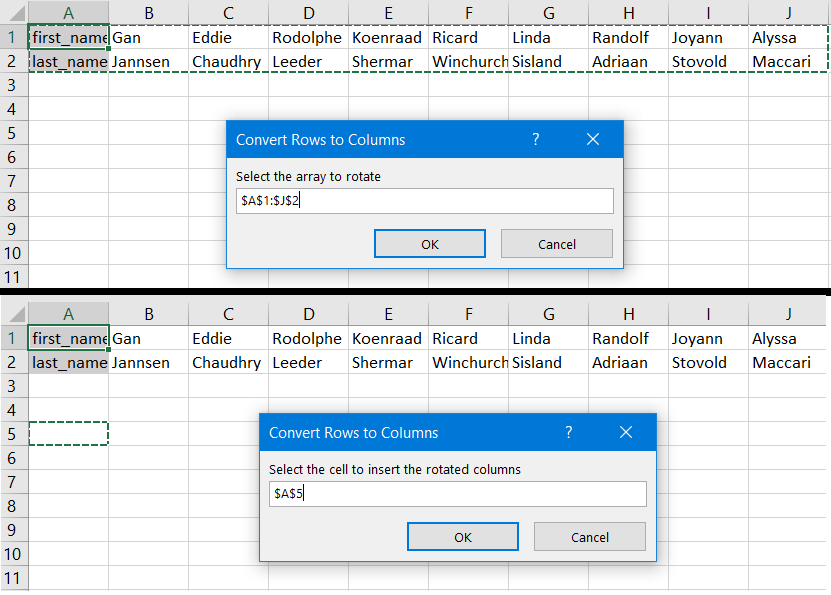
- You’ll be asked to select the array to rotate and the cell to insert the rotated columns.
- There you go – you turned a row to column in Excel in the blink of an eye!
VBA macro script to convert multiple rows to columns in Excel
Sub TransposeColumnsRows()
    Dim SourceRange As Range
    Dim DestRange As Range

    Set SourceRange = Application.InputBox(Prompt:="Please select the range to transpose", Title:="Transpose Rows to Columns", Type:=8)
    Set DestRange = Application.InputBox(Prompt:="Select the upper left cell of the destination range", Title:="Transpose Rows to Columns", Type:=8)

    SourceRange.Copy
    DestRange.Select
    Selection.PasteSpecial Paste:=xlPasteAll, Operation:=xlNone, SkipBlanks:=False, Transpose:=True
    Application.CutCopyMode = False

End Sub

Sub RowsToColumns()
    Dim SourceRange As Range
    Dim DestRange As Range

    Set SourceRange = Application.InputBox(Prompt:="Select the array to rotate", Title:="Convert Rows to Columns", Type:=8)
    Set DestRange = Application.InputBox(Prompt:="Select the cell to insert the rotated columns", Title:="Convert Rows to Columns", Type:=8)

    SourceRange.Copy
    DestRange.Select
    Selection.PasteSpecial Paste:=xlPasteAll, Operation:=xlNone, SkipBlanks:=False, Transpose:=True
    Application.CutCopyMode = False

End Sub
Error message when trying to convert rows to columns in Excel
To wrap up with converting Excel data in columns to rows, let’s review the typical error messages you can face during the flow.
Overlap error when converting column to row in Excel

The overlap error occurs when you’re trying to paste the transposed range into the area of the copied range. Please avoid doing this.
Wrong data type error when converting Excel rows to columns

You may see this #VALUE! error when you implement the TRANSPOSE formula in Excel desktop without pressing Ctrl+Shift+Enter.
Other errors may be caused by typos or other misprints in the formulas you use to convert groups of data from rows to columns in Excel. Always double-check the syntax before pressing Enter or Ctrl+Shift+Enter ?. Good luck with your data!


