Outdated information should never appear on your dashboards when you need to make timely analysis and decision-making. The “ideal” scenario is having real-time insights. However, refreshing reports manually takes a lot of time and effort.
This is why there are a number of tools available that help you automate this process, adding value and saving you time. Let’s explore some of these options to find the best fit for your needs.
Different ways to automate Power BI reports
Automation makes it easy to streamline your Power BI reports. With it, you can keep your reports up-to-date, accurate, and ready when you need them. Not only does it save time, it also reduces manual errors. However, you’ll need tools to do it.
- Coupler.io
This reporting automation solution lets you connect 60+ cloud sources to Power BI and schedule automatic data refresh. Coupler.io supports marketing and analytics apps like Facebook Ads and Google Search Console — which Power BI doesn’t. It also offers dashboard templates to help you streamline your reporting process.
- Power BI gateway
Use the data gateway for on-premises data sources and set a refresh schedule to keep your reports updated. With Power BI gateway, you can update reports every morning with data from SQL Server, local Excel files, SharePoint, SSAS, and other local server data sources.
- Power Automate
This tool lets you create workflows to automate tasks between your favorite apps and services. You can use it for things like setting a refresh schedule, refreshing reports when a new file is added to SharePoint, and sending automated email notifications with reports attached. Plus, with Power Automate visual in Power BI, you can add a “refresh” button to your reports.
- Power BI API
The Power BI API lets developers access the Power BI platform programmatically. It offers flexibility and control over report updates, reporting integration, customization, and automation. You can integrate it with your existing system, automate tasks, and embed reports into custom apps.
How to schedule your Power BI report’s automatic refresh in Power BI Desktop using Coupler.io
To show how Coupler.io works, we’ll set up an “importer” (Coupler.io’s Power BI connector) to transfer data from a data source to Power BI. This will help you automate Power BI reports effortlessly. With just a few steps, you can ensure your data is always up-to-date and ready for analysis.
Use the following form to get started using Coupler.io. It’s super easy—just select your data destination in the left dropdown and click Proceed. If you don’t have a Coupler.io account yet, create a new one (it’s free!). After that, you’ll be redirected to a page where you can configure your first importer.

Step 1: Collect data from your data source
In this example, we’ll use Facebook Ads as the data source. If you use another source, don’t worry—the basic steps are similar. You need to connect your source account and specify which data to export.
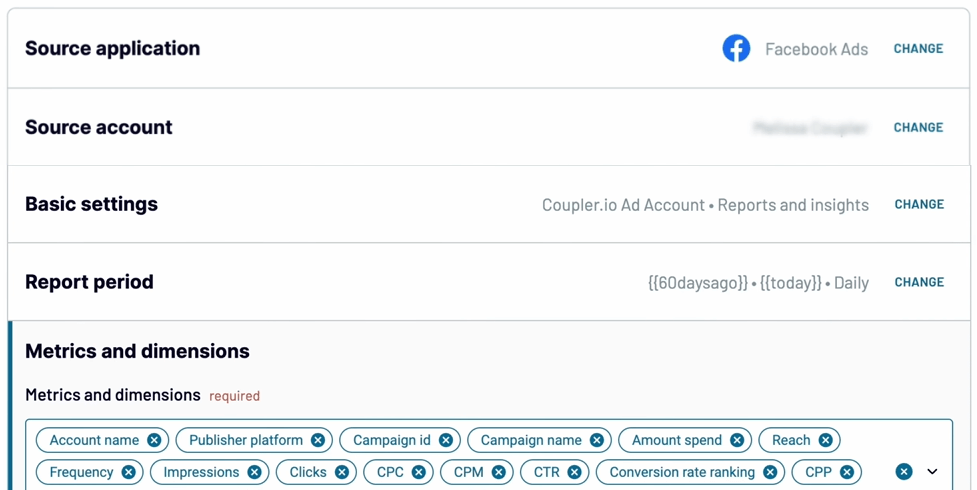
For our example with Facebook Ads as a source app, we need to specify the ad accounts and report type to load. The report can then be customized by selecting metrics and dimensions, report period, etc.
The data source setup for Facebook Ads looks like the following:

Step 2: Transform and organize data
Click Transformations to preview and transform your data. This helps you spot and fix any inaccuracies in your data before loading it into Power BI. If needed, you can:
- Manage your columns: hide, reorder, rename, and change format.
- Filter data based on criteria.
- Sort data by multiple columns.
- Add formula-based column
- Combine data from two or more sources (if you use multiple sources).

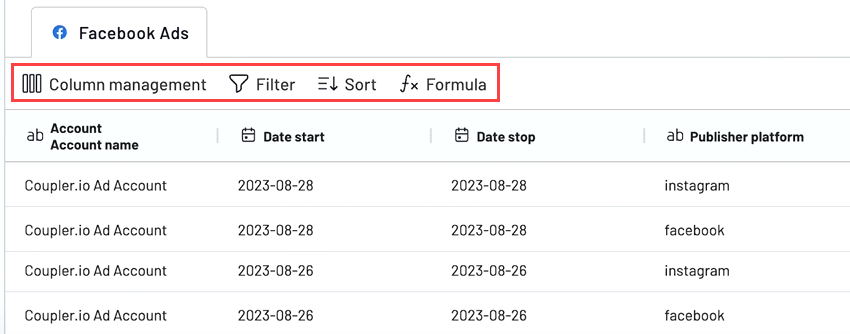
For more on this, see our article about how to transform data in Power BI.
Step 3. Load data to Power BI and schedule refresh
Follow the in-app instructions to set Power BI as the destination, which include the following steps:
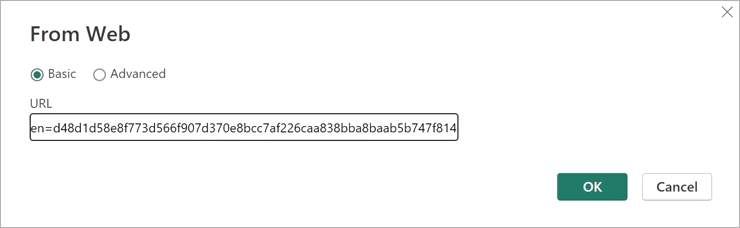
- Generate an Integration URL and copy it.
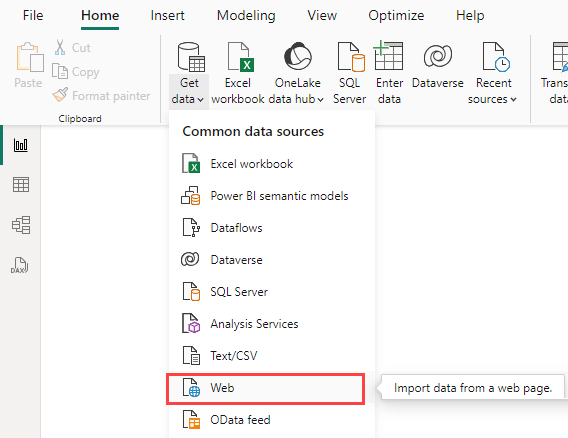
- Open Power BI Desktop. Click Get data and select Web.

- Paste the Integration URL you copied before and click OK.

Power BI connects with Coupler.io, evaluates your query, and shows a data preview in Power Query Editor. Click the Close & Apply button to load your data into Power BI.
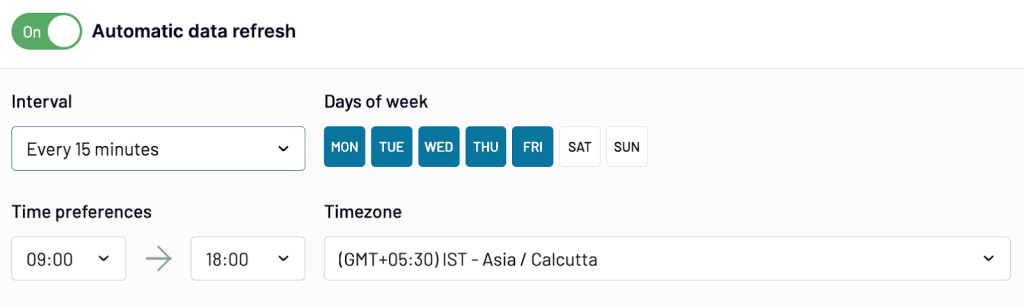
Go back to Coupler.io’s importer setup page in your browser and click the Setup a schedule button. Then, toggle on the Automatic data refresh option.
You can then configure the schedule as needed:

Click Save and Run Importer to finalize the setup. Coupler.io will now refresh your data in Power BI based on the schedule you set.
Congratulations! You can now start creating custom reports in Power BI.
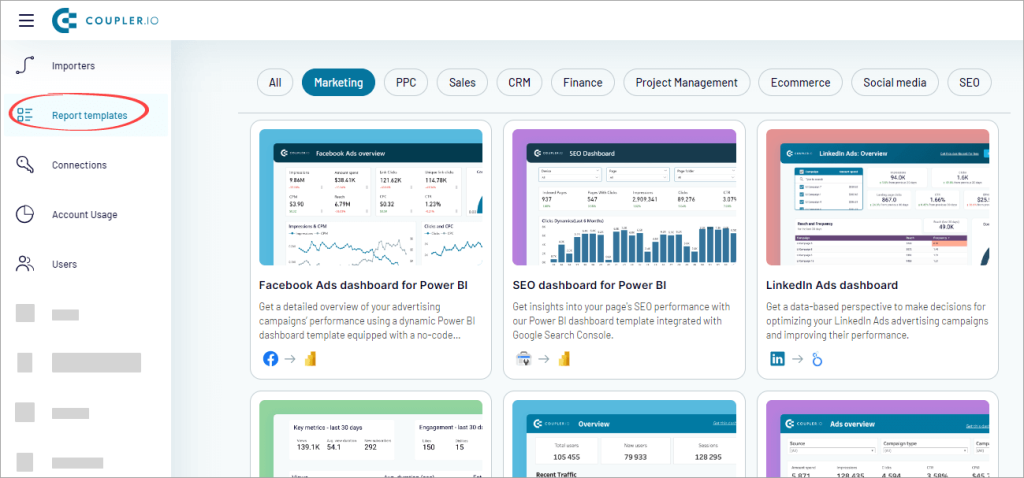
Use the automated Power BI report templates by Coupler.io
Our dashboard templates enable you to quickly visualize your marketing performance. With options like the Facebook Ads dashboard template for Power BI and many others, you can gain insights in minutes. To get started, simply go to Report templates in the Coupler.io app, choose a template, and click Try This Report.

Follow the pre-defined importer setup and set up calculated fields on the report side if necessary. Also, there’s no need to schedule a refresh separately in Power BI since the functionality is enabled by default here, ensuring a seamless experience.
How to schedule automatic data refresh in Power BI Service
Publishing your reports to Power BI Service lets you easily share and collaborate with others. For these online reports, you can schedule automatic refreshes to automate Power BI reports. This ensures that everyone always sees the most updated data.
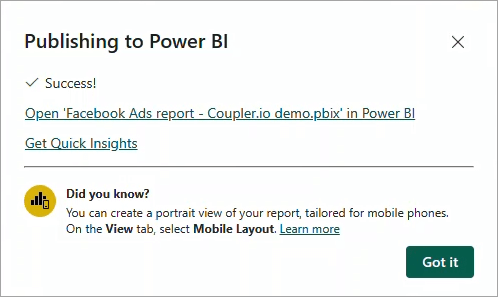
Step 1: Publish your desktop report to Power BI service
Click Publish in the Home tab. If your report isn’t saved, you’ll be prompted to save it first to your device.
Then, choose the workspace for publishing. Wait a few moments. Once you see the success notification, your report is available online.

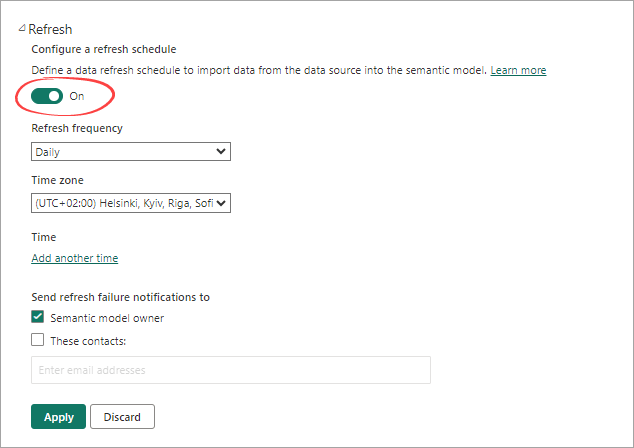
Step 2: Schedule data refresh in Power BI
Open your workspace where the recently published report is located. In the report’s semantic model, click the three dots and select Settings from the context menu.


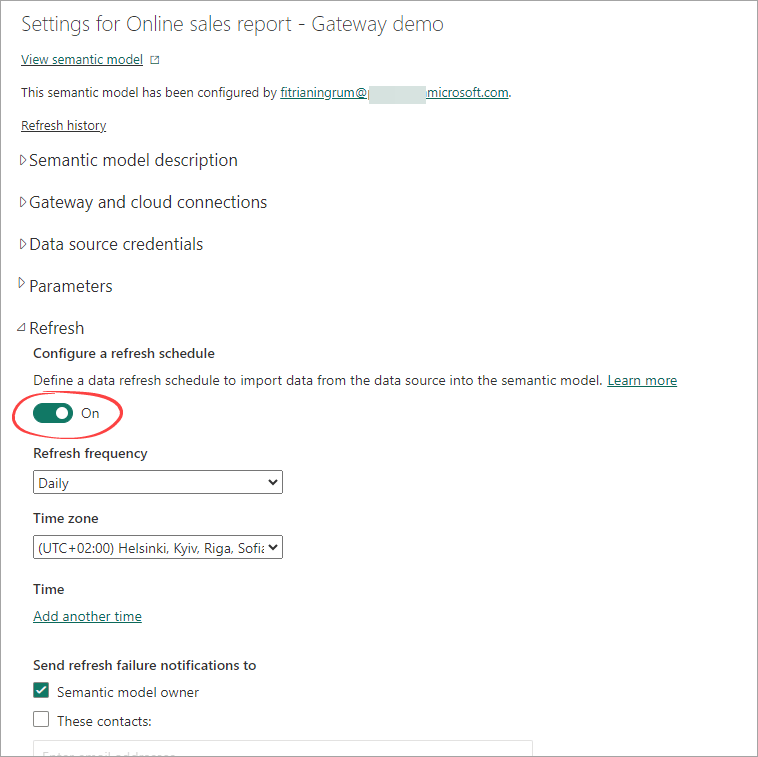
Expand the Refresh section on the semantic model setting page.
Toggle the refresh button to On and set a refresh frequency. Choose daily or weekly, and add another time if needed. If everything looks good, click Apply.

Important notes
If you use Coupler.io to schedule refresh for your Power BI Desktop report, make sure your refresh schedules in Coupler.io and Power BI Service are aligned to always display the most recent data in your reports. The scheduled time in Power BI Service should be set after the Coupler.io scheduled time, plus the time required for the import job to complete.
We recommend a delay of at least 30 minutes. For example, if Coupler.io refreshes daily at 9 AM, set Power BI to refresh at 9:30 AM.
How to use Power BI Gateway to refresh Power BI reports automatically
You’ve seen how easy it is to set up a data connector by Coupler.io to pull cloud data into Power BI and automate reports in Power BI. Now, let’s dive into using a data gateway for accessing on-premises data like SQL Server databases, Excel files, and other data sources on your local domain server. This way, you can seamlessly connect all your essential data, whether it’s in the cloud or on-premises.
The data gateway is free software you can download. It lets you access on-premises data easily without changing firewall settings or moving it to the cloud.
To get started, visit the Power BI gateway page and download the standard mode (recommended). For step-by-step installation and setup, check out our handy Power BI Gateway guide.
Now, let’s say you’ve created a report using an Excel workbook as the data source. The file is located in a shared folder on your local domain. Note that the file needs to be accessible from the machine where the gateway is installed. After publishing it to Power BI Service, you will need to follow these steps to ensure it can be refreshed through the gateway:
- Connect Power BI gateway to the data source.
- Map the gateway’s data source to your report’s semantic model.
Here’s how to automate Power BI reports with the gateway:
Step 1: Connect Power BI gateway to the data source
- To add a data source to the gateway, first, you need to check what data source you use in your report. If you’re unsure, open the report in Power BI Desktop and click Transform data > Data source settings.

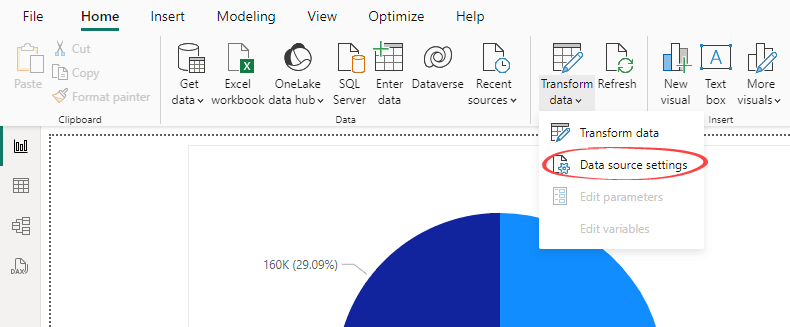
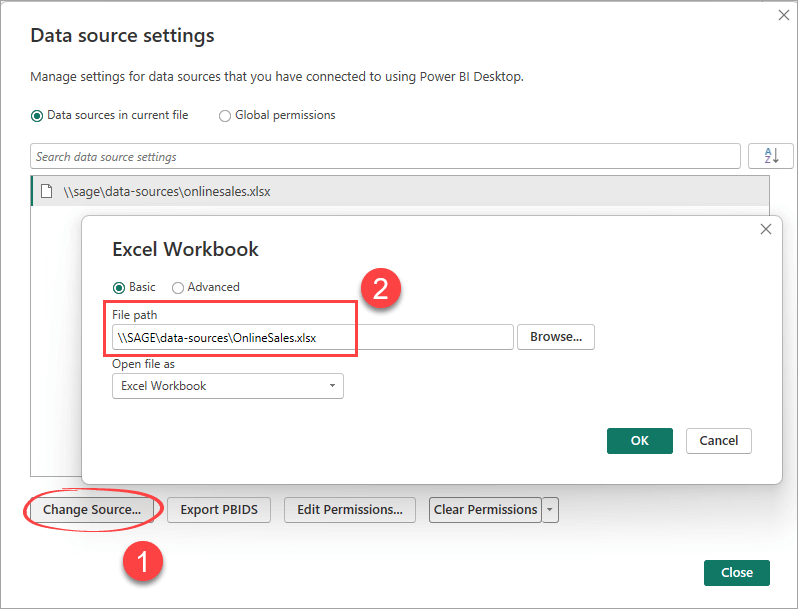
- In the Data source settings window, you’ll see a list of data sources used in your report. To find the path of the Excel file, select the data source, click Change Source, and then copy the file path.

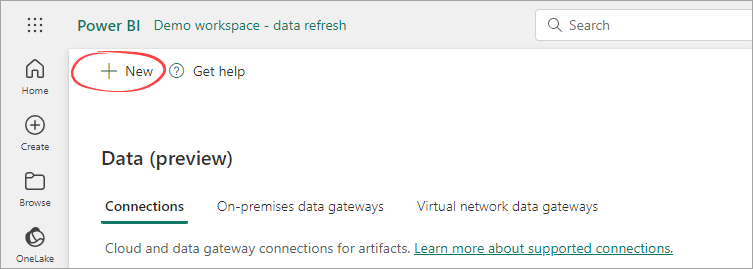
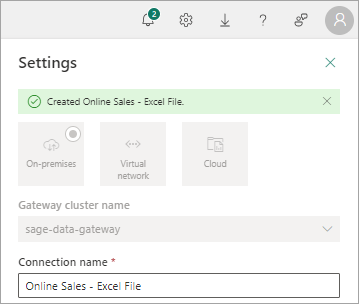
- Now, open Power BI service and click Settings > Manage connections and gateways. In the Connections tab, click New.

- In the New connection pane that appears, enter the connection details, such as selecting the gateway, entering a connection name and connection type, and other details. When done, click Create.

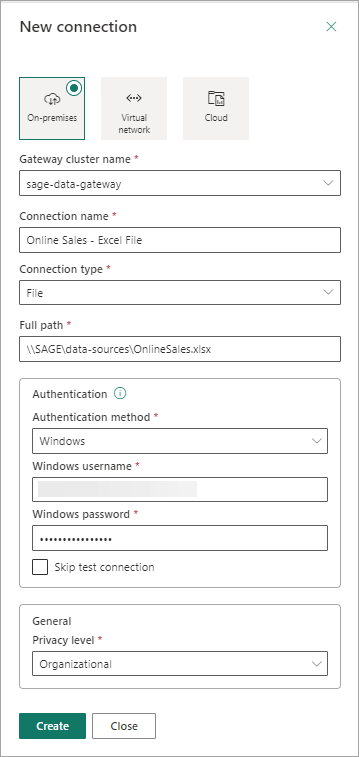
- If everything is set up correctly, you should see a message saying the connection was created.

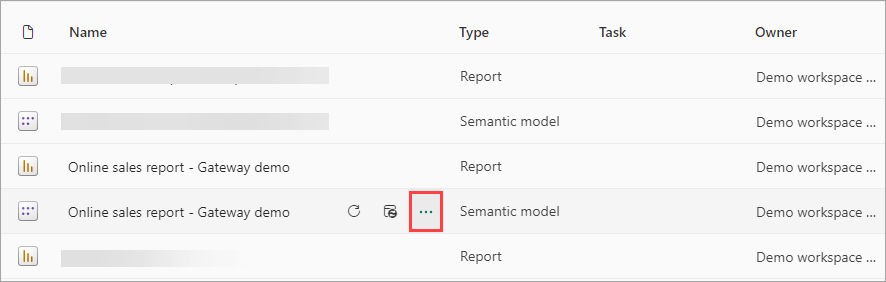
Step 2: Map the gateway’s data source to your report’s semantic model
- Open the workspace where your report is located. In the report’s semantic model, click the three dots and select Settings.

- Under the Gateway and cloud connections section, map the data source to use the new gateway connection and click Apply.

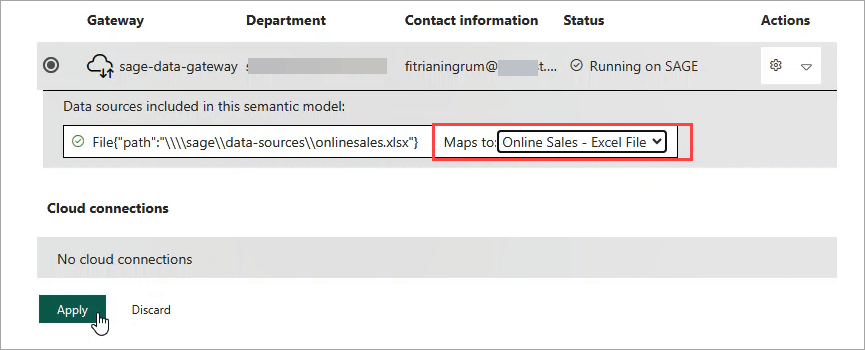
- After that, you can set up a refresh schedule and choose the refresh options just like we did with Coupler.io.

Check out our full power BI tutorial.
How to use Power Automate to refresh Power BI reports automatically
Power Automate lets you create a “flow” to automate reports in Power BI by refreshing your dataset on a schedule. But it doesn’t stop there. You can also trigger a refresh when specific events happen, like receiving a new email, adding a file to OneDrive or SharePoint, submitting a form, or even clicking a button.
To get started with Power Automate, go to https://make.powerautomate.com/ and sign in with your Microsoft account.
There are 3 types of flows you can create in Power Automate:
- Cloud flows: These are built-in Power Automate and allow you to automate tasks across over 1,000 cloud apps and services. The three types of cloud flows are:
- Automated flows: Triggered automatically based on an external event happening (e.g., an email arriving).
- Instant flows: Manually triggered by the user (e.g., clicking a button). And flows that are scheduled.
- Scheduled flows: Executed at scheduled times (e.g., daily or weekly).
- Desktop flows: These flows are built using Power Automate Desktop. You can use the desktop flows to automate tasks on websites or desktop applications, especially for those old-school or legacy apps that don’t have APIs.
Learn how you can connect API to Power BI.
- Business flows (Premium license): These flows are built on Dataverse and are often used in model-driven apps to guide users through defined steps for consistency and completeness. They are useful in scenarios requiring standardized processes, such as in sales, customer service, and project management. For example, you can create a business flow to guide a salesperson through the sales pipeline, ensuring all necessary information is captured during a customer service call.
We won’t dive into details about each flow above. Here, we’ll show you how to create a scheduled cloud flow and an instant flow to refresh Power BI reports:
Refresh reports using scheduled flows
Here’s how easy it is to create a scheduled flow to automate Power BI reports:
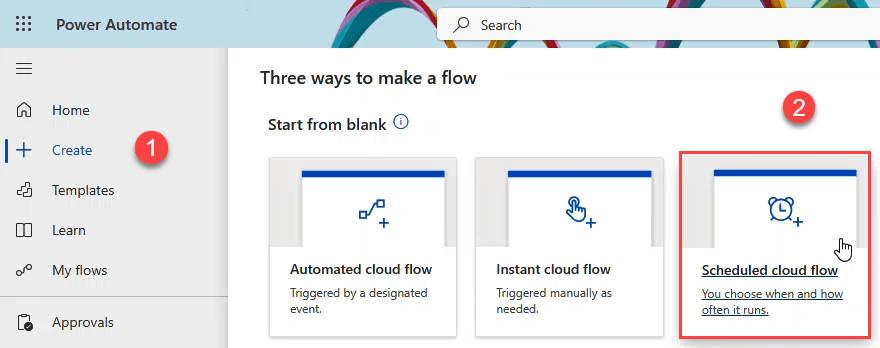
- Open Power Automate. Click Create from the left-side pane, then click Scheduled cloud flow.

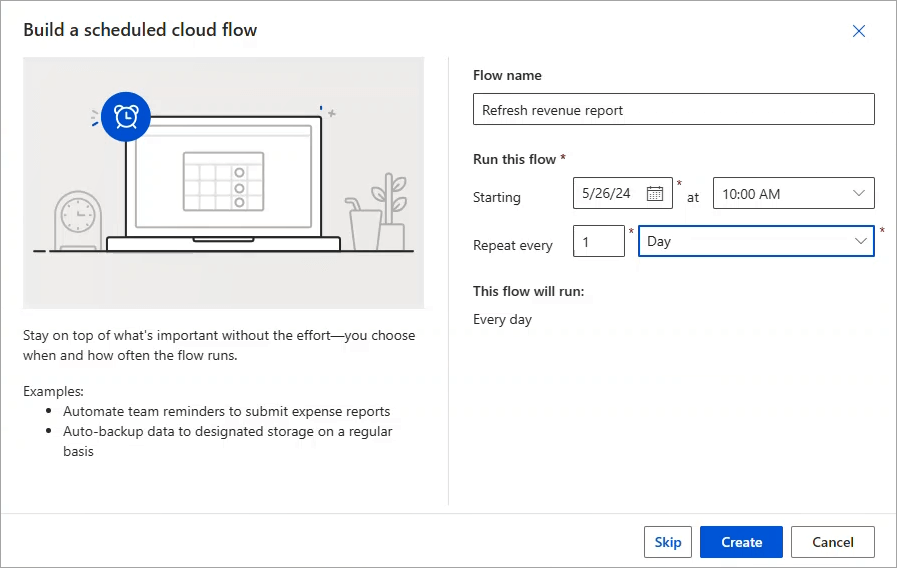
- Enter a flow name and set a schedule, like refreshing daily. When done, click Create.

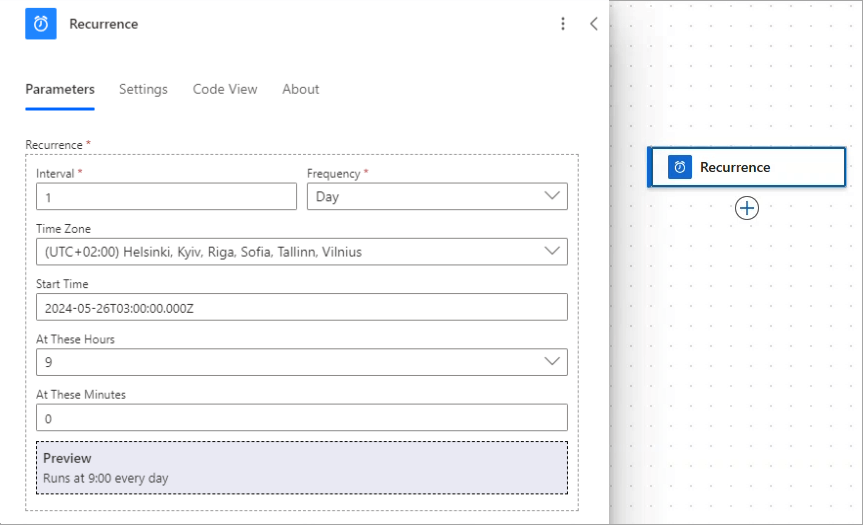
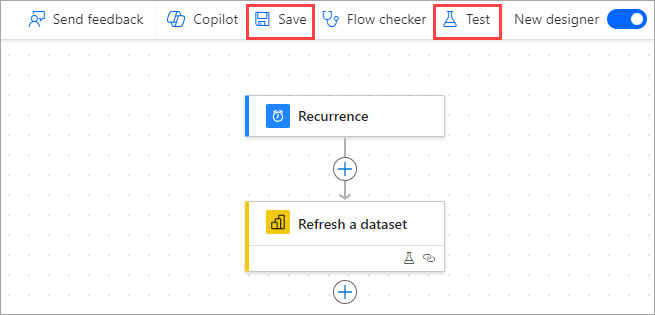
- On the designer page, click Recurrence. In the advanced detail pane, enter the schedule details, such as the hour, minute, and timezone.

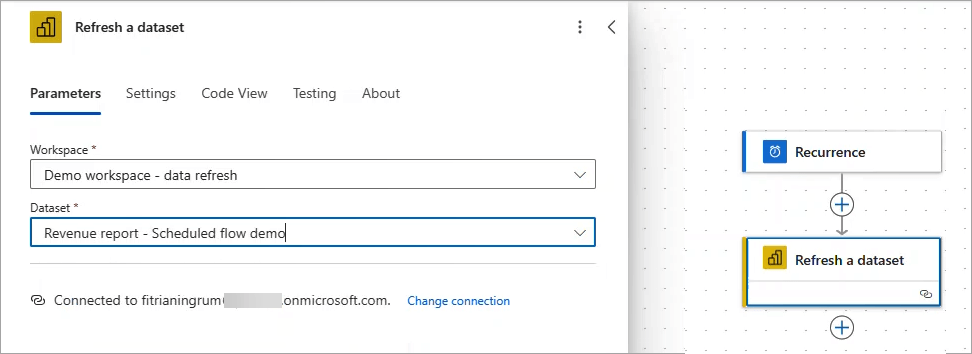
- Add a new Refresh a dataset action after the Recurrence and specify the workspace and the dataset to refresh.

- Save your workflow. You can also click the Test button to run it.

Refresh reports using instant flows & Power Automate for Power BI visuals
Let’s say you want to add a refresh button to your published reports to allow users to refresh them manually by clicking the button.
To do that, follow the steps below:
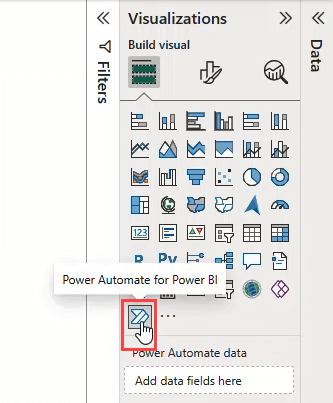
- Open the report in Power BI Service (or Desktop).
- Click the Power Automate for Power BI visual icon from the Visualizations pane to add it to the report.

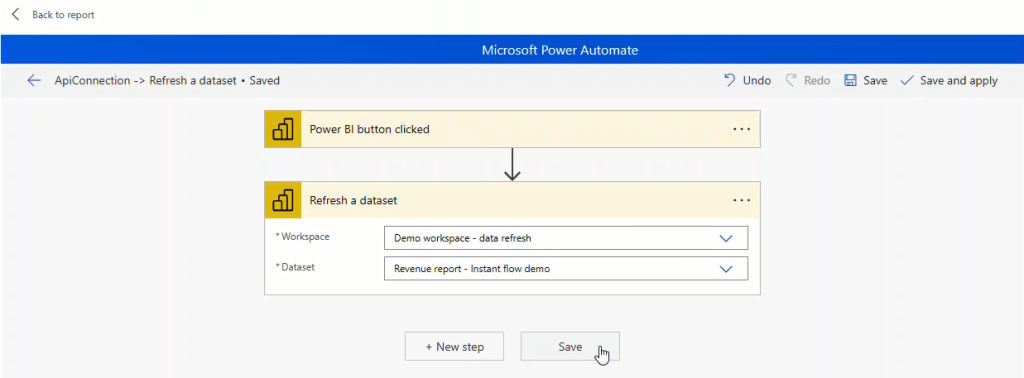
- Go to More options (…) of the visual and select Edit.


- Click New and select Instant cloud flow.


- Click the New step button to choose a new operation. Then, select Refresh a dataset among Power BI actions.


- Set the workspace and dataset to refresh. Then, click Save.

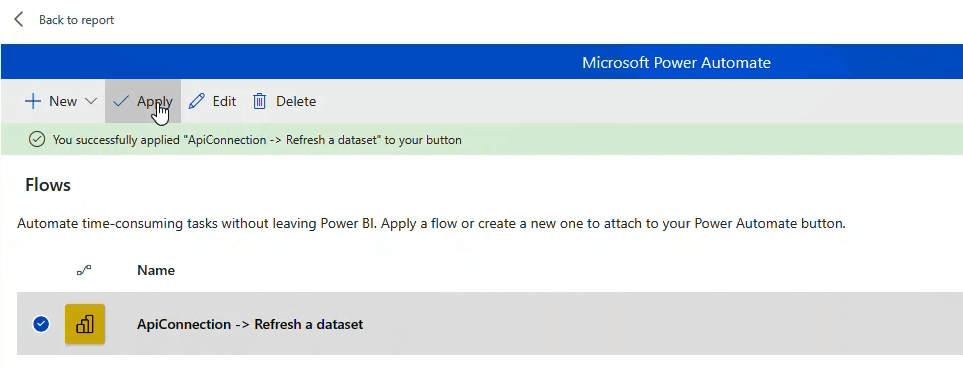
- Back to the flow list. Then, select and apply the newly created flow to the refresh button.

- If you want, customize the button text and fill the color using the Format visual options in the Visualization pane.

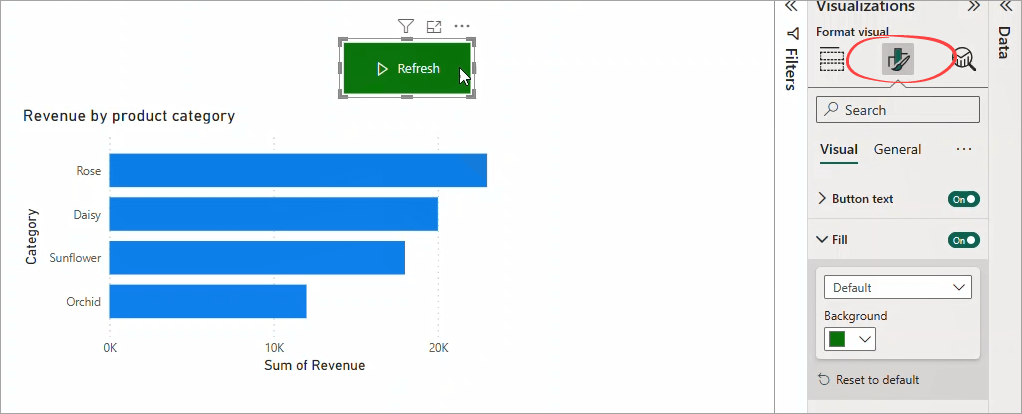
- Done—Save your report (or republish it if you’re editing in Power BI Desktop).
How to use Power BI API to refresh Power BI reports automatically
In this section, we’ll show you how to use Power BI APIs to refresh your report’s dataset and set up an automatic refresh schedule.
We have a comprehensive guide on Power BI REST API. It includes how to register an app in Azure AD and use a service principal for authentication, which can be really helpful for getting started. The article also covers practical examples and FAQs.
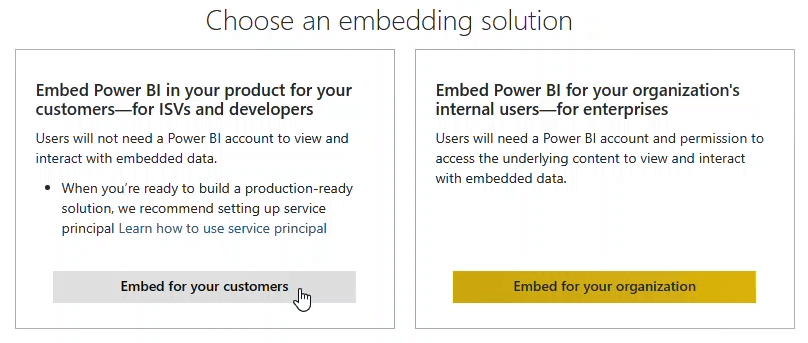
You can also use the Power BI embedded analytics setup tool for an easier registration process. To do that, follow the steps below (Pro license is required):
- Go to https://app.powerbi.com/embedsetup.
- Choose Embed for your customers.

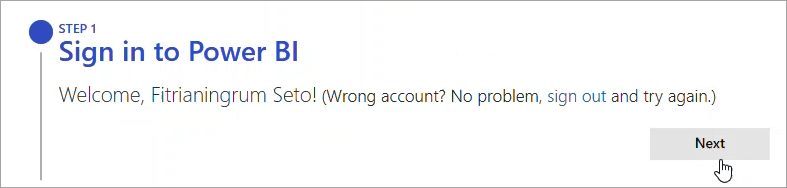
- Sign in to your Power BI service account and click Next.

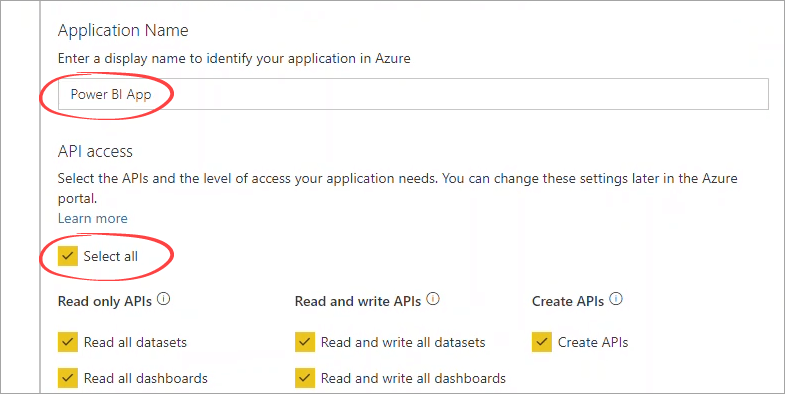
- Register your application by providing an Application Name. Then, tick the Select all option to allow all API access. You can change these settings later in the Azure portal.

- Click the Register button. You’ll have an Application ID on the right.
- You can skip steps 3 and 4 (Create a workspace and Import content) as they are not mandatory.
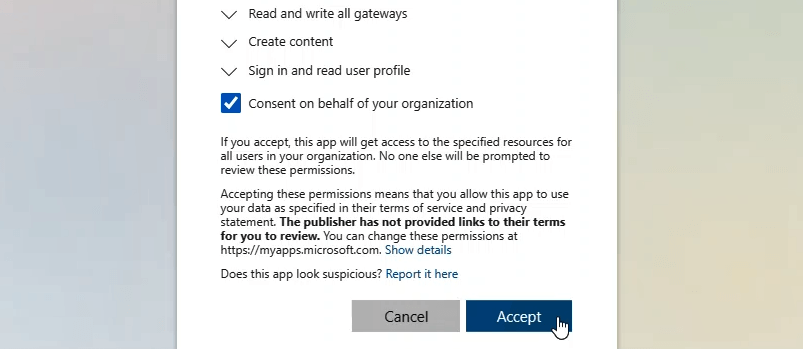
- Grant permissions for your app to access the APIs.

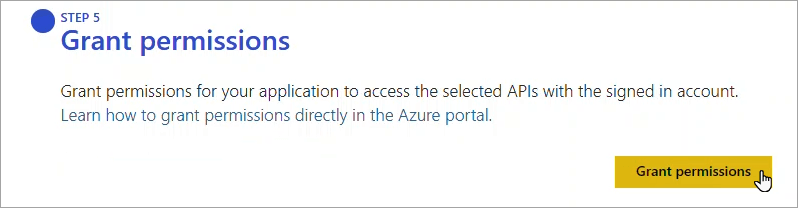
- In the popup that appears, select Consent on behalf of your organization and click Accept.

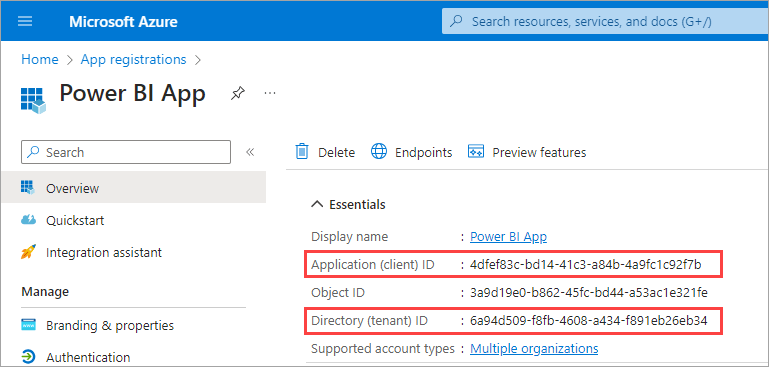
- Now, open the Azure portal and find the App registrations. Your app should be listed there. Click on it to see the details about your app, such as the Application ID and Tenant ID.

An example app using Python
To demonstrate how to access the API programmatically, we’ll use Python scripts to refresh a report in a specific dataset.
Create a new Python file, refresh_report.py, and save it to your computer. Then, copy and paste the following lines—we’ll explain the scripts later.
import requests
import msal
import json
# Change to use your credentials
username = ''
password = ''
# Change to your app id and tenant id
app_id = '4dfef83c-bd14-41c3-a84b-4a9fc1c92f7b'
tenant_id = '6a94d509-f8fb-4608-a434-f891eb26eb34'
# Change to your workspace id and dataset id
group_id = 'bbbfabb2-07ce-4fba-9a29-e14374c6b012'
dataset_id = 'caa69085-e8f5-4b06-9286-a7ed6eef47ca'
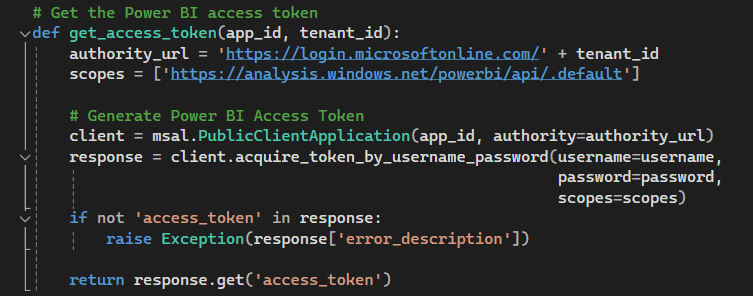
# Get the Power BI access token
def get_access_token(app_id, tenant_id):
authority_url = 'https://login.microsoftonline.com/' + tenant_id
scopes = ['https://analysis.windows.net/powerbi/api/.default']
# Generate Power BI Access Token
client = msal.PublicClientApplication(app_id, authority=authority_url)
response = client.acquire_token_by_username_password(username=username,
password=password,
scopes=scopes)
if not 'access_token' in response:
raise Exception(response['error_description'])
return response.get('access_token')
# Set an automatic refresh schedule
def schedule_refresh(access_token):
url = f'https://api.powerbi.com/v1.0/myorg/groups/{group_id}/datasets/{dataset_id}/refreshSchedule'
headers = { 'Authorization': f'Bearer {access_token}', 'Content-type': 'application/json' }
body = {
"value": {
"enabled": True,
"days": ["Monday","Tuesday"],
"times": ["09:00","10:00"],
"localTimeZoneId": "UTC"
}
}
response = requests.patch(url, headers=headers, data=json.dumps(body))
if response.status_code == 200:
print('Refresh schedule updated.')
else:
print(response.reason)
print(response.json())
# Main
if __name__ == '__main__':
token = get_access_token(app_id, tenant_id)
schedule_refresh(token)
Ensure you have all the dependencies installed:
- request for making http requests.
- msal for authentication.
- json for serialization.
You also need to provide your own username, password, app_id, tenant_id, group_id (workspace id) and dataset_id.
Now, let’s break down the Python code into two main steps: generating an access token and using the Power BI API to set an automatic refresh schedule:
Step 1: Generate access token
Take a look at the get_access_token method that returns the access token:

Code explanation:
- First, a PublicClientApplication object is created using your app_id and authority_url. This URL is constructed using Microsoft’s login URL and your tenant_id.
- It then acquires an access token by calling the acquire_token_by_username_password using username, password, and scopes as parameters. The scopes define the permissions you’re requesting, in this case, access to Power BI API.
- If the response doesn’t include an access token, the code will raise an exception with the error description.
- Finally, it returns the access token from the response.
Step 2: Use API to refresh reports automatically on a schedule
To automate reports in Power BI by setting up the refresh schedule for a specified dataset in the specific workspace, take a look at the following schedule_refresh method:

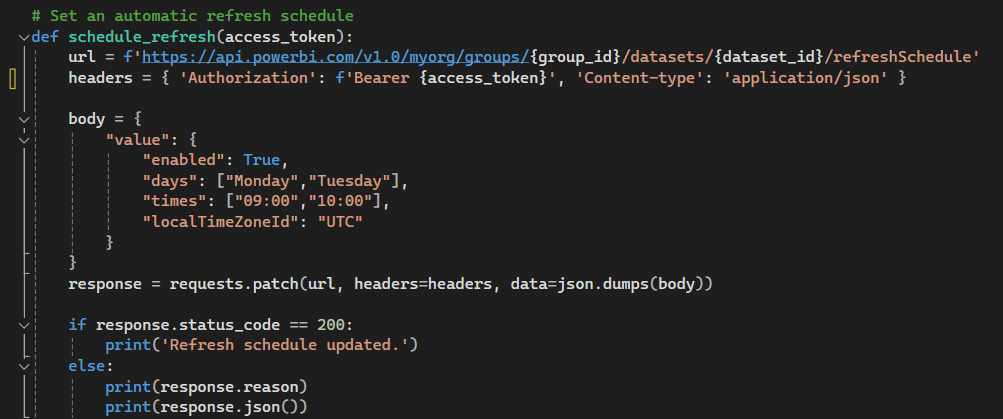
Code explanation:
- You will need to access the refreshSchedule endpoint URL using your group_id and dataset_id.
- The Authorization header includes the Bearer token, and the content type is specified as JSON.
- The body of the request includes the settings to enable the refresh schedule. For example, here we specify the days (e.g., Monday, Tuesday), times (e.g., 09:00, 10:00), and the timezone.
- A PATCH request with the defined headers and body is then sent to the URL. If the response status is 200 (OK), it will show the “Refresh schedule updated.” message.
Main execution
In the __main__ block, get_access_token is called to get the access token, which is then passed as the parameter for the schedule_refresh method:


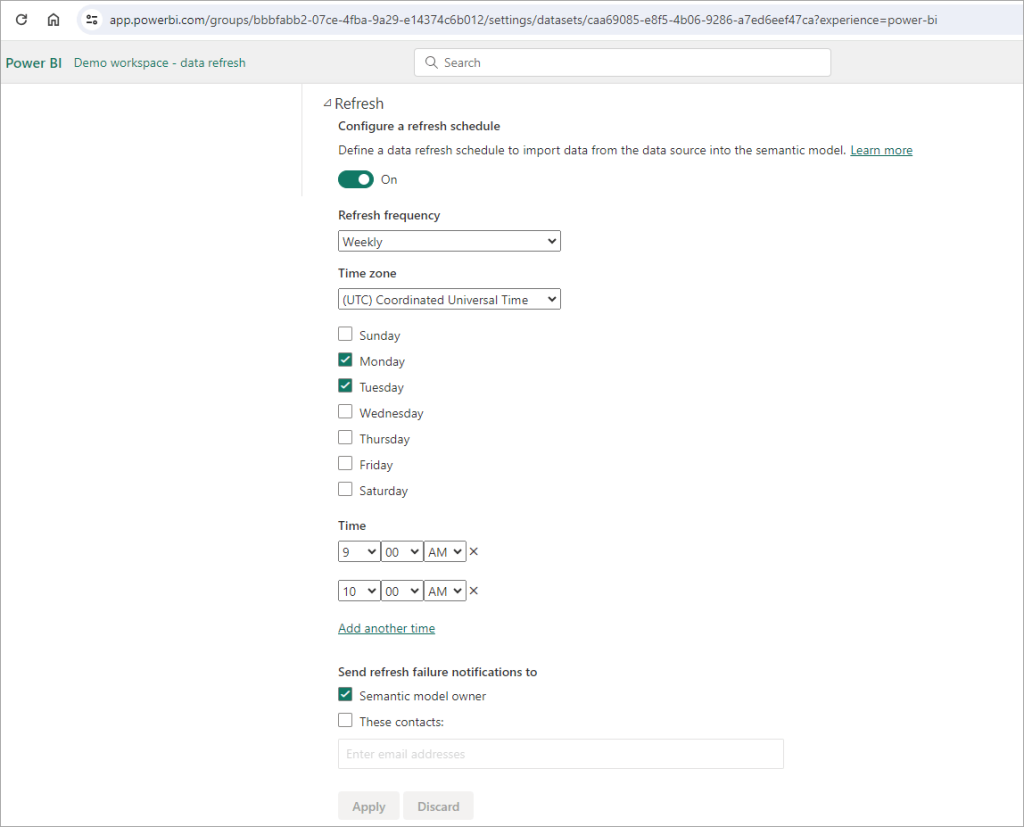
After successfully running, check your report’s semantic model setting. The refresh schedule should be updated:

The best way to automate Power BI reports
Identifying the optimal solution for automating Power BI reports hinges on several factors, including your data source types and specific business requirements. Here’s a brief guide:
- Coupler.io shines with its ease of use and broad compatibility with various cloud data sources, making it ideal for businesses seeking a straightforward setup.
- Power BI Gateway is best suited for scenarios involving on-premises data sources needing secure and reliable connectivity.
- Power Automate offers unparalleled flexibility for creating complex, event-driven automation workflows.
- Power BI API caters to those requiring custom automation solutions with precise control over data refresh schedules.
Coupler.io is a standout option if you’re looking for ease of use and versatility. It offers a user-friendly interface that allows you to schedule automatic refreshes without needing deep technical knowledge. Plus, you can take advantage of these dashboard templates for Power BI to jumpstart your reporting.
So, if you’re tired of manual data updates, then try out Coupler.io. See how simple automating your Power BI reports can be and say goodbye to tedious tasks and hello to stress-free data management!
Connect your cloud apps to Power BI with Coupler.io
Get started for free