You’re probably thinking that it’ll be time-consuming to export Xero data manually. That’s right, mainly if you deal with frequent reporting on vast volumes of data. So, you’d better automate data exports and schedule them at preferred intervals.
Let’s explore some ways you can do this, one of which doesn’t even require any coding!
Methods to export Xero data
First, we invite you to look at all the available methods to export data from Xero:
Automated data exports without coding
If you’d like to export Xero data automatically on the chosen schedule and lack coding skills, a third-party connector is what you need. Coupler.io – a reporting automation platform – enables you to load Xero data into 10+ apps. Destinations include business intelligence (BI) tools, spreadsheets, data warehouses, and more.
With Coupler.io, you can save time and ensure data accuracy by preventing human errors. On top of that, it’s possible to make your reports self-updating. All you need to do is set up the schedule according to your requirements. This way, you’ll have your data auto-refreshed to keep it in sync with the latest changes to the source. It may also serve as Xero backup, a feature not natively built into the application.
API integration
Another way to automate Xero data export is by using Xero API. It’s a flexible, customizable, and scalable method to load your data into the required destination.
API integration does provide the end benefits associated with the above methods. However, it’s only achievable with programming skills or access to development teams. So, this option is relevant to developers and those with technical expertise rather than a broad audience of users.
Another thing for you to know is the API rate limits imposed by Xero. You’re restricted to 5 calls in progress at any one time, 60 calls per minute, and 5,000 calls daily.
Manual data exports
The fundamental method to export data from Xero is manually downloading reports as .csv files. By doing so, you avoid using external tools and need no technical skills under your belt.
Still, you won’t consider it a viable choice if you have to export data in large amounts or on a frequent basis. In this case, it will take a lot of time and effort, as well as put data accuracy at risk.
Now, let’s move to the most versatile option – automated data exports with the help of Coupler.io.
How to set up an automated export of Xero data on a schedule?
Using Coupler.io, you only need to take three simple steps to automate and schedule Xero data export:
Step 1: Collect Xero data
Get started with the form below. Here, we’ve preselected Xero as the source. Your task is to choose the preferred destination from the dropdown list. For instance, you can connect Xero to Google Sheets. As soon as you do this, click Proceed.
In addition to raw data, you can also export specific Xero reports by selecting the source labeled Xero Reports instead of just Xero.
Now, sign up to Coupler.io for free. After that, authorize your Xero account and configure the source settings:
- Specify the Xero tenant from where you’d like to extract data.
- Pick the Data entity – the particular data type you will export. We’ve preselected Accounts, but you have 20+ other options.
- Choose the Report type, which can be Simple or Detailed. Let’s take Detailed, for example.
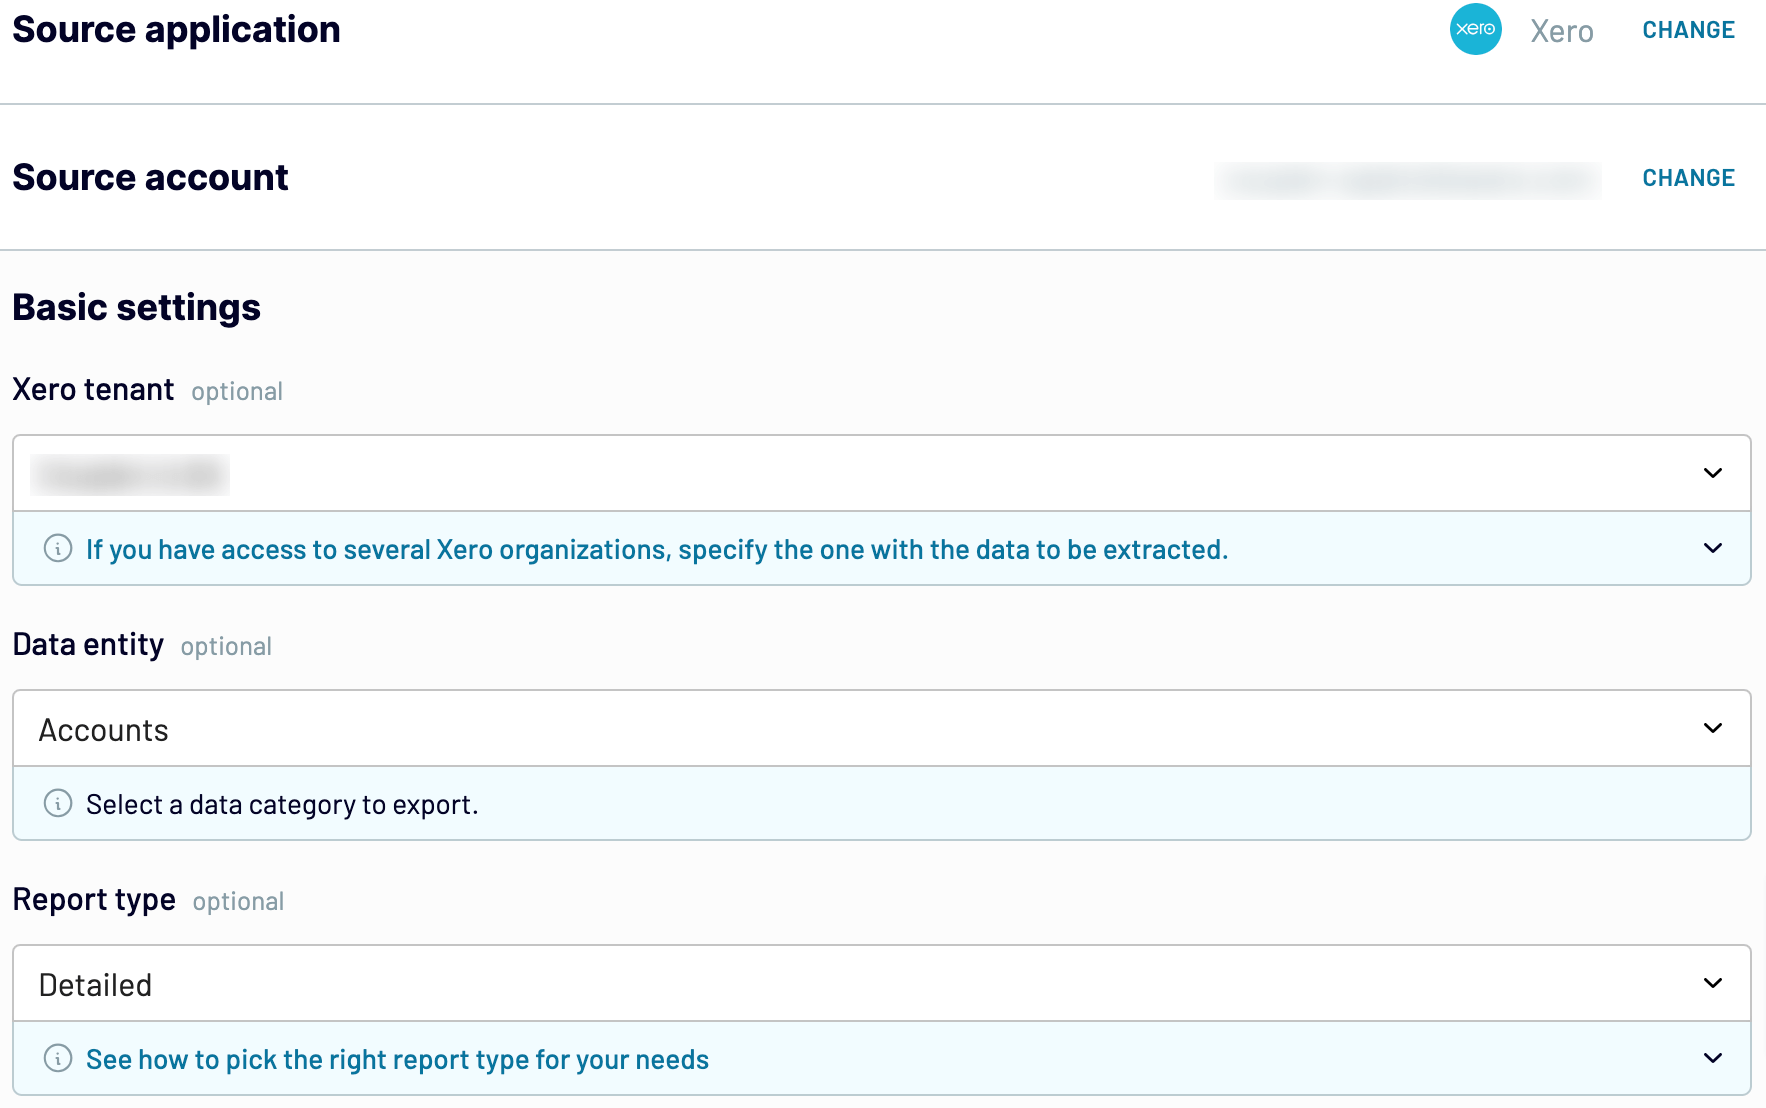
Click Finish and proceed. Then, press Transform data.
Step 2: Organize and transform data
In this step, preview your data and transform it if necessary. Here’s what you can do:
- Rename, rearrange, hide, or add columns.
- Apply various filters and sort your data.
- Create columns with custom formulas.
- Combine data from several accounts or apps.
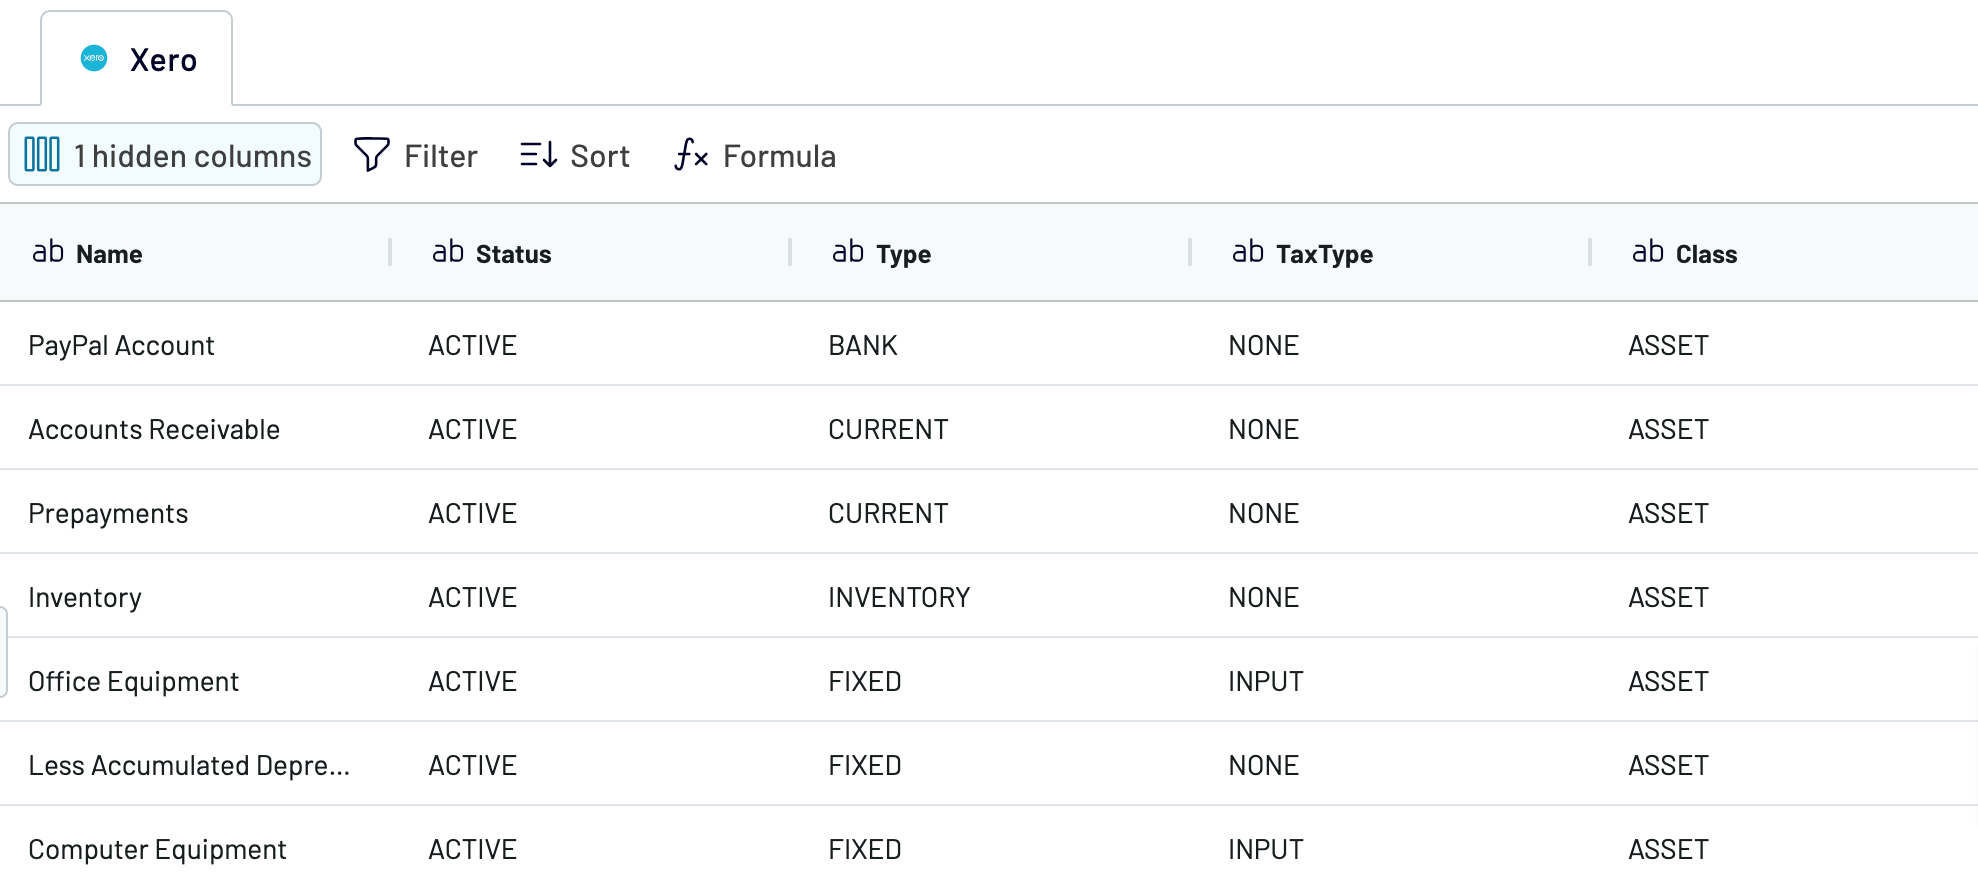
Once the data meets your needs, click Proceed and follow in-app instructions to connect to the destination. Then, click Setup a schedule to proceed next.
Step 3: Schedule your updates
Turn on Automatic data refresh. After that, specify the preferred interval, days of the week, hours, and time zone for auto-updates. By default, your report will get updated daily. So, if you need to have this done more frequently, choose from hourly to every 15 minutes, making it near real-time.

Finally, click Run importer to load your Xero data to the destination app.

Automate data export with Coupler.io
Get started for freeWhat data can be exported by Coupler.io from Xero?
Coupler.io supports the export of diverse Xero data entities. When configuring source settings, you get an extensive list from which to choose. To help you understand what data you can extract and which option to select, we’ve gone into detail about popular data categories.
| Data type | Description |
| Accounts | This data entity allows you to overview financial accounts within the system. It includes information such as account status, type, tax type, class, bank account number, bank account type, and related details. |
| Bank transactions | Here, you can learn about bank transaction status, type, currency, transaction ID, bank account ID, and contact details. It’s best for tracking and reconciling transactions conducted through bank accounts. |
| Contacts | Use this data category if you need the contact ID, status, name, address, phone number, default currency, bank account details, and more. It helps in communication with individuals or entities associated with transactions. |
| Credit notes | Available details on credit notes comprise IDs and numbers, currency rates, remaining credit, contact information, dates, and others. This data entity is useful in managing credit transactions, e.g., issuing, tracking, and reconciling credit notes. |
| Invoices | Explore billing and payment activities through details like payment count, ID, date, and amount, as well as the amount paid, due, and credited. You can leverage this information to improve your financial tracking and analysis. |
| Items | For informed decision-making regarding product offerings and pricing, look at this data category dedicated to inventory management and sales performance. It offers item IDs, purchase descriptions, unit prices, tax types, sales details, etc. |
| Payments | Delve into financial transactions by checking out payment IDs, dates, bank amounts, currency rates, payment types and statuses, account IDs, and others. It’s what you need to optimize reconciliation and cash flow management. |
| Purchase orders | If you seek to enhance procurement and inventory management processes, this data entity may be helpful. It contains purchase order IDs and numbers, dates, delivery addresses and instructions, currency details, and contacts. |
| Tax rates | To ensure compliance with tax obligations, review the information included in this data category. That’s where you can access tax types, report tax types, display tax rates, effective rates, and tax component details. |
| Users | Using this data entity, you can simplify user management within the system. It is achievable thanks to details like global user IDs, user IDs, email addresses, names, and other applicable information. |
What Xero reports can you export on schedule?
As mentioned before, you can also use Coupler.io to load Xero reports by specifying Xero Reports as the source. Here’s a ready-to-use form for you:
The further setup process is basically the same as described above for the Xero source. So now we can go over the reports available for export:
| Report type | Description |
| Aged payables by contact | Illustrates amounts owed to suppliers or for expense claims and highlights whether payments are overdue. |
| Aged receivables by contact | Outlines amounts owed by customers and indicates the duration of overdue payments. |
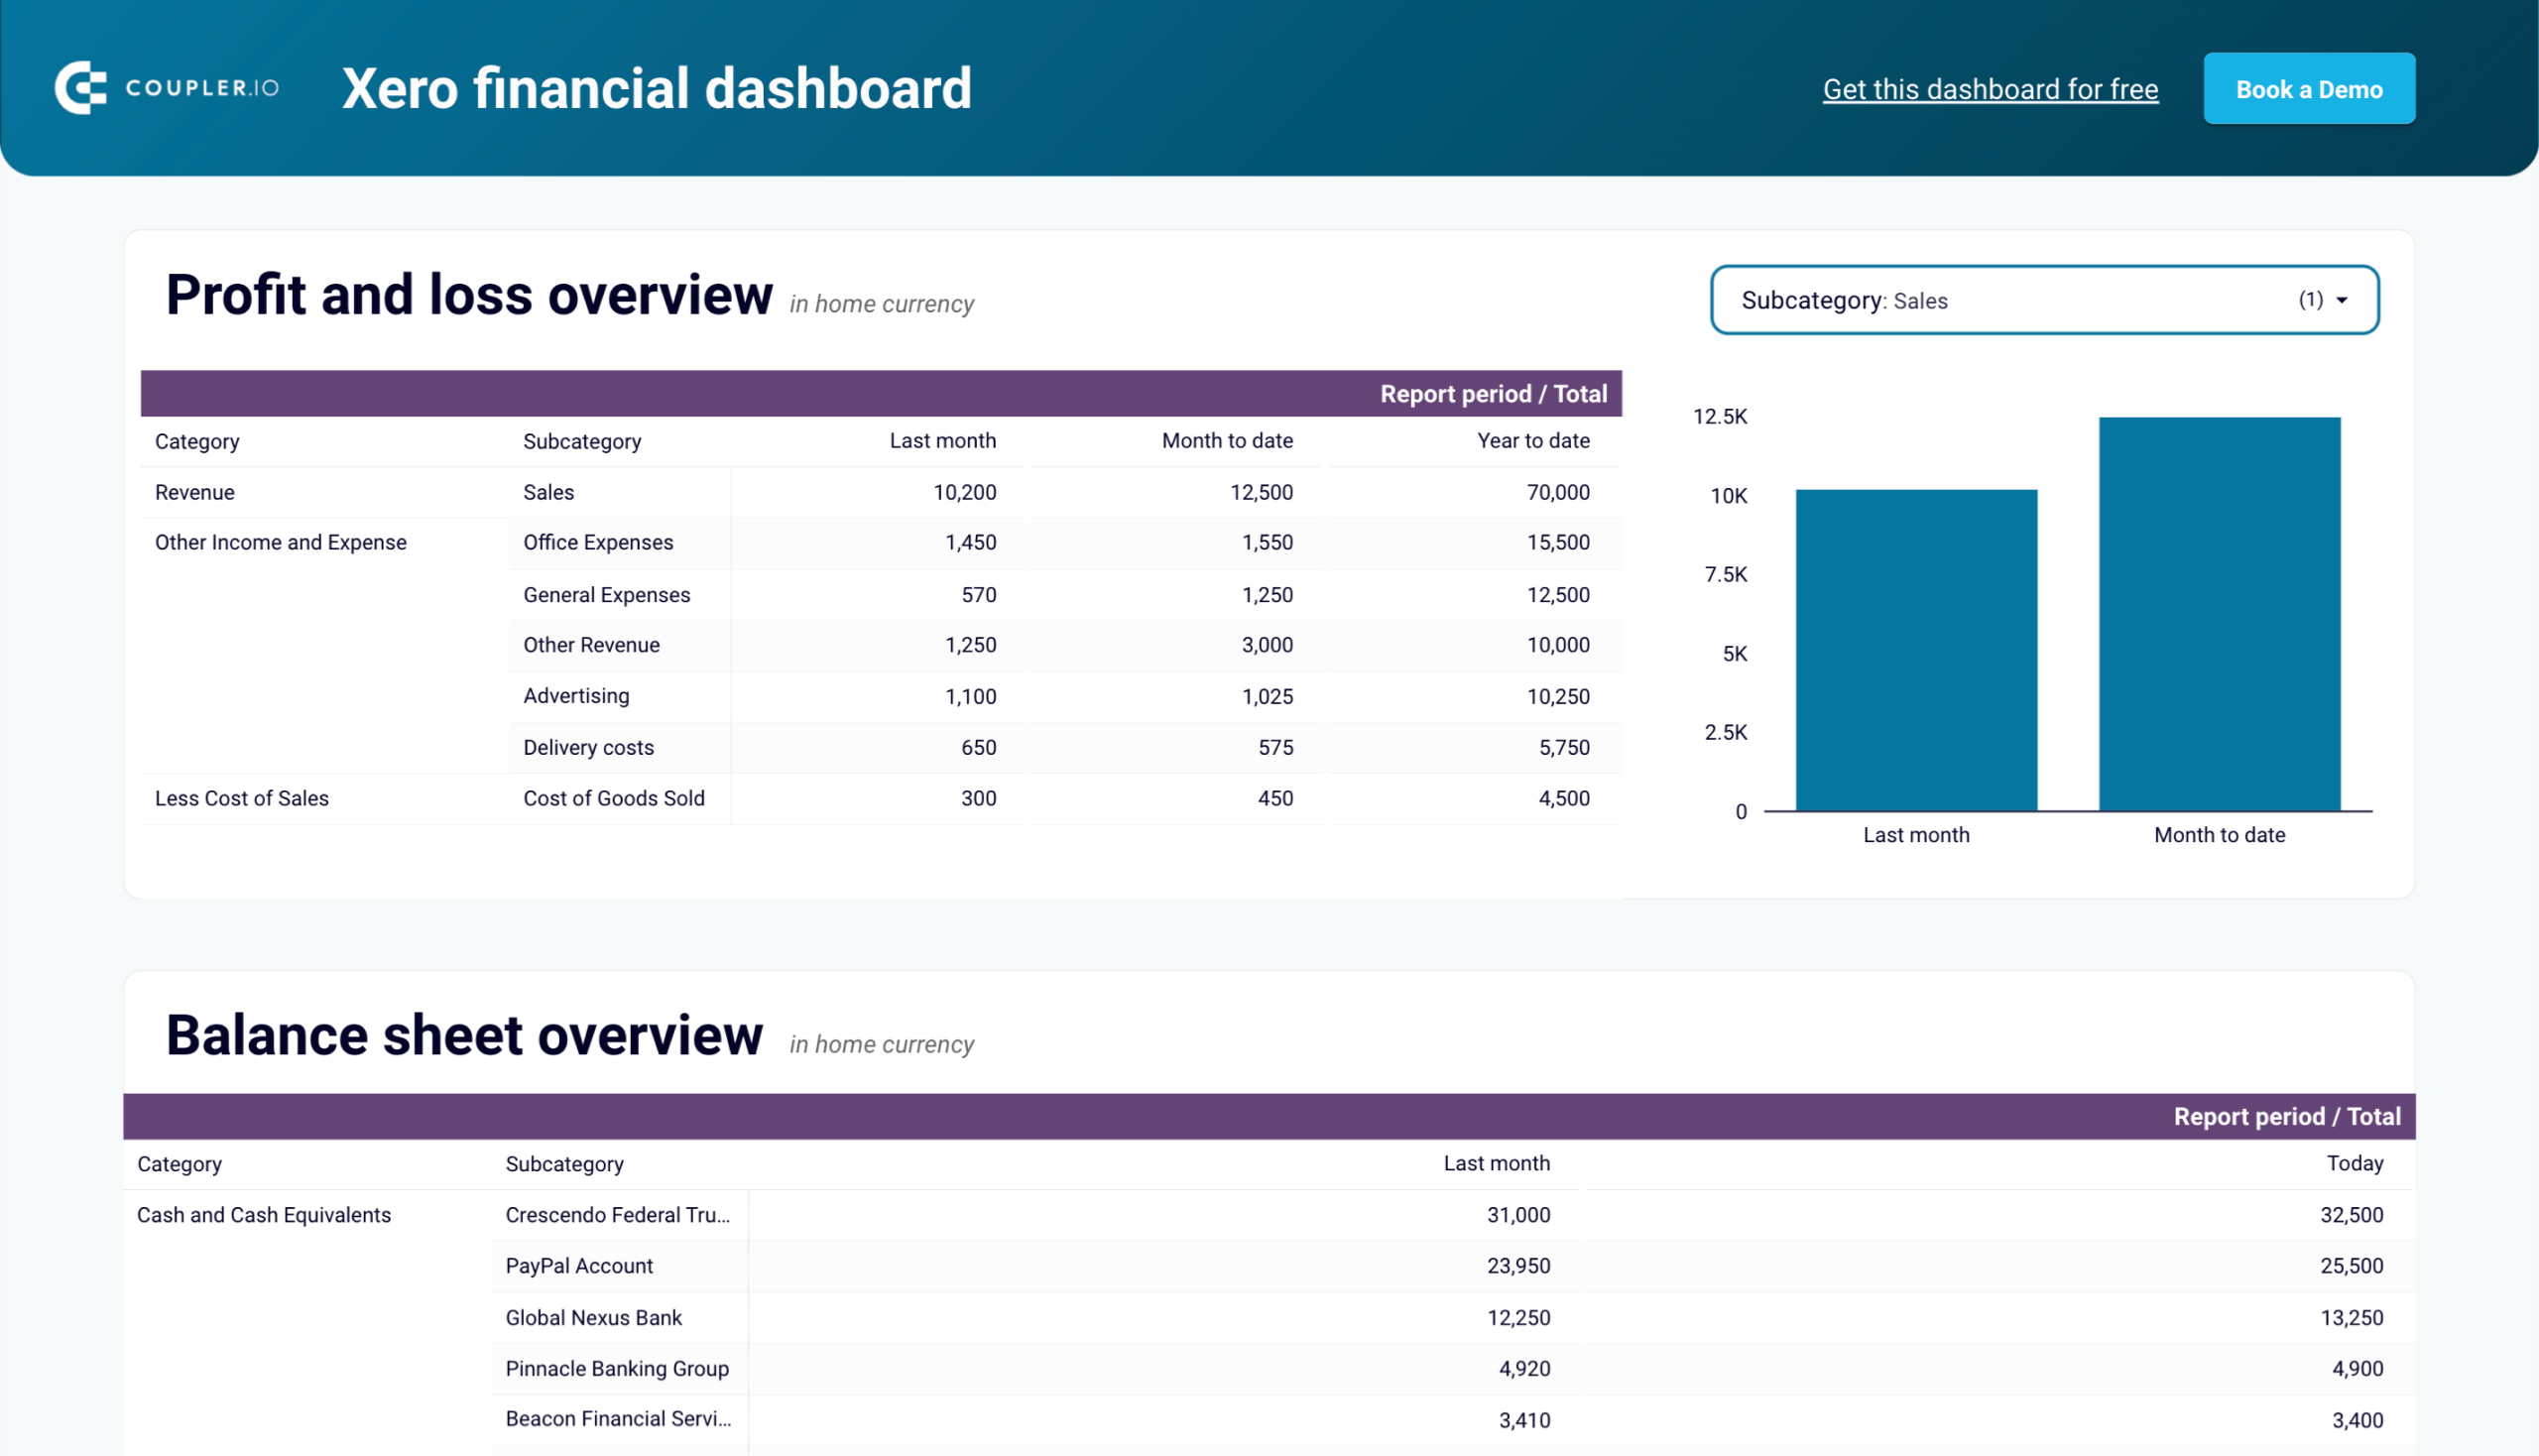
| Balance sheet | Provides a snapshot of the organization’s financial position, detailing what you own and owe at a specific moment. Check out a free balance sheet reporting dashboard by Coupler.io. |
| Bank statement | Presents individual transactions imported from the bank so you can see the big picture of your financial activity. |
| Bank summary | Summarizes the inflow and outflow of funds across bank accounts over a designated period. |
| Budgets summary | Offers an overview of budgets you’ve created in the Budget manager report within Xero. |
| Executive summary | Contains information on cash, profitability, balance sheet, income, performance, and position items. |
| Profit and loss | Displays income, expenses, and profit over a specified period, reflecting the organization’s financial performance. |
| Trial balance | Includes details regarding the balances of your general ledger accounts on a selected date. |
Now, it’s time to learn where to import Xero data for further analysis.
What are the supported destinations to import Xero data?
If you choose Coupler.io to export your Xero data, you can load it into multiple applications. To make this happen, you have to set up different importers, each dedicated to a specific destination, including:
- Spreadsheets. Import data to Google Sheets or Microsoft Excel spreadsheet software to create formulas for analytics or visualize data by building charts.
- Data warehouses. You can store, query, and analyze exported data from Xero to BigQuery, PostgreSQL, and Redshift data warehousing software.
- BI tools. For visual analytics purposes, you have various destination apps supported by Coupler.io: Looker Studio, Power BI, Tableau, and Qlik Sense.
- JSON. As an option, you can export your Xero data as a .json file to use in applications that support this format.
- Project management. Load your data into monday.com for reporting in the context of workflow optimization.
Let’s now discuss one of the mentioned processes you can perform based on imported data – visualization.
How to visualize data from Xero with dashboard templates
Visualizing Xero data helps you identify trends and patterns in it, as well as simplifying your understanding of information and leading to meaningful conclusions. Here, Coupler.io comes as a handy addition on your way to data visualization. It allows you to import data from Xero to Looker Studio, connect Xero to PowerBI, Tableau, and Qlik.
You can easily load Xero data to the chosen app by taking the steps described earlier in the article. Once you’ve imported your data, you’ll be ready to build a dashboard from scratch. At the same time, Coupler.io provides a collection of dashboard templates in BI tools and spreadsheet apps.
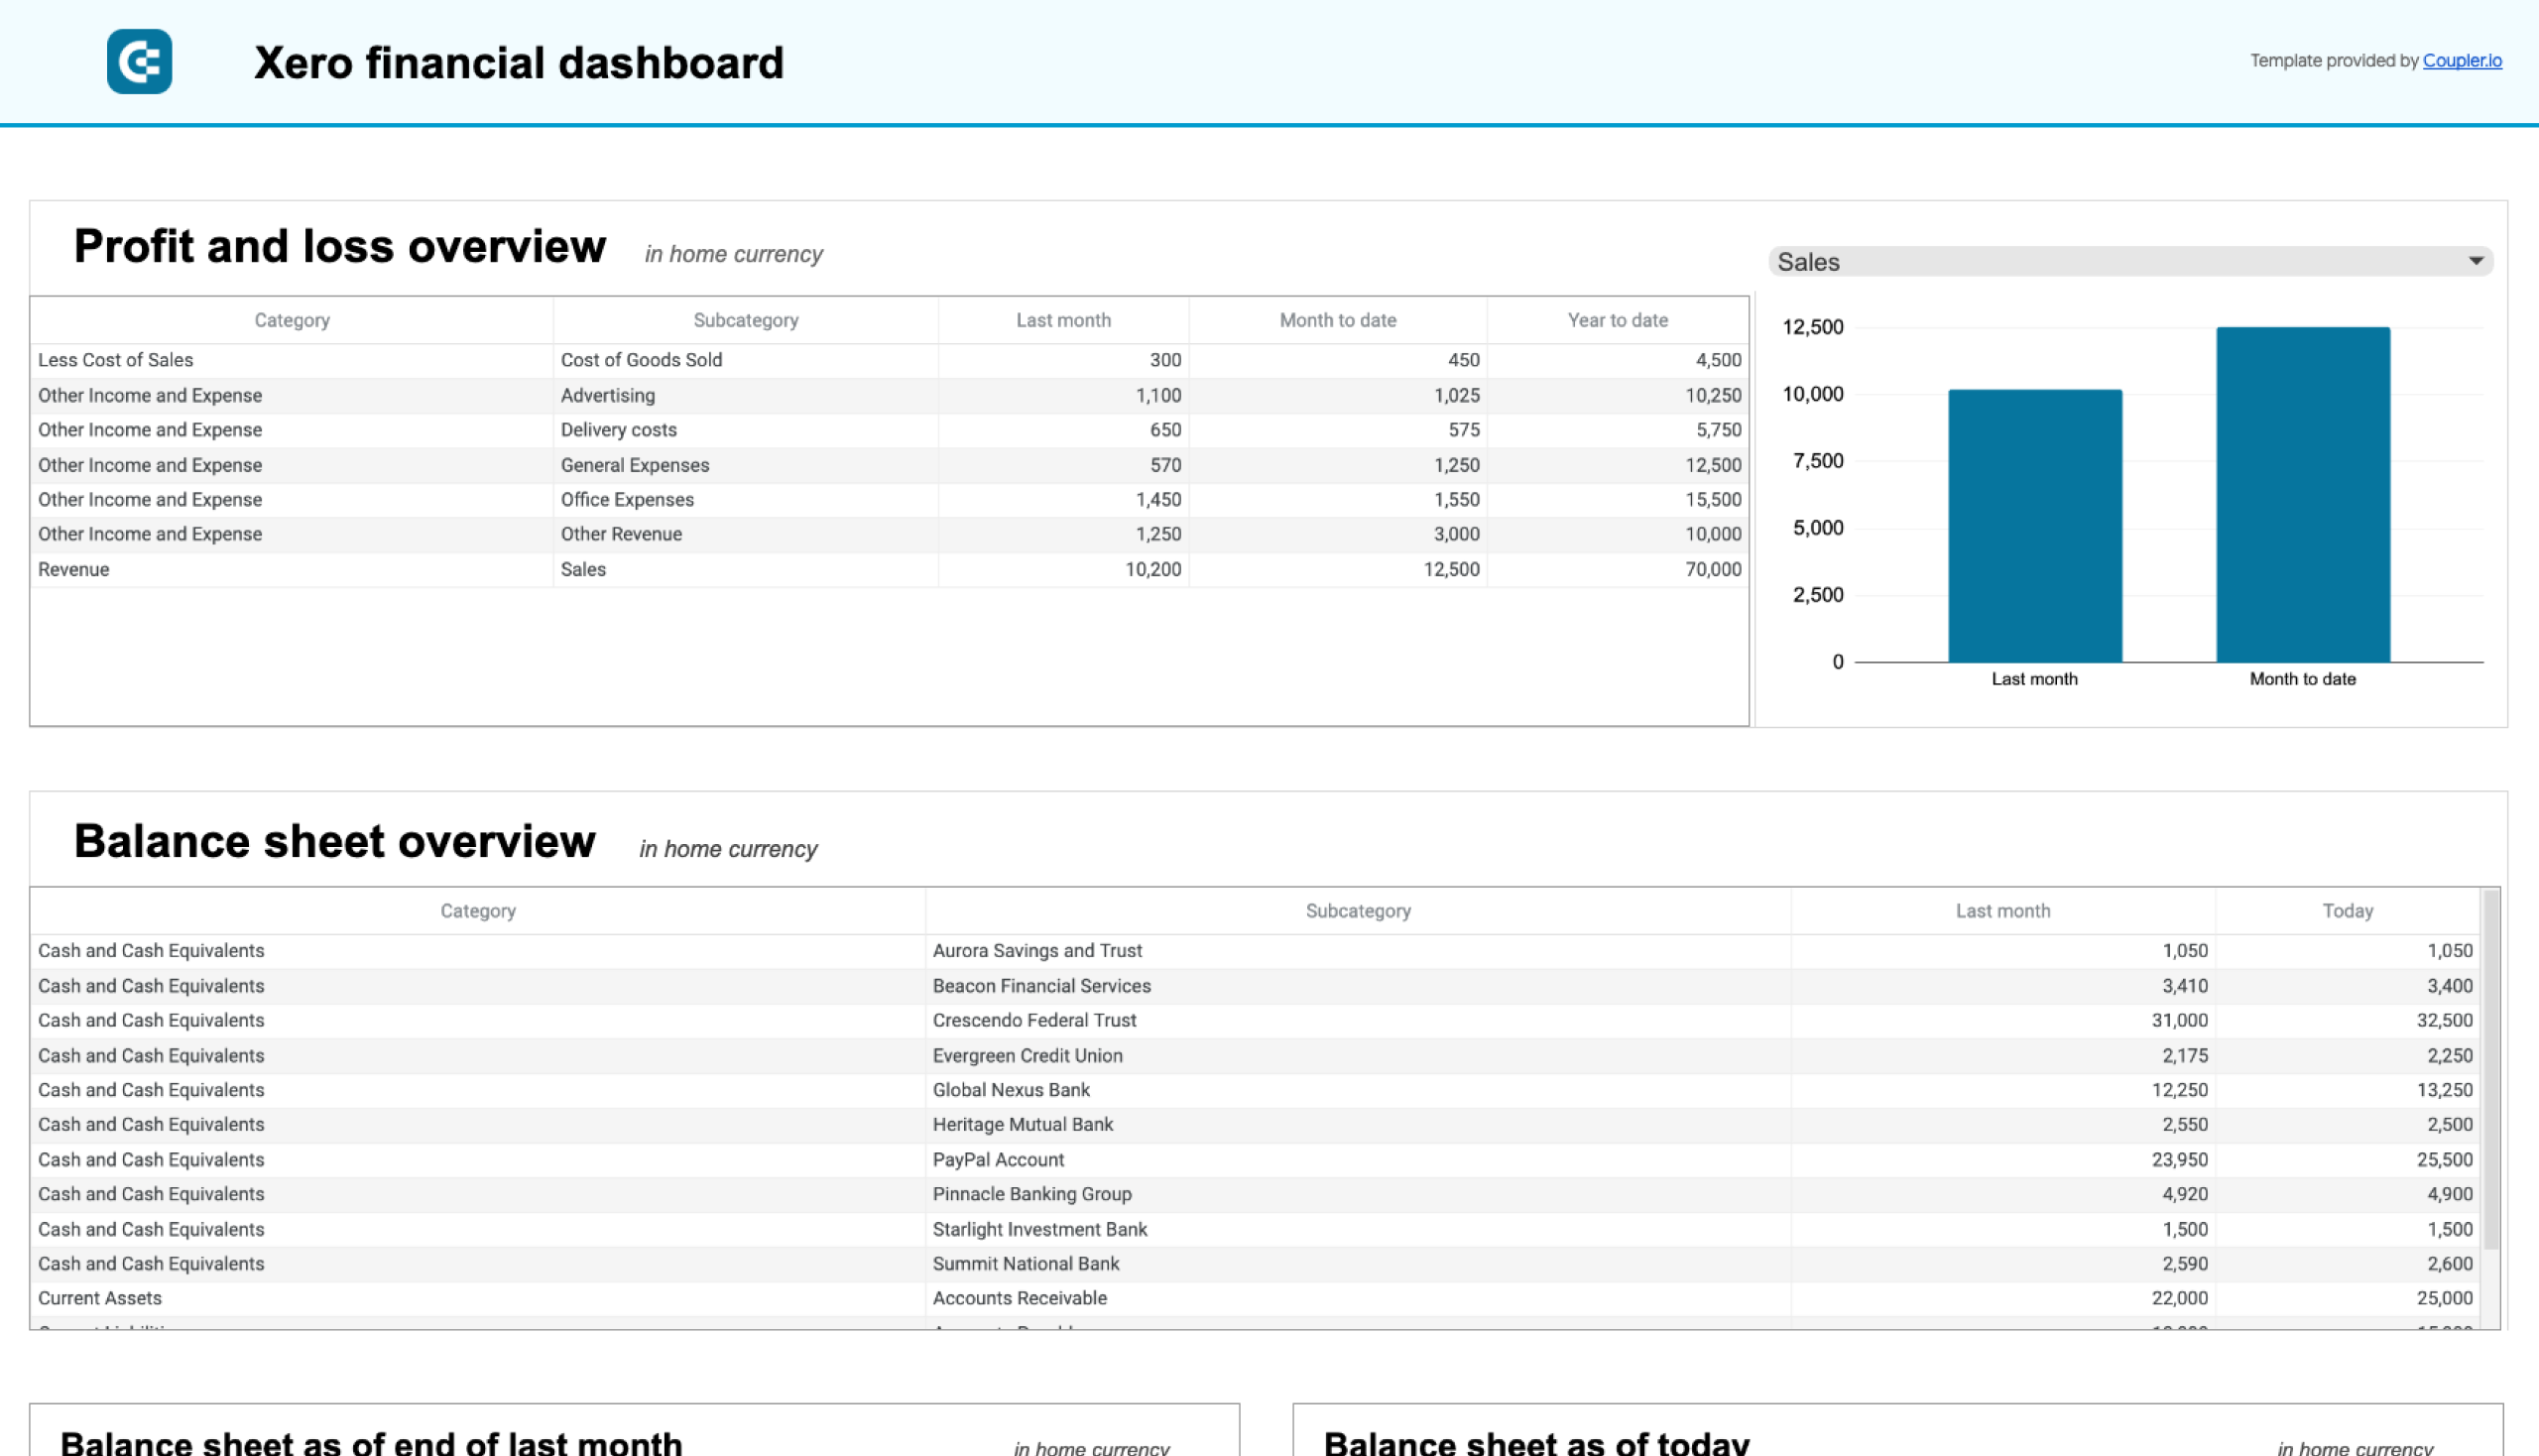
Financial dashboard for Xero
This Xero financial dashboard gives you a complete view of your company’s financial performance. It helps you track revenue, expenses, cash flow, and balance sheet changes easily. It also simplifies financial monitoring with visual insights, so you don’t have to dig through complex reports. With all key metrics in one place, you can use this dashboard to analyze profitability, manage cash flow, and assess financial stability.
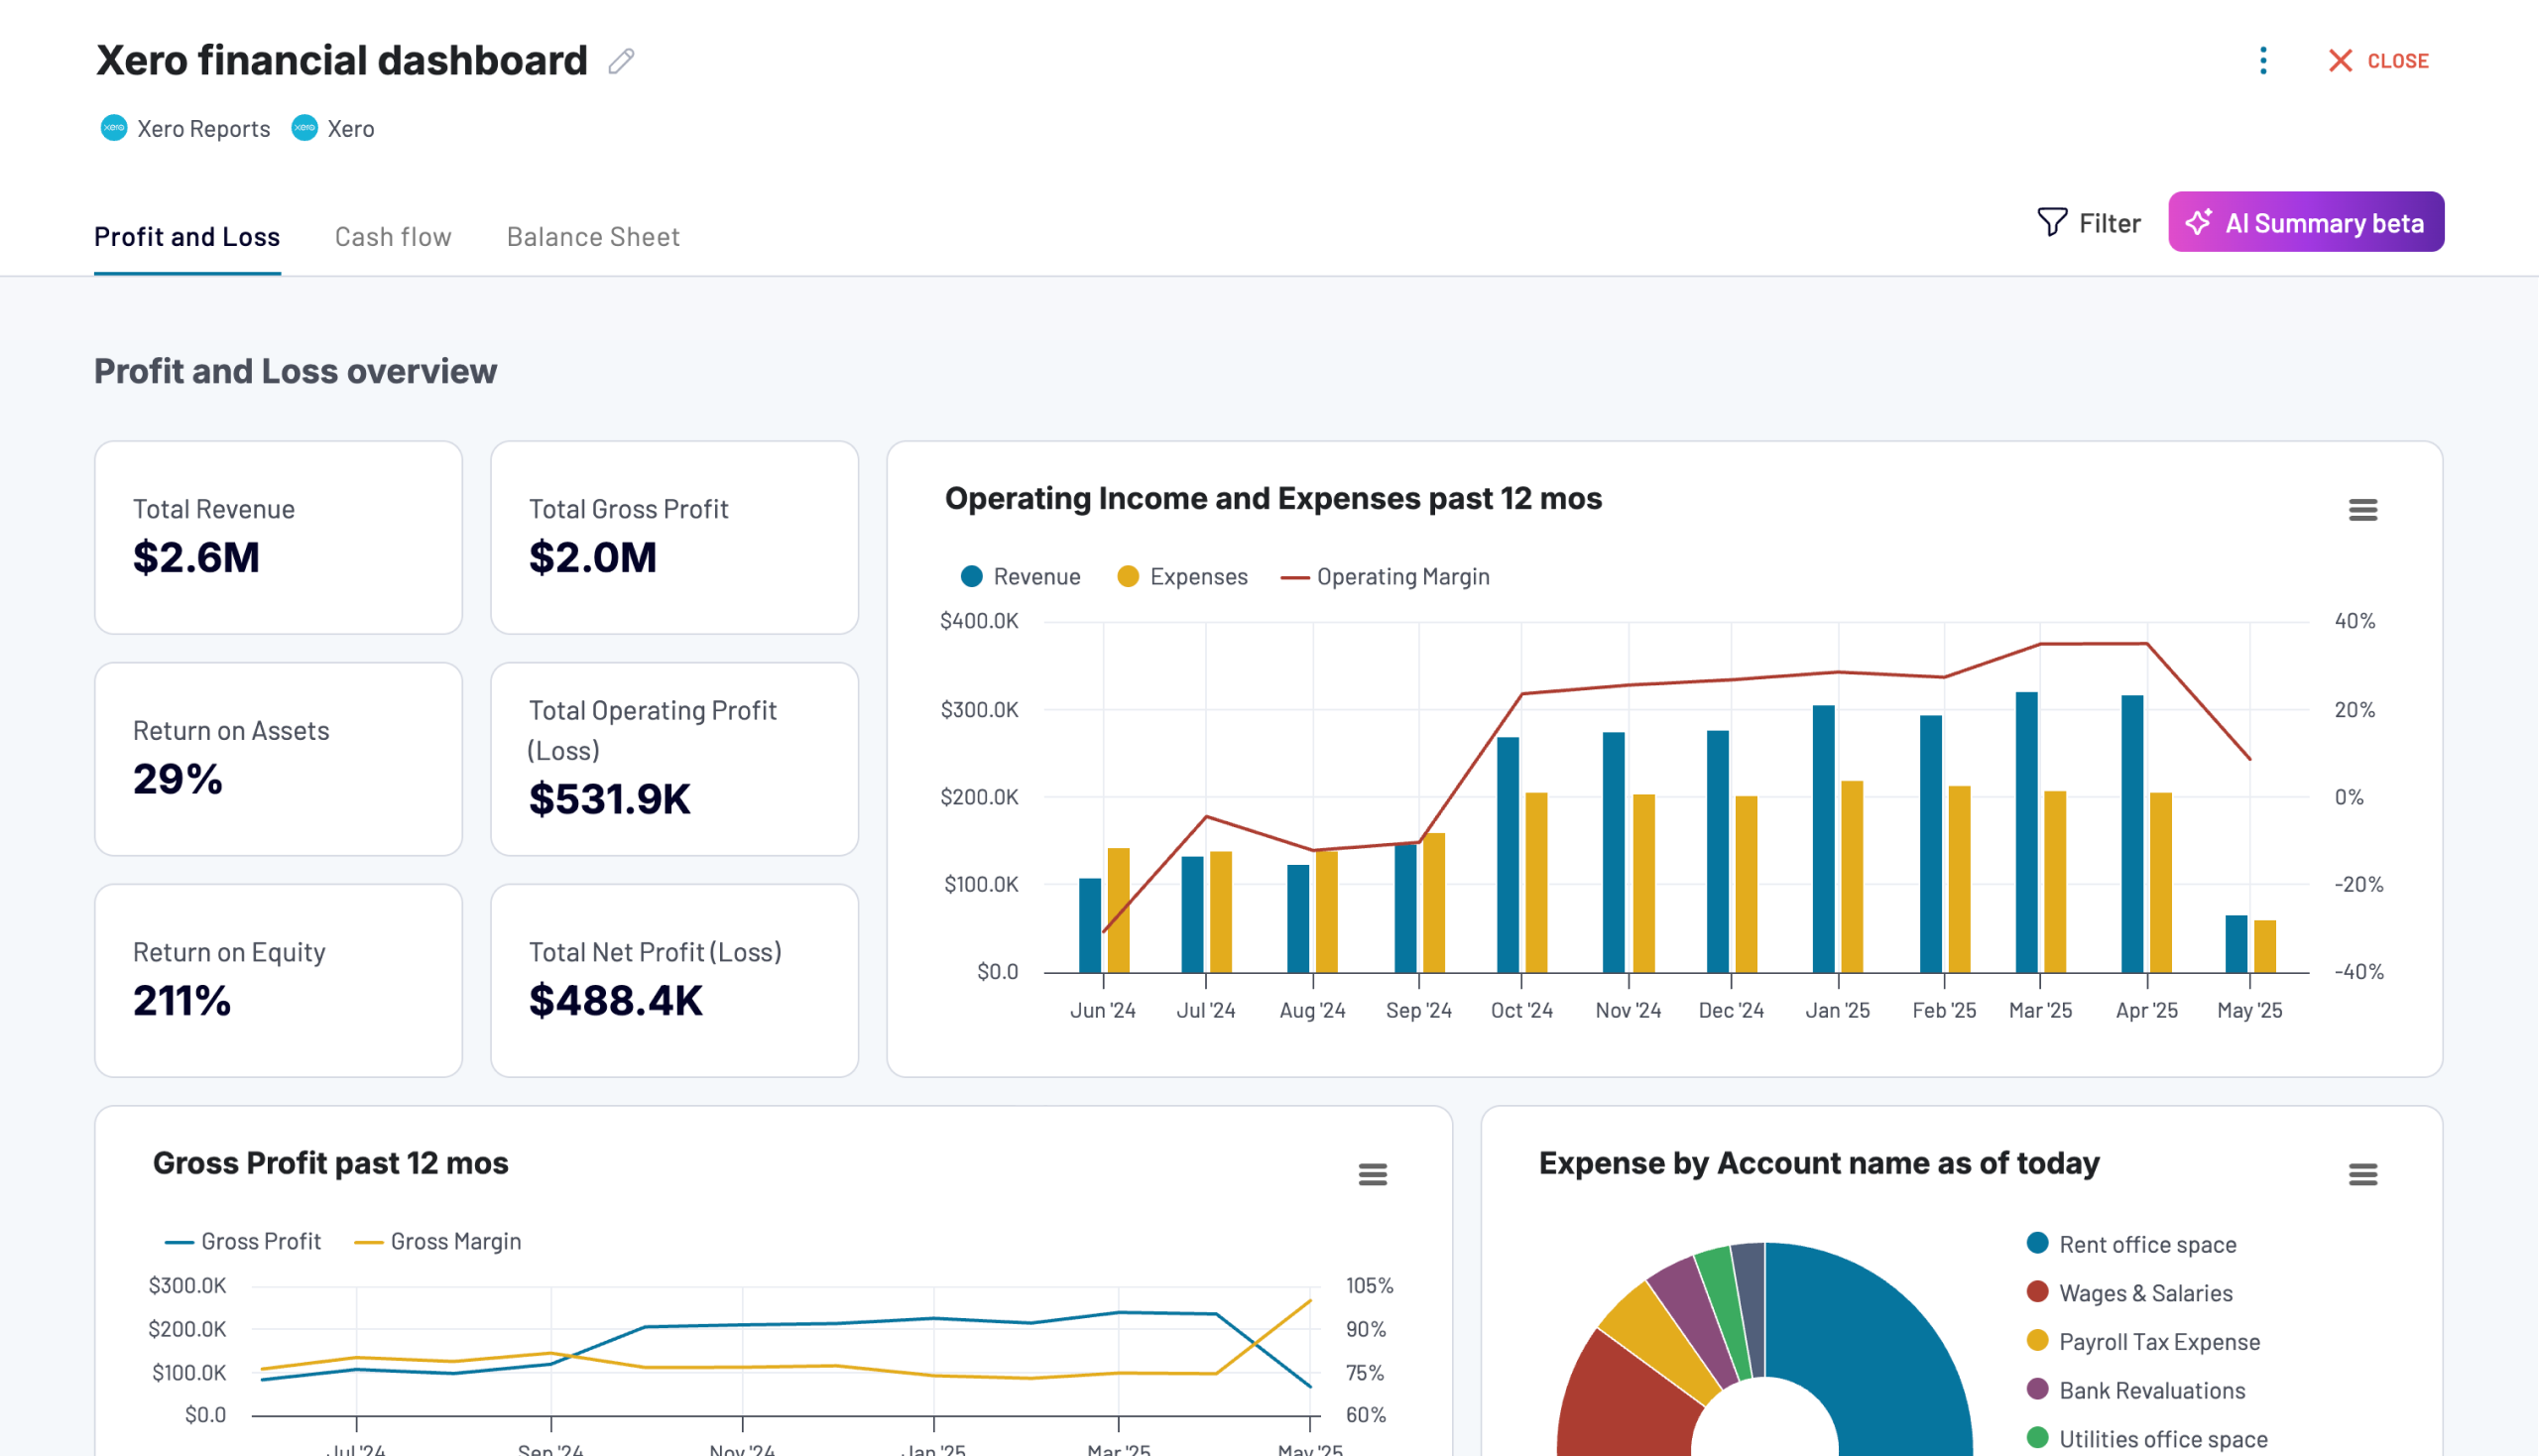
To use this dashboard with your data, connect your Xero account by following the instructions in Coupler.io. Just like the rest of the introduced Xero report templates, this one is available in Looker Studio and Google Sheets and equipped with the Coupler.io connector for automatic data refresh. If you use this version, check the Readme tab for instructions.


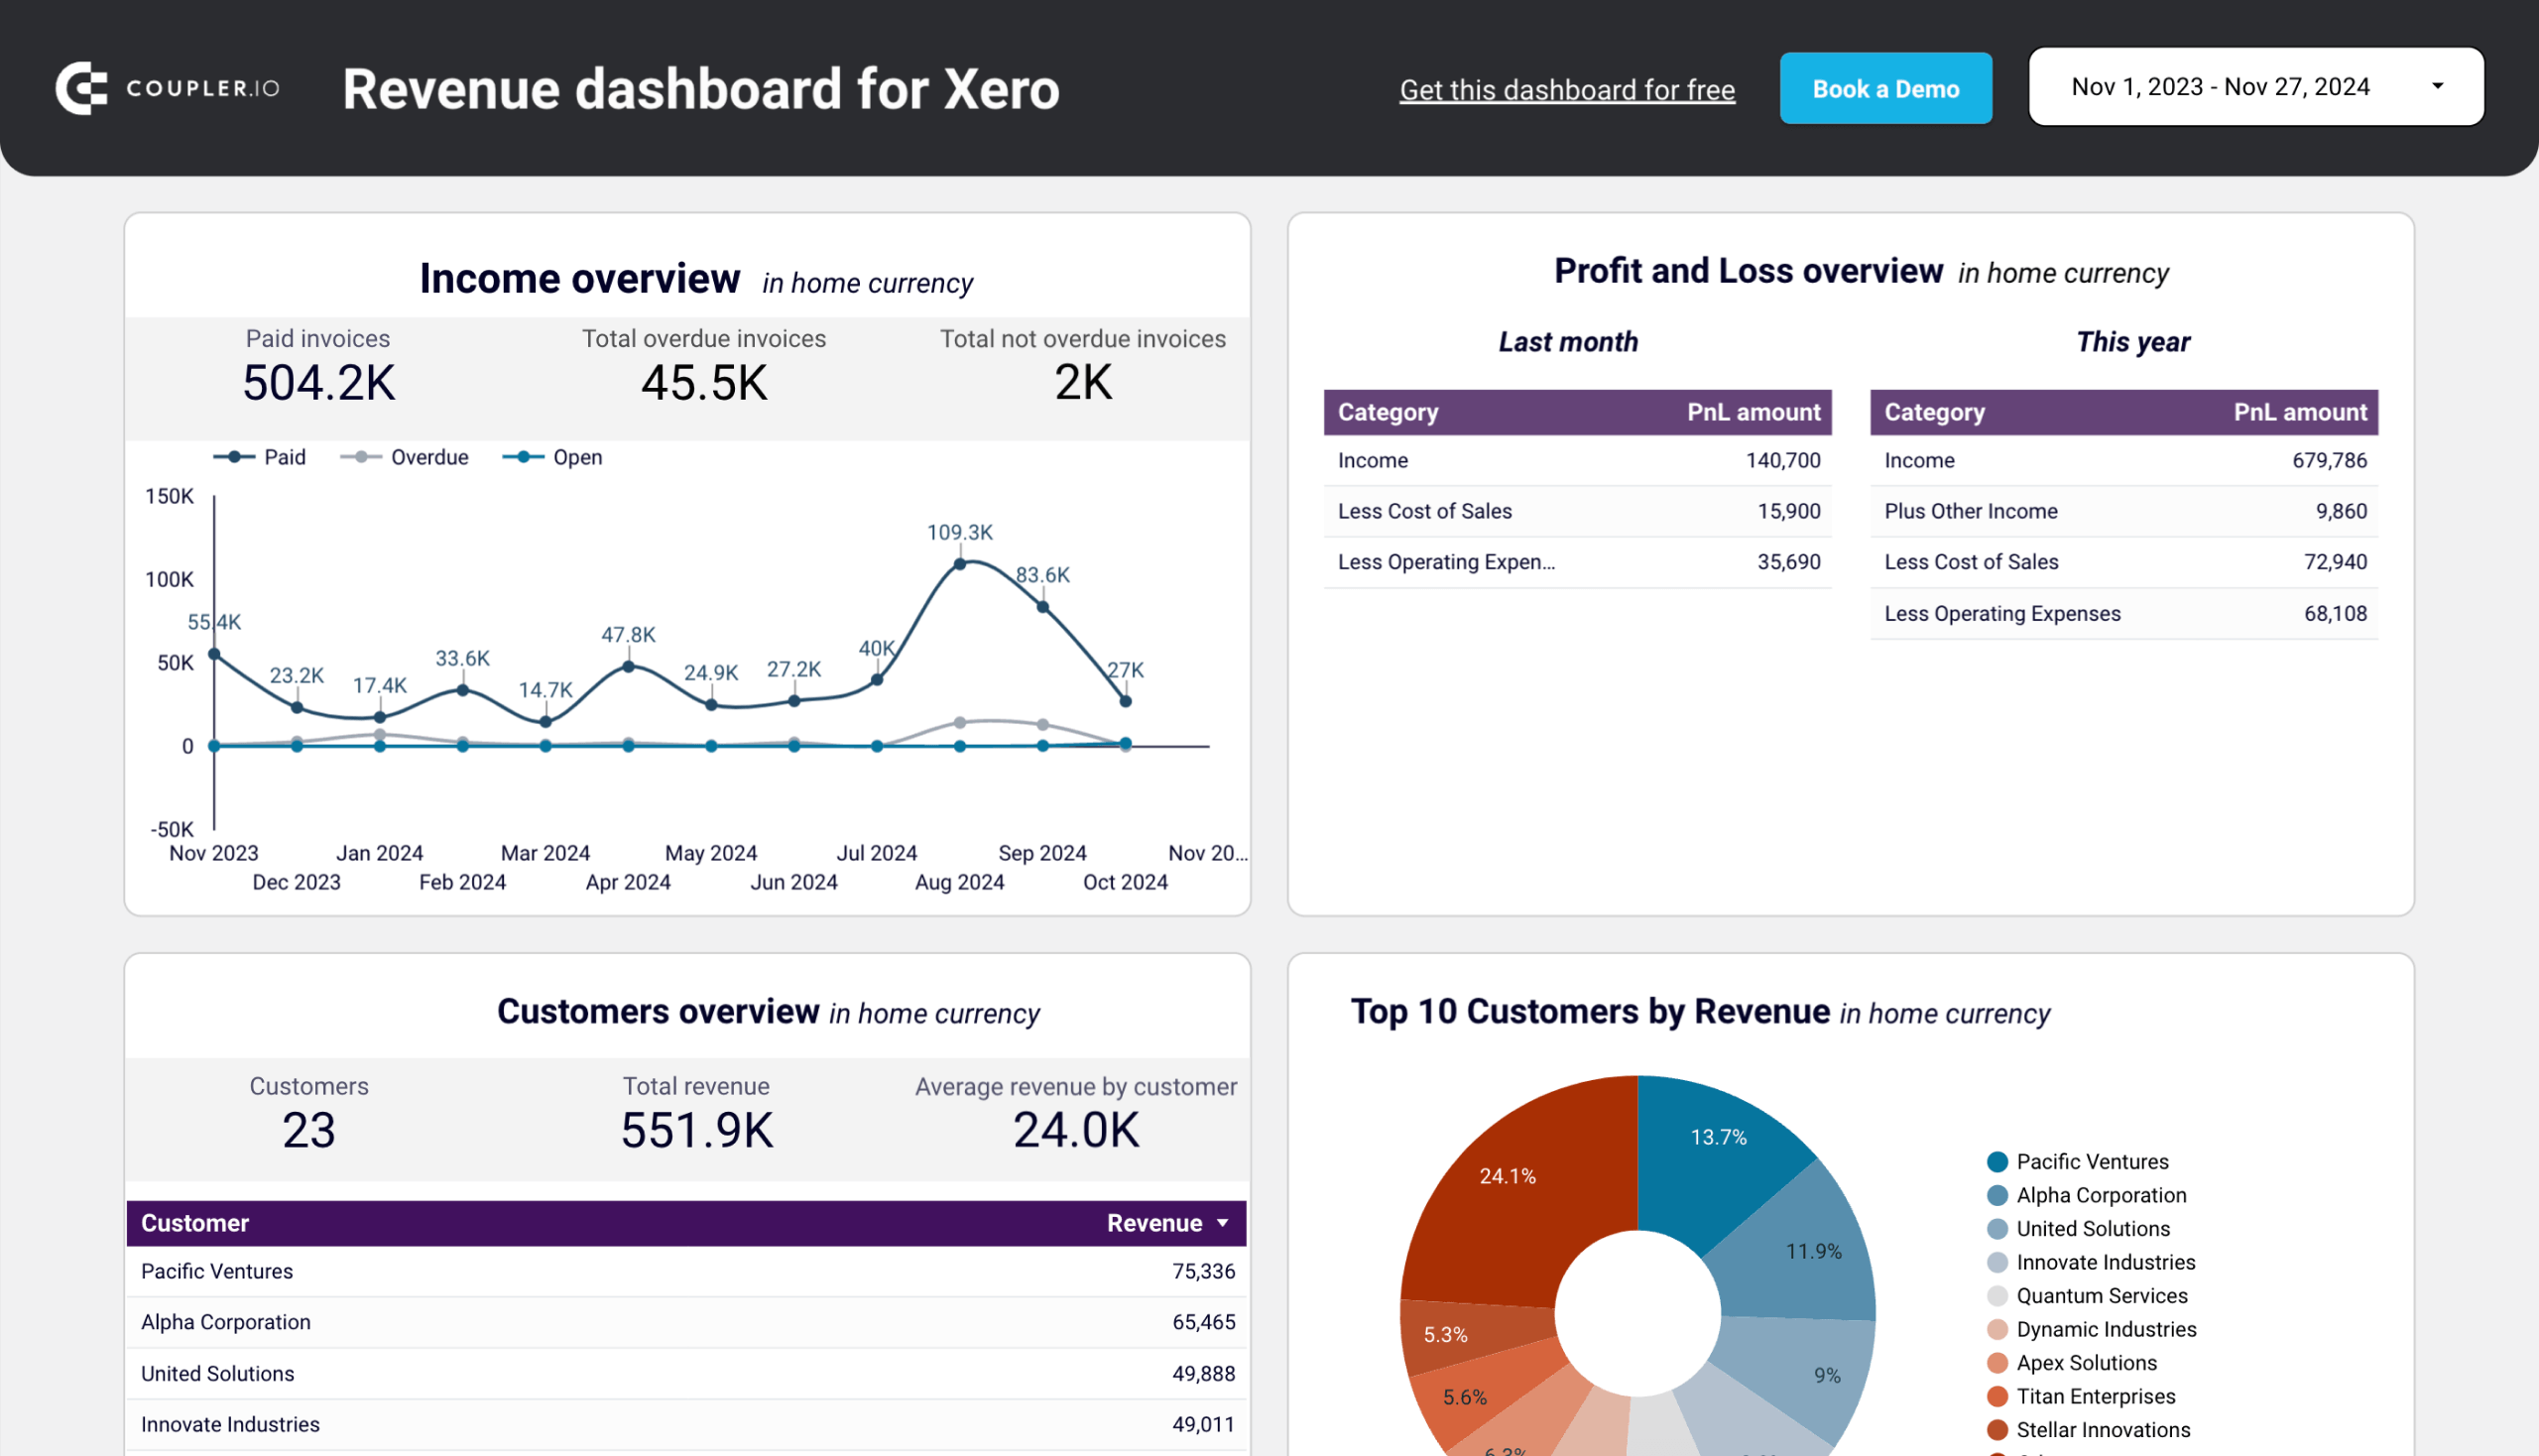
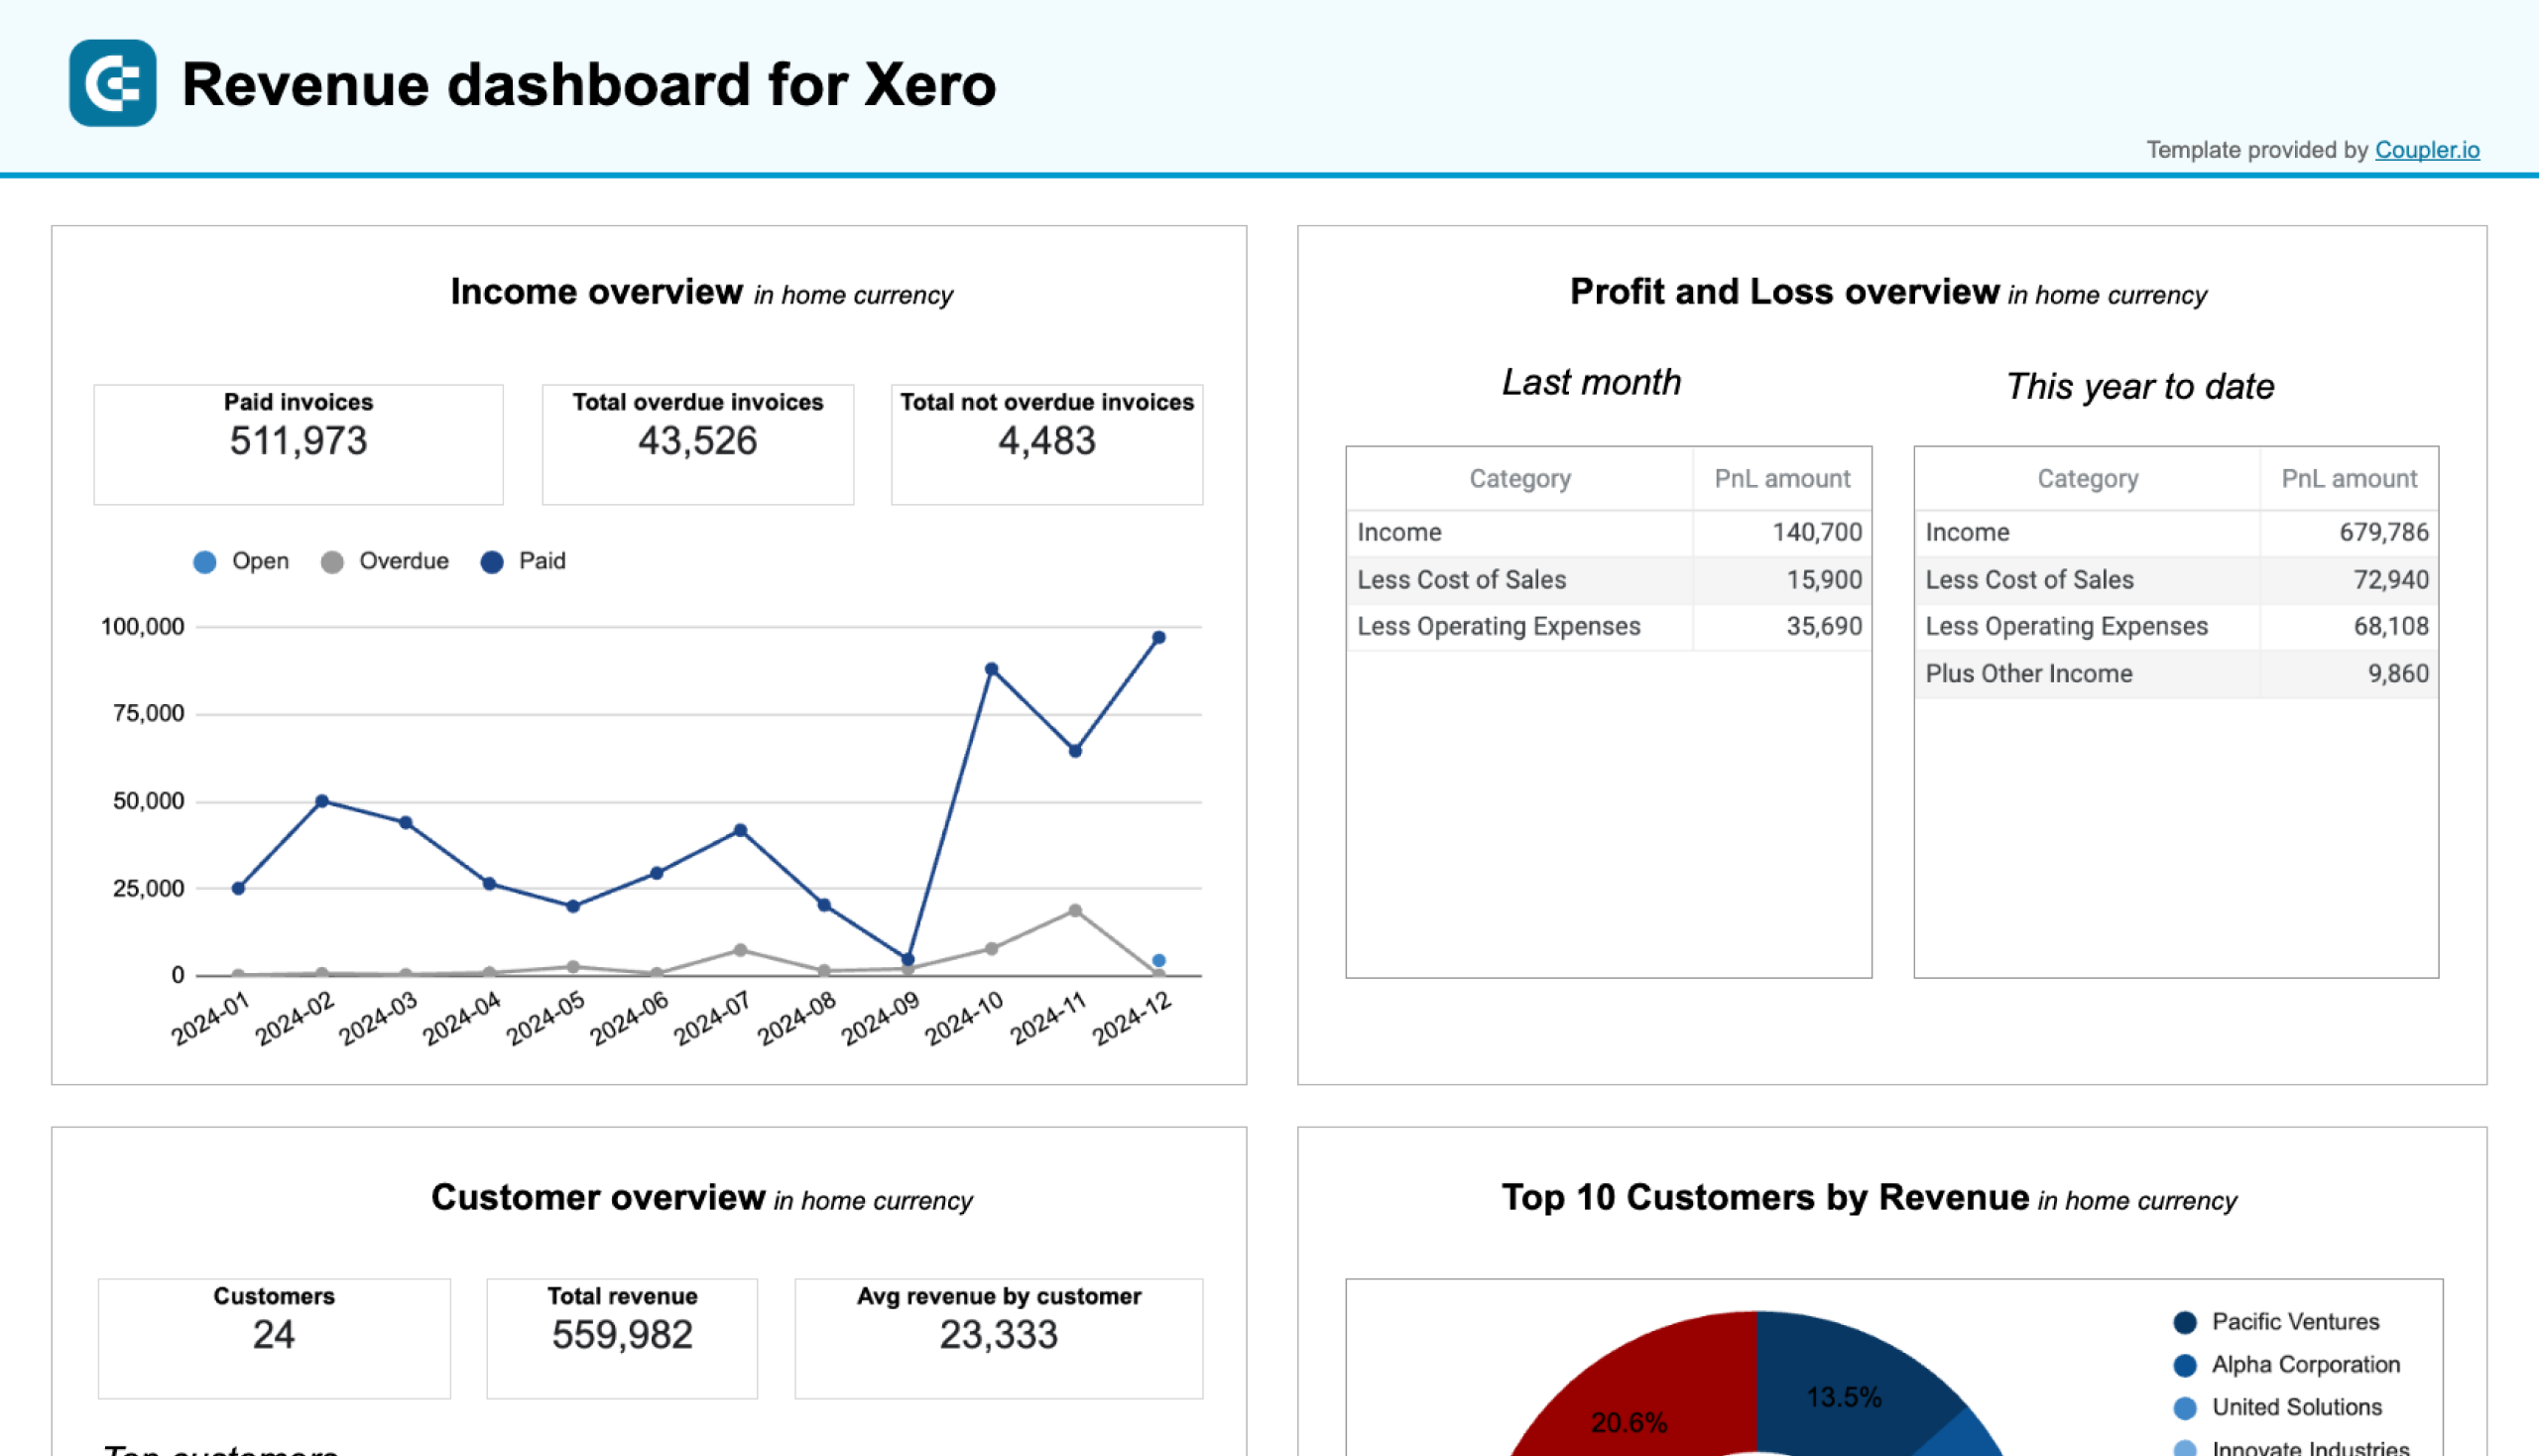
Revenue dashboard for Xero
The revenue dashboard for Xero provides a detailed view of your business’s financial performance. It highlights revenue trends over the past 12 months to identify peak periods and fluctuations. It also shows your top customers and products by revenue so that you understand which clients and offerings drive the most income.

It’s one of the P&L dashboards by Coupler.io, and is also available as a template in Looker Studio and Google Sheets. Pick the version you need and follow the instructions in the Readme tab to populate the dashboard with the data from your Xero account easily.
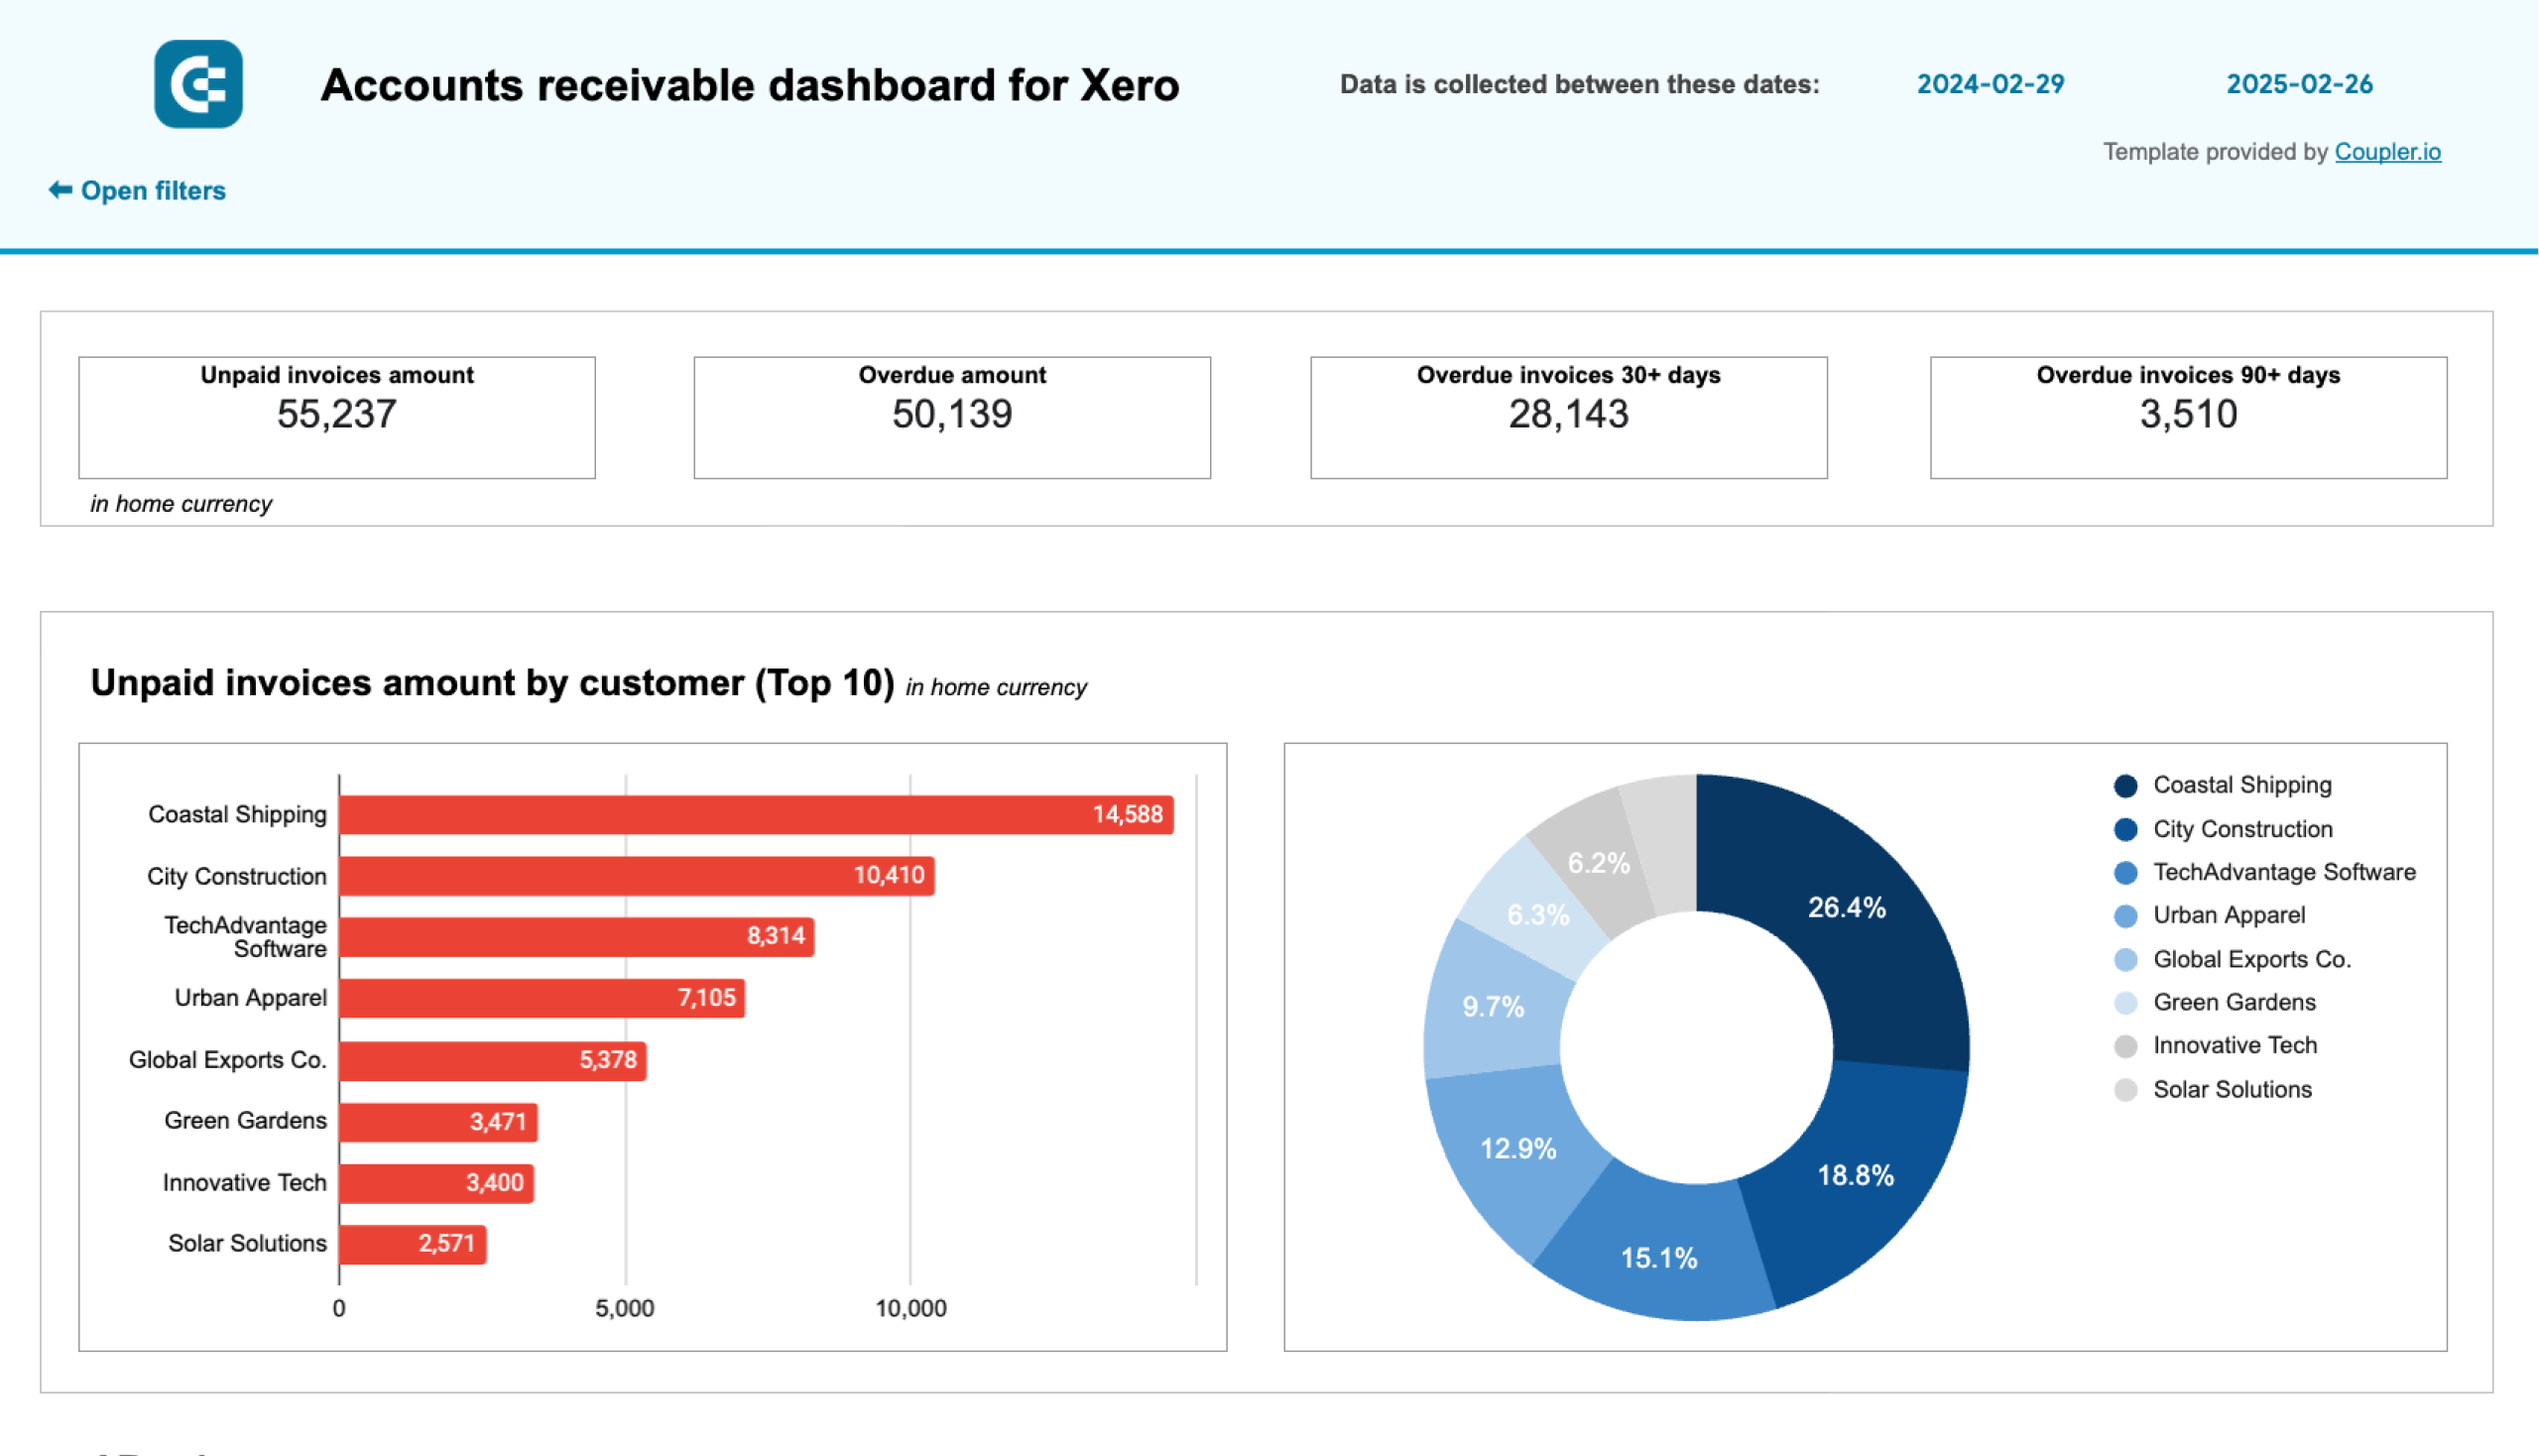
Accounts receivable dashboard
This dashboard provides a clear picture of invoices and outstanding client balances. The accounts receivable overview displays a breakdown of paid, unpaid, and overdue invoices. With these insights, you can make decisions such as payment follow-ups and cash flow management.
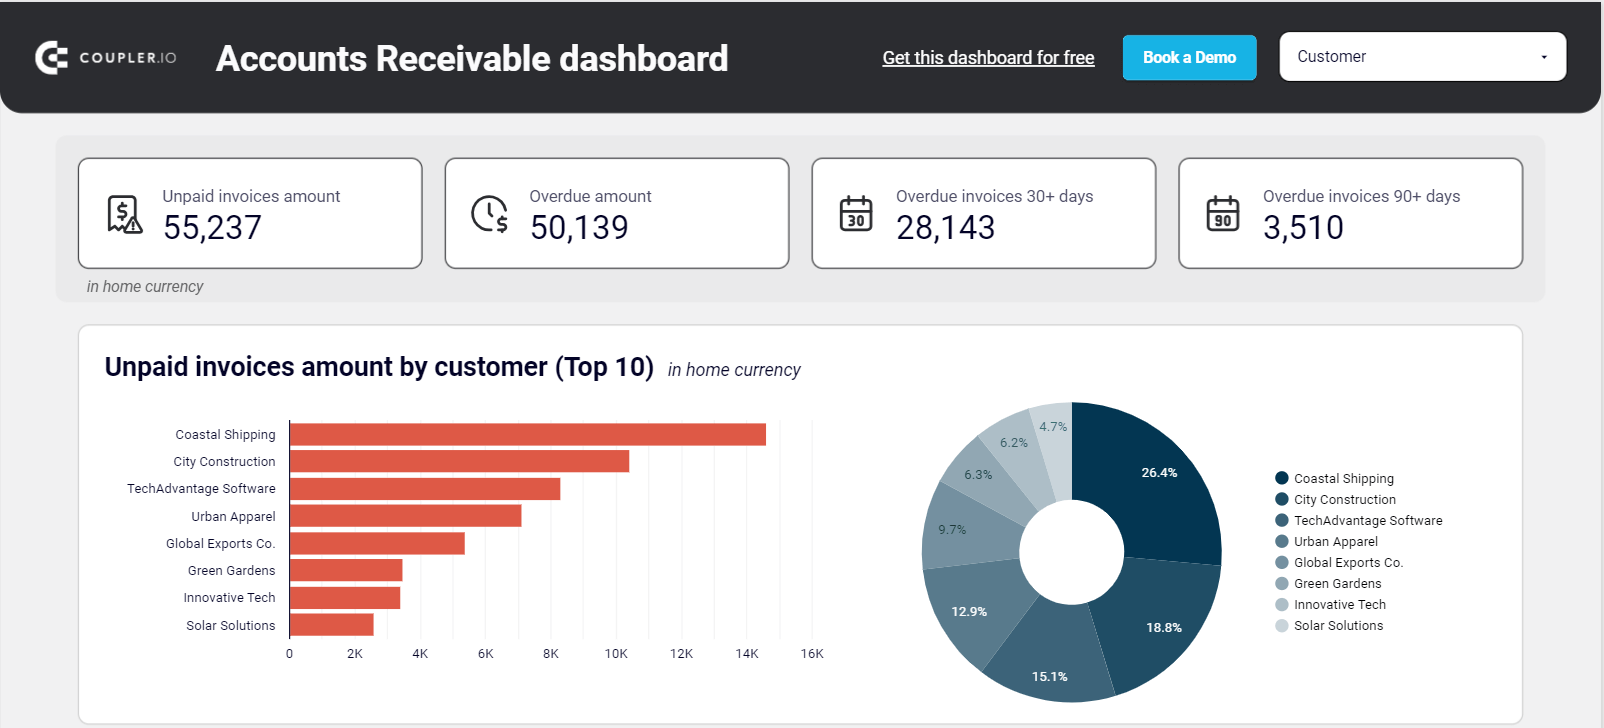
To use the accounts receivable dashboard template, go to the Readme and follow the instructions to connect your Xero account. The connector by Coupler.io will load data from Xero to Looker Studio or Google Sheets and will refresh the dashboard automatically.

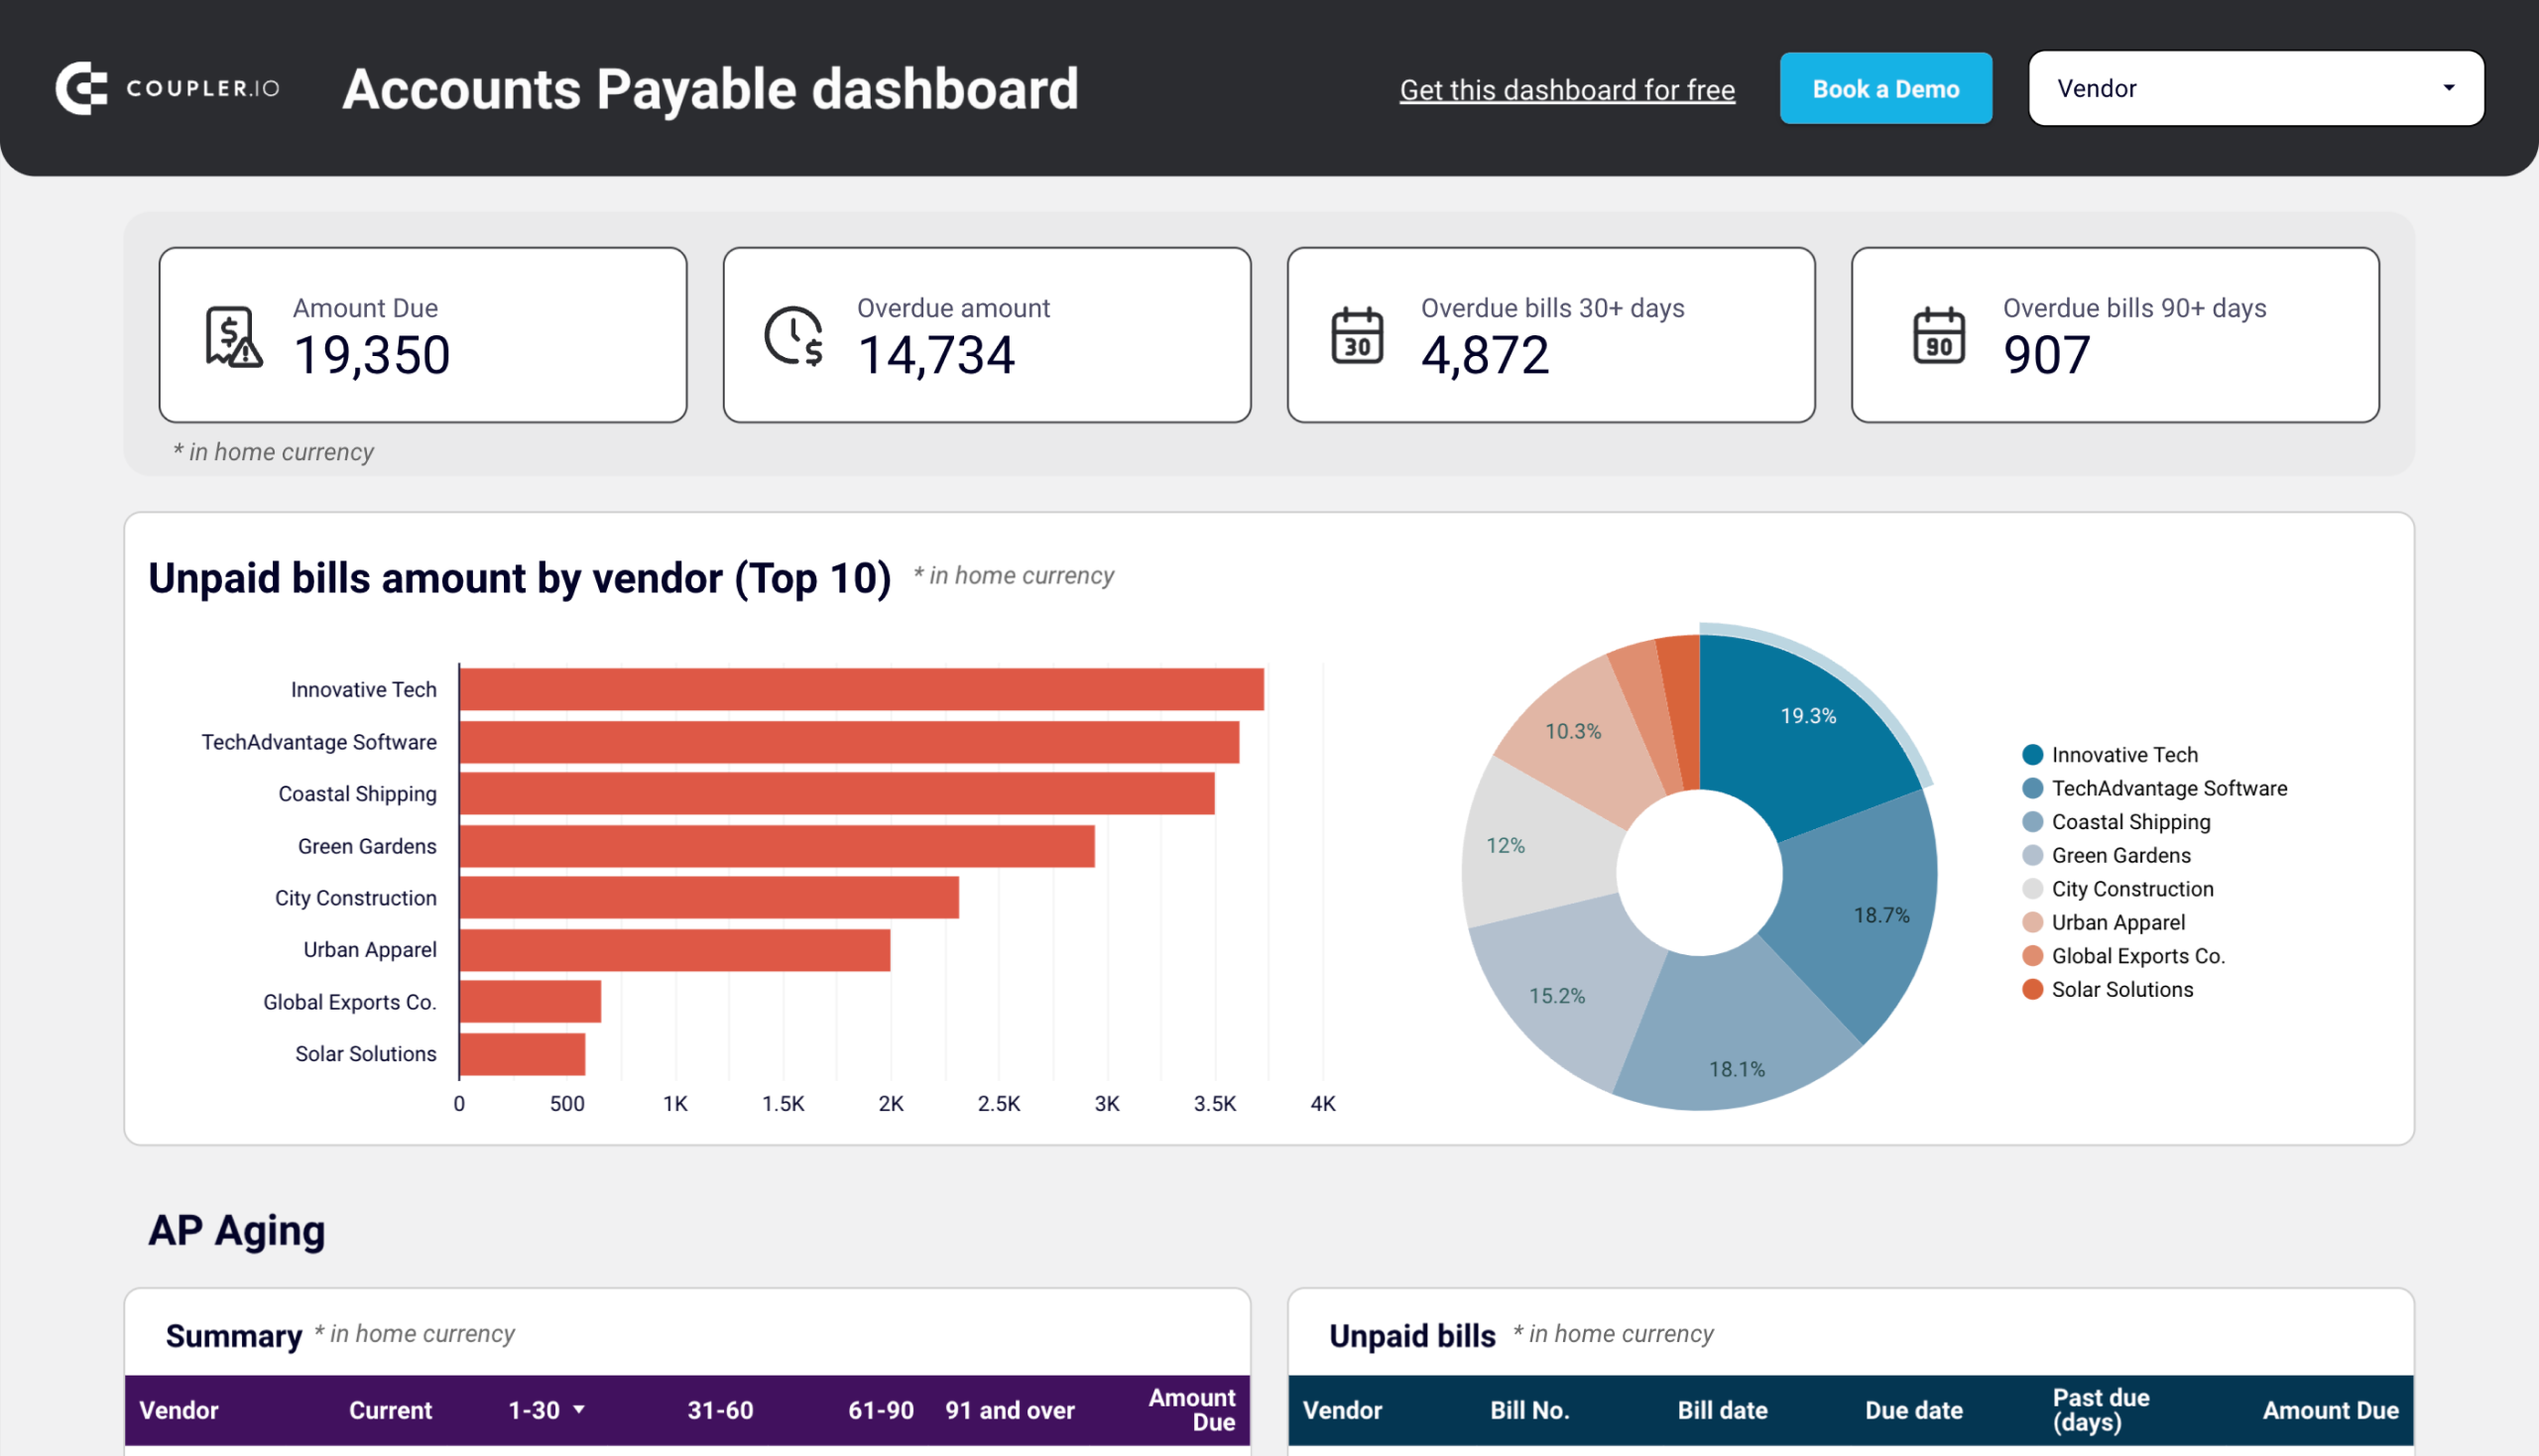
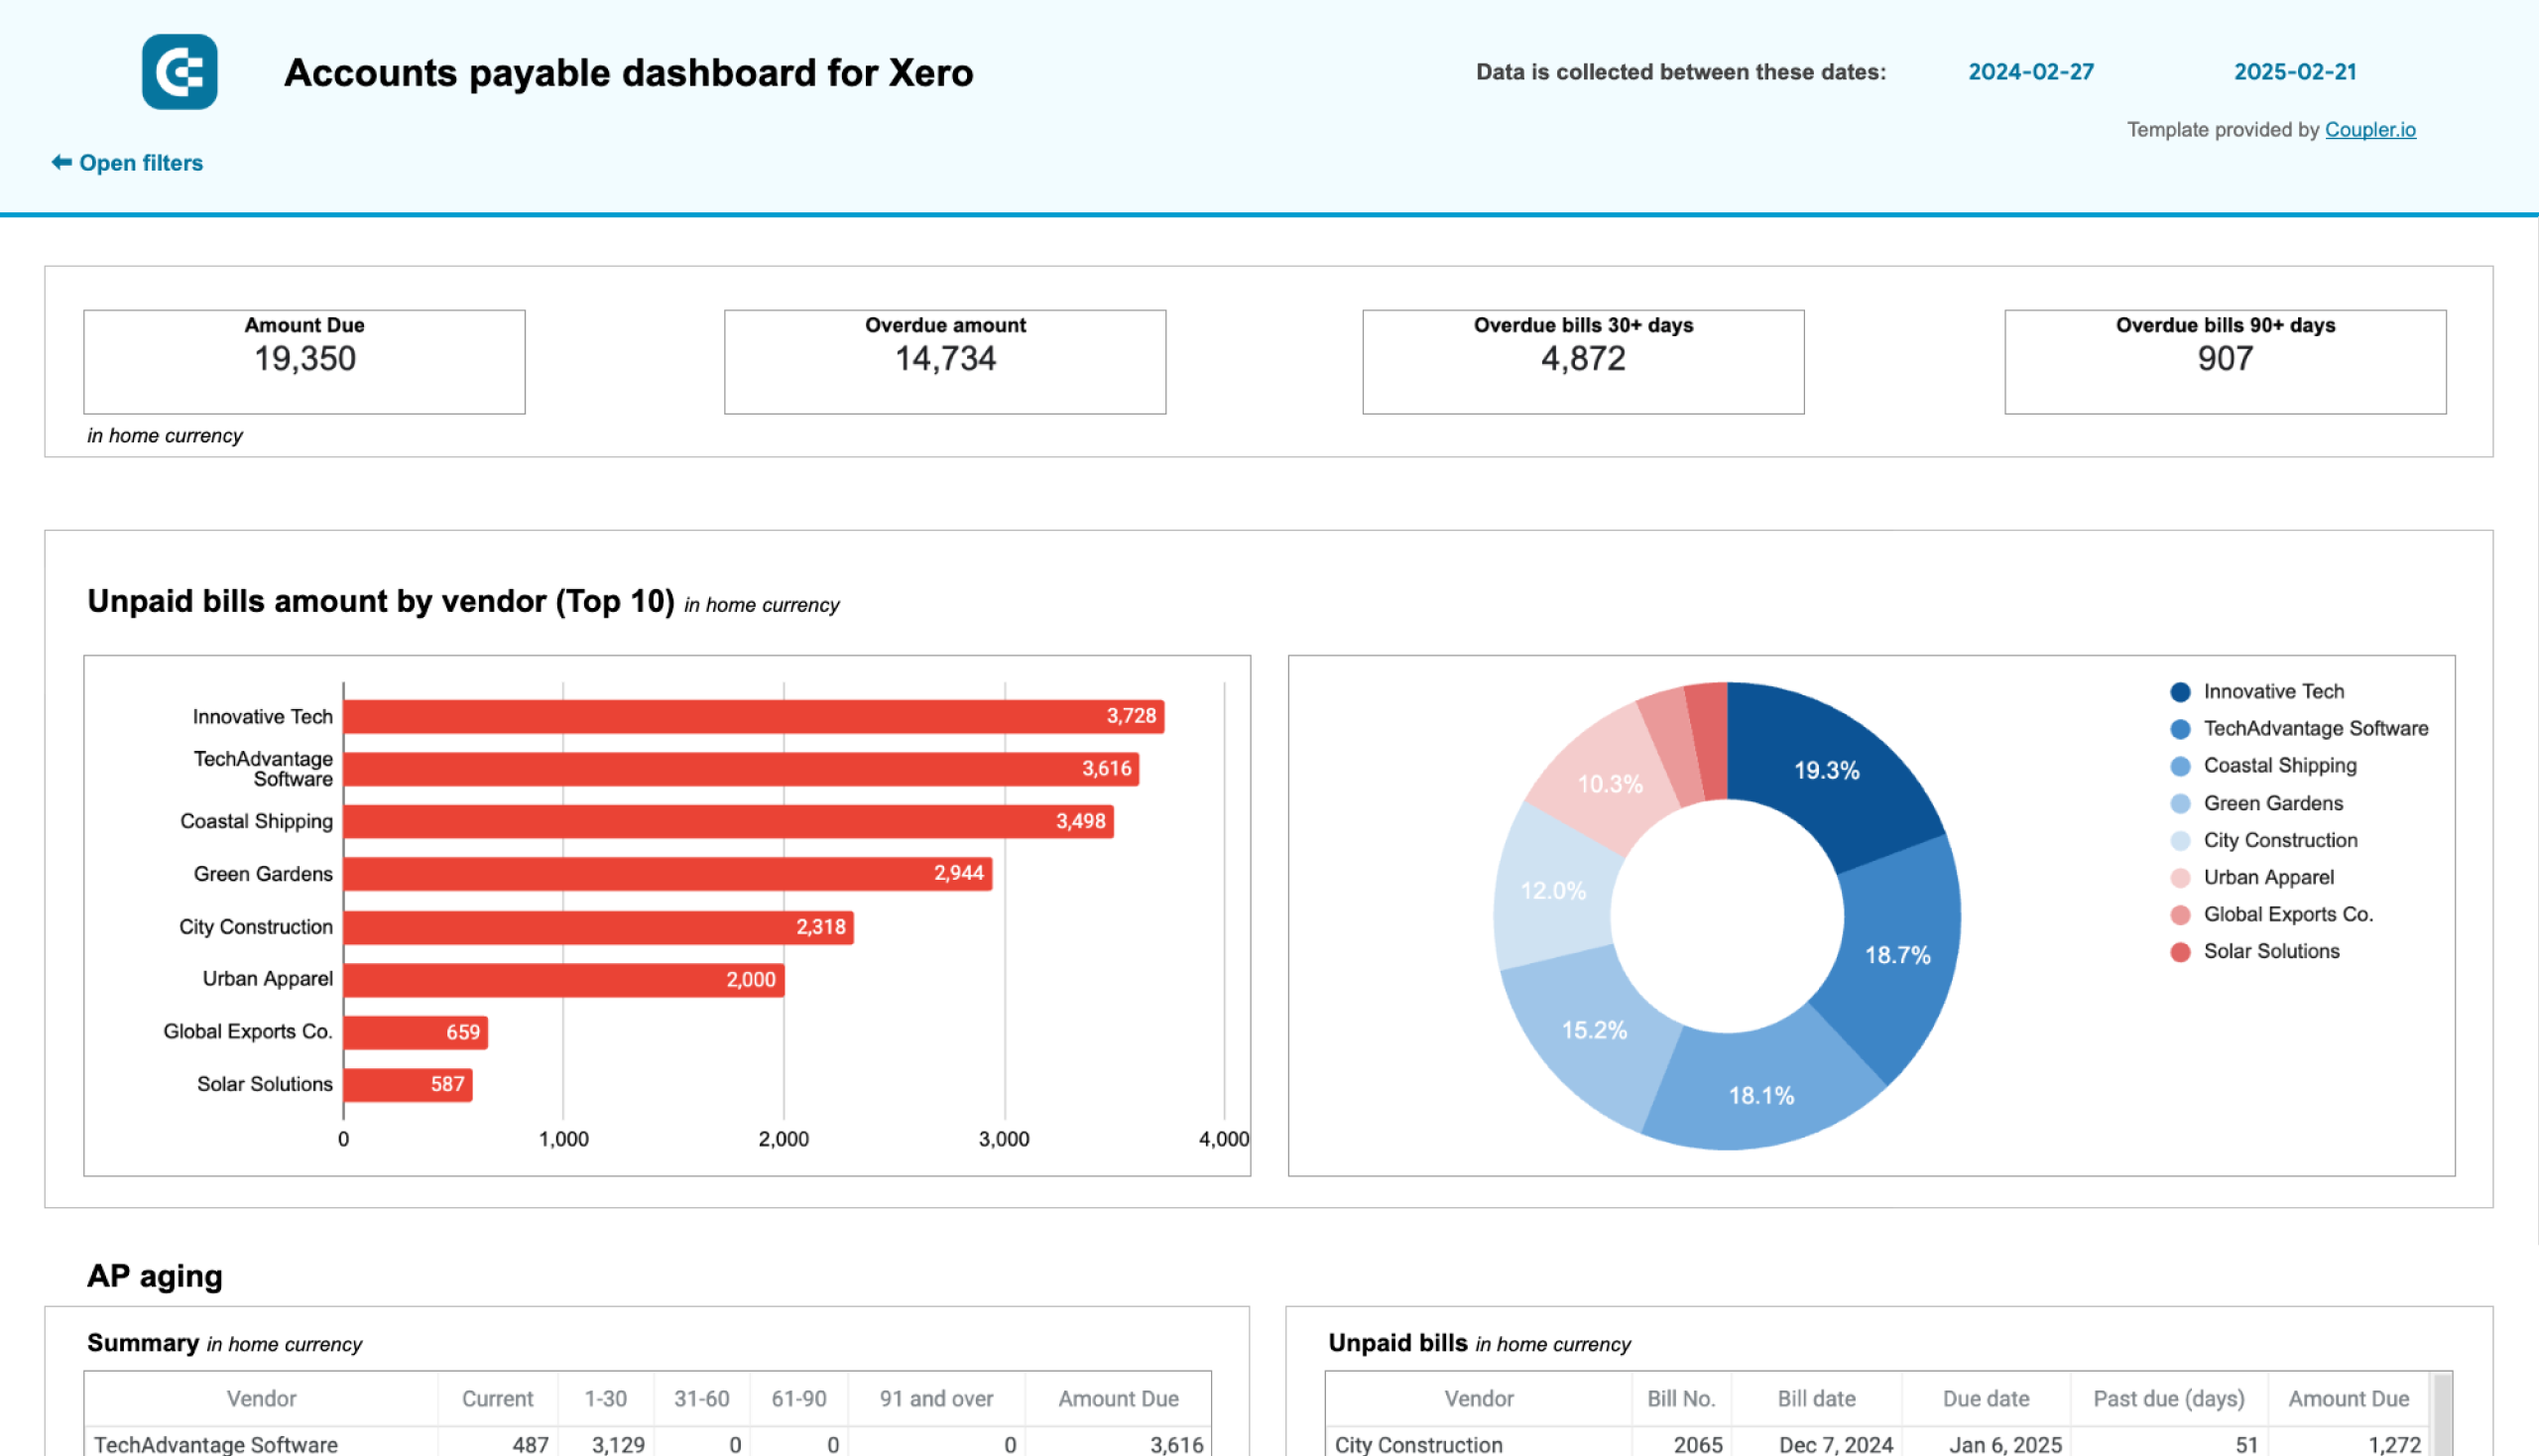
Accounts payable dashboard
A similar dashboard but for the bills received from vendors and suppliers. It allows you to monitor the total amount due, view specific details on unpaid bills, and more. You can categorize bills and choose the order in which you’d like to settle them.
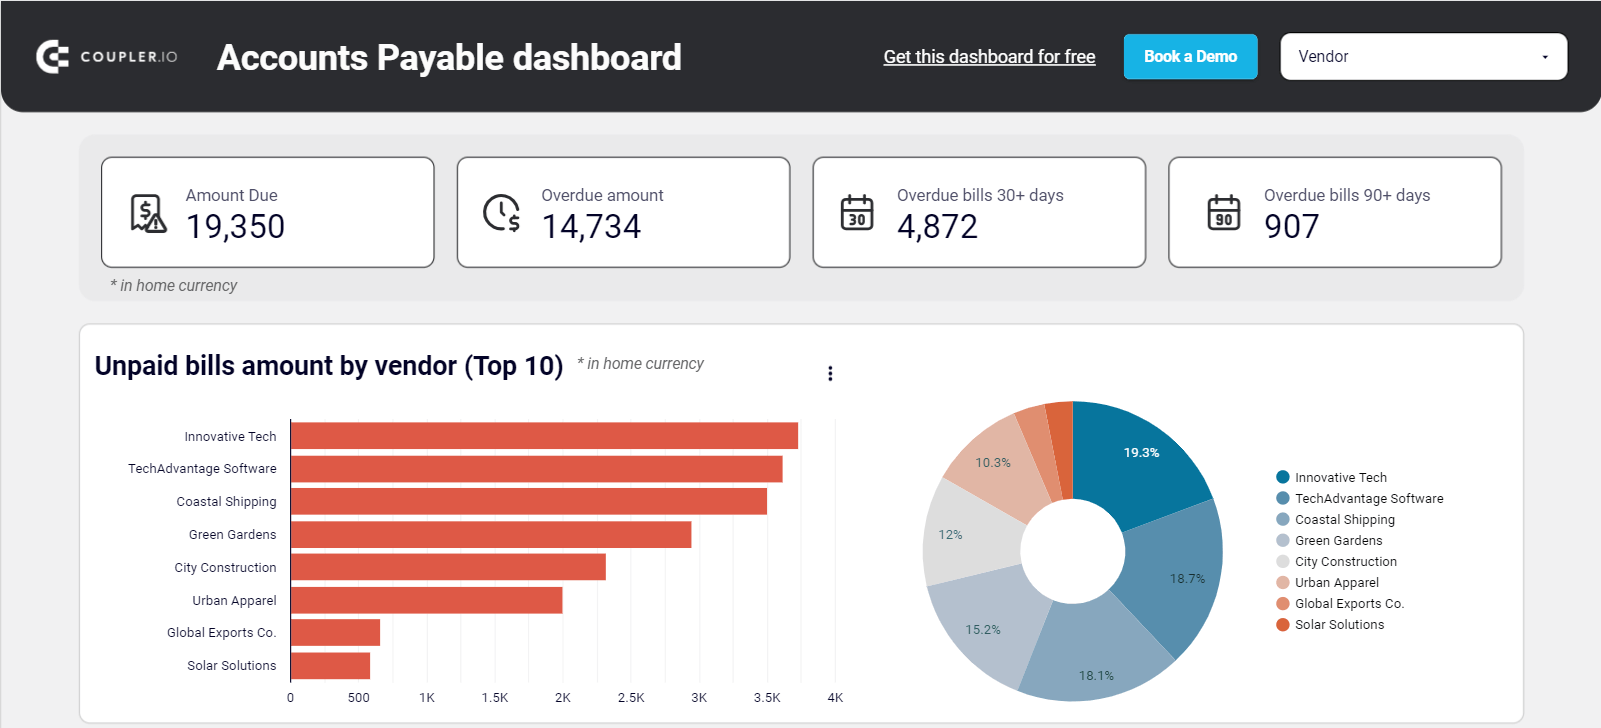
Follow the instructions on the Readme tab to connect Xero to the Google Sheets or Looker Studio template and start using the accounts payable dashboard.
Refresher: How to export Xero data manually
Now that you’ve learned to export Xero data automatically, let’s proceed to the manual method. Here’s a step-by-step breakdown of this process:
- Sign in to your Xero account.
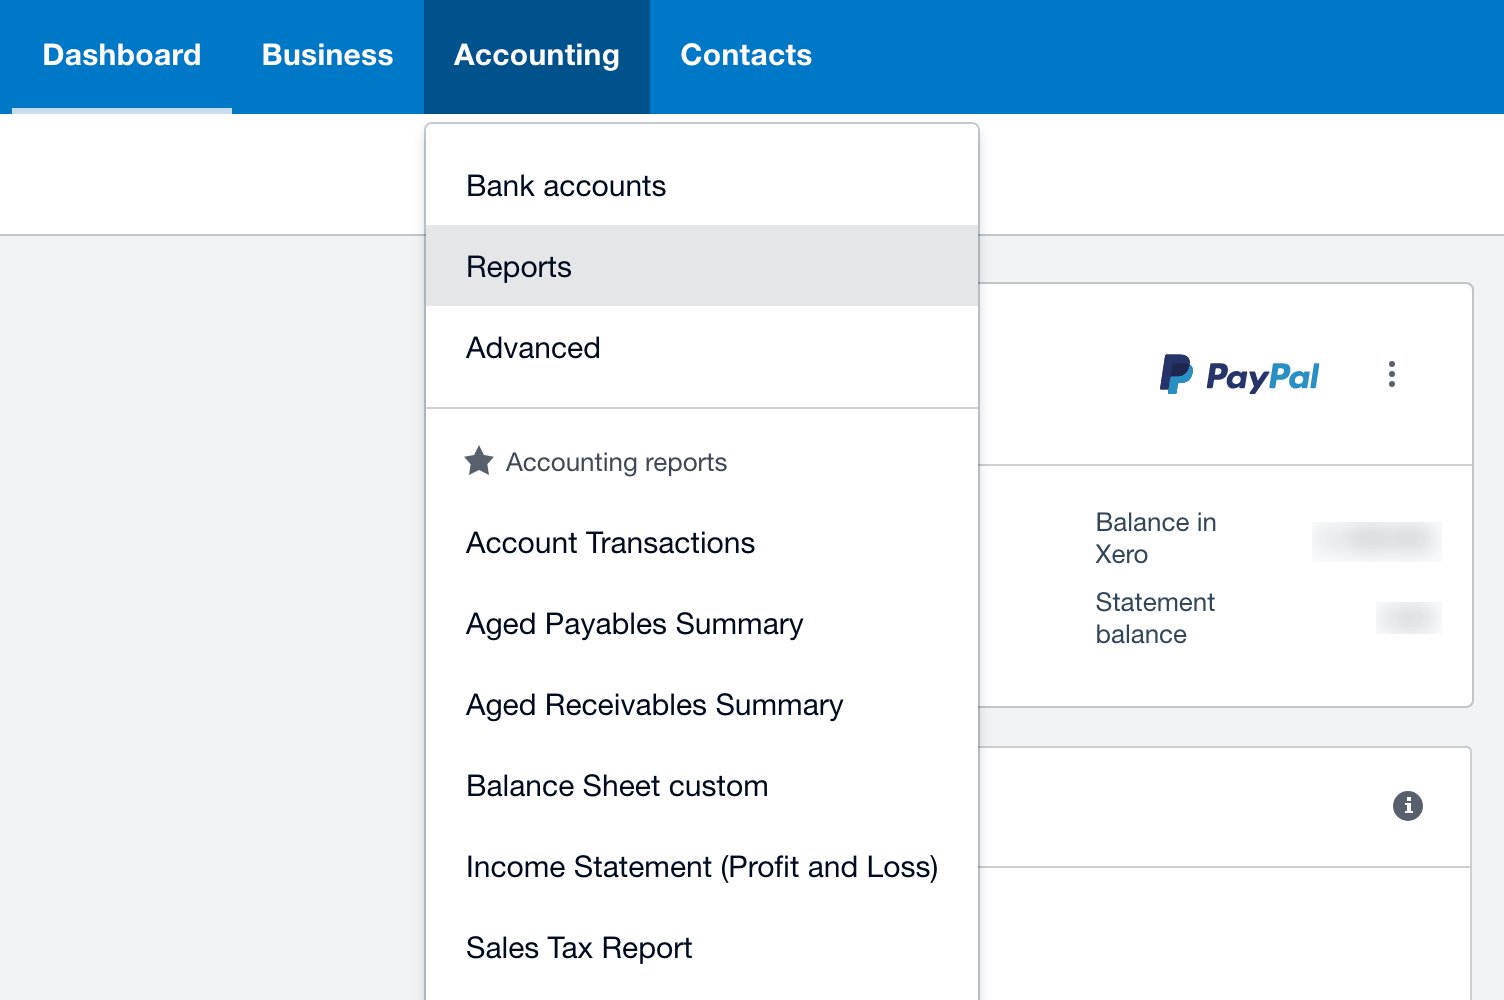
- Click on the Accounting tab and choose Reports from the dropdown list.
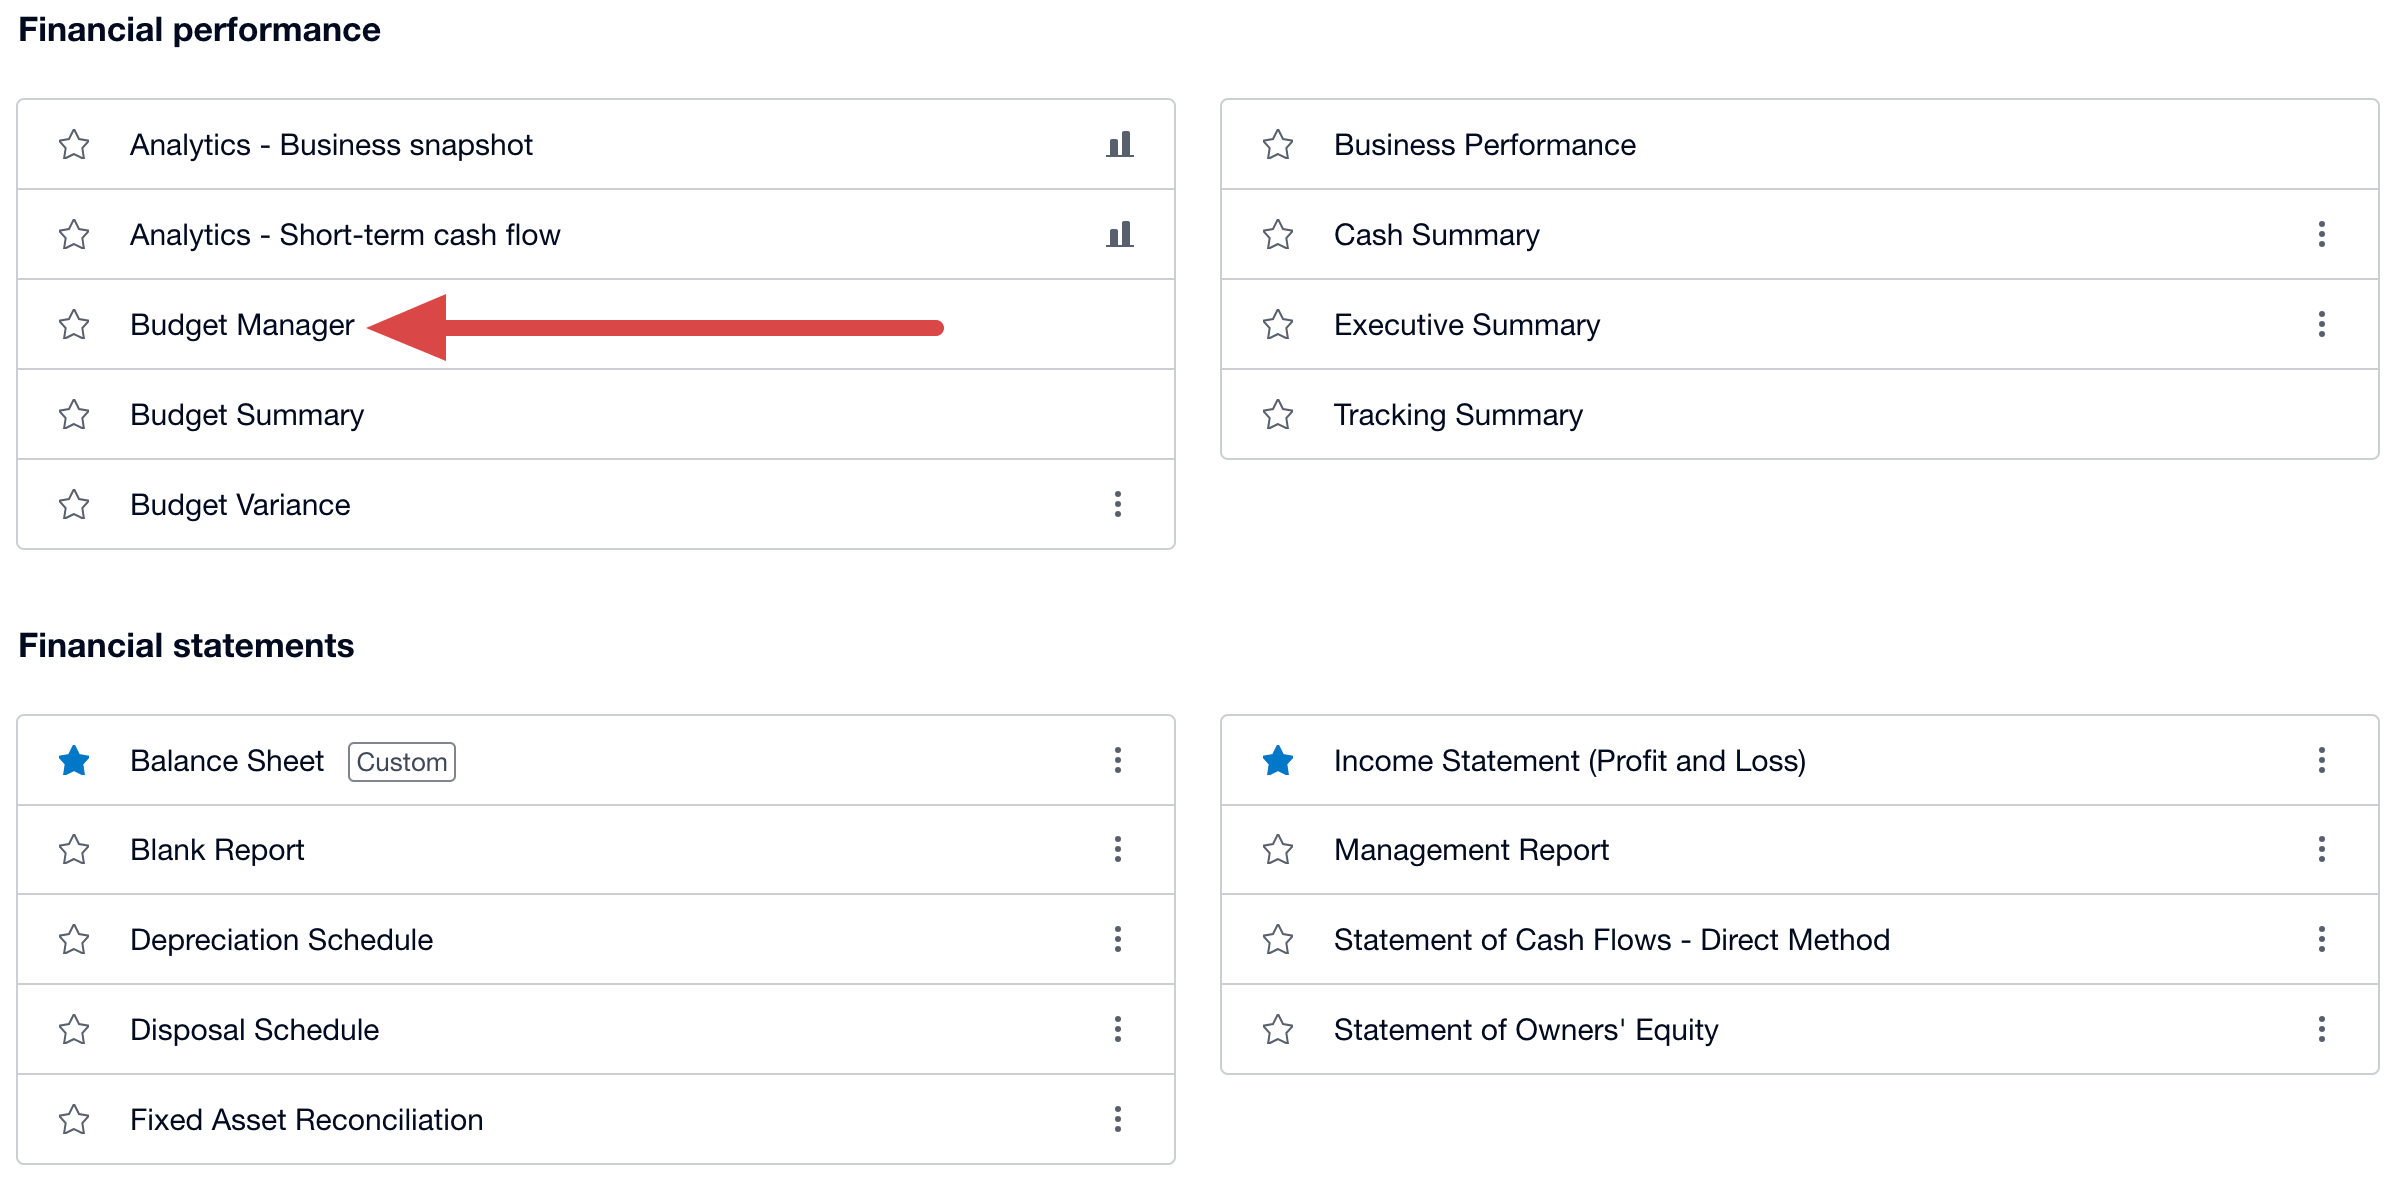
- You’ll get lists of reports grouped into Financial performance, Financial statements, Payables and receivables, Reconciliations, Taxes and balances, and Transactions. For example, let’s choose the Budget manager from the Financial performance list.
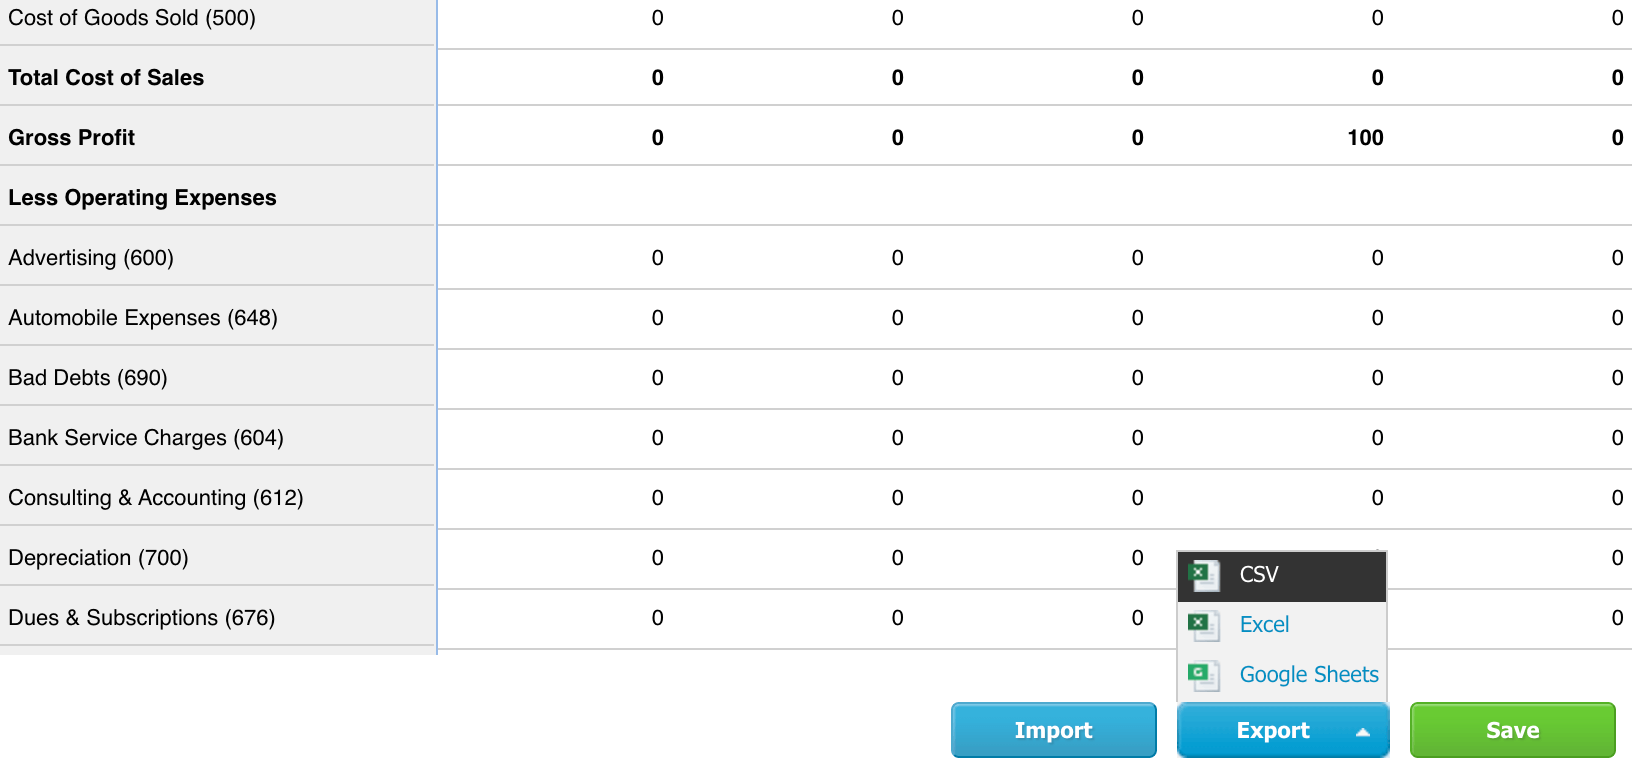
- At the top of the page, set up the period to track. Then scroll down to the bottom to click Export, choose CSV, and save the file on your device.
Done! The file with your Xero data is ready for import into the preferred app. While it seems feasible at first glance, this is only appropriate for small data amounts exported once in a while. If that’s not the case for you, then you’d better choose a finance automation to come to your rescue.
Thanks to Coupler.io, you can quickly export any volumes of Xero data and load them into the destination. Apart from time efficiency and scalability, it allows you to keep the imported data as precise as in the source. Make sure of this by trying Coupler.io for free and testing it in real-life use cases!
Automate data export with Coupler.io
Get started for free