What is a Google Sheets database?
Google Sheets is a spreadsheet application that is often used to solve business problems, such as data management and analysis. In this sense, a Google Sheets database is simply a spreadsheet to store, organize, and analyze business data.
Compared to standard database management systems (DMBS) like MySQL or Oracle, a database in spreadsheets is free to use with a low learning curve. It also offers basic data querying functions, the ability to automate repetitive tasks, and opportunities for real-time collaboration.
Using a spreadsheet as a database
By default, spreadsheet applications such as Microsoft Excel and Google Sheets were not created to work as databases, although small companies and simple applications are already using them in this way. Why? Because these businesses usually have a limited budget and don’t work with large volumes of data (yet). They need a basic data management solution rather than a DMBS which can increase the project’s complexity.
Spreadsheets are often the go-to solution. Again, a standard database management system requires a lot of time and resources to install, configure, and maintain. It may also take a long time to become proficient in a single database tool. If you are wondering whether Google Sheets is the right choice for you, we have already answered the critical questions in our article on spreadsheets vs. database.
Still undecided but considering using a Google Sheets database? Keep reading. We’ll show you why and how to use Google Sheets as a database solution. We’ll also present a couple of use cases to help you decide!
Why use Google Sheets as a database
There is no one-size-fits-all solution when it comes to databases. You simply have to choose the best option for your specific needs. So, let’s go over the advantages and disadvantages of a Google Sheets solution compared to a DMBS.
Pros as a database
Google Sheets, among other spreadsheet apps, has a number of great advantages as a database:
- Connectivity: Google Sheets is a web application, which means it is available online. Your database is safely stored in Google’s cloud so there is no way to lose your files.
- Access Control: If you use Google Sheets, you have access to Google’s access control system. With only a few clicks you can provide view and edit permissions to your data, or revoke existing permissions.
- Pricing: Google Sheets is one of many Google products that is free for unlimited usage. Other proprietary software such as Microsoft Excel requires a license or a subscription, which adds another layer to the overall application cost.
- Learning Curve: If you are managing a business or working at one, you probably have already used a spreadsheet application. Even if you haven’t, the learning curve is very smooth. You can quickly understand how the software works and leverage its capabilities to the fullest.
- Visualization: Google Sheets has a great number of built-in features that allow you to quickly manipulate the appearance and structure of the data, and then quickly visualize and analyze it.
Cons as a database
On the other hand, comparing Google Sheets to a DBMS has its disadvantages as well:
- Scalability: Google Sheets is not the best option for scalability. There are data limitations on the platform, and as your dataset grows, the response time becomes slower.
- Query Options: While Google Sheets provides query mechanisms, it is limited compared to a DBMS. A DBMS provides advanced query mechanisms that can handle a large amount of data with ease.
- Real-time collaboration:: DBMS are built in a way that allows multiple users to access and modify data simultaneously. Unfortunately, that’s not the case with Google Sheets, where there can be inconsistencies when two users are changing the same set of data in parallel.
It’s clear that if you are managing a small business, if your data requirements are small, or you are in the early stages of development of an app, then Google Sheets is the right option for you! The tool provides a lot of flexibility, it’s easy to set up and can handle a decent amount of data. As your business grows, you might have to consider a full DBMS, but only when Google Sheets is no longer enough for your needs.
Ways to create a Google Sheets database
Now that you understand what you can and can’t achieve with a Google Sheets database, let’s explore how to create one. The spreadsheet will provide the basic infrastructure for the database. But you still need a reliable way to bring your data (spread across different apps) into the sheet.
There are three different ways to do this:
- Manual data import: You can input data into a spreadsheet by hand, or download data as CSV files from various apps and manually upload them.
- Automated data imports: To save time and avoid manual data entry, you can automate imports with Coupler.io. It’s a reporting automation solution to turn data into insightful reports. Coupler.io provides Google Sheets connectors to import data from 60+ data sources (e.g., HubSpot, GA4, Airtable) into your spreadsheet and automate data refresh on a set schedule.
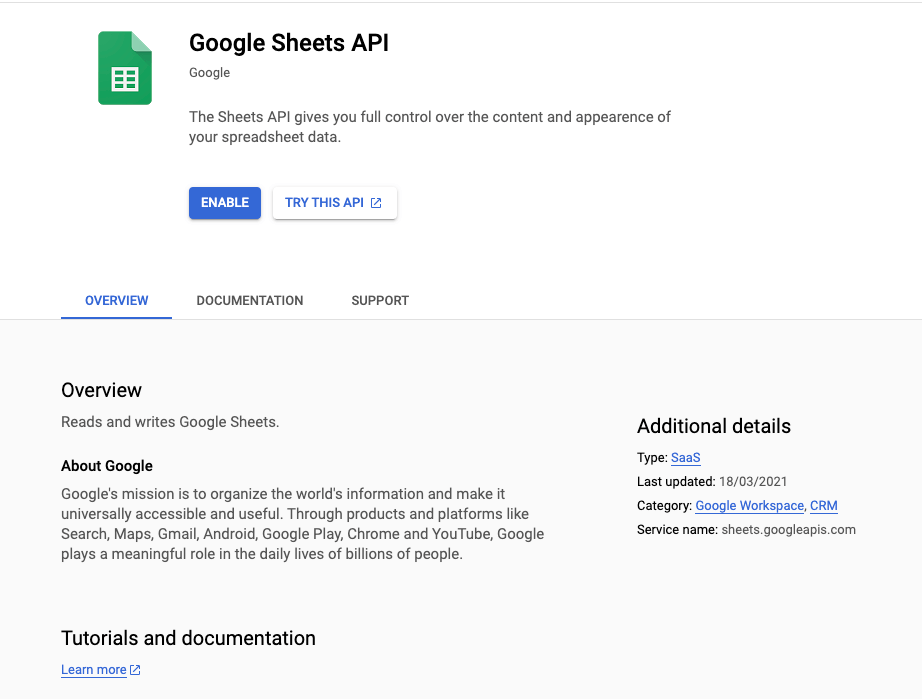
- Use the Google Sheets API: Alternatively, you can load data into Google Sheets with the native API. It’s a more customized option but requires some technical knowledge. Still, we’ll discuss it in more detail later.
Let’s start with the most convenient way to create a database in Google Sheets – the automated method with Coupler.io.
How to set up a database in Google Sheets with Coupler.io
Imagine you want to create a centralized sales database focused on lost/won deals. Your data is spread across a few different tools (such as Salesforce, HubSpot, and Pipedrive) and you need a way to transfer and aggregate the data in Google Sheets. You can easily do this with Coupler.io.
It lets you automate imports of data from other apps/databases to Google Sheets without much effort. But you can also use Coupler.io to create tailored, insightful dashboards or quickly visualize your data with pre-built templates.
You can try out Coupler.io right away for free. Select the desired data source in the form below and click Proceed. We’ve already preselected Google Sheets as a destination app.
Tip: Create an empty spreadsheet in Google Sheets before you start. This will make the process of loading your data more seamless.
1. Connect your accounts to Coupler.io
The next step is to connect all your sources, which must be added one at a time. Continuing with our sales database example, let’s start with Pipedrive.
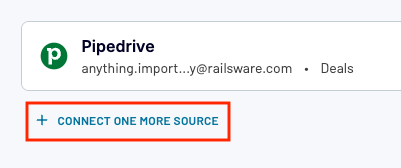
- Simply choose the account you want to connect and under Basic Settings, specify the Data Entity (based on the data categories in your Pipedrive account). Unless you want to filter and organize columns at this stage, click Finish and Proceed. You can always make changes to your data later.
- On the next page, click Connect One More Source.
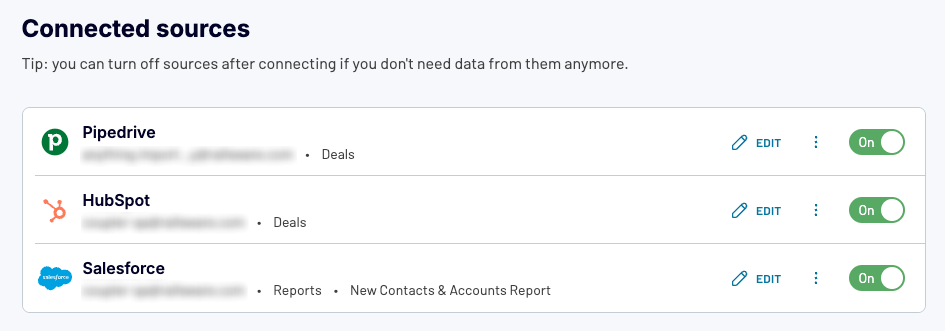
We’ll add HubSpot and Salesforce as sources of sales data here, but you can choose any source you like – Coupler.io supports 60+ apps.
- Follow the same steps as with Pipedrive, selecting your account and Data Type (e.g. deals, leads, reports, accounts). Configure date filters if you want to fetch data from a specific period.
- Review your sources and proceed to the Transformations step.
2. Organize and transform your data
Here you can modify your data to control how it will be presented in the Google Sheets database:
- Hide or rename columns
- Sort and filter your data
- Append or join data from the various apps
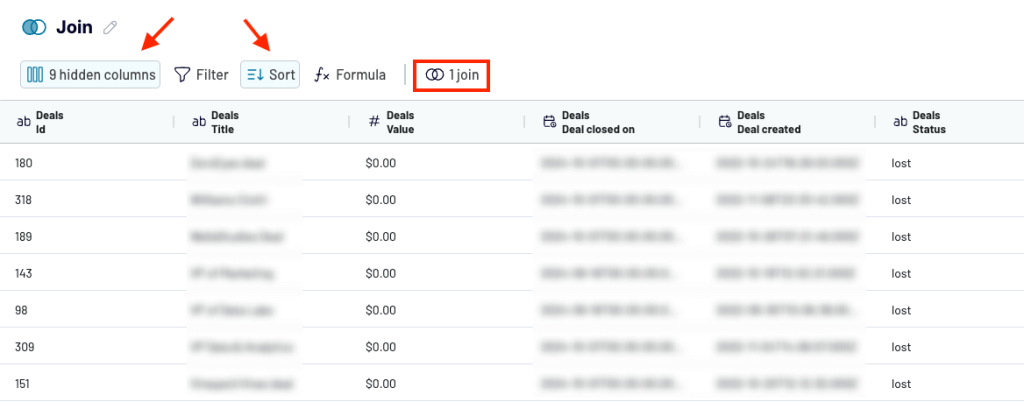
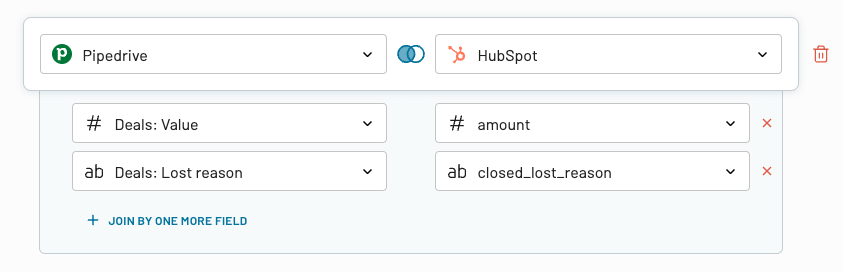
For instance, you may decide to use the Join function to align how your data will be stored and organized in the final database. This feature lets you combine data from differently-named columns into a single column, as shown below:
After you’ve made your changes, proceed to the next step: Destinations.
3. Load data and schedule automated data refreshes
It’s time to finalize the setup. Check that your destination – Google Sheets – is correct, then:
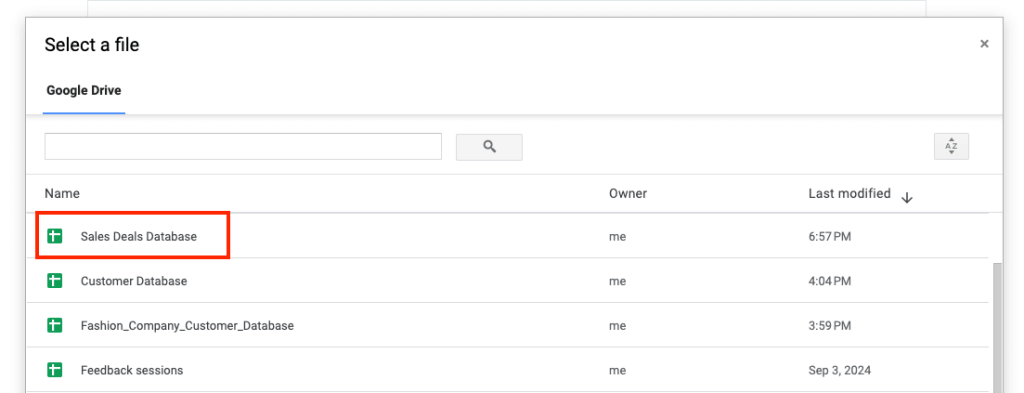
- Choose the Data to Share. In this case, we choose Join to ensure the aligned data will show up in the final database.
- Follow the instructions to select your (empty) Google Sheets database and populate it with the collected data.
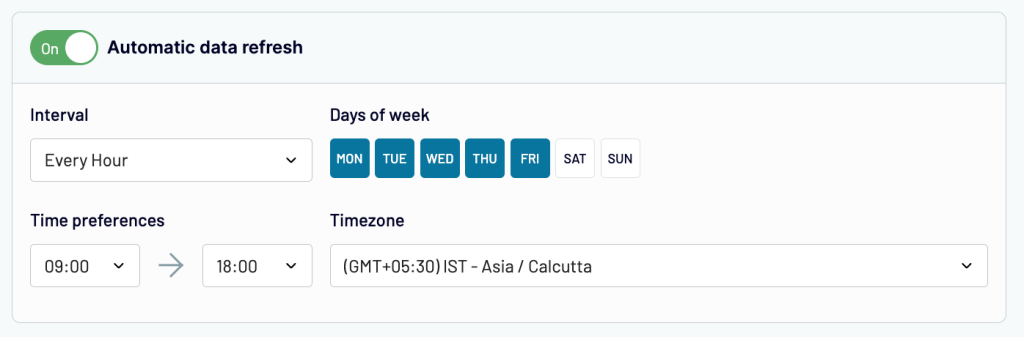
Before you start working with the database in a separate tab, continue with the steps in the Coupler.io interface to set up a data refresh schedule. This will ensure your database remains up-to-date at all times. Depending on your needs, you can configure the database to update every day of the week and as frequently as every 15 minutes.
And that’s it, you’re ready to use, modify, and share your database in Google Sheets!
Automate data import to Google Sheets with Coupler.io
Get started for freeCreate a database by loading your data manually
If you choose not to automate the process, there is always the option to create a database manually in Google Sheets.
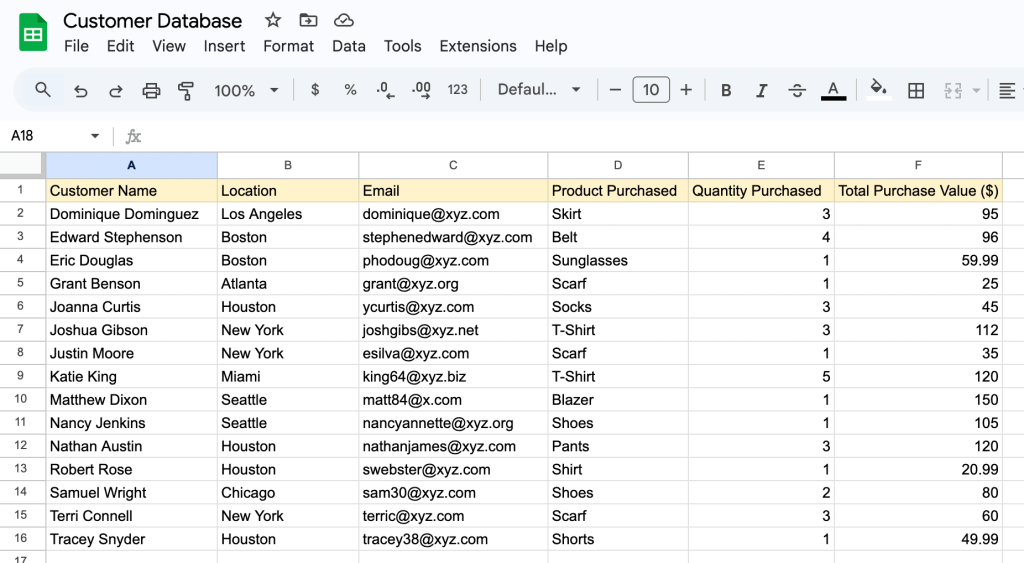
Let’s say you own a fashion company with an online store. You want to track and organize data related to your customers, such as items they have purchased and which region they’re from. Here’s how to do it:
1. Create a new spreadsheet in Google Sheets
The first step is to open Google Sheets and create a spreadsheet that will serve as your future database.
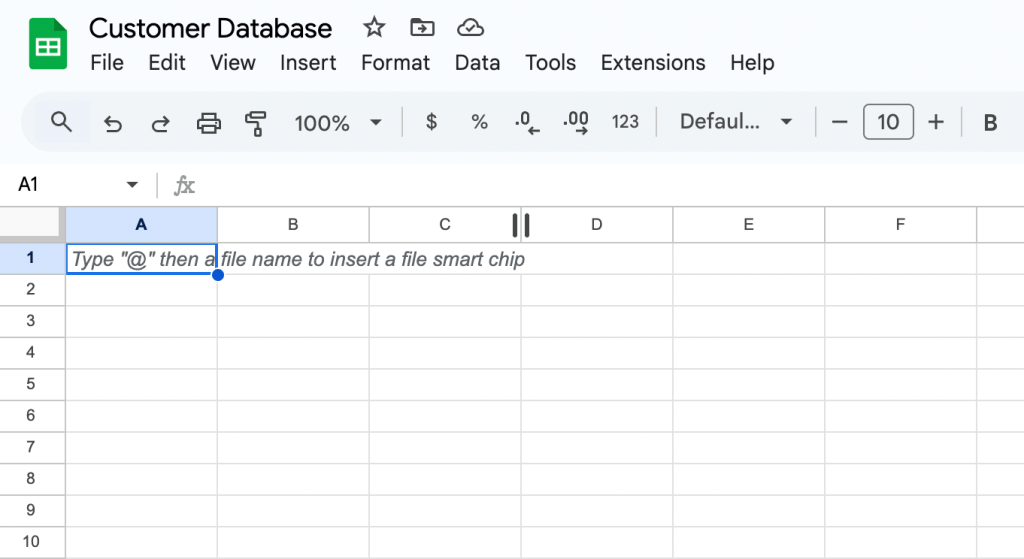
To prevent any confusion or mix-ups between sheets, label it right away – for example, Customer Database.
2. Define data fields and columns
Determine what type of data you want your database to include. Then, create column headers to ensure that data will be properly stored and formatted. For example, our simple customer database will have six data fields:
- Customer Name
- Location
- Product Purchased
- Quantity Purchased
- Total Purchase Value
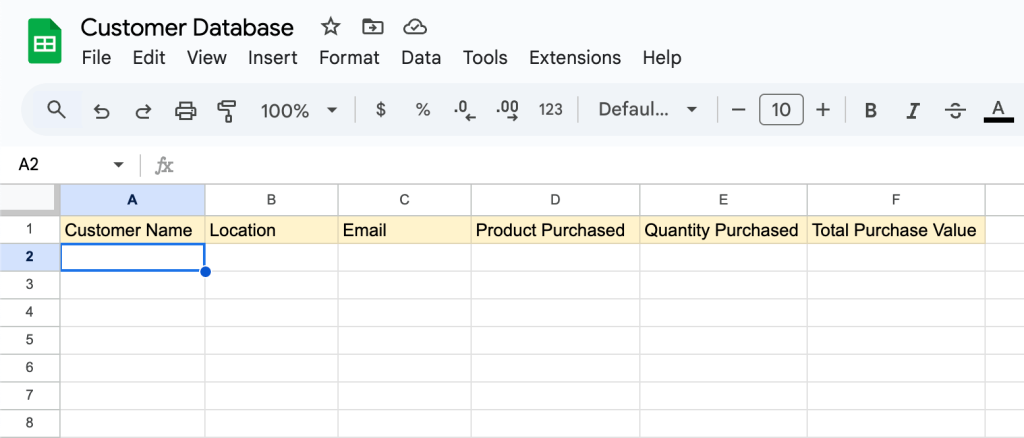
This is enough to help us understand customers’ characteristics, their purchasing preferences, and which items in the store are the most popular.
3. Add and sort your data
Now it’s time to add or import your data. You have two options here – manually enter it row by row, or import a CSV file that contains at least some of the needed data. For example, you can extract relevant purchasing data from your payment processing tool and import the CSV into your prepared database.
Here’s a dedicated guide on how to import CSV in Google Sheets.
Once all your data has been entered correctly, you can use the Google Sheets sorting function to quickly organize the data alphabetically or numerically.
Let’s say you wanted to sort the sheet alphabetically. Simply select all the columns with data, right-click, and select Sort sheet A-Z from the drop-down menu. Here’s what the database for the fictional fashion company might look like once filled out and sorted:
As an optional final step, you can share access to the database with your team. Simply click the Share button in the top right corner and configure access permissions. At some point, you may want to link data between various databases in your organization. Here’s a complete guide on how to link sheets in Google Sheets.
Tip: For step-by-step guidance on how to export your data from other tools or repositories, you can read our Airtable to Google Sheets or BigQuery to Google Sheets guides.
How to set up Google Sheets as a database with the API
As I mentioned earlier, Google Sheets has an API that you can use to import, export, or modify your data. Let’s say you are a small business owner. If you have an application for your business, you can connect it to Google Sheets via the API and automatically import/export your data. Google provides built-in libraries for the following set of programming languages:
- Browser JavaScript
- C#
- Go
- Java
- Node.js
- PHP
- Python
- Ruby
This way you can update your product information, add new products to your database, add new clients to your database, or remove out-of-stock products from it without having to open the database sheet and manually perform these operations.
For example, when a client buys something, you add a new record to the database that says which client bought which product, along with the total cost. This operation is called “Create”, and it means that you are importing new data to your database.
When you want to find a specific customer in your database, you retrieve the customer data. The operation of retrieving the information from the database is called “Read”.
When you’re modifying an existing record in your database, the database performs an “Update” operation.
Finally, when you want to remove a record from your database, you initiate a “Delete” operation.
The above, commonly known as CRUD operations, are the core actions that someone can perform in a database, and any tool must be able to handle these operations to be considered as one. To summarize the functions:
- Create: Import/Add new data to the database.
- Read: Query the database and retrieve its data.
- Update: Modify the data in the database.
- Delete: Delete data from the database.
When using Google Sheets as a database, you can perform any of the above actions either manually or automatically. On a more granular level, the Google Sheets API lets you programmatically:
- Read and write data
- Format text and numbers
- Build pivot tables
- Enforce cell validation
- Set frozen rows
- Adjust column sizes
- Apply formulas
- Create charts
With all this functionality in mind, let’s discuss how to set up the API, starting with the authentication process. Later, we’ll provide a brief example of how to read and write data.
Authenticating with Google Sheets API
In order to be able to use Google Sheets API, you must first authenticate yourself with the service. All Google APIs use the OAuth 2.0 protocol for authentication and authorization, which simplifies the process. Moreover, you can also create a service account that can be used to access all of Google’s resources.
If the above feels intimidating, fear not! We’ll explain in detail all the required steps for obtaining the client_secret file, which is necessary to authenticate with Google, and how to use this file to access your data.
Before explaining the process, it’s important to say that every access to a Google API is handled by a Google Cloud Platform project. Through this project, you can manage the resources used, the user access, and define which APIs can be reached via your application. So, let’s jump to the process:
Enable the Google Sheets API
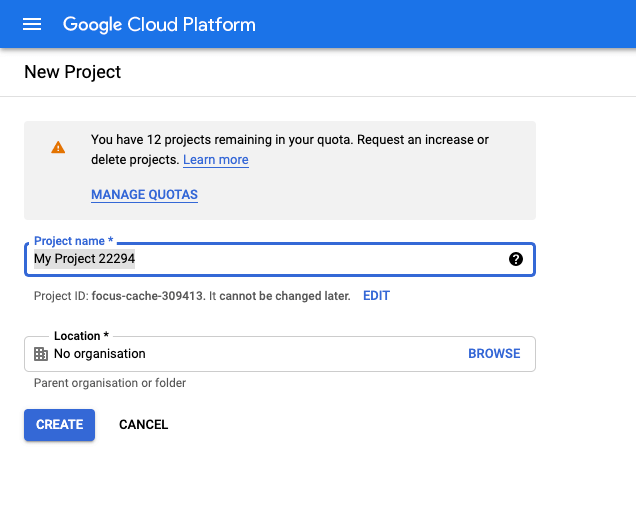
- Go to the Google APIs Console.
- Click Select a project in the top-right corner.

- Click the New Project option.
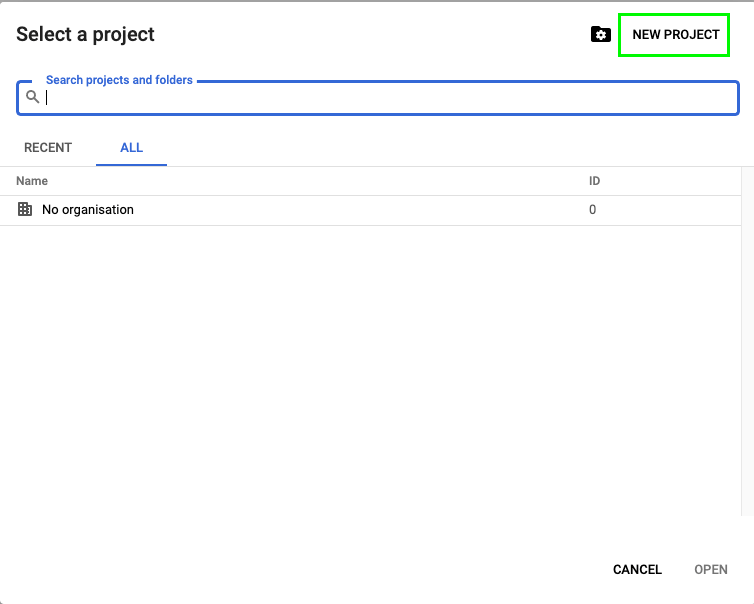
- Give a unique name to your project and click Create.
- Go to the APIs dashboard.
- Search for Google Sheets API and click on it.
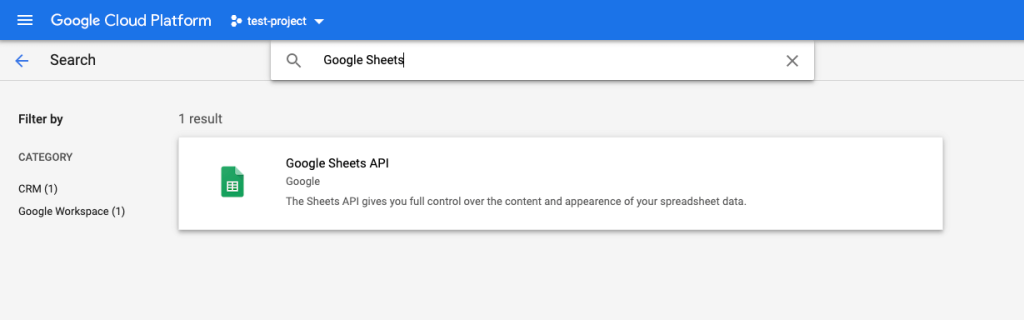
- Click Enable and wait for the API to be enabled.
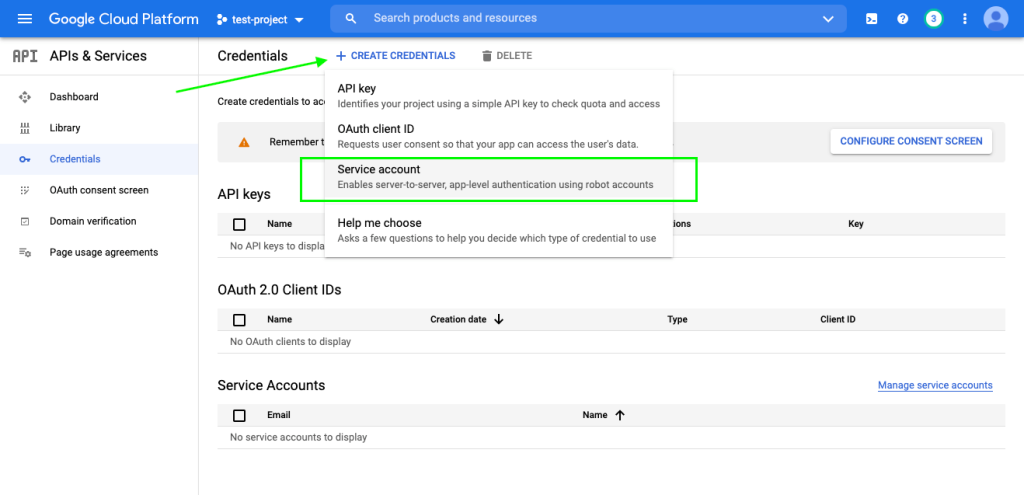
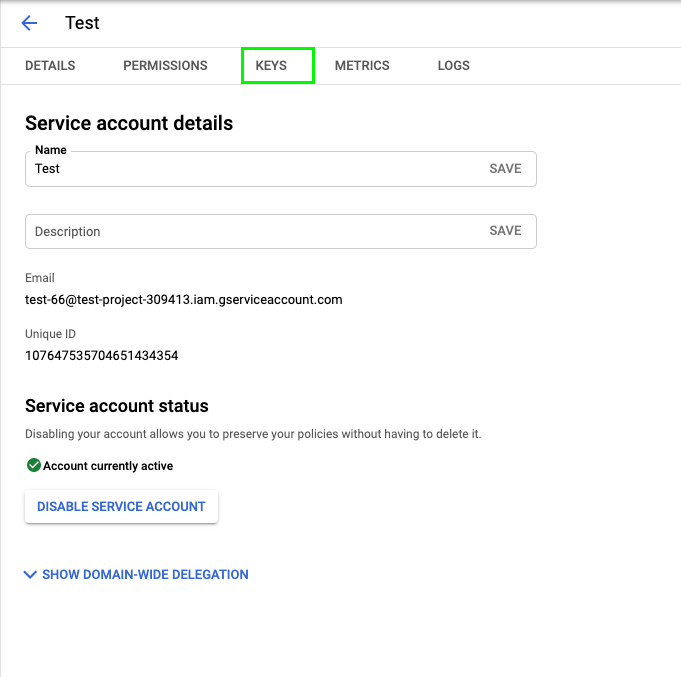
Create a Service Account
- When the API is enabled, move to the Credentials page.
- Click the Create credentials option and select Service Account.
- Give a name to the service account and click Create.
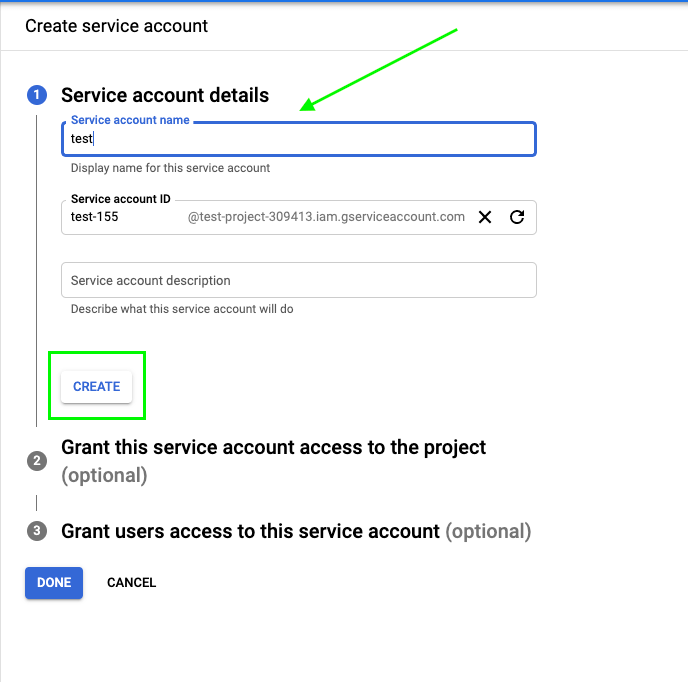
- Click Select a role => Project => Editor.

- Click Done.
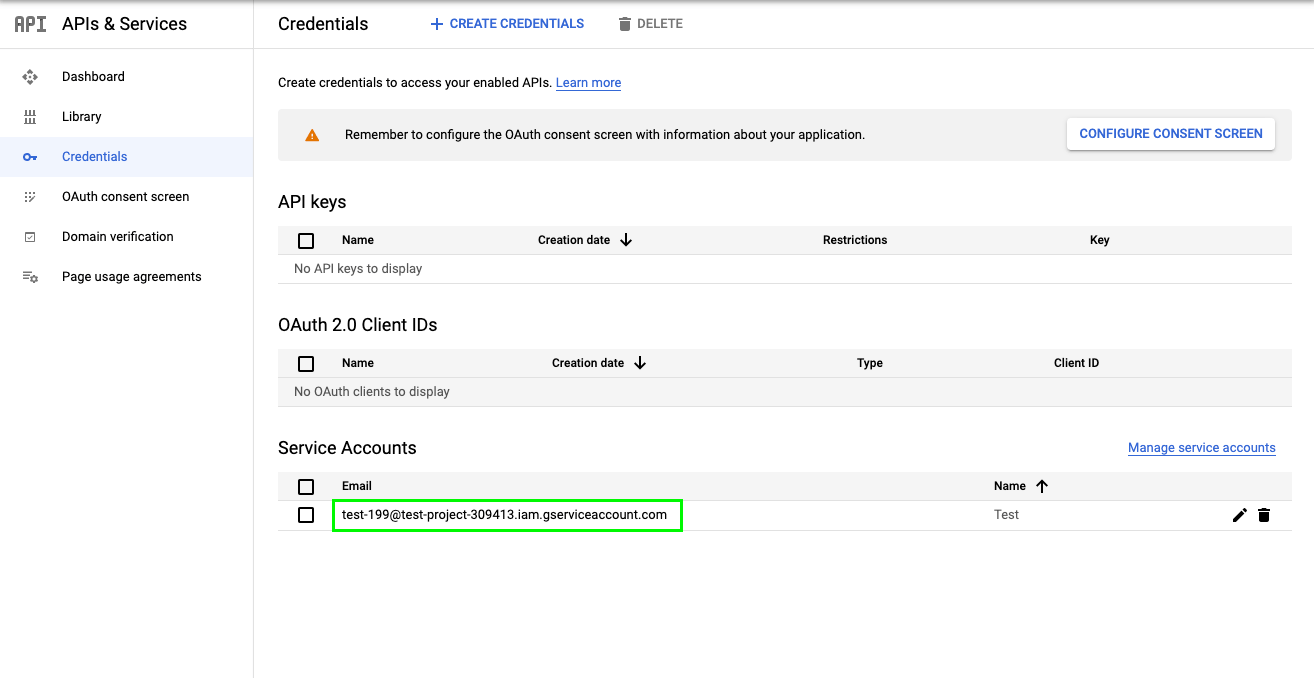
Now that your service account has been created, you will have to create a key, which will allow you to connect to the API automatically via this service account.
Create a Service Key
- On the Credentials page, click on your service account name.
- Go to Keys.
- Select Add Key => Create new key.
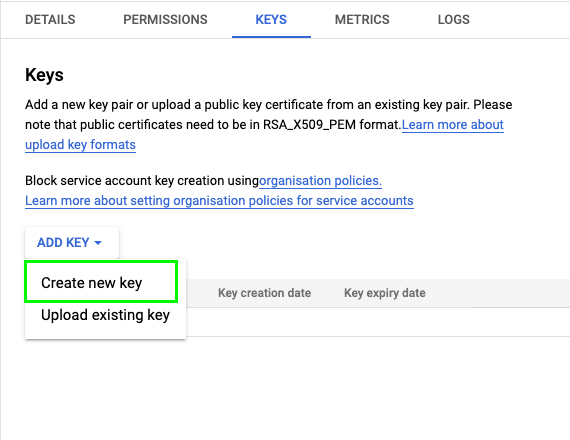
- Leave the option as JSON and click Create.
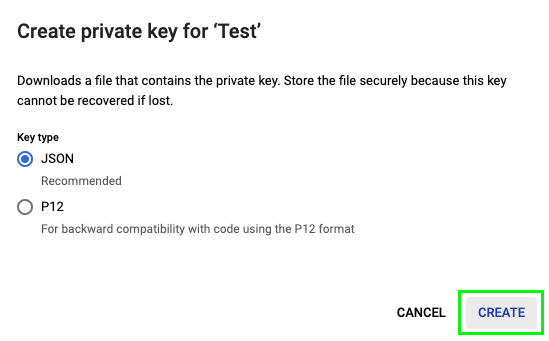
- This action will download a JSON file – rename that file
client_secret.json
This file contains all the sensitive information that will allow your app to authenticate with Google and have access to the API. It’s critical for this file to be kept private so that only your application has access to it.
The file will look like this:
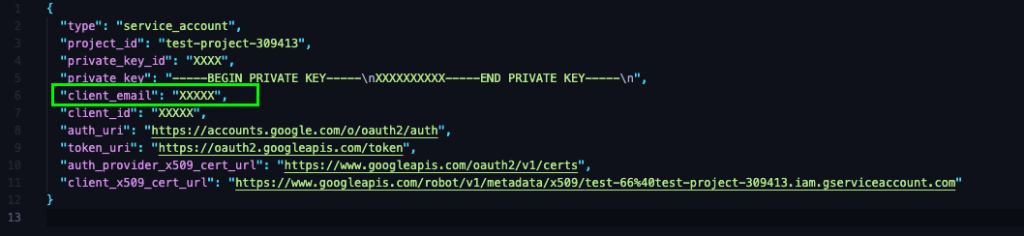
Find the “client_email” value and copy the email address. Each spreadsheet that you want to be manipulated by your app must provide access to this email.
Share your spreadsheet with client email
- Click Share in the top-right corner of your spreadsheet.
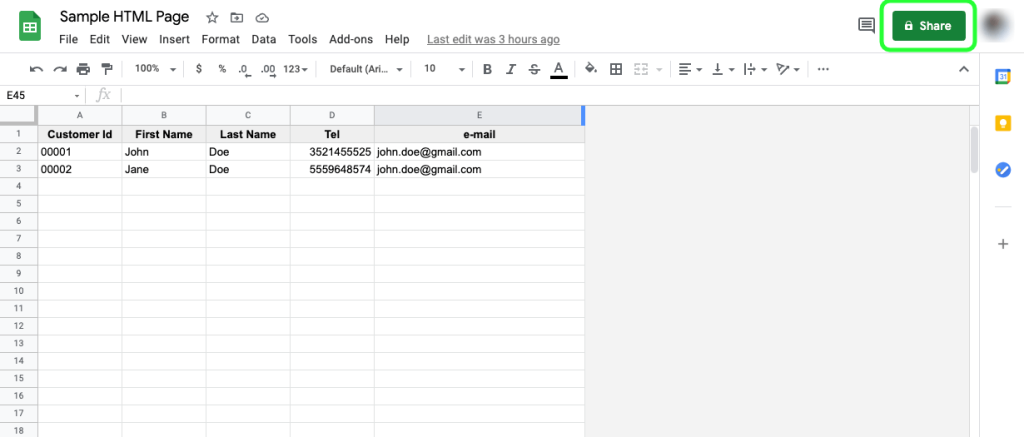
- Paste the
client emailyou just copied in the field and give Editor rights. Click Send.
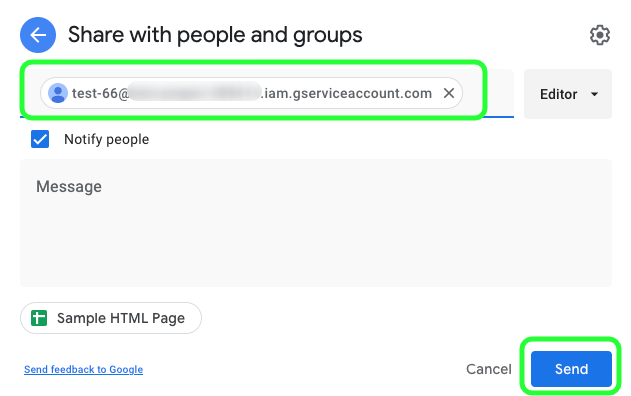
Now your service account has Edit access to the sheet and your application can use Google Sheets API to access the spreadsheet.
Read from Google Sheets
Using one of the client libraries mentioned in the previous section, and after you get the client_secret.json file, it’s really easy to read values from Google Sheets. For example, when your application needs to show some data from the database on the screen, first it needs to connect to the database and query (read) the data. A quick example of reading a range of values from Google Sheets using Node.js is shown below:
let google = require('googleapis');
let secretKey = require("./client_secret.json");
let jwtClient = new google.auth.JWT(
       secretKey.client_email,
       null,
       secretKey.private_key,
       ['https://www.googleapis.com/auth/spreadsheets']);
//authenticate request
jwtClient.authorize(function (err, tokens) {
 if (err) {
   console.log(err);
   return;
 } else {
   console.log("Successfully connected!");
 }
});

//Google Sheets API
let spreadsheetId = 'XXXXX';
let sheetRange = 'Homepage_Data!A1:B10'
let sheets = google.sheets('v4');
sheets.spreadsheets.values.get({
   auth: jwtClient,
   spreadsheetId: spreadsheetId,
   range: sheetRange
}, function (err, response) {
   if (err) {
       console.log('The API returned an error: ' + err);
   } else {
       console.log('Movie list from Google Sheets:');
       for (let row of response.values) {
           console.log('Title [%s]\t\tRating [%s]', row[0], row[1]);
       }
   }
});
In the above code block, we first authenticate with Google Sheets API using the secret file and then then we read the data providing the spreadsheet ID and a specific range using A1 notation. A1 notation is a string that tells the API which sheet and which range we want to query. For example, Sheet1!A1:B2 refers to the first two cells in the top two rows of Sheet1. The cells are defined using column and row numbering, as shown below:

Write to Google Sheets
Similarly, there are many cases where we want to write results back to Google Sheets. The process is almost the same, so, using Node.js and the secret file, we can open the spreadsheet, select a range, and write the data in it. A sample code to do that is shown below:
let google = require('googleapis');
let secretKey = require("./client_secret.json");
let jwtClient = new google.auth.JWT(
       secretKey.client_email,
       null,
       secretKey.private_key,
       ['https://www.googleapis.com/auth/spreadsheets']);
//authenticate request
jwtClient.authorize(function (err, tokens) {
 if (err) {
   console.log(err);
   return;
 } else {
   console.log("Successfully connected!");
 }
});

//Google Sheets API
let spreadsheetId = 'XXXXX';
let sheetRange = 'Homepage_Data!A4:E4'
let sheets = google.sheets('v4');
let values = [
  [
    “00004”,
    “Jack”,
    “Smith”,
    “1115748594”,
    “jack.smith@gmail.com”
  ]
];
const sheetResource = {
  values,
};
sheets.spreadsheets.values.update({
   auth: jwtClient,
   spreadsheetId: spreadsheetId,
   range: sheetRange,
   resource: sheetResource
}, function (err, response) {
   if (err) {
       console.log('The API returned an error: ' + err);
   } else {
       console.log('Movie list from Google Sheets:');
       for (let row of response.values) {
           console.log('Title [%s]\t\tRating [%s]', row[0], row[1]);
       }
   }
});
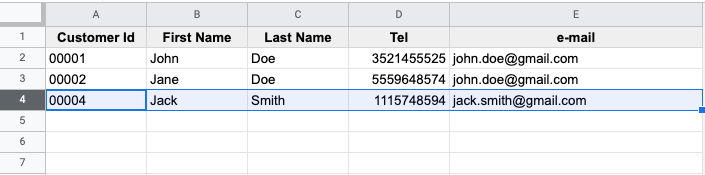
When writing data to Google Sheets, you need to make sure that the selected range (rows and columns) matches the numbers of the data you want to write. For the above example, the range must describe 2 rows and 2 columns to write the four numbers defined in the first line of code. After running the above, a new customer row is added to the database:
Use Google Sheets as a database for your reporting
The main reason we collect and store data is to analyze it and make more informed business decisions. When it comes to evaluating different aspects of business performance, a Google Sheets database can serve as a source of key information. It can also function as a data repository which you can later use to create dashboards and reports.
For example, let’s say you have a Google Sheets customer database that contains names, contact details, addresses, purchase data (purchase history, discounts used), and customer demographics (region, gender, age). To identify trends and potential opportunities, you could visualize the data in Google Sheets.
Do you want more than this spreadsheet app can offer in terms of business intelligence? Then connect it to a BI tool like Looker Studio or Tableau. The graphs and charts will allow you to easily compare purchasing data and understand which products are the most popular among specific audience segments. This can help you improve targeting in your sales and marketing efforts.
To create such reports with minimal hassle, use one of Coupler.io’s prebuilt dashboard templates for marketing, sales, finance, and more. These templates are free to use and are available for Google Sheets and a host of BI tools: Looker Studio, Tableau, Power BI, etc.
Free dashboard templates
BrowseIf you prefer to use Google Sheets native (yet limited) data visualization features, you can check out our comprehensive guide on How to Make a Chart or How to Create a Graph in Google Sheets.
Use Google Sheets as a database for a website
One of the most common use cases when someone is thinking about using Google Sheets as a database is to integrate it with their website. Let’s say you have an amazing blog where you are writing information about your daily life and occasionally upload recipes you love.
Wouldn’t it be great if you could keep a spreadsheet with all the recipes and the ingredients in it, and the website would load them automatically? Well, Google provides a Browser JavaScript client library, and this means that you can create a custom JavaScript snippet within your website to extract all the important information. Below you can see a simple way to structure your spreadsheet to have all the important information:

To access the above data and show them in your website, you can run an example like the one below:
function listTitles() {
        gapi.client.sheets.spreadsheets.values.get({
          spreadsheetId: '1BxiMVs0XRA5nFMdKvBdBZjgmUUqptlbs74OgvE2upms',
          range: 'Recipes!A2:F',
        }).then(function(response) {
          var range = response.result;
          if (range.values.length > 0) {
            appendPre('Name, Recipe:');
            for (i = 0; i < range.values.length; i++) {
              var row = range.values[i];
              // Print columns A and E, which correspond to indices 0 and 4.
              appendPre(row[0] + ', ' + row[4]);
            }
          } else {
            appendPre('No data found.');
          }
        }, function(response) {
          appendPre('Error: ' + response.result.error.message);
        });
      }
As you can see, you can have the title, blog post date, the body of the blog post, the ingredients, and a link to the blog post image. This information is sufficient to build an entire blog post. Just use the library to access Google Sheets API, connect to the spreadsheet, and extract the information you need.
As soon as you create this flow, it will be really easy to add or remove new posts as the only thing required is your time to input the new piece of information or delete an old one.
Use Google Sheets as a database for an HTML page
Google’s Apps Script provides all the resources you need to create HTML pages and dynamically interact with its content using only Google Sheets. Below we’ll describe the process of building a simple HTML page using Apps Script and Google Sheets as a database:
- Let’s start by creating a brand new Google Sheets spreadsheet.
- Rename the current sheet (or create a new one and name it) “
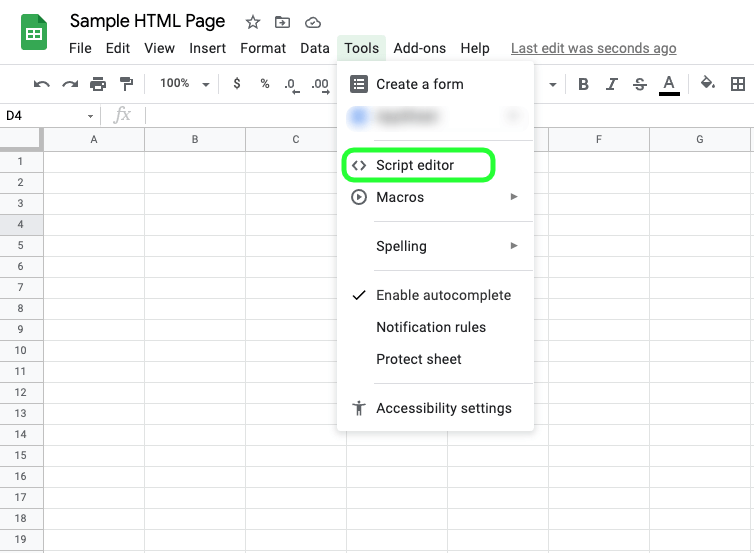
Homepage_Data”. - Go to Tools => Script Editor.
- You will be introduced to the standard Apps Script environment.
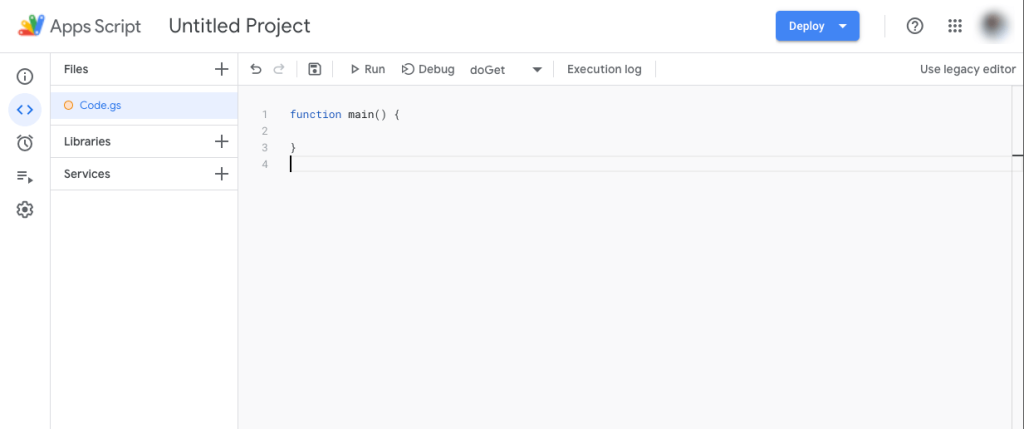
- Click on Untitled Project and rename it
Sample HTML Page. - Press the
+icon next to Files on the left panel and select HTML. - Name the new HTML file
Homepage. - Replace all the code from the new HTML page with the code below:
<!DOCTYPE html>
<html>
  <head>
    <base target="_top">
  </head>
  <body>
    <table width="175" border="1" id="table"></table><br><br>
    <input id="enterdata" type="text"/><button onclick="writeData()">Write Data</button>

    <script>
    function getData(values) {
    values.forEach(function(item, index) {
    var tbl = document.getElementById("table");
    tbl.innerHTML += '<tr><td>' + item[0] + '</td></tr>';
    });
    }
    google.script.run.withSuccessHandler(getData).readData();

    function writeData() {
    var sendvalue = document.getElementById("enterdata").value;
    var tbl = document.getElementById("table")
    tbl.innerHTML += '<tr><td>' + sendvalue + '</td></tr>';
    google.script.run.writeData(sendvalue);
    document.getElementById("enterdata").value = null;
    }
    </script>
  </body>
</html>
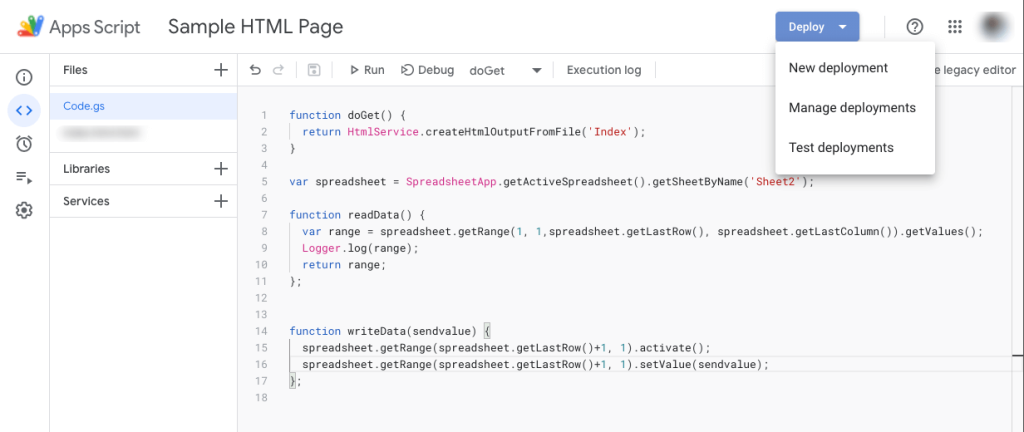
- Then open the “Code.gs” file and replace the included code with the code below:
function doGet() {
  return HtmlService.createHtmlOutputFromFile('Homepage');
}

var spreadsheet = SpreadsheetApp.getActiveSpreadsheet().getSheetByName('Homepage_Data');

function readData() {
  var range = spreadsheet.getRange(1, 1,spreadsheet.getLastRow(), spreadsheet.getLastColumn()).getValues();
  return range;
};
function writeData(sendvalue) {
  spreadsheet.getRange(spreadsheet.getLastRow()+1, 1).activate();
  spreadsheet.getRange(spreadsheet.getLastRow()+1, 1).setValue(sendvalue);
};
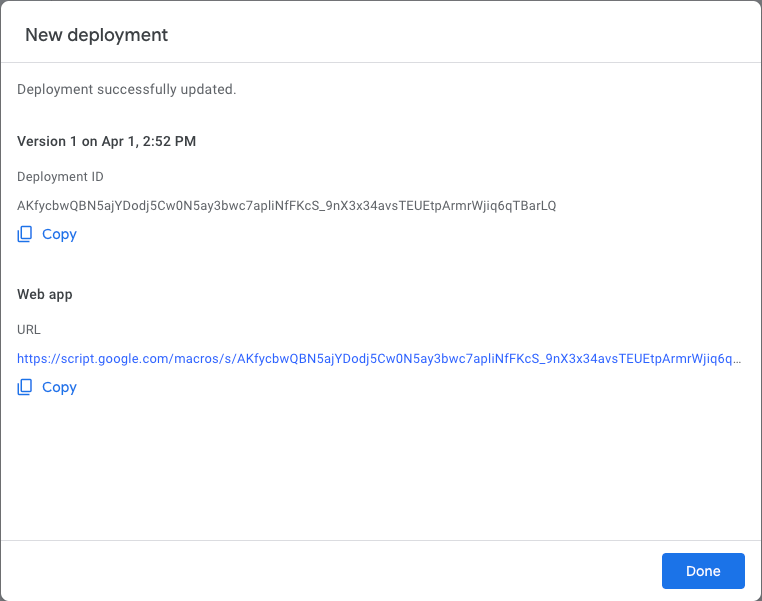
- Then click the blue Deploy button on the right and select New deployment.
- Click on the little gear icon next to Select type and select Web App.

- Give a description to your app, leave the other fields as they are, and click Deploy.
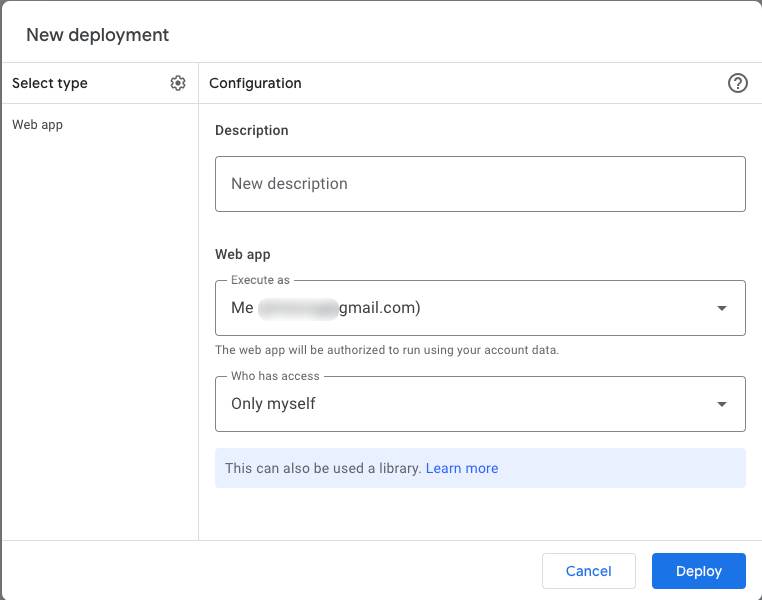
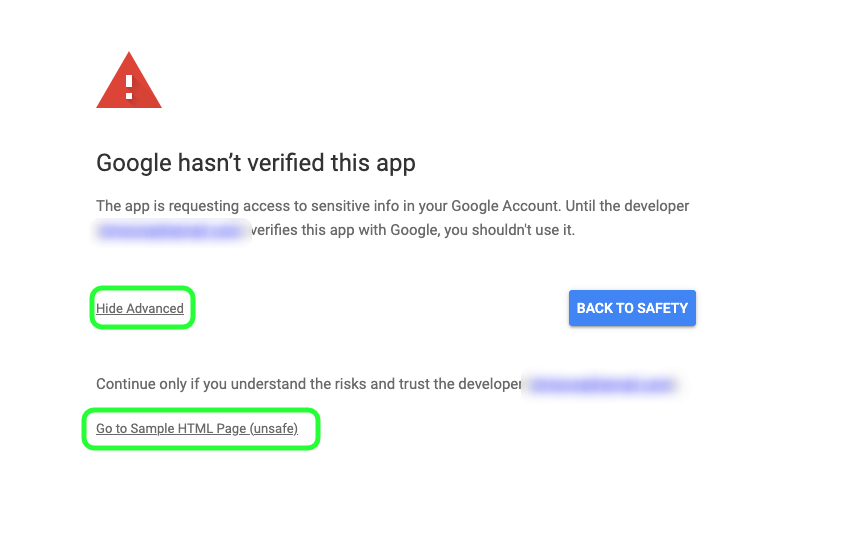
- Wait for the app to be deployed. The first time, you will need to authorize access to the app – click Authorize access => and choose your Google account. If the next screen says “Google hasn’t verified this app”, that’s natural as you are not an official developer – just click Advanced => Go to Sample HTML Page (unsafe) => Allow
- Your app is now deployed – click your web app URL to visit your app.
Here is how it looks:

You can add and remove data, and you will see it in the spreadsheet.

Congratulations on your first HTML page with Google Sheets as a database
Use Google Sheets as a database for a Django App
If you are involved in any part of web development, you probably already know Django. Django is a Python Web framework that makes it easy for developers to build, maintain, and deploy scalable web applications.
Let’s say you have built a Django application where you present a leaderboard for a board game tournament you are participating in. Building a whole database for this might be overkill as you just want a small solution that is easy to integrate and maintain. Moreover, you want to be able to change the leaderboard with as little effort as possible, so Google Sheets is your best option.
It’s really easy connecting to Google Sheets as there is already a package ready to simplify the process. Gspread is a Python package that is using the Google Sheets API v4 and adds spreadsheet functionality to your app, allowing you to sync data to and from Google Sheets. Using this package, you can:
- Use Google Sheets API v4
- Open a spreadsheet by title, key or URL
- Read, write, and format cell ranges
- Control sharing and access
- Perform batching updates
Connecting your app to Google Sheets, you can keep the scores in a spreadsheet and, as you update the spreadsheet with new data, your website will be dynamically updated. You can interact with Google Sheets really easily, for example:
Read all data from a specific sheet:
import gspread
from oauth2client.service_account import ServiceAccountCredentials

# use creds to create a client to interact with the Google Drive API
scope = ['https://www.googleapis.com/auth/spreadsheets']
creds = ServiceAccountCredentials.from_json_keyfile_name('client_secret.json', scope)
client = gspread.authorize(creds)

sheet = client.open("Example Spreadsheet").sheet1

sheet.get_all_values()
Or insert data to a sheet:
import gspread
from oauth2client.service_account import ServiceAccountCredentials

# use creds to create a client to interact with the Google Drive API
scope = ['https://www.googleapis.com/auth/spreadsheets']
creds = ServiceAccountCredentials.from_json_keyfile_name('client_secret.json', scope)
client = gspread.authorize(creds)

sheet = client.open("Example Spreadsheet").sheet1

row = ["We","LOVE","COUPLER"]
index = 1
sheet.insert_row(row, index)
Awesome, right?
Use Google Sheets as a database for an API
APIs are critical components for two entities to communicate with one another. APIs essentially power the whole internet as they allow important operations such as reads and writes. As we have already discussed, to communicate with Google Sheets programmatically, we use its API to read, write or change data.
When building your own API to create an interface for clients to communicate with your application, you may want to create a simple logger to keep all the requests to the API or use the API itself to let the users read or write data to your database.
For example, if you’re building an API using Node.js, you can use a built-in client library for Node.js that allows you to communicate with Google Sheets, thus making it easy to use it as a database. Google has a detailed guide on how to quickstart using Node.js and Google Sheets.
If you have created an API or found a ready-made one and all you need to do is export data automatically to your Google Sheets database, Coupler.io can be your favorite friend. With the JSON to Google Sheets integration, you can connect your spreadsheet to JSON APIs to import records, metadata, and other valuable data to your Google Sheets database without code. Google Sheets to Google Sheets connection is also provided as an alternative to the IMPORTRANGE function.
Use Google Sheets as a database for a WordPress website
WordPress is the most popular CMS out there. If you have a website, there’s a very good chance that you’re using WordPress to build and host it. WordPress has a great community that has already built many plugins to make your life easier.
Almost every website, besides the basic content, usually has a “call to action” button to download some content, sign up for the service, or a form to express interest in learning more. While we do not recommend using Google Sheets as a database for registrations, as you need a more secure and robust solution to store passwords, Google Sheets is a great option to store leads from form submissions.
There are many form plugins that you can use in WordPress, such as Contact Forms 7, NinjaForms, and GravityForms, and almost all of them provide a way to connect forms with Google Sheets. You don’t need to set up and maintain a whole database system just to store contact form submissions when you can set up Google Sheets and have a database up and running in just a couple of clicks and no code at all. After all, we are used to looking at spreadsheets and we can even analyze our leads on the spot!
Use Google Sheets as an inventory database
An inventory database is where you store all of the information about your inventory. For example, in an inventory database, you can store part names, quantities, vendors, locations, etc. It should be accessible, accurate, up-to-date, and customizable so that you have complete control over your inventory and can run your business as efficiently as possible. The database can be on paper, on a database system, or on a spreadsheet.
Many small businesses use Microsoft Excel as an inventory database and are already familiar with keeping the information up to date within the spreadsheet files. With Google Sheets, you get all the nice features of spreadsheet software along with online capabilities.
Using Google Sheets as an inventory database, you can keep your inventory up to date automatically. By building a nice interface and connecting it to your Google Sheets file, you can add, delete, update, or even enhance your inventory with new information.
This use case scenario is very popular and even Google provides a detailed guide on how to “Create an inventory management app from Google Sheets with AppSheet”. Google Cloud’s AppSheet lets you create apps without writing a single line of code and you can have your inventory database up and running in just a few steps.
Use Google Sheets as a relational database
We’ve talked a lot in previous sections about how to use Google Sheets as a database, but we haven’t said if Google Sheets could work as a relational database yet. Before going to that, it’s important to first understand what a relational database is.
A relational database is a type of database that uses a structure that allows us to identify and access data in relation to another piece of data in the database. Often, data in a relational database is organized into multiple tables.

In the above picture, you can see how a relational database is structured. The schema consists of three tables:
- Teachers: Contains the IDs, first names, and surnames of the teachers
- Classes: Contains the IDs, the teachers, the students, and the names of the class.
- Students: Contains the IDs, first names, and surnames of the students
A relational database is implemented and maintained via a Relational Database Management System (RDBMS). An RDBMS is a tool that allows you to install, use, and maintain relational databases. They usually use a language called Structured Query Language (SQL) to query the data.
Usually, to query the data, you need to build a query that will join and filter the data you need in an efficient way. Unfortunately, while we can simulate such functionality in Google Sheets, it’s not convenient enough to create all these functions to query the data in an efficient way. This is why we do not recommend using Google Sheets when your data are structured in this relational model.
Why to move away from Google Sheets as a database
Google Sheets can be a perfect tool for early days, proof of concepts, and small businesses where the data needs are not too demanding yet. But it has a limit of 5 million cells. If you feel that your business has outgrown the use of spreadsheets as a database, it’s time to consider a more advanced solution.
A logical next step is migrating to a relational database (as mentioned above) such as MySQL or PostgreSQL. Although it requires more technical expertise to set up, an RDBMS is better at storing and structuring fast-growing datasets. It also lets you manage complex data relationships, perform quick read and write operations, and scale more efficiently.
There is also an option to move to a data warehouse like BigQuery or Amazon Redshift. These data management systems are suitable for businesses with high volumes of big data (e.g., Spotify, Walmart) and who need to run lots of complex queries.
In any case, data warehouses are more efficient than relational databases or Google Sheets at handling large datasets. They also offer advanced querying capabilities, faster data processing for analytics, and horizontal and automatic scaling options.
Here are two other major limitations of Google Sheets to consider:
- Consistency: Google Sheets API is great for simple usage and common requests, but it’s not always consistent. There may be cases when a request fails or times out. Common database systems have “fault tolerance” features that solve this kind of problem while, in Google Sheets, you have to create them yourself.
- Security: Google Sheets is a great tool for storing simple data, but when it comes to security, other options may be a better fit. For example, if you want a database to store sensitive user information and passwords that need to be encrypted, you may have to use a database system that provides more tools for this kind of data.
We’ve covered everything you need to create your first database in Google Sheets. If you want to go further and gain tangible insights from your data, you can check out this selection of Google Sheets dashboards for visualizing your marketing, finance, ecommerce data, and more. You can also find more inspiration in our dashboard gallery!
Automate data load to Google Sheets with Coupler.io
Get started for free


