Each formula you write in Looker Studio (ex. Google Data Studio) unlocks a new insight from your data. Formulas help unravel the story behind your numbers. They “calculate” answers to critical questions like the average sales value, conversion rates, changes in subscriber count, etc.
Yet, Looker Studio offers more than just formulas. It has many built-in functions that handle everything from simple sums to tricky conditional tasks.
Looker Studio formula and function fundamentals
Looker Studio formulas
Formulas help you to manipulate your data in order to derive new information. It can be a mathematical operation, string manipulation, date calculation, etc.
Looker Studio formulas can be used within calculated fields (to create custom metrics and dimensions) and filters. Here’s an example of a formula used to create a calculated field:
Let’s say you want to create a new calculated field called Total that substracts a subtotal field (Subtotal) by a discount field (Discount). The Looker Studio formula for this calculated field would be ‘Subtotal – Discount’:
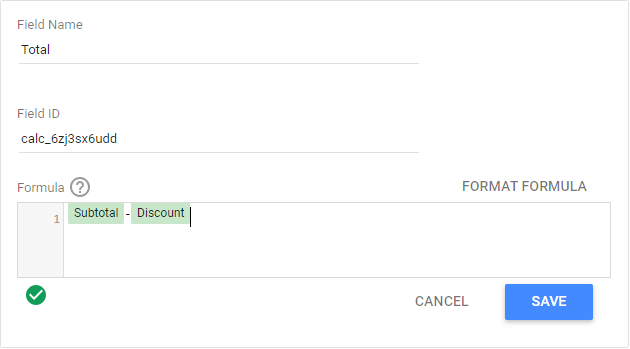
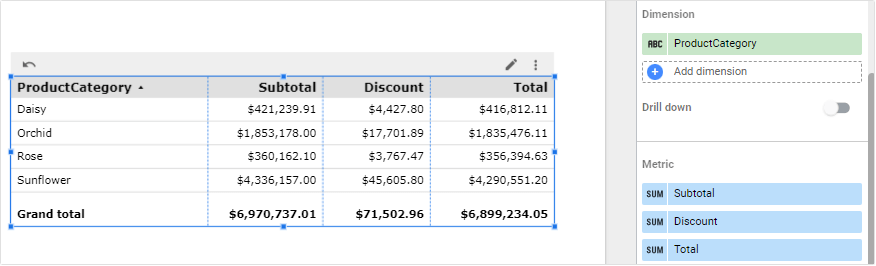
This calculated field can then be used in reports and dashboards just like any other field in the data model:
Note: It’s common for users to use the term “formulas” when referring to “calculated fields”. This is because all calculated fields in Looker Studio are built using formulas. Yet, it’s important to note the distinction between the two for accurate understanding.
Moreover, in Looker Studio Pro, you can use AI to help you create formulas. Learn more about this in our blog post where we’ve compared Looker Studio vs Looker Studio Pro.
Using functions in formulas
Looker Studio provides over 80 functions. You can use them inside your calculated field’s formula.
Each function handles specific needs. For example, the MAX and MIN functions return the maximum and minimum values. The UPPER function converts a text to uppercase. You can use the YEAR, MONTH, and DAY functions to extract the year, month, and day of a date or datetime value.
Let’s look at an example. Say you want to display the average order value (AOV) of your online sales in a scorecard. You can do this by creating a calculated field with an AVG function in its formula:

Note: In the latter section, we’ll explain various Looker Studio functions based on their types.
Looker Studio formula syntax: Simplifying complexity
Formulas are written using certain rules. These rules are known as syntax.
It’s important to understand how to structure your formulas in Looker Studio correctly to get accurate results.
Now, let’s make it easy and break down some main points about Looker Studio formula syntax:
- Operators: Looker supports a variety of operators in its formulas, including:
- Arithmetic operators (+, -, *, /)
- Comparison operators (>, <, =, >=, <=, <>)
- Logical operators (AND, OR, IN, IS NULL, NOT)
- Functions: Every function in Looker Studio has a syntax that defines how the function must be used, including the parameters needed.
- Conditionals: You can use conditional logic in your formulas with the CASE WHEN THEN ELSE END statement. This allows you to perform different calculations based on certain conditions.
- Literals: A literal represents a constant value written directly into your formulas. They can be:
- Numerics (like 2 or 3.14)
- Strings (like “Looker Studio” or ‘formulas and functions’)
- Booleans (true or false)
- Dates (like DATE ‘2021-4-1’ or DATETIME ‘2021-5-29 23:59:59’)
How to use Looker Studio formulas: Your step-by-step guide
We’ll show you how to apply formulas in Looker Studio calculated fields, which you can create either in the data source or directly in charts.
The exciting part is that we’ll also explain how to use Coupler.io to create custom fields with formulas. So, keep reading!
Using formulas in the data source’s calculated fields
The benefit of creating calculated fields in a data source is that you can use them in any report that uses the data source.
To create a formula in a data source’s calculated field:
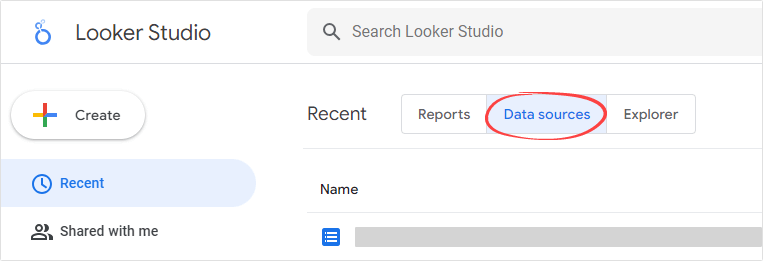
- Click the Data sources tab in the top menu bar.
- Click a data source where you want to add the formula. This will open the data source in edit mode.
- Click the Add a field button in the top section. Then, select Add calculated field from the context menu that appears.

- Enter Field Name and Formula. Note: You can reference an existing field by typing its name directly in the formula field or by clicking it from the Available Fields list.

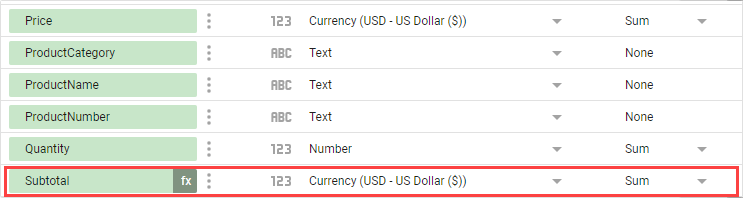
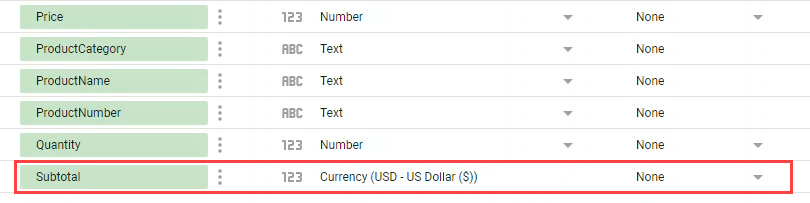
- Click Save. Review the newly calculated field in your data source. If you want, you can change its data type and default aggregation to ensure it displays the correct value and format in charts.
Using formulas in chart-specific calculated fields
When you add a calculated field in a chart level, it only exists in that specific chart. It won’t affect your original data source.
To create a formula in a chart-specific calculated field:
- Open your report in edit mode.
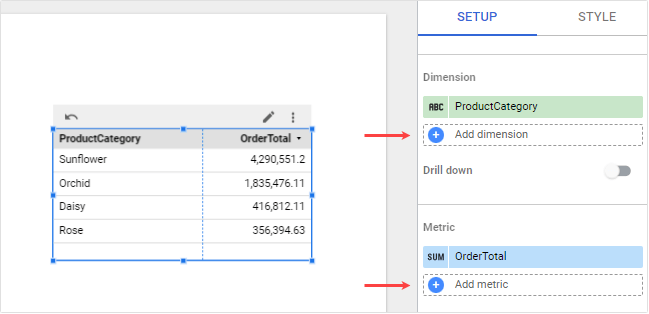
- Click a chart where you want to apply the formula.
- In the Setup tab, click Add dimension or Add metric, depending on what you want to create.
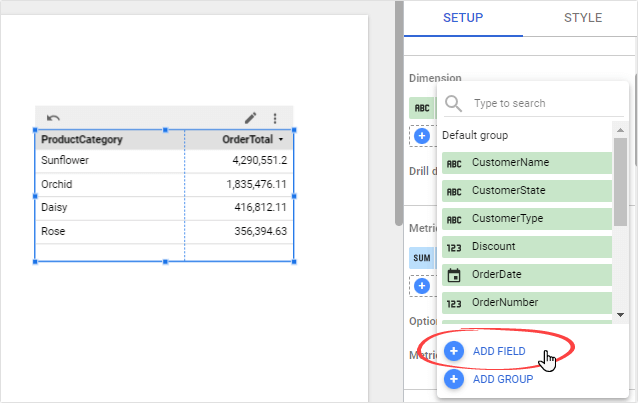
- In the menu container that appears, click Add field.
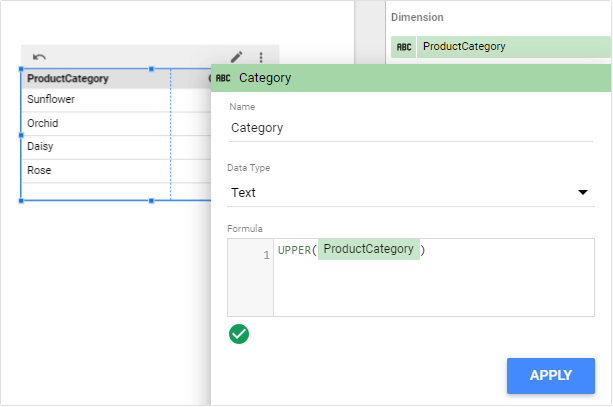
- Enter a Name and Formula for the new field. For example, here, we add a new dimension named Category and use a formula with a function: UPPER(ProductCategory).
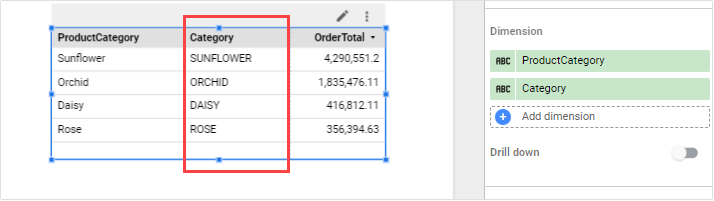
- Click Apply. Now, you can see the new field in the chart.
Create calculated fields for the data sources connected to Looker Studio
Please keep in mind, though, that creating too many calculated fields might slow down your Looker Studio reports and dashboards, especially with large datasets. In this case, we suggest creating the fields before loading your data to Looker Studio. You can Coupler.io as a data automation tool that provides a Looker Studio connector to load and transform data from 50+ apps.
With this approach, the formulas are carried out on the Coupler.io side before the data ends in Looker Studio. This will lead to a better performance.
As an example, here, we select Google Sheets as the source. You can try it yourself for free to load data from your source to Looker Studio. Select the required app in the form below and click Proceed.
Then, follow the steps below to configure your importer.
Step 1: Collect data
In this step, you configure the data source to extract data from.
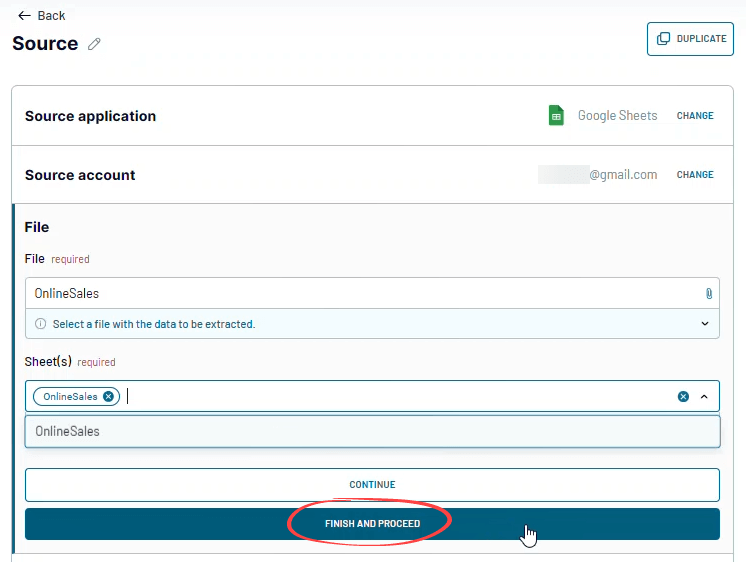
For example, to connect with Google Sheets, you must connect your Google account. Then, select a File and specify the Sheet you will extract as the data source. When done, click Finish and Proceed.
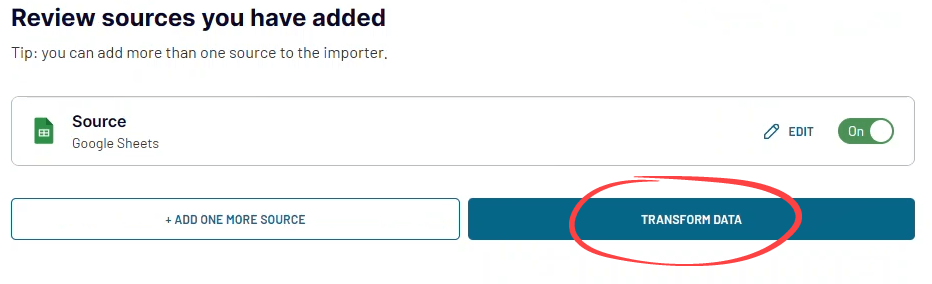
Review your data source. If you want, you can add another data source to the importer. To apply data transformations and add new fields with formulas, click Transform data.
Step 2: Transform data & apply formulas
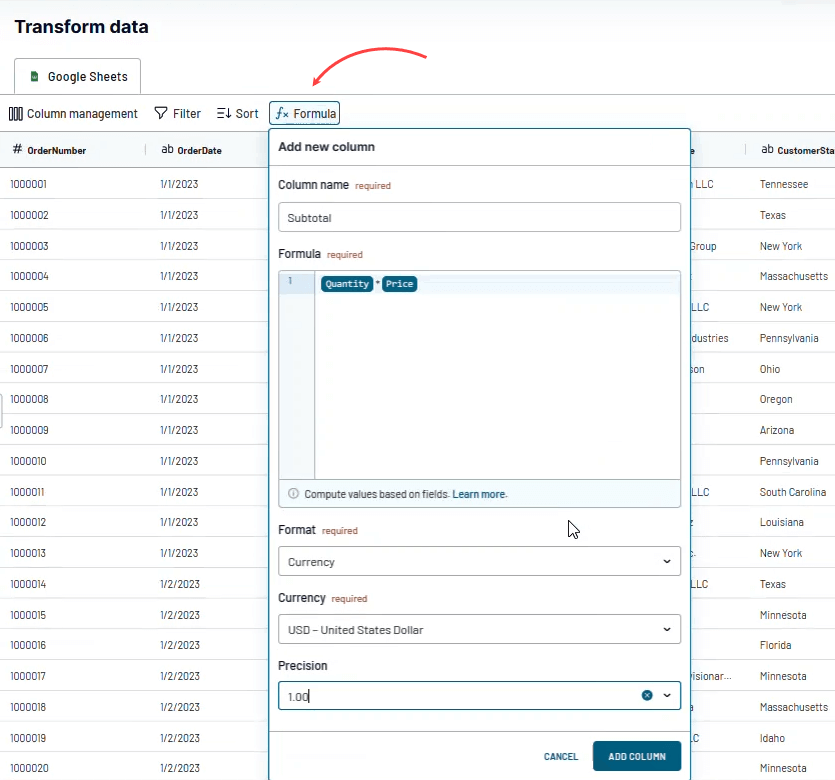
In this step, you can manipulate your data in different ways. You can hide some columns, apply filtering and sorting, blend data from several apps into one dataset, and add new custom columns with formulas.
To create a new field or column, simply click the Formula button on the top of your data preview. Then, enter the field details, such as Column name and Formula. Then, click Add column when done.
You can also check out our documentation on how to add formula-based columns.
Once you’re done with your data transformation setup, click Proceed to move on to the next steps.
To load your data to Looker Studio, click the Generate data source button.
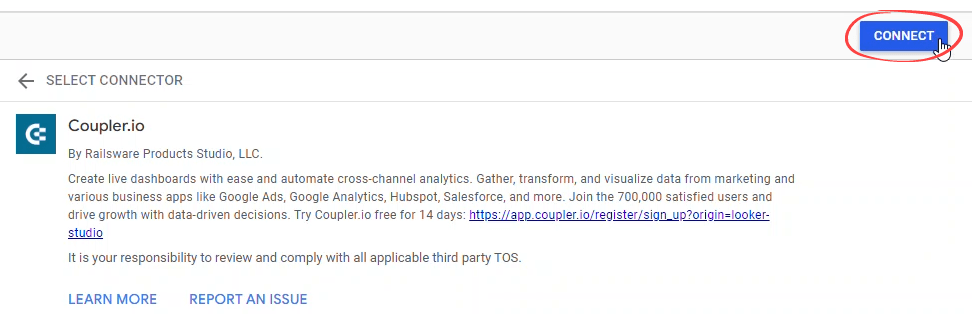
You will then be redirected to Looker Studio and see the following screen. Authorize the connection if prompted. Click Connect to connect the importer.
A new data source will be added to the Looker Studio. This will also include the calculated field we created using Coupler.io.
As you can see, Coupler.io’s data transformation feature can help you create custom fields with formulas in Looker Studio data sources. It works for both new metrics and dimensions. You can also create fields with various data types.
Step 3: Schedule your importer
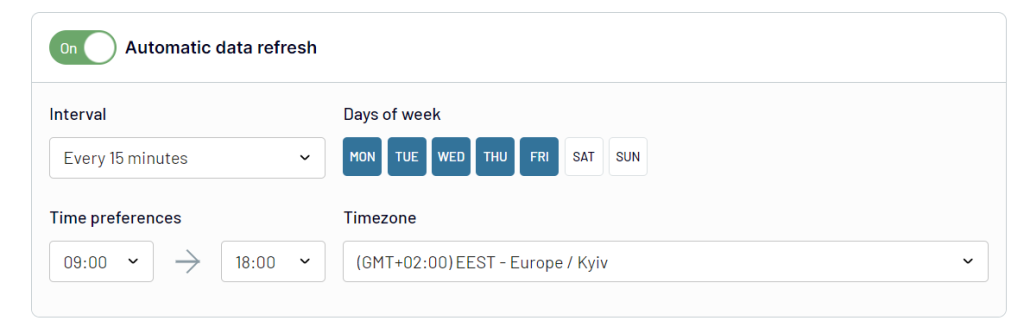
Coupler.io lets you set up an automatic data refresh. You can configure your importer to automatically refresh at an interval of your choice, as short as every 15 minutes.
To do this, go back to Coupler.io and refresh your browser. You’ll see a screen similar to this below to choose an interval and other settings.
Looker Studio formula examples
Let’s explore more examples of how formulas and functions can be applied in different use cases. We’ll show some real-world examples that you can apply in your own work. However, please note that these merely scratch the surface of what’s possible with Looker Studio’s formulas and functions.
Looker Studio basic formulas
You can use basic operators, such as arithmetic, logical, and comparison operators, in your formulas to help you perform calculations.
Here are some examples:
- Calculating profit: Let’s say you have Revenue and Expenses fields, and you want to calculate revenue using subtraction (-). You can create a calculated field with this formula: Revenue – Expenses.
- Percentage calculation: For example, you can use division (/) to calculate the percentage of a value compared to the total. Your Looker Studio formula would be something like SalesX / TotalSales. You can then format your number in Percent to display it nicely in reports.
- Out-of-stock alert: You can use the less than (<) operator to flag items with stock less than a certain number. Your formula would be something like IF(Inventory<3, “Reorder needed”, “OK”).
Looker Studio formulas with functions
By using Looker Studio functions in formulas, you can simplify calculations and data manipulation.
Here are some examples:
- Calculating the average order value: Understanding your average order value can help you gain insights into your customers’ buying habits. You can calculate this using the AVG function, for example, AVG(TotalOrder).
- Project deadline calculation: Suppose you want to create a visualization of your project data. You add a new dimension that shows the number of days until a project deadline. In this case, you can use the DATE_DIFF function in your formula: DATE_DIFF(ProjectDeadline, TODAY()).
- String modification: You have product data and want to show the product categories in uppercase letters in your report. To do this, you can use a formula like this: UPPER(ProductCategory).
Looker Studio advanced formulas
Advanced formulas and functions in Looker Studio are useful for in-depth data analysis and manipulation.
Some examples:
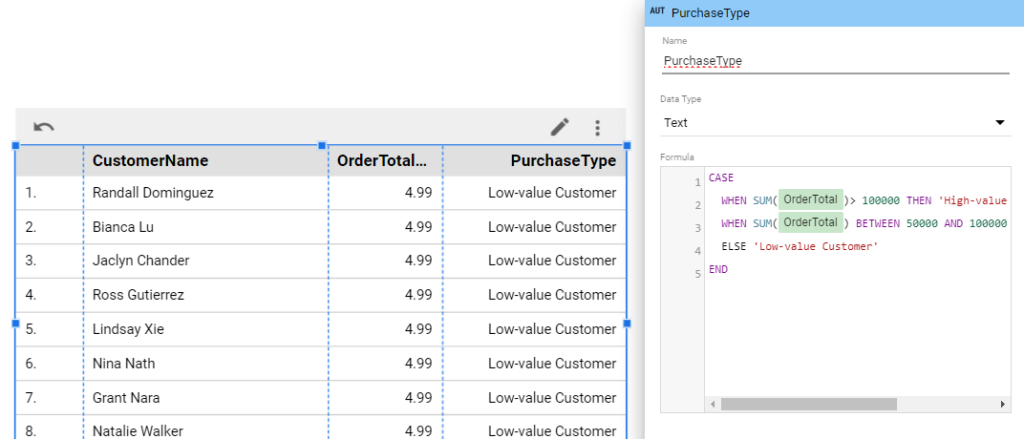
- Segmenting customers using the CASE function
Suppose you want to segment your customers based on their purchase history. A CASE statement can help you achieve this:
CASE
  WHEN SUM(OrderTotal)> 100000 THEN 'High-value Customer'
  WHEN SUM(OrderTotal) BETWEEN 50000 AND 100000 THEN 'Mid-value Customer'
  ELSE 'Low-value Customer'
END
- Standardizing data with REGEXP_REPLACE function
If you have a dataset with URLs in various formats and want to standardize them to start with ‘www.’, you can use REGEXP_REPLACE for this:
REGEXP_REPLACE(WebsiteUrl, '^(http[s]?://)?', 'www.')
This formula matches any URL starting with http:// or https:// (the ? in the regex expression makes the s optional) and replaces it with www. This ensures all URLs in your dataset follow a consistent format.
Exploring the different types of Looker Studio functions
There are over 80 built-in functions in Looker Studio. You don’t need to memorize all of them. In reality, you’ll find yourself using some of them regularly.
The following are the different types of Looker Studio functions:
Looker Studio aggregation functions
Aggregation functions allow you to summarize and group your data, providing insights that might not be apparent at first glance.
Some commonly used aggregation functions include:
| Function name | Syntax | What it does |
|---|---|---|
| SUM | SUM(X) | Returns the sum of all values of X. |
| AVG | AVG(X) | Returns the average of all values of X. |
| MAX | MAX(X) | Returns the maximum value of X. |
| MIN | MIN(X) | Returns the minimum value of X. |
| COUNT | COUNT(X) | Returns the number of values of X. |
| COUNT_DISTINCT | COUNT_DISTINCT(X) | Returns the number of unique values of X. |
Other aggregation functions include MEDIAN, PERCENTILE, STDEV, and VARIANCE.
Looker Studio arithmetic functions
Arithmetic functions help you perform mathematical calculations.
Here are some arithmetic functions in Looker Studio:
| Function name | Syntax | What it does |
|---|---|---|
| ROUND | ROUND(X, Y) | Returns X rounded to Y precision digits. |
| CEIL | CEIL(X) | Returns the nearest integer greater than X. For example, if the value of X is v, CEIL(X) is greater than or equal to v. |
| FLOOR | FLOOR(X) | Returns the nearest integer less than X. For example, if the value X is v, FLOOR(X) is equal to or less than v. |
| POWER | POWER(X, Y) | Returns result of raising X to the power Y. |
| SQRT | SQRT(X) | Returns the square root of X. |
| ABS | ABS(X) | Returns the absolute value of a number. |
Other arithmetic functions include NARY_MIN, NARY_MAX, trigonometry functions (SIN, COS, TAN, ASIN, ACOS, ATAN), and logarithmic functions (LOG, LOG10).
Looker Studio string/text functions
String functions manipulate text data. They can help you clean and format your data.
Common string functions include:
| Function name | Syntax | What it does |
|---|---|---|
| SUBSTR | SUBSTR(X, index, n) | Returns a text that is a substring of X. The substring begins at index and is n characters long. |
| TRIM | TRIM(X) | Returns X with leading and trailing spaces removed. |
| UPPER | UPPER(X) | Converts X to uppercase. |
| LOWER | LOWER(X) | Converts X to lowercase. |
| REPLACE | REPLACE(X, Y, Z) | Returns a copy of X with all occurrences of Y in X replaced by Z. |
| LENGTH | LENGTH(X) | Returns the number of characters in X. |
| CONCAT | CONCAT(X,Y) | Returns a text that is the concatenation of X and Y. |
Other string functions include STARTS_WITH, ENDS_WITH, CONTAINS_TEXT, LEFT_TEXT, RIGHT_TEXT, REGEXP_CONTAINS, REGEXP_EXTRACT, REGEXP_MATCH, and REGEXP_REPLACE.
Looker Studio date functions
Date functions allow you to work with dates and times.
Common date functions include:
| Function name | Syntax | What it does |
|---|---|---|
| DATE | DATE(year, month, day) | Constructs a Date field or value from numbers or from a Date & Time field or expression. |
| DATE_DIFF | DATE_DIFF(X, Y) | Returns the difference in days between X and Y (X – Y). |
| YEAR | YEAR(date_expression) | Returns the year of a given date expression. |
| MONTH | MONTH(date_expression) | Returns the month of a given date expression. |
| DAY | DAY(date_expression) | Returns the day of a given date expression. |
| TODAY | TODAY([time_zone]) | Returns the current date as of the specified or default timezone. |
| CURRENT_DATE | CURRENT_DATE([time_zone]) | Returns the current date as of the specified or default timezone. |
| PARSE_DATE | PARSE_DATE(format_string, text) | Converts text to a date. |
Other date functions include DATETIME, CURRENT_DATETIME, DATETIME_DIFF, EXTRACT, PARSE_DATETIME, YEARWEEK, WEEK, QUARTER, and many more.
Looker Studio conditional functions
Conditional functions are used to perform different actions based on different conditions.
Conditional functions in Looker Studio include:
| Function name | Syntax | What it does |
|---|---|---|
| IF | IF(condition, true_result, false_result) | Returns true_result if condition is true. Else, returns false_result. |
| IFNULL | IFNULL(expression, result) | Returns result if the input expression is null. |
| NULLIF | NULLIF(expression1, expression2) | Returns null if expression1 matches expression1. |
| COALESCE | COALESCE(field_expression[,field_expression, …]) | Returns the first non-missing value found in a list of fields. |
| CASE | CASE WHEN condition THEN result [WHEN condition THEN result] […] [ELSE else_result]END” | Evaluates the condition of each successive WHEN clause. If the first condition is true, any remaining clauses are not evaluated. If all conditions are false or NULL, returns else_result if present; if not present, returns NULL. |
| CASE (Simple) | CASE input_expression WHEN expression_to_match THEN result [WHEN expression_to_match THEN result] […] [ELSE result]END | Compares input_expression to expression_to_match of each successive WHEN clause and returns the first result where this comparison returns true |
Looker Studio geo functions
Here are Looker Studio functions that allow you to work with geographic data:
| Function name | Syntax | What it does |
|---|---|---|
| TOCITY | TOCITY(X [,Input Format]) | Returns the city name for X. |
| TOCONTINENT | TOCONTINENT(X [,Input Format]) | Returns the continent name for X. |
| TOCOUNTRY | TOCOUNTRY(X [,Input Format]) | Returns the country name for X. |
| TOREGION | TOREGION(X [,Input Format]) | Returns the region name for X. |
| TOSUBCONTINENT | TOSUBCONTINENT(X [,Input Format]) | Returns the sub-continent name for X. |
Looker Studio miscellaneous functions
There are also several miscellaneous functions in Looker Studio that don’t fit into the categories above but are still very useful.
| Function name | Syntax | What it does |
|---|---|---|
| CAST | CAST(field_expression AS TYPE) | Cast field or expression into TYPE. Aggregated fields are not allowed inside CAST.TYPE can be NUMBER, TEXT, or DATETIME. |
| HYPERLINK | HYPERLINK(URL, link label) | Returns a hyperlink to the URL, labeled with the link label. |
| IMAGE | IMAGE(Image URL, [Alternative Text]) | Creates Image fields in your data source. |
| NATIVE_DIMENSION | NATIVE_DIMENSION(“JSON_VALUE(‘{“name”: “Dana”}’, ‘$.name’)”,”STRING”) | Returns the result of an SQL expression as evaluated by the underlying dataset. The expression cannot include any aggregations. |
Using Looker Studio, formulas, and functions efficiently with Coupler.io
In conclusion, Looker Studio formulas and functions are powerful tools for data analysis. However, they come with their own set of challenges. One of them is the potential slowdown in performance with extensive calculations. This is where Coupler.io can make a real difference.
By taking care of these complex calculations outside of Looker Studio, Coupler.io ensures your data analytics process runs efficiently and smoothly. This enhancement in speed and efficiency can be a game-changer for your data analysts.
We highly recommend checking out our Looker Studio tutorial to enhance your Looker Studio experience.


