
A Mailchimp list is the backbone of your email marketing. That’s why it’s crucial to understand how to work with Mailchimp lists and how to manage them in a way that will enhance efficiency and ensure solid business results. We’ll cover these vital questions in this article, providing you with a detailed overview of the Mailchimp list basics. Let’s dive in!
What is a Mailchimp mailing list?
Practically speaking, a Mailchimp list is a database containing information about your contacts to whom you send emails in bulk using Mailchimp. It’s called a “list” because its core element is, well, a list of your customers’ names and email addresses. However, over time, lists typically accumulate many other data types, such as customer location, engagement stats for each contact, and so on.
Another term for the Mailchimp list is audience. This is what lists are now officially called in the Mailchimp interface, tutorials, and other materials. Despite this, many marketers still keep calling them lists because this term was widely used by Mailchimp before. In this article, we’ll use both terms interchangeably.
Requirements for Mailchimp lists
Not just any list of emails can be a Mailchimp list. The platform has certain requirements. First of all, you should only include contacts you collected yourself under relevant circumstances. This means you cannot use any third-party email lists or copy email addresses from publicly available sources. You should also be careful with the contact details you collect for purposes other than subscribing.
For example, if you run a restaurant and customers provide their email addresses to take part in a promo, you cannot treat these people as subscribers just because they gave you their contact information. To subscribe them, you’ll need to get their explicit permission to send them your marketing materials.
What is Mailchimp list management?
This is the process of organizing, refreshing, and maintaining your audience data in Mailchimp with the help of the platform’s in-built list management functionality.
Why manage Mailchimp lists?
Proper list maintenance is vitally important. Accumulating a huge database of contacts alone does not necessarily translate into increased sales or engagement. For instance, you can have a big audience but a low open rate and a lot of inactive users. In such a case, you will need to re-engage or delete idle subscribers. Otherwise, you might get stuck with distorted statistics and spend money on users who are not interested in your services. Such customers might even report your emails as spam and cause additional problems.
That’s why it’s crucial to keep your Mailchimp lists relevant, analyze them, and implement improvements based on the findings.
Examples of Mailchimp list management include:
- Segmenting. This implies arranging an audience into groups and segments and marking it with various tags. With a well-structured audience, it’s easier to run targeted campaigns and conduct analyses.
- Growing and updating. To keep an audience refreshed, it’s necessary to constantly add new contacts and regularly update the already existing ones. An example of the list growth tools in Mailchimp can be signup forms.
- Analyzing. When you closely monitor your list data, you can derive valuable insights and change your strategy to maximize efficiency. Mailchimp provides quite a lot of analysis tools and features, such as predicted demographics, engagement statistics, or audience dashboard.
- Re-engaging. This implies running a special Mailchimp campaign designed to win back inactive users. It can include special offers, sending promo codes, and so on.
- Cleaning and archiving. The users who cannot be re-engaged should be removed from your Mailchimp list. You can do so by deleting them or archiving a part of your list.
- Keeping back-ups. The more list data you collect, the more value it harbors. So, naturally, you wouldn’t want to lose this hard-won asset due to some mistake or technical issue. Keeping a backup copy of your list and constantly updating it is an important part of Mailchimp list maintenance.
As you can see, list management is closely connected to performance, efficiency, and, eventually, to business results. Now, let’s learn more about working with Mailchimp mailing lists.
How to create a list in Mailchimp
Before you begin, you will need to gather contacts from email signup sources – for example, on-site banners or widgets. Alternatively, you can prepare a list of contacts that you collected in other apps, as long as this isn’t a third-party list and all other Mailchimp requirements are met.
There are several ways to create a list in Mailchimp. The first one is adding contacts manually one by one, and the other ways are different types of importing.
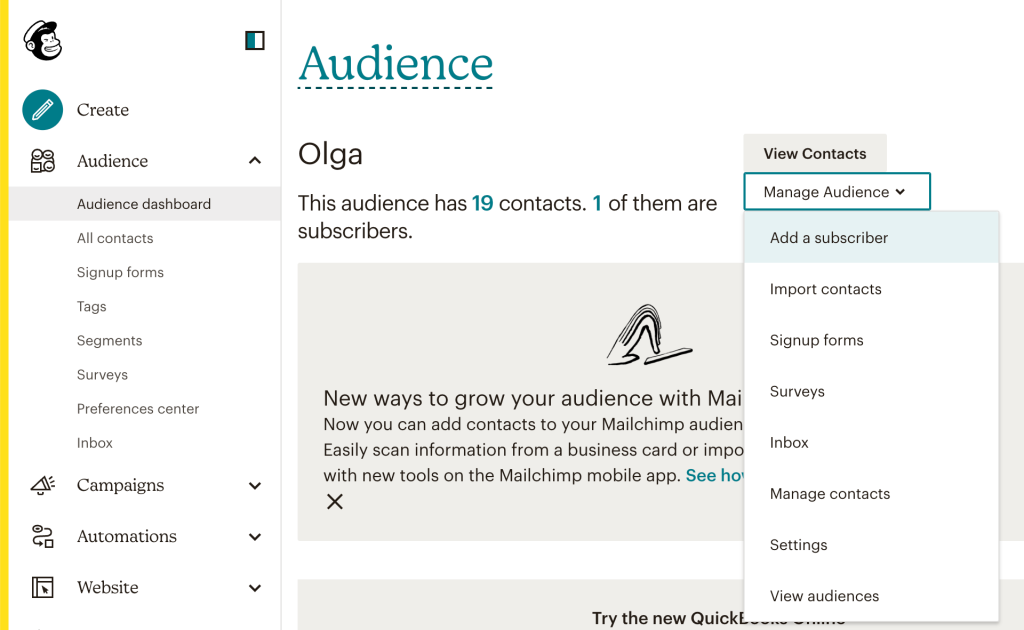
- To create a list manually by adding each contact separately, press Audience in the main menu on the left panel. Then, select Audience dashboard. Press the Manage Audience button in the upper right corner and select Add a subscriber from the dropdown menu.
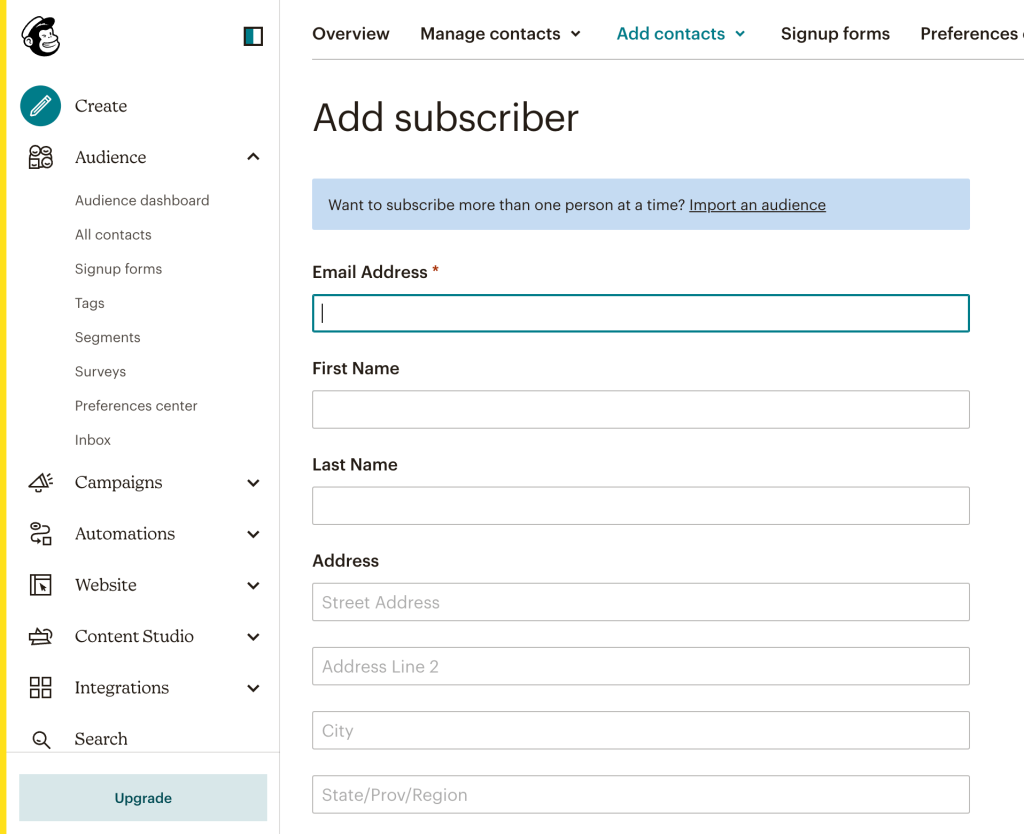
After this, you’ll be able to add a subscriber’s information to the provided form. The only mandatory field is Email Address, but you can include many other details, such as a person’s name, birthday, phone number, and tags.
- Once this is done, you will need to repeat these steps for the next subscriber.
Although this is a pretty simple way to create a list in Mailchimp, adding contacts one by one only makes sense if you have just a few of them. This can be useful when you’re starting out or when you need to update some details. For most other cases, importing contacts in bulk seems a much better option.
How to import new contacts to a Mailchimp list
Mailchimp offers several options for importing contacts. Which one is the best for you depends on the format of your contact base. You can import contacts from a CSV or TXT file, transfer them directly from other apps, or copy-paste manually from a spreadsheet.
Importing new contacts from a CSV file
Most apps allow users to export data in the CSV format, so it should be easy to get a CSV file with your contacts. This file must include a column with email addresses. It can also contain other columns, but they are optional. Keep in mind that you might need to format your contacts before importing according to Mailchimp requirements.
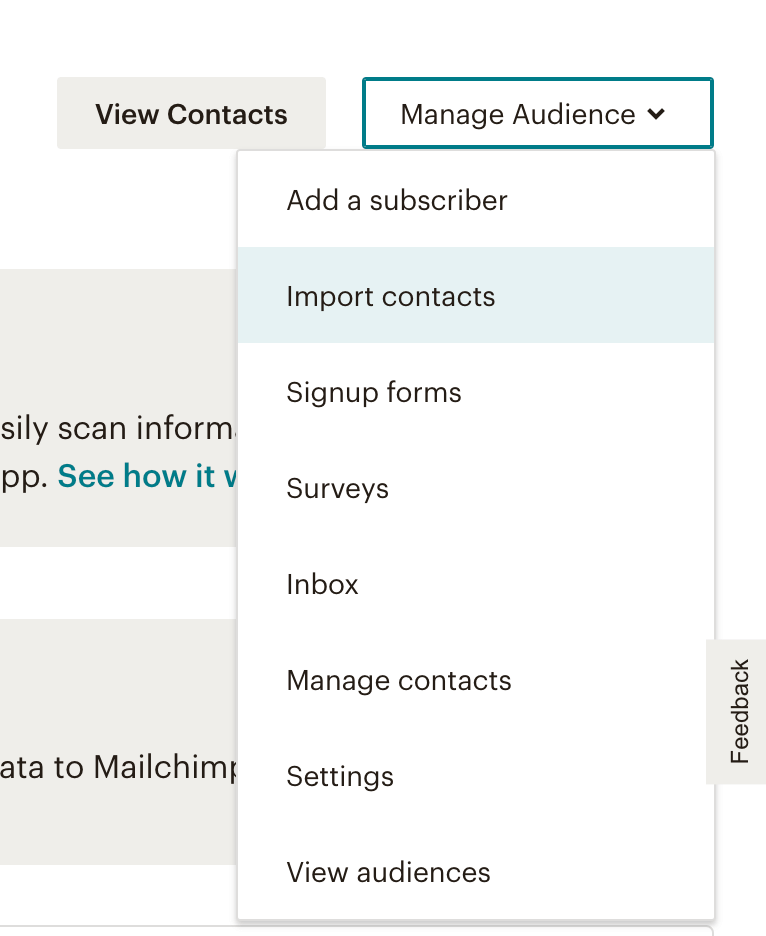
- Once your CSV file is ready, go to the main menu on the left and press Audience, then Audience dashboard. After this, click the Manage Audience button on the right and select Import contacts.
- Then, select Upload a file and hit Continue.
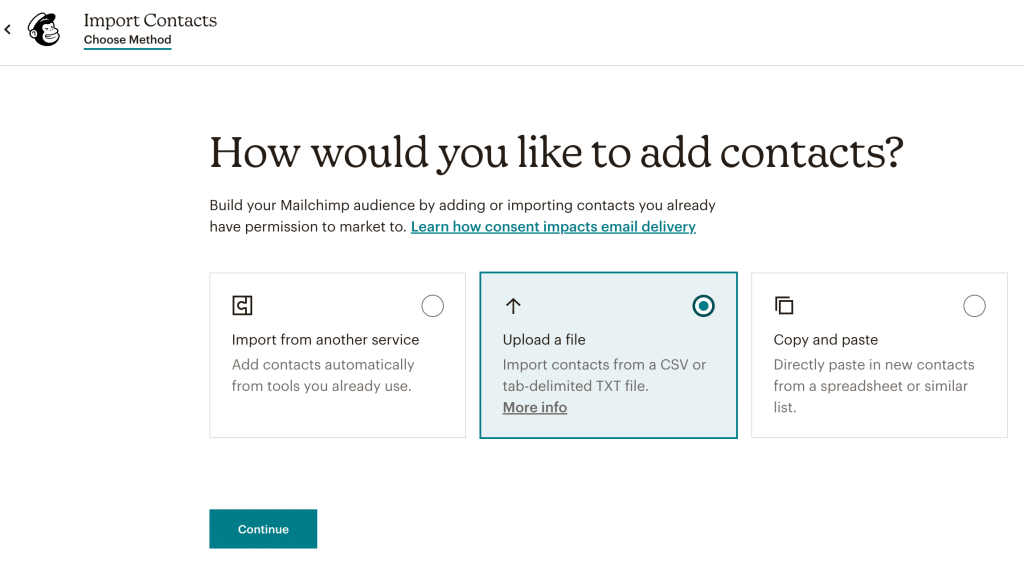
- In the next dialog window, press Browse and upload your CSV file. Then click Continue to Organize.
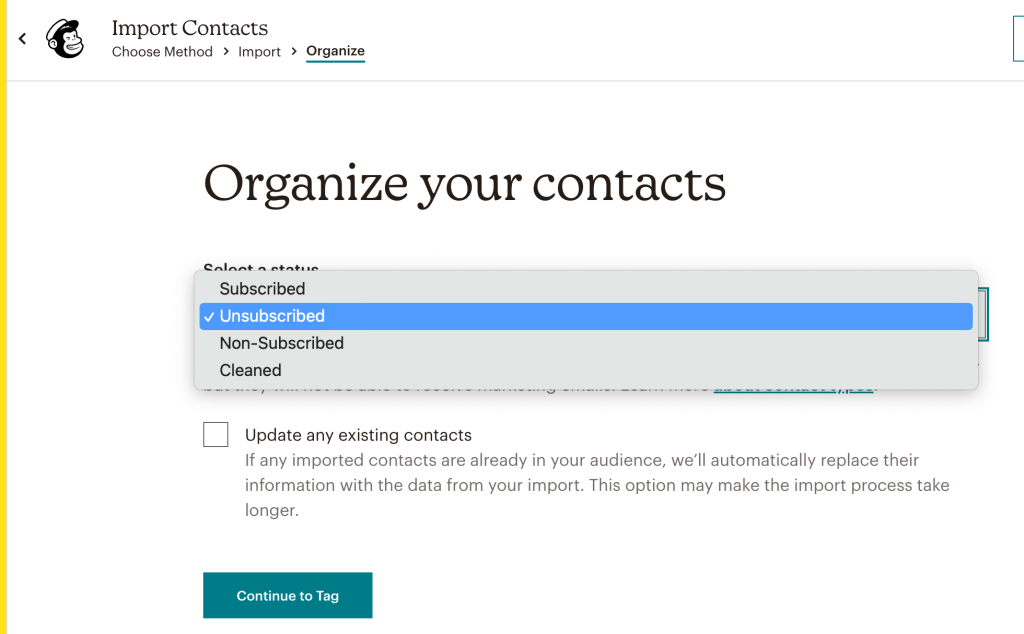
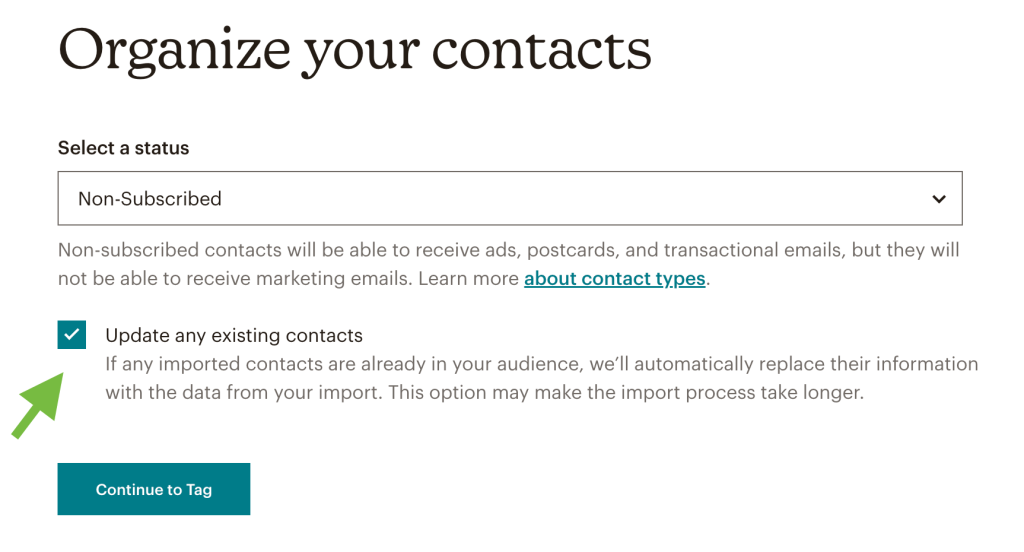
- At the next step, select the status of your contacts – subscribed, unsubscribed, non-subscribed, or cleaned. Then, click Continue to Tag.
- Add tags to your list. You can choose from the suggested options or create custom tags. When everything is ready, press Continue to Match.
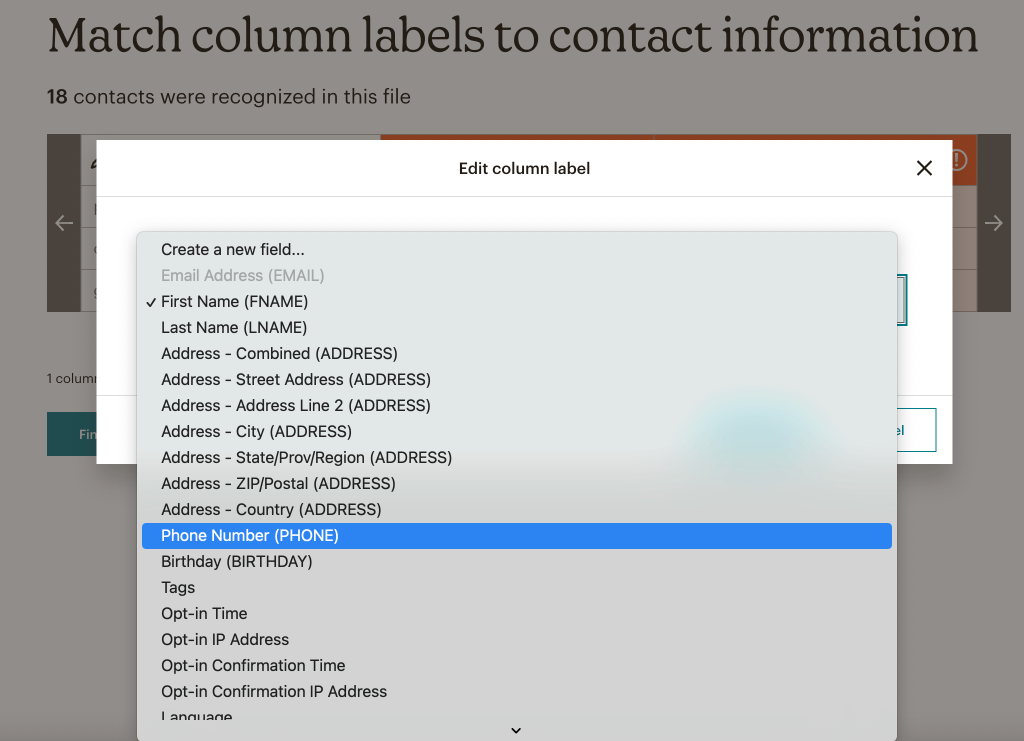
- If you haven’t spent much time on formatting your import file beforehand, at this point, you might need to correct some formatting errors. In the example below, Mailchimp recognized the Email column but didn’t recognize the phone number information. To fix this, we’ll need to rename the column.
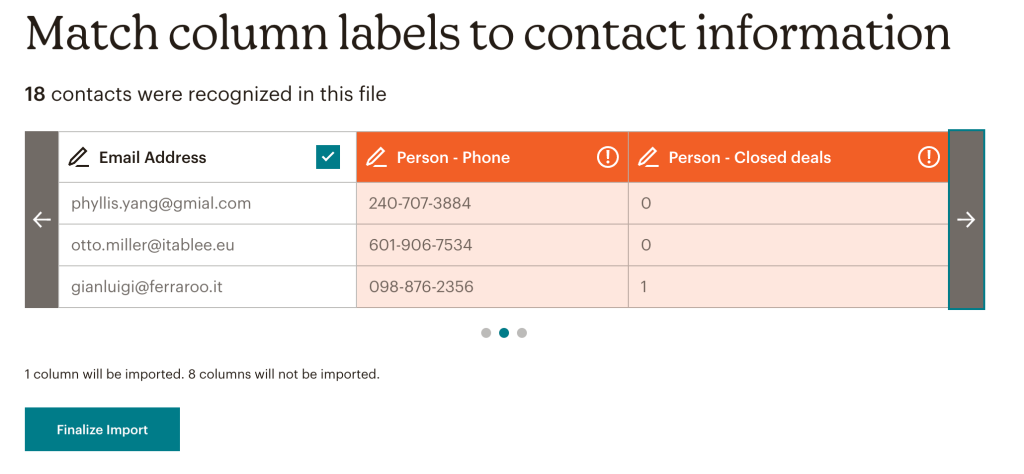
- To do so, click the column title to edit. Then select one of the standard options from the dropdown list. Once this is done, the error will be corrected, and Mailchimp will be able to import the information from this column.
- Then, press Finalize Import. Review the details and confirm the action by clicking Complete Import.
- After this, the contacts will be added to your audience. This is what it looks like:
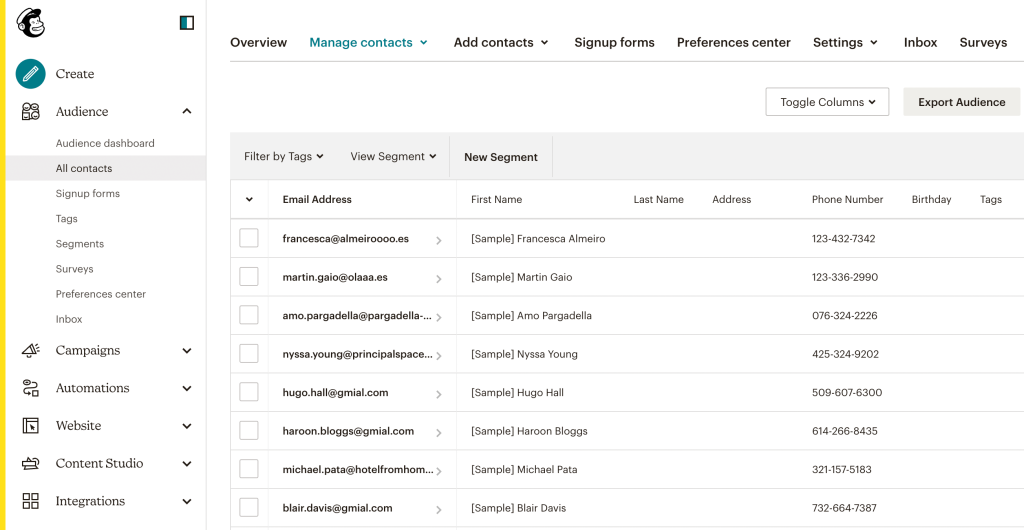
Congratulations, you’ve created your first Mailchimp mailing list.
You can follow the same flow to import contacts from a TXT file.
Transferring contacts from other apps
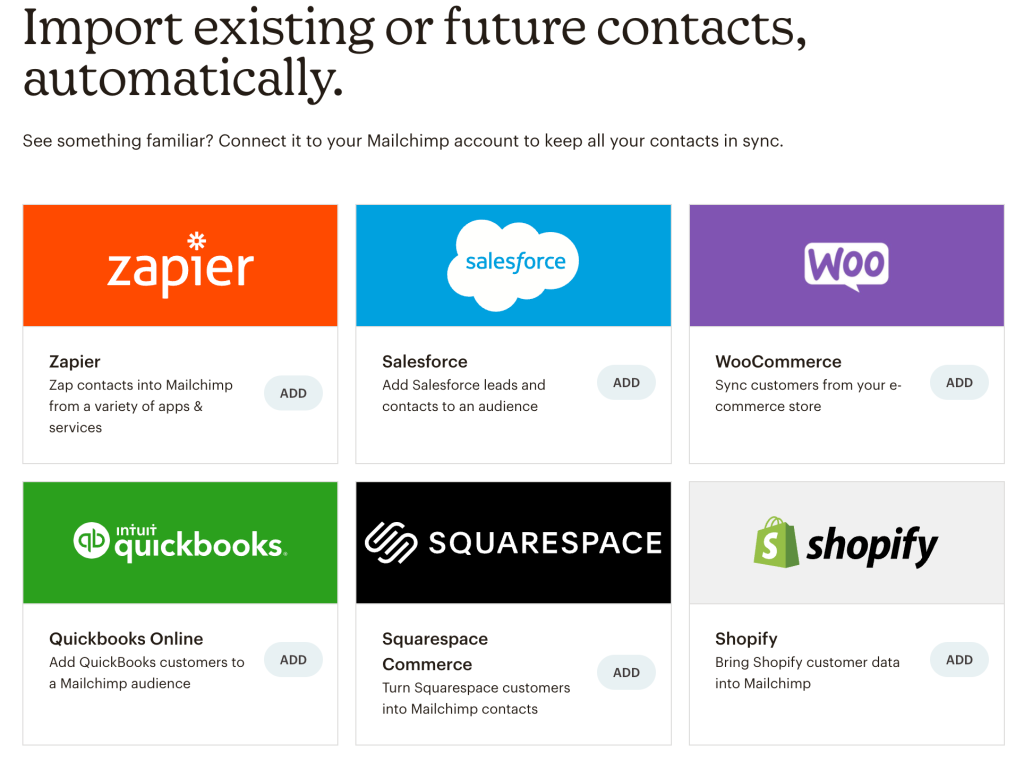
Mailchimp allows you to import contacts directly from other apps. The most popular sources are:
- Shopify
- QuickBooks Online
- Salesforce
- Zapier
- WooCommerce
- Squarespace
- First, go to the import menu. The path is the same as described in the previous section. Audience ? Audience dashboard ? Manage Audience ? Import contacts.
- In the import menu, select Import from another service. Hit Continue.
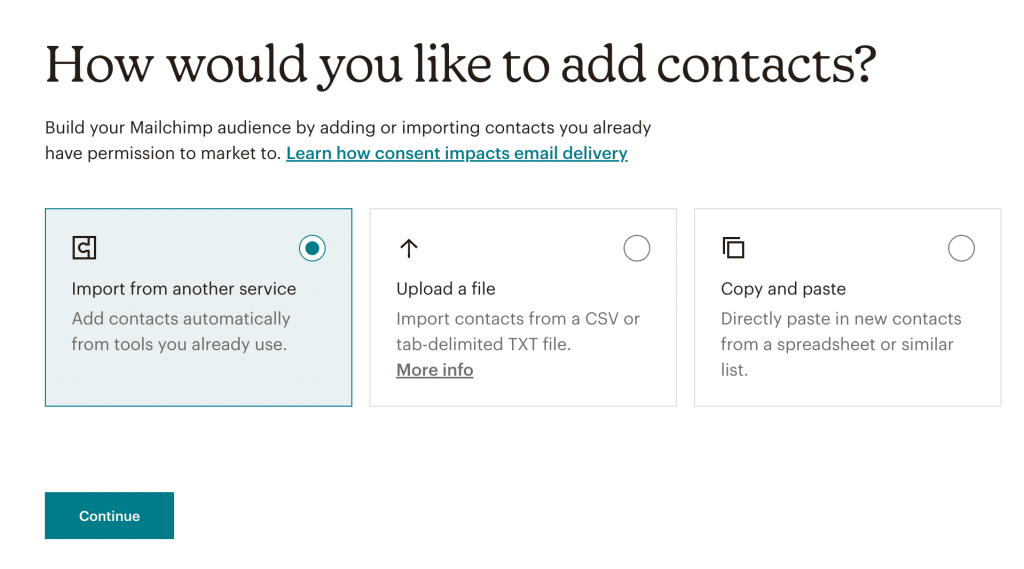
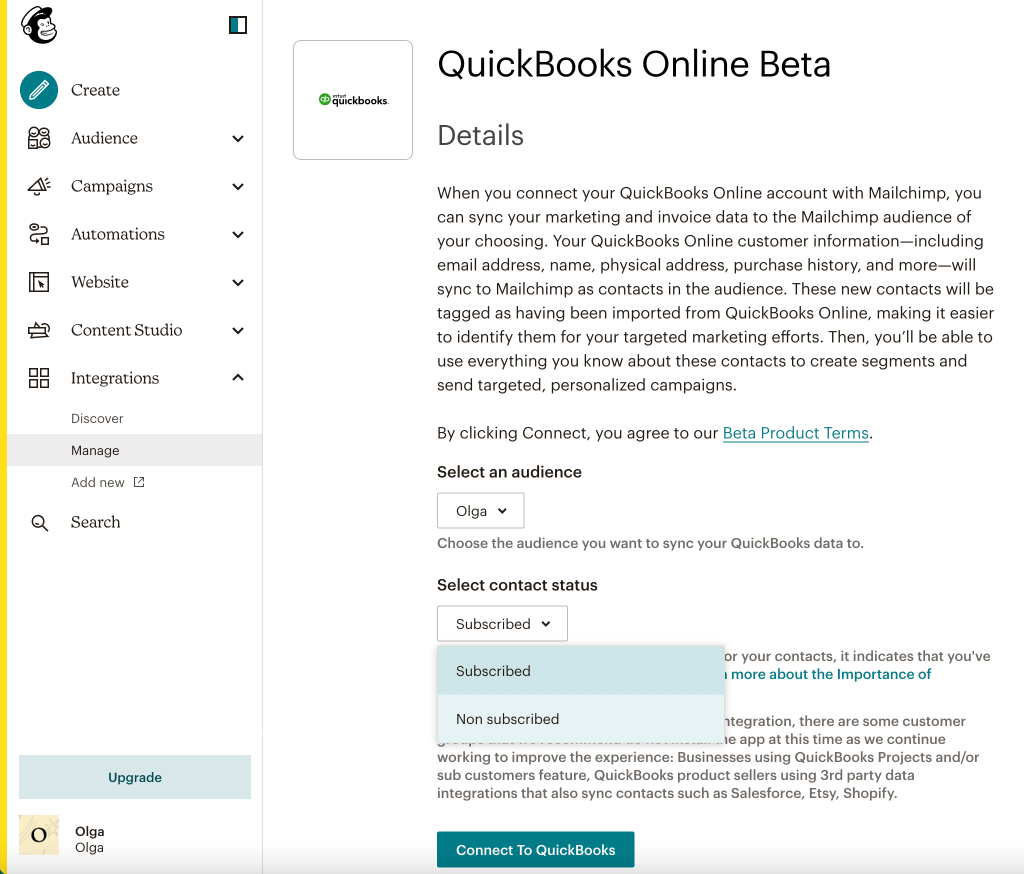
Select the app you want to export contacts from and click the Add button next to the chosen option. At the next step, you will need to connect the account of the selected platform to Mailchimp. The exact flow depends on the app. We’ll take QuickBooks Online as an example.
Once we pick QuickBooks, Mailchimp will show the details of the integration. Select Contact status and press the Connect to QuickBooks button. Make sure you are signed in to your QuickBook account.
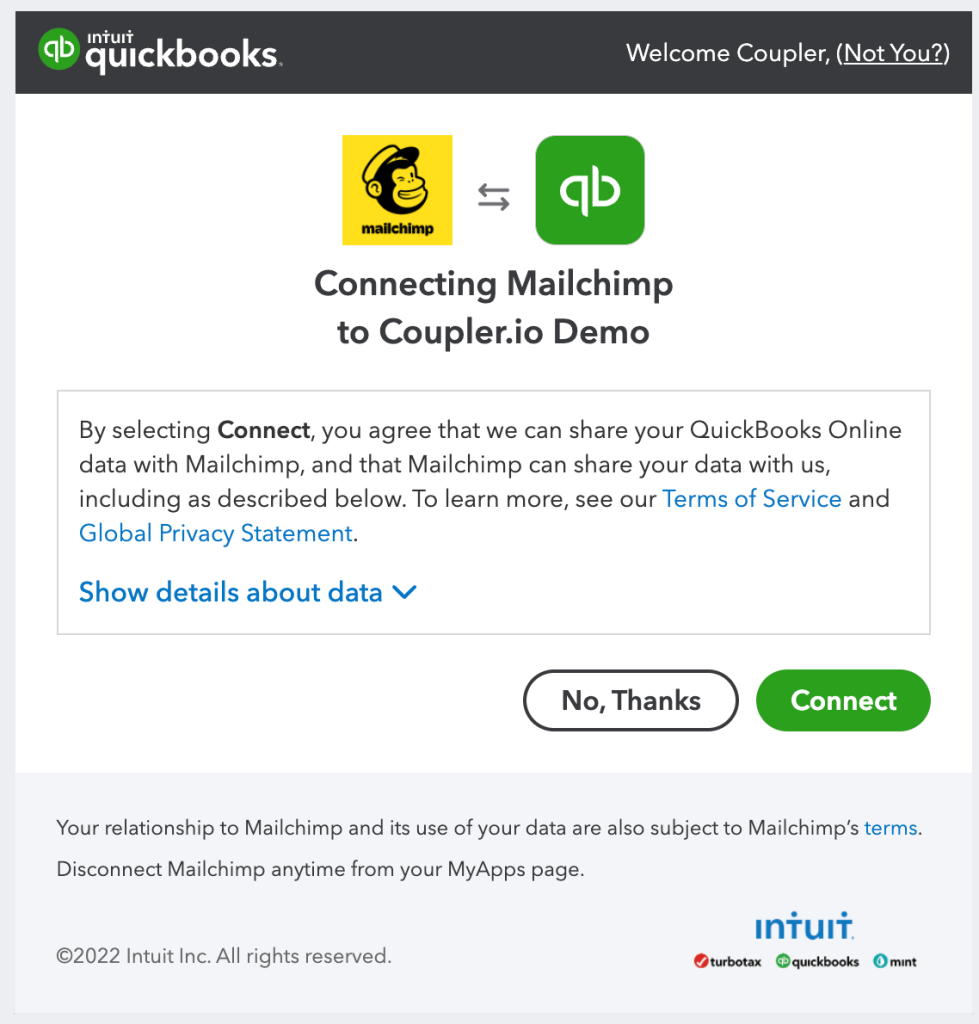
- In the next dialog window, press Connect.
- Your data will be synced automatically. When the status bar shows 100%, click the View Contacts button at the bottom.
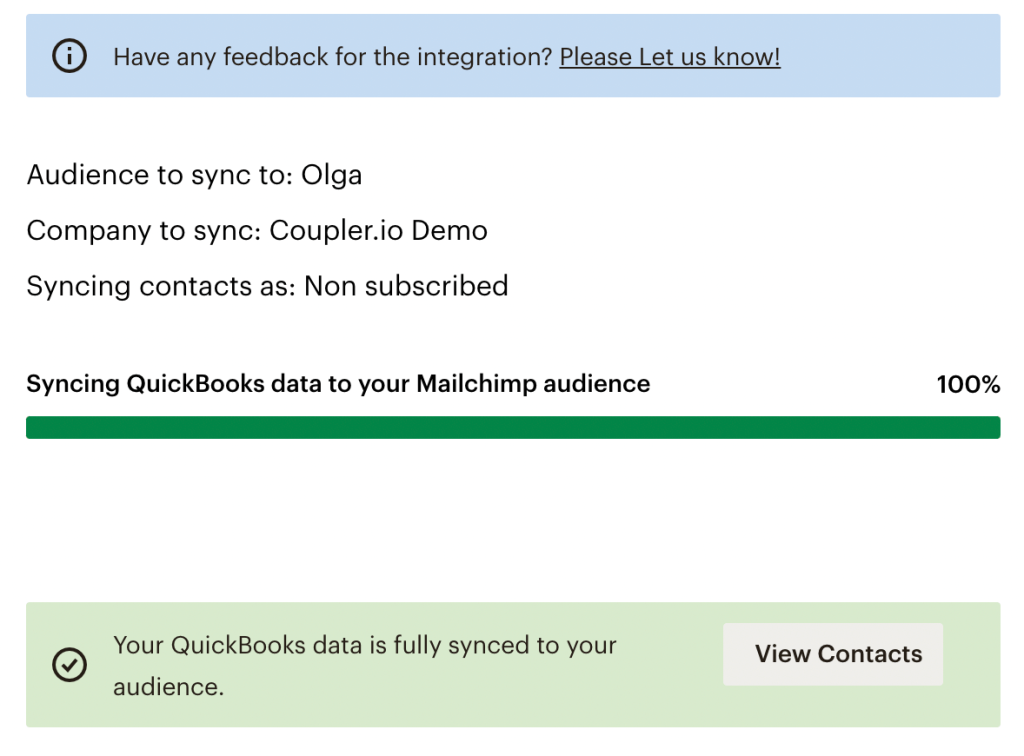
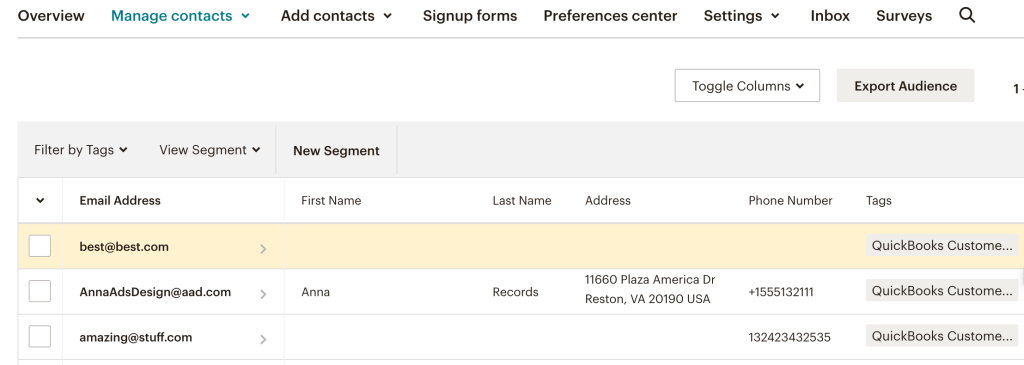
- QuickBooks contacts have been imported to your Mailchimp email list.
Copy-pasting new contacts from a spreadsheet
Another way to import contacts is to copy and paste them manually. It’s implied that most users copy from an Excel workbook or Google Sheet spreadsheet, but, actually, contacts can be copied from any list.
- Go to Audience ? Audience dashboard ? Manage Audience ? Import contacts.
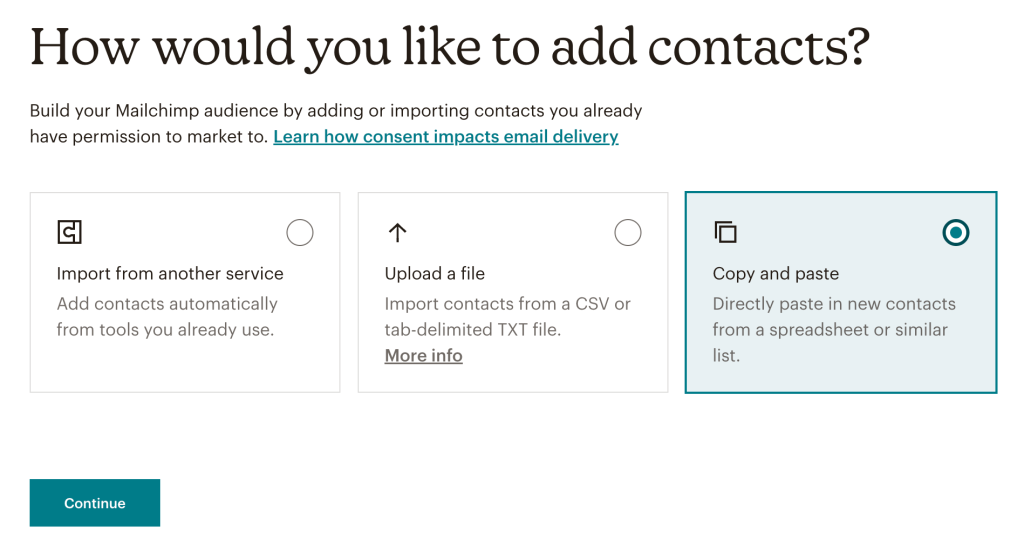
Then, select Copy and paste. Hit Continue.
- Paste your list in the provided field. It helps to prepare the list in advance according to the given example. If your list has a different structure and custom column names, you might need to edit it at the next step so that Mailchimp can import your data correctly.

- Click Continue to Organize, then select the contacts’ status, add tags, and rename the unrecognized columns, if necessary. After this, press Finalize Import, check the details, and click Complete Import if everything is correct.
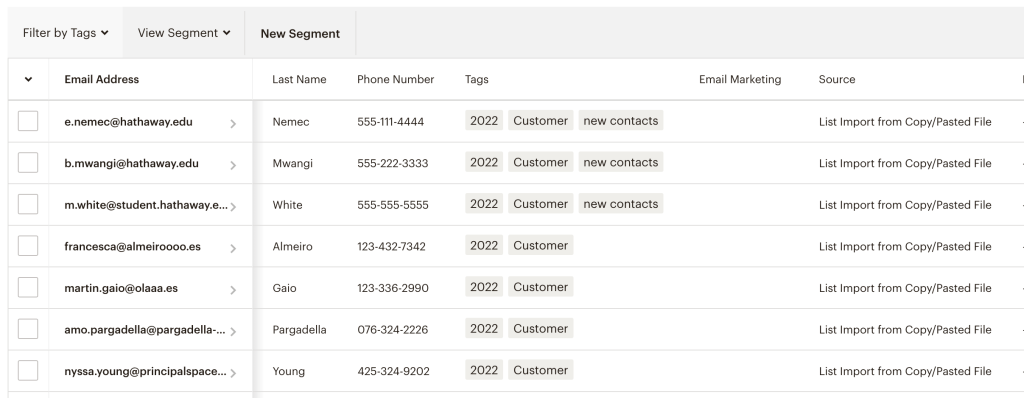
- Press View Contacts and check the latest addition to your Mailchimp email list.
Now you know everything about importing lists to Mailchimp. Over time, your audience will keep growing, and at some point, you will need to create a backup and export your list data from your Mailchimp account. Let’s see how to do this.
How to create a backup copy of a Mailchimp list
After dozens of campaigns, your Mailchimp list will accumulate a lot of valuable data – contact details, engagement metrics, and so on. You will need to ensure the safety of this data. Otherwise, you might risk losing it over an accidental mistake or a technical problem. The best way to protect your data is to make a backup copy and update it regularly. Luckily, you can do this automatically.
For example, you can create a backup copy of your Mailchimp list data using Coupler.io. This is a popular tool for exporting data to Google Sheets, Excel, and BigQuery. It allows you to connect Mailchimp to any of these apps and set a custom schedule for the automatic updates. So, once you set the connection and export Mailchimp data, you’ll have a backup copy in Google Sheets (or Excel/BigQuery, depending on your preferences). After this, Coupler.io will regularly fetch the refreshed Mailchimp data to the selected spreadsheet or dataset. It’s rather convenient as your backup will always be up to date, and you won’t need to do anything to maintain it. By the way, you can also use Coupler.io to merge Mailchimp lists.
The types of data you can export with Coupler.io for a backup include:
- Audiences (lists)
- Contacts
- Audience activity
- List growth history
- Interest categories
- Audience locations, and more.
Please see the details on how to export Mailchimp list data automatically in our Mailchimp Export Contacts Tutorial. You can use the flow described in this article for exporting other types of data as well – for instance, campaign reports.
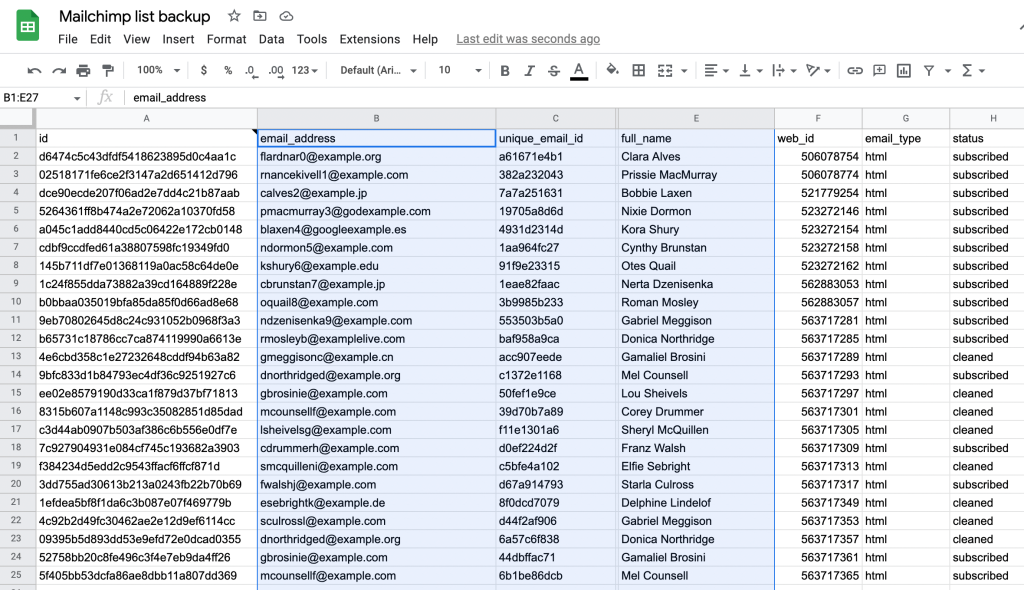
Here’s an example of Mailchimp list data transferred to Google Sheets with Coupler.io.
Another way to export data from Mailchimp is to use a native CSV tool. But this option requires you to transfer data manually each time you want to update it, so it’s not the best solution for backup purposes.
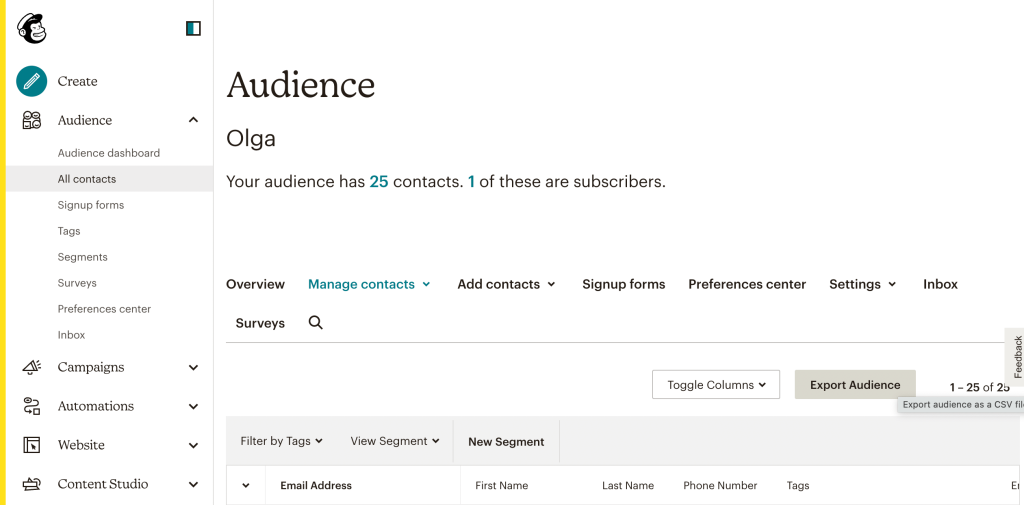
If you need to extract your contact list manually, go to the Audience -> All contacts -> Export audience -> Export as CSV. For other list data, like engagement metrics, you’ll need to export your campaign reports separately.
How to create a Mailchimp suppression list
This type of list comes in handy when you need to exclude some recipients from your mailing list. When you add people to a Mailchimp suppression list, they stop receiving your messages. If customers decide to unsubscribe on their own, their email addresses also end up on the suppression list. In the latter case, contacts are added to the list automatically.
Sometimes suppression lists are called the unsubscribed contacts list – so, technically, it’s the same thing.
There are two ways of creating a Mailchimp suppression list. The choice depends on the type of contacts you want to include there.
- If you want to comprise this list of already existing contacts, you can just unsubscribe them in bulk.
To do so, go to Audience -> All contacts, then tick all the contacts you need to exclude and click Actions -> Unsubscribe.

The unsubscribed contacts will stop receiving your emails.
- If you want to create a suppression list with entirely new contacts, you can import them. For example, you can use the same flow we’ve described above for importing lists from a CSV file (Audience -> Audience dashboard -> Manage audience -> Import contacts). The only crucial difference is that you need to mark the contacts as Unsubscribed before importing.
If you have several Mailchimp audiences in one account, you will need to create a separate suppression list for each of them.
How to create multiple Mailchimp lists
For most cases, it’s enough to keep just one list and organize it with segments, groups, and tags. However, sometimes you might need two or more – for example, if you have several brands.
Multiple Mailchimp lists are available to customers with paid accounts only. With a free plan, users can get one audience with up to 2,000 contacts. Paid options allow marketers to have from three to an unlimited number of audiences depending on the option.
The flow for creating multiple Mailchimp lists is mostly the same as for creating the first audience.
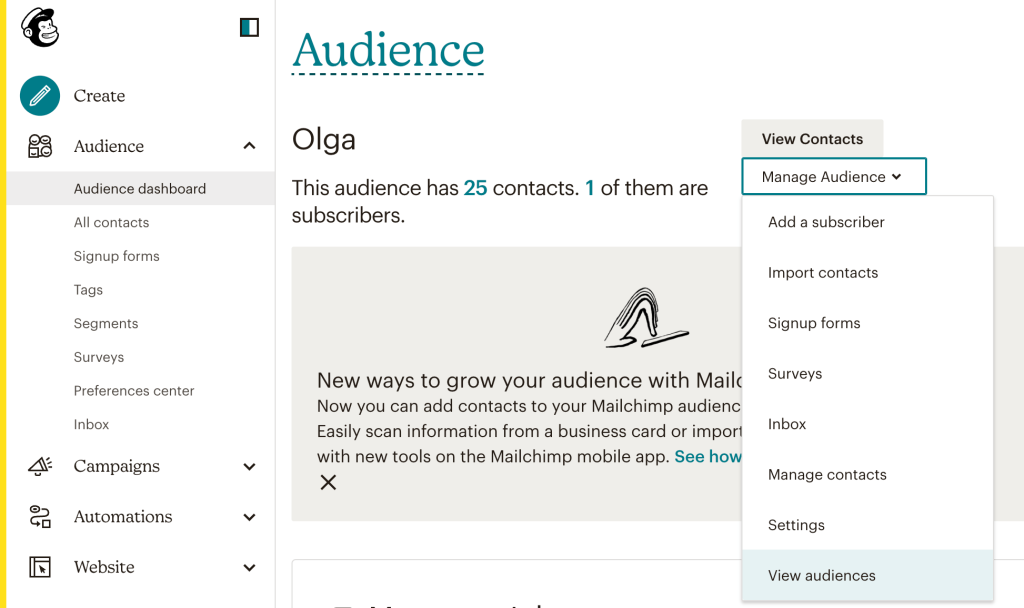
- To add a second list, go to the Audience -> Audience dashboard -> Manage Audience -> View audiences.
- Press the Create Audience button in the upper right corner. If you have a paid plan, the button will be active.
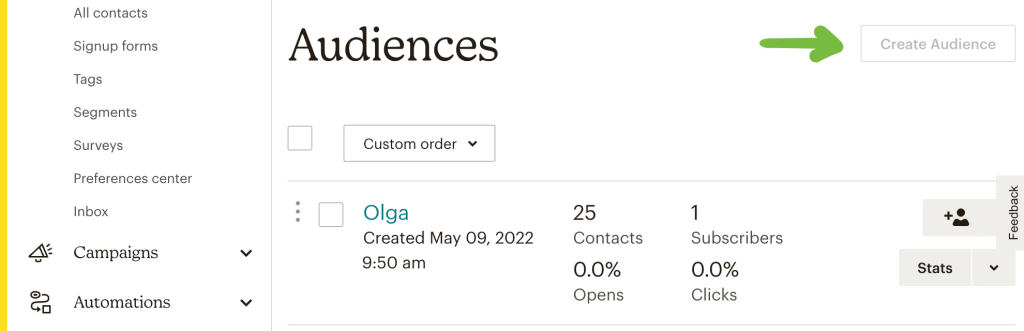
- Name your new audience, set your preferences, and click Save.
You’ll be able to work with your audiences by clicking Manage Audience -> View audiences. Just choose the audience you need from the dropdown menu.
How to update a Mailchimp list
The steps for updating are basically the same as for importing. The only difference is that when you import already existing contacts and tick the Update feature, the data you import replaces old information in the corresponding columns.
- To start updating, press Audience -> Audience dashboard -> Manage audiences -> Import contacts (see the details in the How to import new contacts to a Mailchimp list section).
- Then, select the import method – Uploading a file or Copy-Pasting contacts from another list.

- In the next step, upload or insert your contacts (depending on the selected method).
After this, in the Organize your contacts section, tick Update any existing contacts, as shown below.
- Finish the importing process. Once it’s completed, your Mailchimp list will be updated.
How to clean Mailchimp lists
With time, information on your list may become partly outdated. Some customers may change email addresses, others may lose interest in your services for personal reasons. Such contacts should be cleaned. If you keep them, they will accumulate over time and distort your statistics. This can negatively impact the efficiency of your campaigns. Moreover, when you have a big audience, Mailchimp charges you proportionally to the number of contacts on your list. So, there’s no sense in paying for customers who are simply not interested.
Mailchimp automatically removes outdated contacts from your list if their email addresses hard-bounce or repeatedly soft-bounce. Such contacts are marked as Cleaned, and they cannot receive your messages anymore. But if you have inactive customers with valid email addresses, you’ll need to clean them manually.
To do so, you will need to filter out inactive users and archive them. Technically, archived contacts will not be marked as Cleaned, because this only happens to automatically cleaned contacts. But this doesn’t matter – the important thing is they will be removed from your list, and you won’t be charged for them.
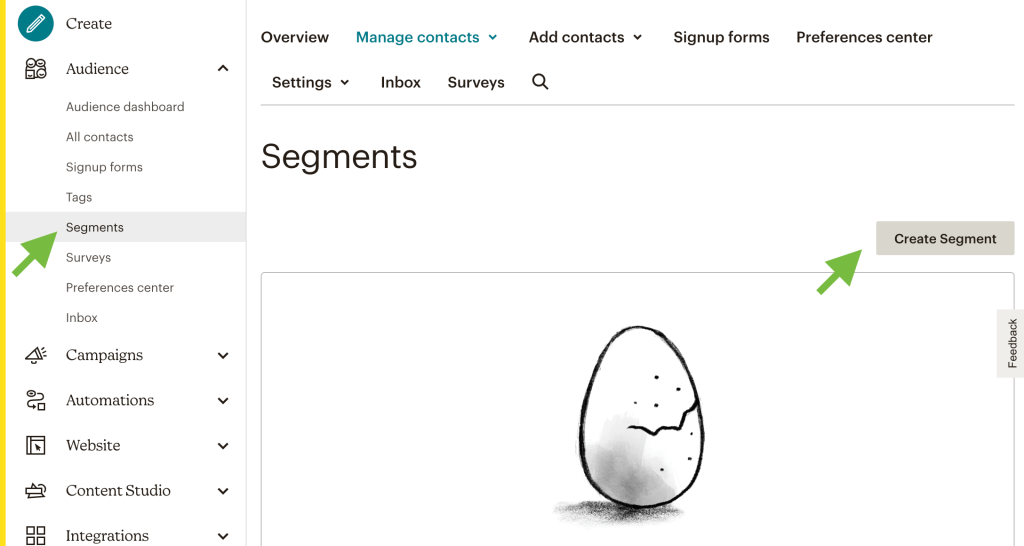
- Click Audience in the main menu on the left and select Segments.
Click the Create Segment button.
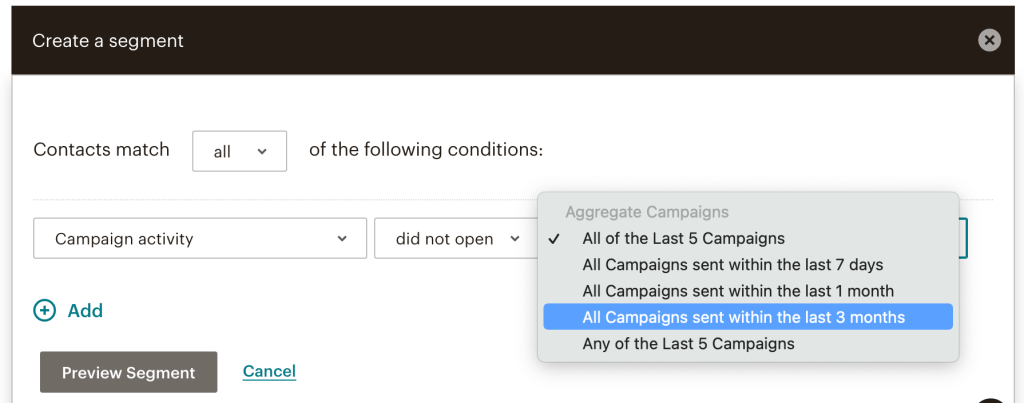
- In the next menu, choose Campaign activity and did not open. Then, select the period for which users didn’t interact with your emails. In our example, it’s All campaigns sent within the last 3 months.
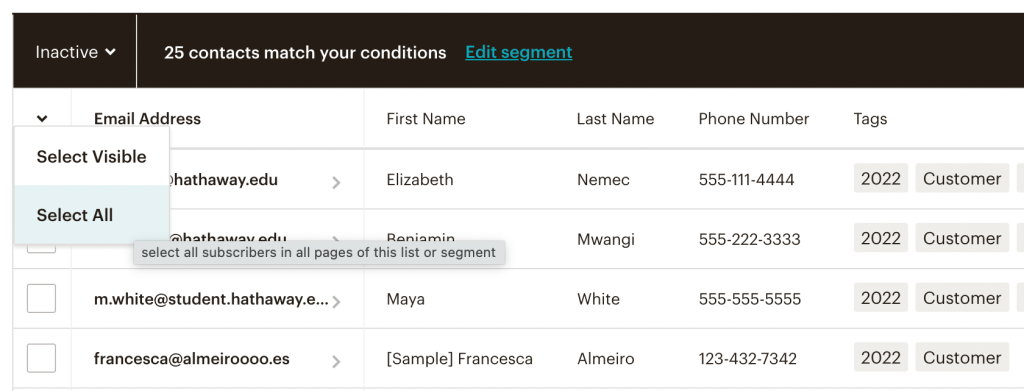
- Click Preview segment. Name this segment, if necessary. Then click the arrow on the left from the Email Address field and click Select All.
- Then, click Actions -> Archive.

- Press Confirm. That’s it! Your list has been cleaned. The users who didn’t interact with your emails for the last three months have been removed from the list.
How to delete Mailchimp lists
In many cases, it may be enough to just archive or delete inactive contacts, but sometimes you may need to delete your Mailchimp lists completely. We recommend exporting your data before doing this. See details in the How to create a backup copy of a Mailchimp list section.
Once your backup copy is ready, you can safely delete your list.
- Go to Audience -> Audience dashboard -> Manage Audience -> View audiences.
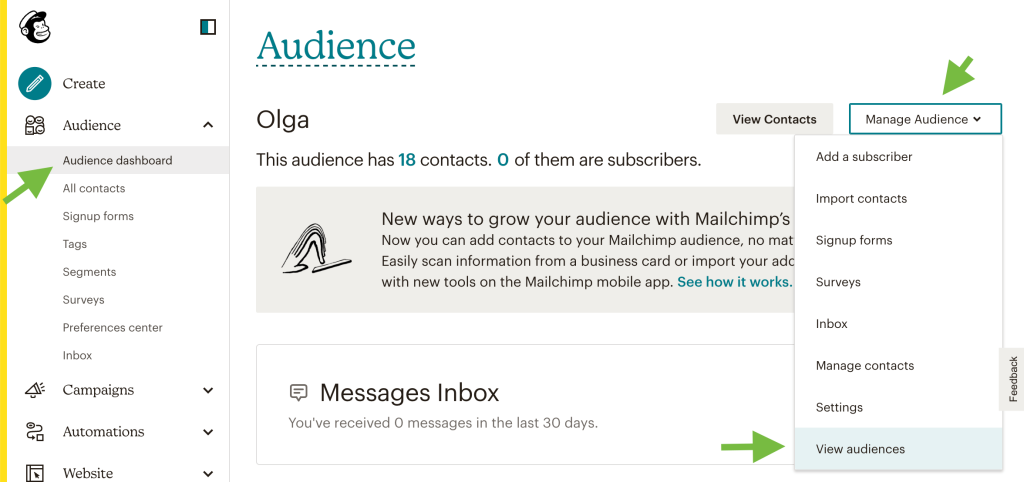
- If you have several audiences, select the one you want to delete. Tick the chosen audience and press the Delete button.
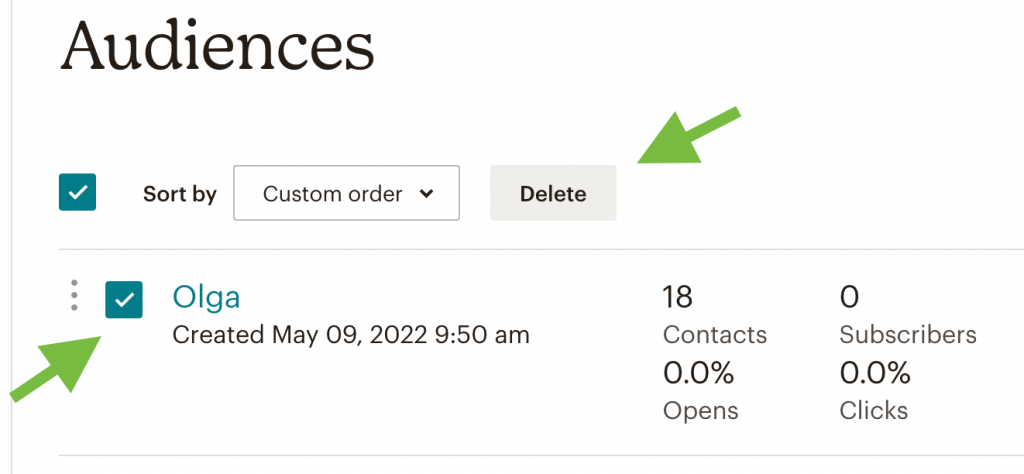
After this, your Mailchimp list will be deleted along with most of the associated information like engagement metrics and reports.
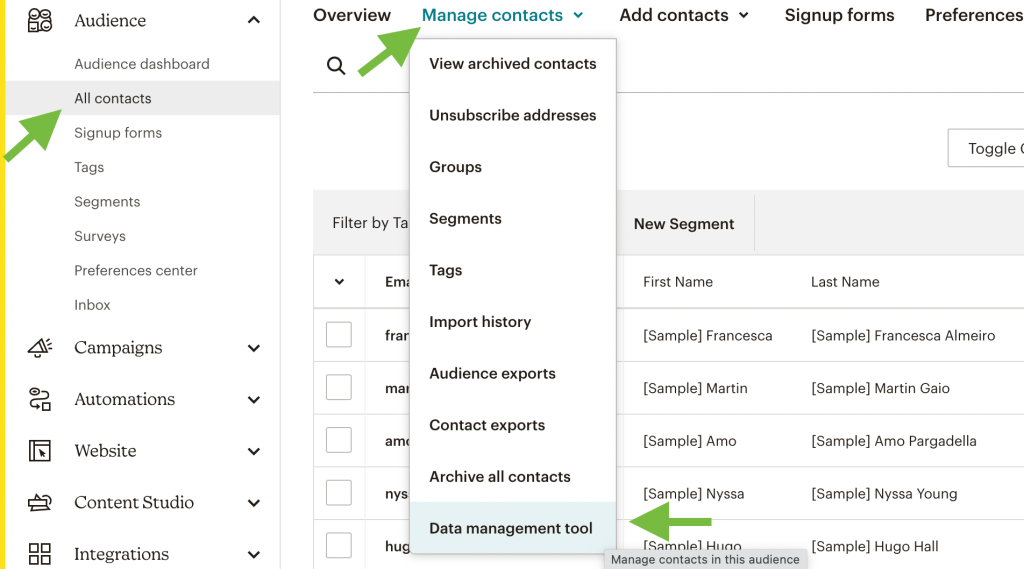
- If you want to delete some contacts instead, go to Audience -> All contacts -> Manage contacts -> Data management tool.
- After this, select the contacts you want to remove and press the Delete permanently button.
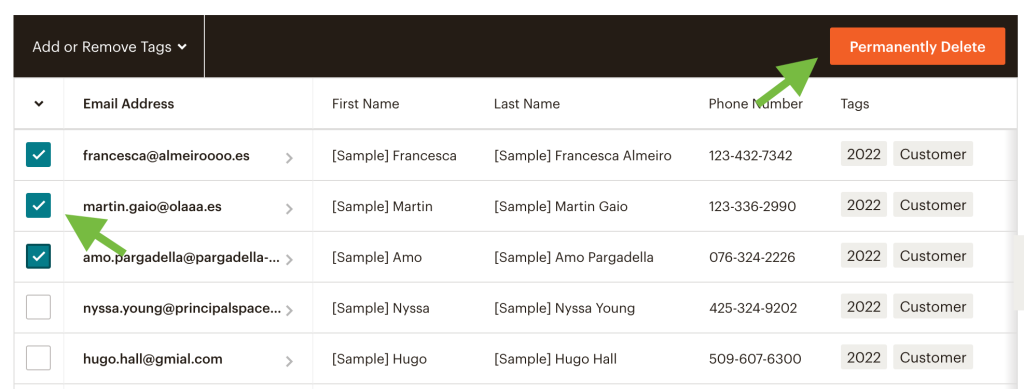
- Type in PERMANENTLY DELETE and press Confirm.
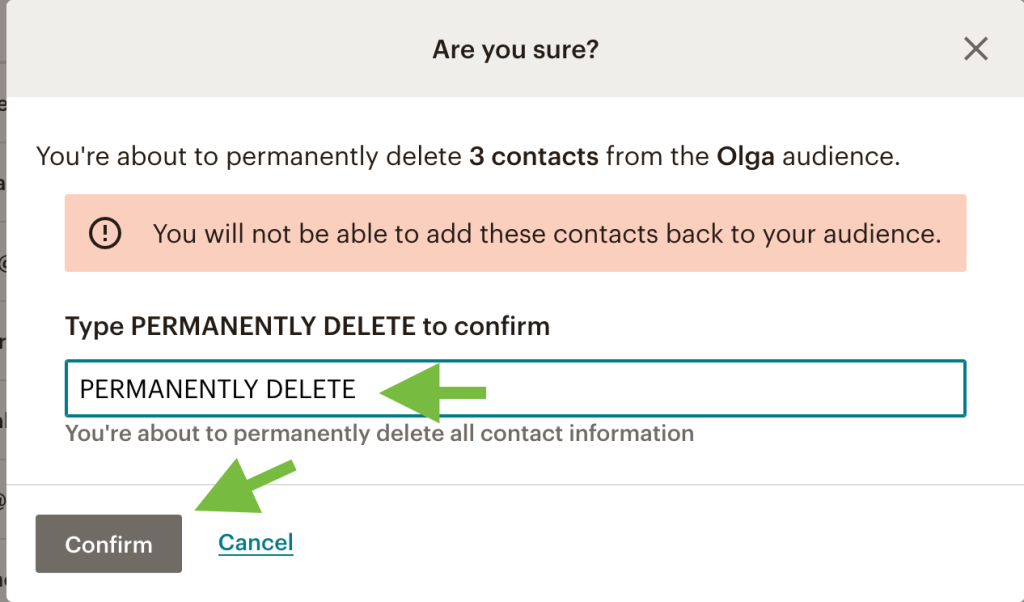
Done! The selected contacts have been deleted.
How to archive Mailchimp email lists
When you archive some of your contacts, they are removed from your list (audience). If you want to archive a list completely, you will need to delete all the contacts it includes.
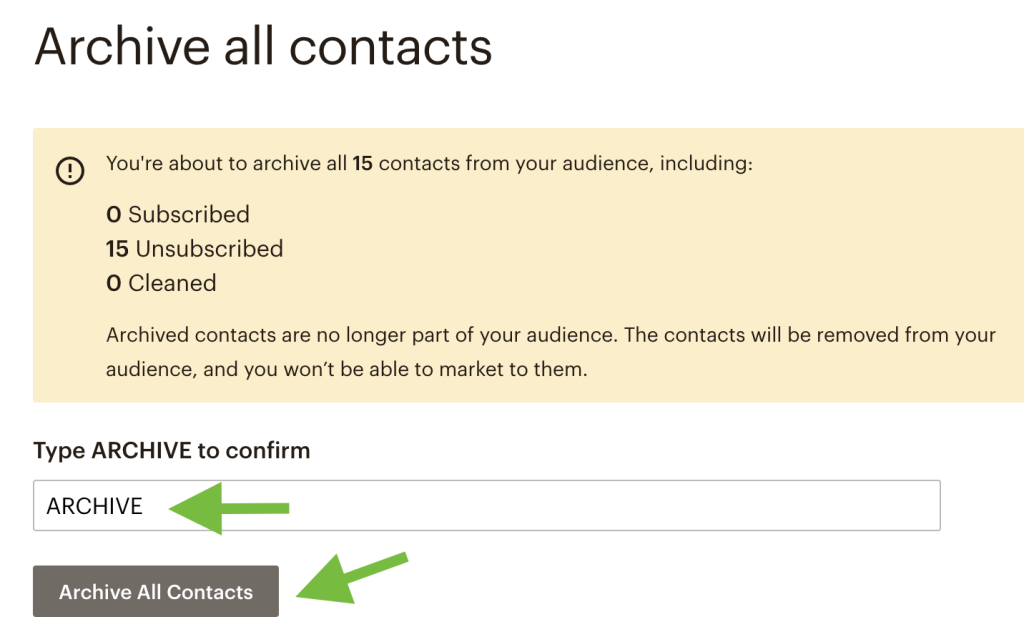
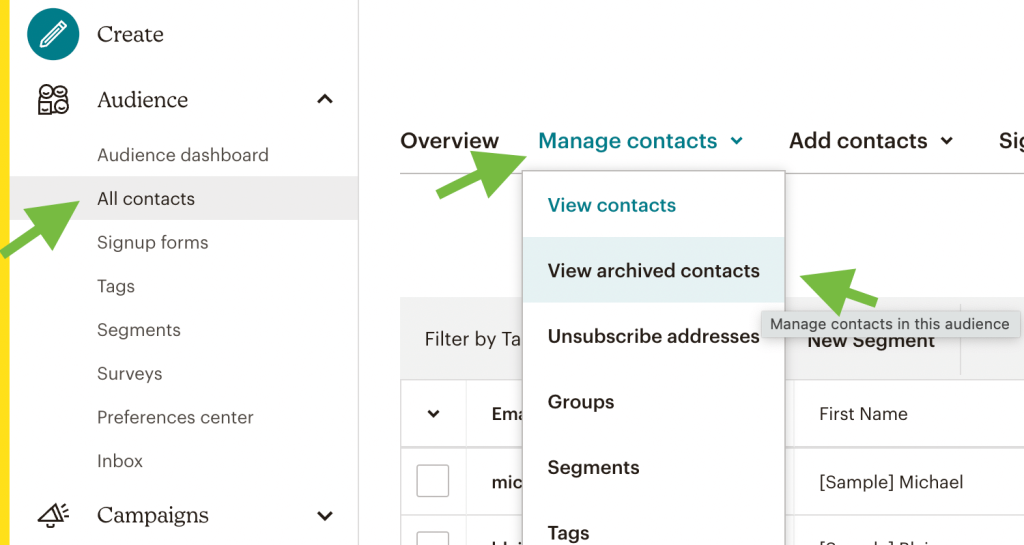
- To delete a Mailchimp list, go to Audience -> All contacts -> Manage contacts -> Archive all contacts.

- Type in ARCHIVE to confirm your action and press Archive All Contacts.
If you don’t want to archive the whole list, you can archive some contacts instead.
- Go to Audience and select All contacts.
- Tick contacts you want to archive, then press Actions and select Archive.
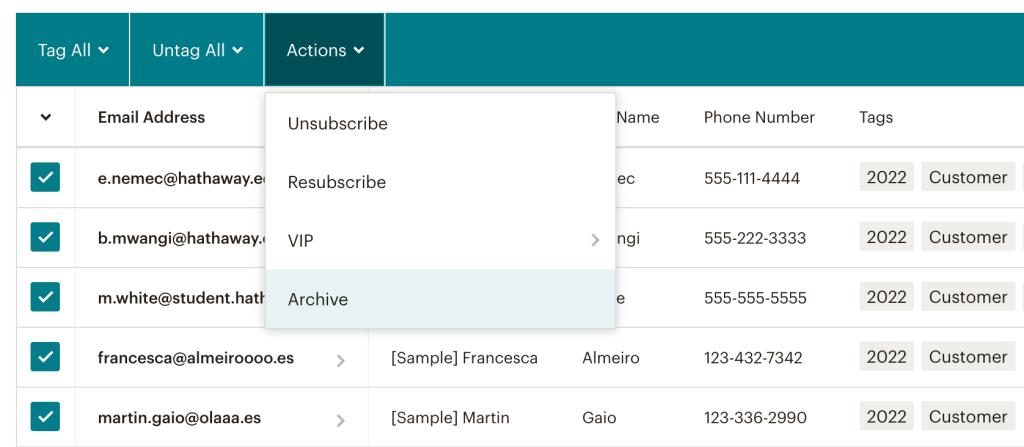
- In the next dialog window, press Confirm. Done!
You can view the archived contacts in All contacts -> Manage contacts -> View archived contacts.
Now you know how to archive Mailchimp lists or separate contacts.
Expand your expertise further. What’s next?
Creating Mailchimp lists is easy, but maintaining them properly may require a bit more effort. So, you’ll need to make sure your lists are updated, cleaned, and backed up in time. Another important topic to explore is how to analyze your list data and use your findings to enhance performance. You can find some answers in our Mailchimp Analytics 101 tutorial, so check it out.
We hope your Mailchimp campaigns will show brilliant results!