Power BI stands out for its ability to seamlessly connect with many cloud-based data sources. However, what if you need to use on-premises data sources for your reports, like an SQL Server database? This data source type is usually secured behind firewalls, and accessing it could be challenging. You may be thinking is it necessary to migrate your data to Azure SQL DB for easier access? Fortunately, the answer is no.
The solution is straightforward: the Power BI gateway.
What is Power BI gateway?
You can think of it as a bridge linking your on-premises data source and Power BI cloud service. This bridge ensures your data moves fast and securely. Microsoft Power BI gateway also lets you access your data easily without the need to migrate it to the cloud or change firewall settings.

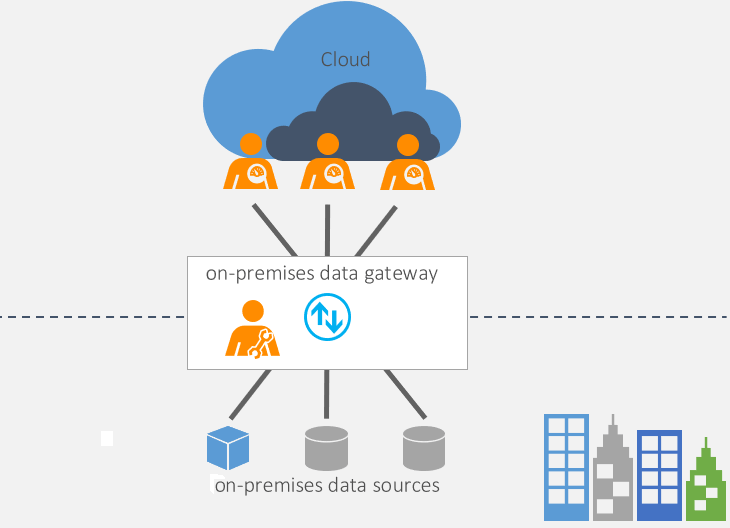
The on-premises data gateway is free software. You can download it from the Microsoft Power BI gateway page. You need to install it on a Windows computer on your on-premises network. Once set up, it will run quietly in the background as a Windows service. The data flow between your on-premises sources and Power BI service will be handled efficiently by Azure Service Bus.
The gateway functions in two modes: personal and standard.
- The personal mode is for individual use and focuses on connecting your on-premises data source to Power BI.
- In standard mode, the gateway also works with other Microsoft cloud services, including Power Apps, Azure Analysis Services, Azure Logic Apps, Power Automate, and Microsoft Fabric.
What is Power BI gateway used for?
In general, you need a Power BI data gateway when your data source is located on-premises.
Some examples of on-premises data sources are SQL Server databases, Excel workbooks, SQL Server Analysis Services, SharePoint, and other data sources located on your local domain server.
The gateway provides:
- A connection between the cloud service and the local network.
- A secure path for transferring your on-premises data into Power BI services.
- Automatic data refresh, keeping your Power BI reports and dashboards fresh with scheduled updates.
With a data gateway, you can keep your data on your local network while also safely accessing it from the cloud.
When you don’t need a Power BI gateway
Most of the time, a gateway is unnecessary if your data source is cloud-based. However, you still need a gateway when your cloud data sources reside within a private network, such as an Azure Virtual Network (Azure VNet).
Some examples of cloud-based data sources are Azure SQL Database, Google BigQuery, and cloud-based apps such as Salesforce, Xero, and QuickBooks Online. To connect to these cloud data sources, you can use Power BI connectors. Each Power BI connector supports a single data source.
If you use multiple data sources, Coupler.io can be an alternative way of bringing your data into Power BI. This tool is like a multi-source connector that can transfer and manage data from over 60+ apps directly into Power BI. It also supports automatic data refreshes so your reports are always kept up-to-date.
Try it yourself right away! Choose your data source from the drop-down list below and click Proceed.

You can start for free without any credit card required.
As an added benefit, Coupler.io offers dashboard templates for Power BI to help you streamline your reporting process.
What are the types of Power BI gateway?
There are three types of gateways:
- On-premises data gateway (personal mode)
- On-premises data gateway (standard mode)
- Virtual network (VNet) data gateway.
The on-premises data gateway is free software to download (both standard and personal modes). The VNet gateway, on the other hand, is a Microsoft-managed solution designed for more complex requirements.
Let’s dive into the details.
Power BI on-premises gateway (personal mode)
The personal mode gateway installation allows a single user to connect to on-premises data sources. It simplifies the process of creating reports and publishing them, making it perfect for individual uses.
Key points:
- Supports a single user/developer. Only one person can connect to the gateway.
- Cloud service compatibility: Works with Power BI only.
- Ideal for: Business analysts or individuals working on personal projects, needing to publish, refresh, and share reports with others.
- Connection types: Supports import data and scheduled refresh.
- Setup: Easier installation compared to the standard mode. This gateway uses the same credentials as the person who installed it.
- User credentials: Runs as a Windows service using the same credentials as the person who installed it.
Power BI on-premises gateway (standard mode)
This standard mode gateway is designed for team environments, allowing multiple users to connect to on-premises data sources.
Key points:
- Supports multiple users/developers. Multiple developers can use the same gateway.
- Cloud service compatibility: Works with Power BI, Power Apps, Azure Logic Apps, Power Automate, Azure Analysis Services, and Dataflows.
- Ideal for: Teams.
- Connection types: Supports import data and scheduled refresh, DirectQuery, and Live Connection.
- Setup: Needs data source configuration after installation. A gateway administrator is usually the one who installs and configures a gateway.
- User credentials: Runs as a Windows service and requires administrator privileges.
Power BI VNet gateway
You will need to use this type of gateway to access data sources located in a private network without the need to install an on-premises data gateway.
Key points:
- Supports multiple users/developers and data sources secured by VNets.
- No installation required: It’s a managed service by Microsoft.
- Availability: Only in Fabric and Power BI Premium capacities.
- Ideal for: Scenarios requiring advanced security and data control. If your organization utilizes VNets and needs to ensure secure access to data sources, this gateway provides a robust solution without the hassle of manual installations.
Please note that this article mainly covers the on-premises data gateway. You can visit virtual network data gateway docs for more info about this type of gateway.
Unwrapping the Power BI gateway architecture
The following image shows the architecture of the on-premises data gateway:

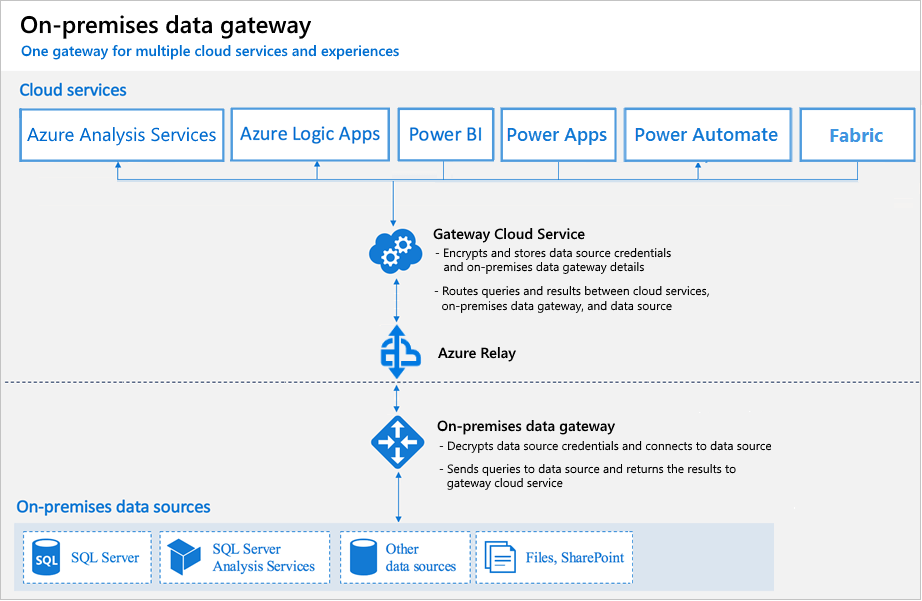
The key components in this architecture are cloud services (including Power BI), Gateway Cloud Service, Azure Relay, on-premises data gateway, and on-premises data sources. How the data flows between these components, particularly for Power BI, is as follows:
- The process begins whenever the Power BI service needs to refresh its data. It encrypts the credentials for accessing on-premises data sources. Next, these encrypted details and the query are sent to the Gateway Cloud Service.
- The Gateway Cloud Service analyzes the query and then forwards the request to Azure Relay, which is one of the key capability pillars of the Azure Service Bus platform.
- Azure Relay checks for any requests in the queue, including the one from Power BI, and sends them to the on-premises data gateway. This Relay acts as a secure bridge that allows services running within your organization’s network to be safely exposed to the public cloud without having to open a port on your firewall.
- After receiving the query, the on-premises data gateway decrypts the credentials. It uses them to establish a connection with the specified data sources. It then executes the query against these data sources.
- Once the query has been executed on the on-premises data sources, the results are transferred back through the gateway to the Power BI service. These are then used to update the reports and dashboards to ensure they contain the latest info.
How to set up Power BI gateway from A to Z
In this section, we’ll walk you through the steps of downloading and installing the gateway. While there are two modes available for installation — personal and standard — we will focus on the recommended approach, which is installing the gateway in standard mode.
Requirements and other considerations
The following are some requirements and considerations to help you ensure a smooth and successful setup:
- The minimum requirements are .NET Framework 4.8, 64-bit Windows 10 or Windows Server 2019, and 4 GB disk space.
- It’s recommended you use an 8-core CPU, 8 GB RAM, Windows Server 2019 (64-bit) or newer, SSD storage.
- Install the gateway on a stable, always-on Windows computer within your domain. Avoid devices that may be turned off or lose internet connection.
- Gateways are incompatible with Server Core installations and Windows containers. It also cannot be installed on a domain controller.
- Opt for a wired network connection for the gateway to ensure optimal performance, as wireless connections may degrade its efficiency.
- A single computer can have up to two gateways in different modes: one in personal mode, which is exclusive to Power BI, and another in standard mode. Running multiple gateways with the same mode on one computer is impossible.
Download and install a standard gateway
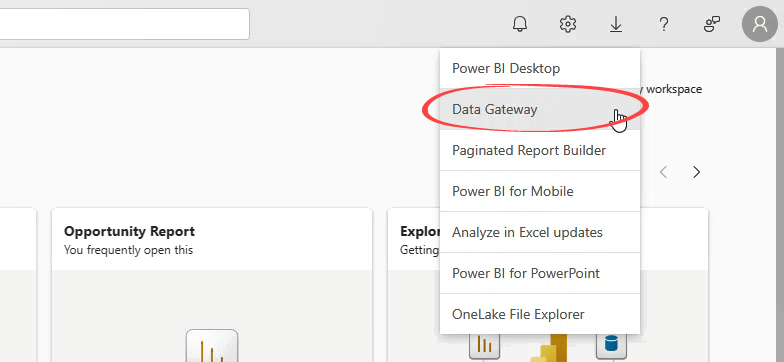
- Go directly to https://powerbi.microsoft.com/en-us/gateway/. Optionally, if you are currently logged in to the Power BI service, click Download in the top bar and select Data Gateway.

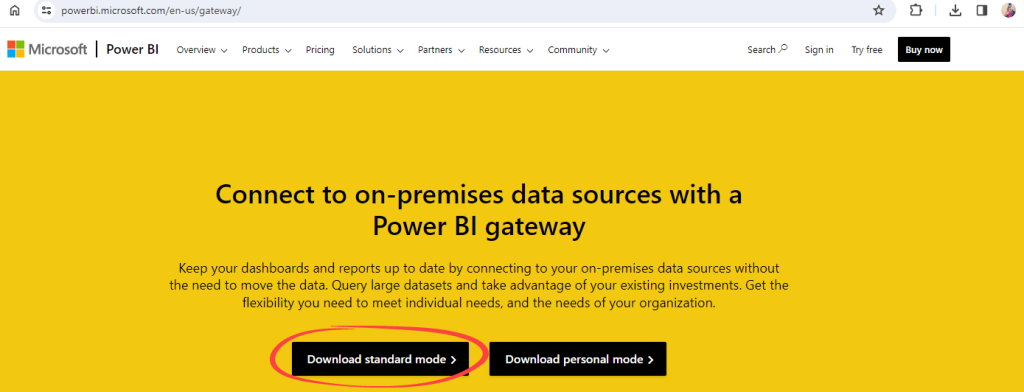
- In the Power BI data gateway page, click Download standard mode. This will download the installation file.

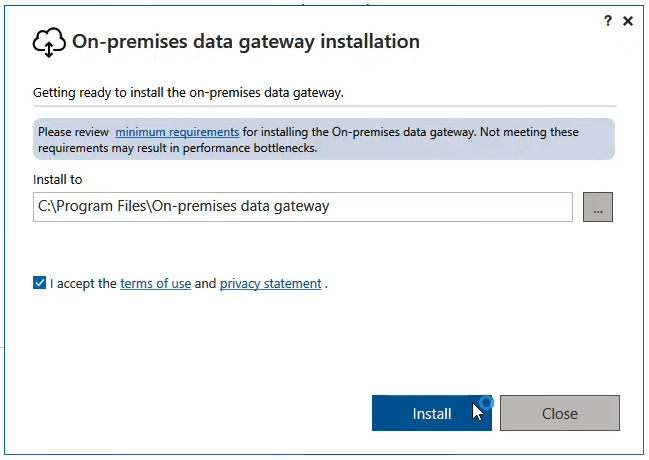
- Open the installation file.
- Accept the terms of use and click Install. You can keep the default installation path as it is.

- Enter the email address to use with the gateway and click Sign in.


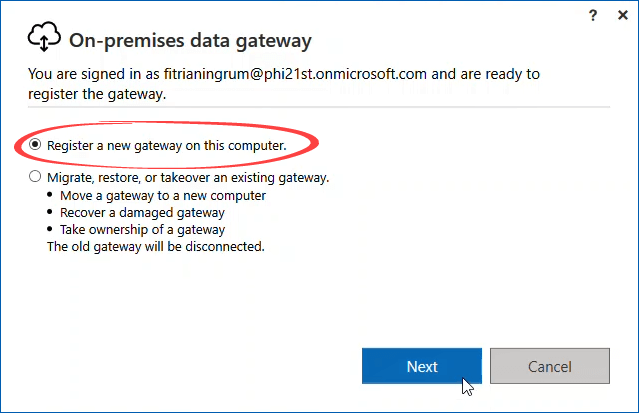
- Select Register a new gateway on this computer and click Next.

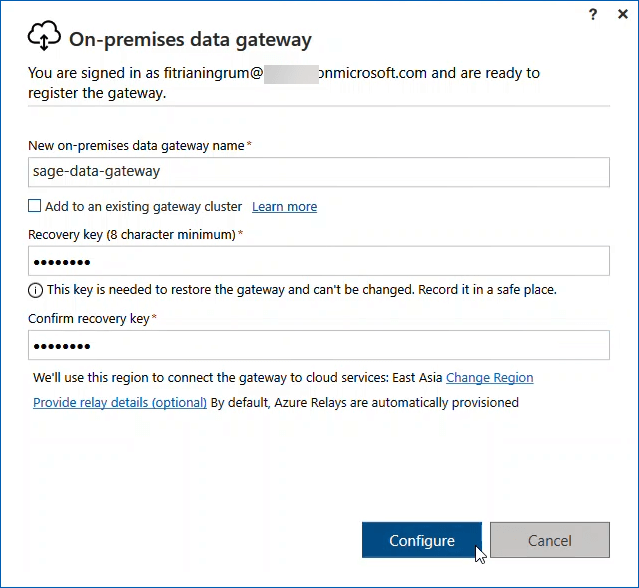
- Enter a gateway name and a recovery key, then click Configure.
- Gateway name: The name must be unique. Give a name that will remind you of where this gateway is installed.
- Recovery key: You’ll need this key if you ever want to recover or move your gateway.
We’ll leave the Add to an existing gateway cluster checkbox unchecked in this example. This option is for a high-availability gateway environment. If you want, you can install and add multiple gateways to the same cluster. This ensures if the primary gateway is unavailable, data requests are automatically redirected to the second gateway that you add, and so on.

- You’ll see a message showing your gateway is online and ready to be used. Click Close.


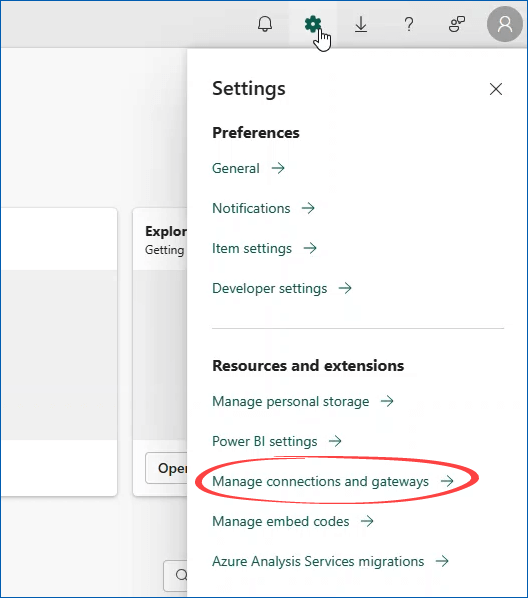
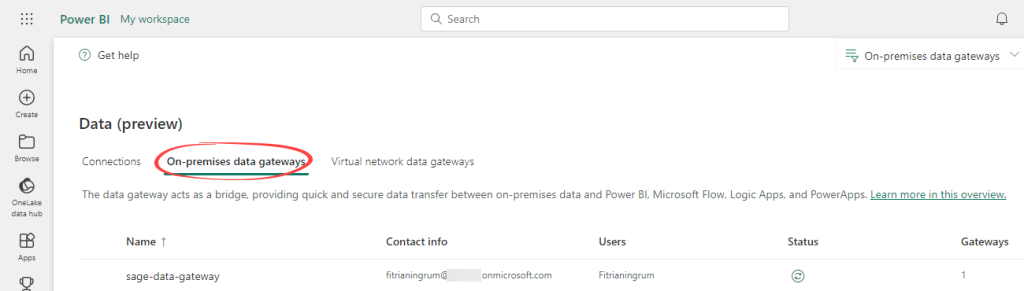
After a gateway is installed and ready for use, it will be listed on the manage gateways page under your Power BI account. You can see it by clicking Settings, then selecting Manage connections and gateways.

In the On-premises data gateways tab, you should see all the gateways that are set up under your account:

How to connect to Power BI gateway data source
The gateway itself creates a bridge between the cloud and your local domain. To ensure your data sources can be refreshed via this gateway, you need to add data source connections to it. Here are the steps:
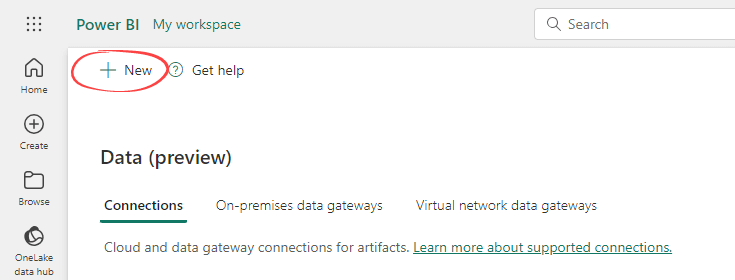
- Open the manage gateways page in the Power BI service by clicking Settings > Manage connections and gateways. In the Connections tab, click the New button.

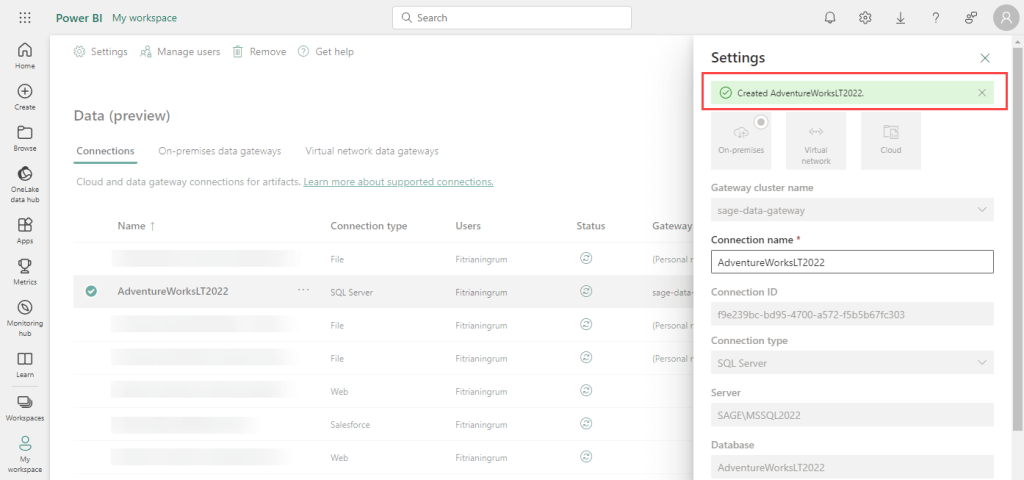
- In the New connection pane that appears, enter the connection details, such as selecting the gateway, entering a connection name and connection type, and other details. When done, click Create.


- If everything is set up correctly, you should see a message saying the connection was created.

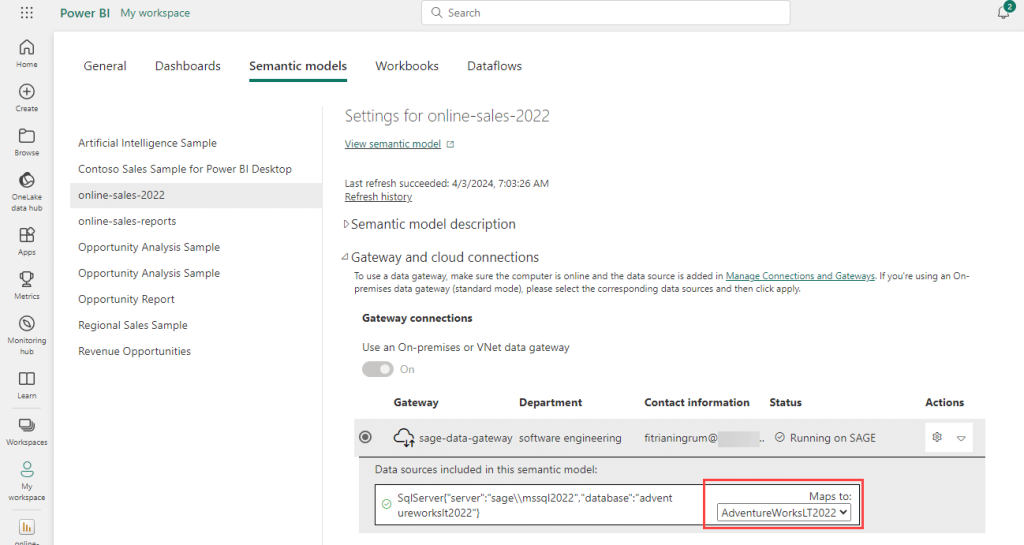
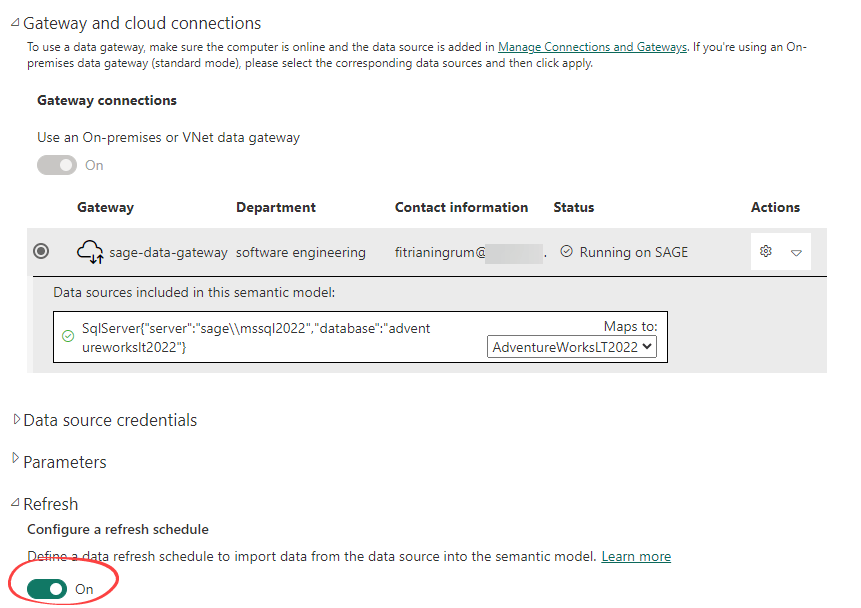
- Map the gateway’s data source to your report’s semantic model. To do this, you can click the Settings icon and select Power BI settings. Then, click the Semantic models tab and select your report. Under the Gateway and cloud connections settings, map the data source to use the gateway connection and click Apply.
‘Semantic models’ is the new name for ‘Power BI datasets’. You can also open your report’s semantic model settings from your workspaces.

Congratulations! You have successfully configured the Power BI gateway connection to your data source. You can now refresh your data source manually.
If you want, you can also change your data source settings to update automatically on schedule. This way, your reports and dashboards are always up-to-date.

Troubleshooting guide for gateway in Power BI
With the right tools and approach, you can efficiently identify and resolve most issues. It’s best to start with the logs. This section also explores how to address some of the most common issues specific to the Microsoft Power BI gateway.
If you still encounter any challenges, submit a support ticket for Power BI to get help from the Microsoft support team.
Start with the logs
Collect the logs from these two places: from the gateway app and the event logs. You can then analyze them yourself or include them when submitting a ticket.
Collect logs from the on-premises data gateway app
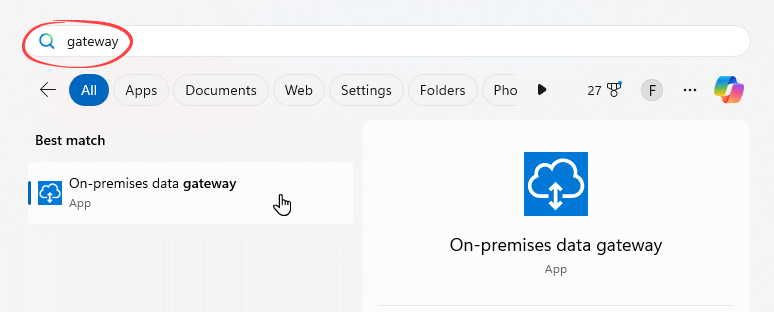
On the computer where you install the gateway, type “gateway” in Windows search. Then, select the On-premises data gateway app.

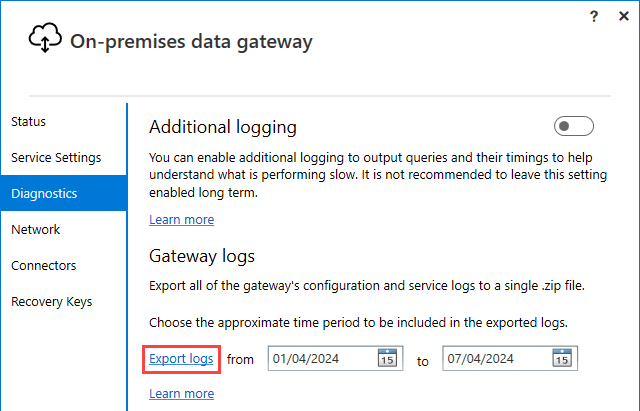
Select Diagnostics. Then, customize the date range for the logs and click Export logs. This action exports the logs to the ODGLogs folder on your Windows desktop in .zip format.

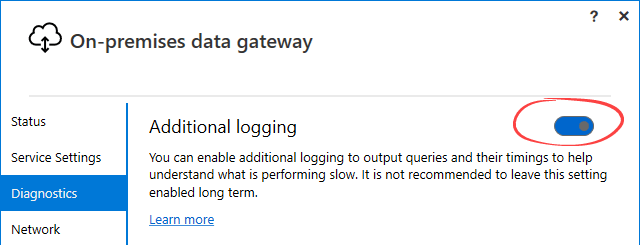
If you want, you can also enable additional logging. This is a good way to monitor slow-performing queries running through the gateway.

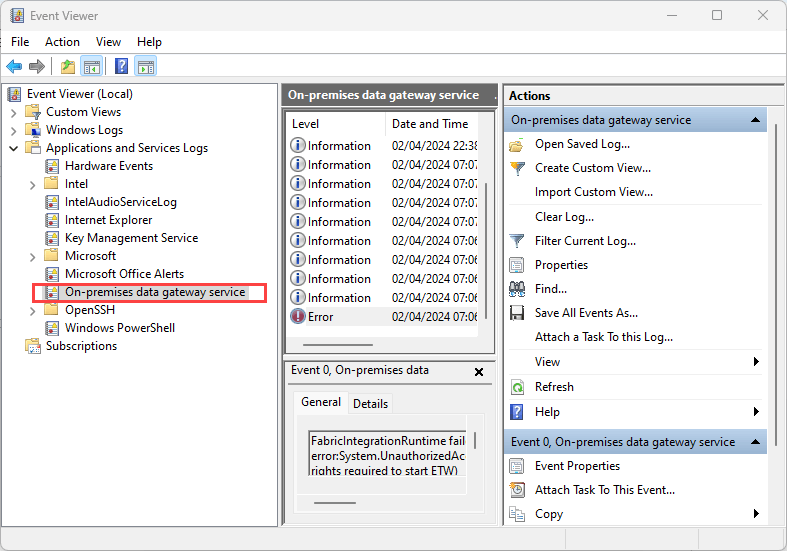
Collect logs from the Windows Event logs
Open the Event Viewer on the computer where you install the gateway. Expand Applications and Services Logs. Then, select On-premises data gateway service.

Standard troubleshooting procedures
- Ensure you have the latest version of the gateway. The latest version may include a fix for your issue. Also, if you use a cluster, ensure all the gateways are updated to the newest version to avoid data refresh failure.
- Restarting the gateway every time you make changes to the gateway configuration files is recommended.
Common errors and how to fix them
With the detailed logs in hand, you may be able to resolve many common issues related to the on-premises data gateway. Take a look at the following list:
Common installation errors
- Installing the same version or a previous version of the gateway on the same computer will cause the installation to fail. You’ll need to uninstall the current version first to proceed with the installation.
- Disable antivirus software like McAfee Endpoint Defender during the installation. You can also try configuring your antivirus software to ignore the gateway process.
Common data source errors
- Error: You don’t have any gateway installed or configured for the data sources in this dataset. ? Ensure you add a data source to your gateway configuration to fix this.
- Error: Unable to Connect. Details: “Invalid connection credentials”. ? Ensure you use the correct username and password to access the data source.
- Error: Unable to Connect. Details: “Cannot connect to the database”. ? Check the database name and confirm the user has the necessary permissions to access the database.
- If your data source can’t be refreshed, ensure you use valid credentials to access it.
Common gateway errors
- If the Power BI service reports the gateway as unreachable, try restarting the Windows service. This may make the gateway ‘live’ again and allow communication to be successful.
- Error: Unable to Connect. Details: “Unknown error in data gateway ? Review gateway logs for more insight, as several reasons might cause this error.
Connect your on-premises and cloud data sources to Power BI without any hassle
The Power BI gateway acts as a bridge that allows connection between the on-premises data sources and Microsoft cloud services, including Power BI. It ensures your on-premises data is accessible securely without having to migrate it to the cloud.
For scenarios where your data sources are primarily cloud-based, Coupler.io can be a solution that effortlessly bridges over 60+ cloud-based applications and Power BI. It simplifies the data transfer process, supports automatic refreshes to keep your dashboards current, and even offers Power BI templates to streamline your reporting process.
Connect your data sources to Power BI with Coupler.io
Get started for free