Even though Salesforce now offers quite good reporting capabilities, it is still primarily a CRM tool. Consequently, its data reporting and visualization features are not as comprehensive and refined when compared to business intelligence (BI) tools and spreadsheet software. This step-by-step guide shows you how to export data from Salesforce to Excel and provides a few free Salesforce dashboard templates for instant data visualization. Let’s go!
What are the ways to connect Salesforce to Excel?
For this type of data connection, consider the following methods:
- Coupler.io — a data and reporting automation tool that provides over 60 connectors for Excel. It allows you to seamlessly integrate data from your Salesforce account and even combine it with information from other sources into a single dataset. You can export the data set to Excel and schedule data refreshes at your desired frequency. Additionally, Coupler.io offers ready-made dashboard templates that deliver instant insights with minimal configuration.
- Native export options in Salesforce — each of these options lets you export a specific data type (e.g., reports), save it as an XLSX, XLS, or CSV, and later open it in Excel. This method involves a more manual process that is prone to errors, which can be critical when handling essential data.
- Data Loader — this app for PC/Mac is primarily used for Salesforce data backup. However, you can also use it to export a specific dataset. It’s better suited for Salesforce admins who have permissions to all data and can use Salesforce Object Query Language (SOQL) for more advanced operations.
- Power Query in Excel — this approach uses the data transformation engine called Power Query that’s built into Excel. To connect Excel with Salesforce, you’ll need to sign in to Salesforce with your credentials. After establishing the connection, you’ll be able to load and transform your data as required.
Note: There’s also a more advanced way to connect using the Salesforce REST API. We’ll not cover it here, as it requires an advanced understanding of APIs and the ability to write API request code. If you’re interested anyway, you’ll find more information on how to create a connected app and get an access token in our guide on Export Salesforce reports. The blog post on how to connect API to Excel can also be useful in this regard.
Check out the subsequent sections to learn the details and see which method works the best for you and your needs.
The easiest & fully automated approach to export Salesforce data to Excel: Coupler.io
Use Coupler.io to automate data transfers from Salesforce to Microsoft Excel, no complex configuration or coding required. It only takes three simple steps to set up the connection.
Step #1: Collect data from Salesforce
- First, click Proceed in the form just below:
You’ll be offered to sign up for Coupler.io for free (no credit card required).
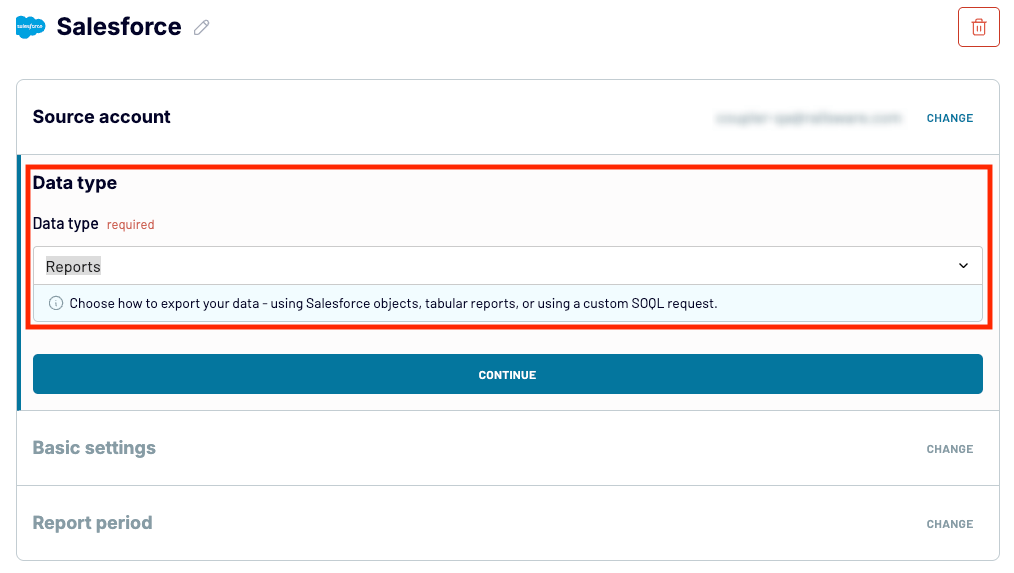
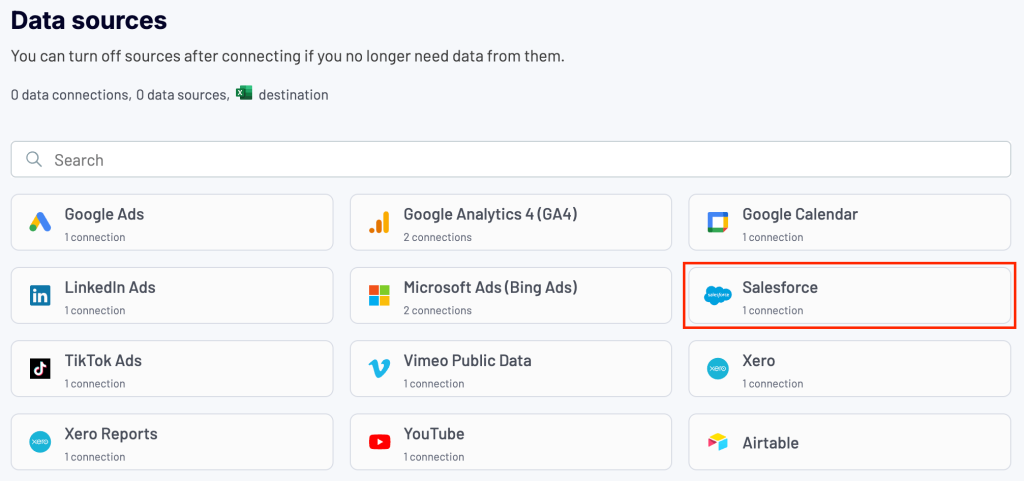
- Once you’re signed in, connect to your Salesforce account, then choose the data type you want to export. For the sake of the presentation, we’ll go with Reports, but you can also choose:
- Objects (for example, to export Salesforce contacts to Excel); or
- Custom SOQL (this requires you to know how to write SOQL queries, but gives the most customization).
- In the next section (Basic settings), choose the desired report you want to export from Salesforce, for example, New Contacts & Accounts Report, and click Finish and Proceed.
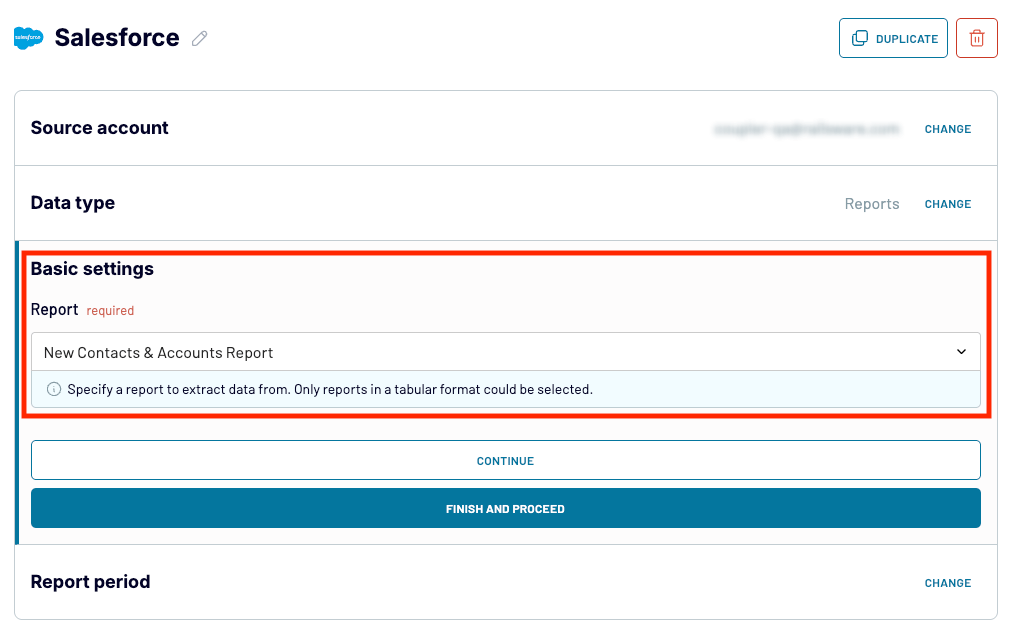
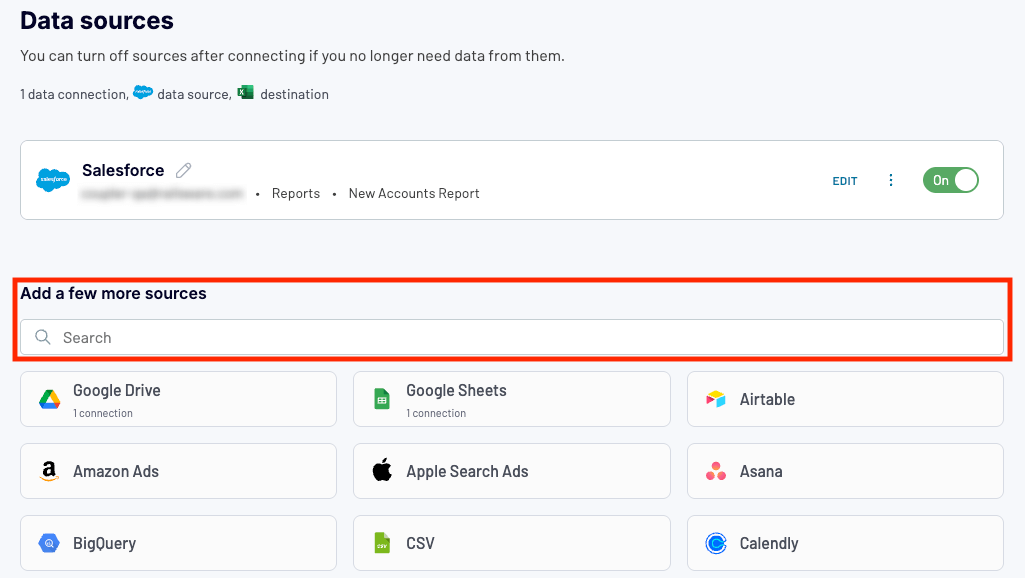
Coupler.io allows you to create multi- and cross-channel reports where you can combine data from Salesforce with data from other apps and sources. Just choose an additional source under Add a few more sources and configure it as needed:
When you’re done with the sources, proceed to the next step.
Step #2: Transform your data
Coupler.io loads data for preview. Users can organize their dataset using the following transformation options:
- Reorder the columns by dragging and dropping them
- Hide/unhide columns and add new ones
- Narrow down the displayed data by using custom filters
- Custom sort the data according to your preferences
- Summarize your data through data functions (e.g., sum, average, etc.)
You can access the transformation options using the toolbar just above the table with your source data.

The blending options for multiple data sources offer the following functionality:
- Append — use this for datasets with similar structure (similar columns) to match data by column names. Data will be combined in the vertical direction.
- Join — if your datasets’ structures differ but have at least one common column, use this option to combine the datasets in the horizontal direction.
When your data looks how you like, configure your data destination.
Step #3: Load data to Excel and schedule refresh
- (Optional) Note: This step is shown only if you have configured multiple data sources. In the Data to share section, choose the data you want to import to Excel—just data from one source or data blended from different sources.
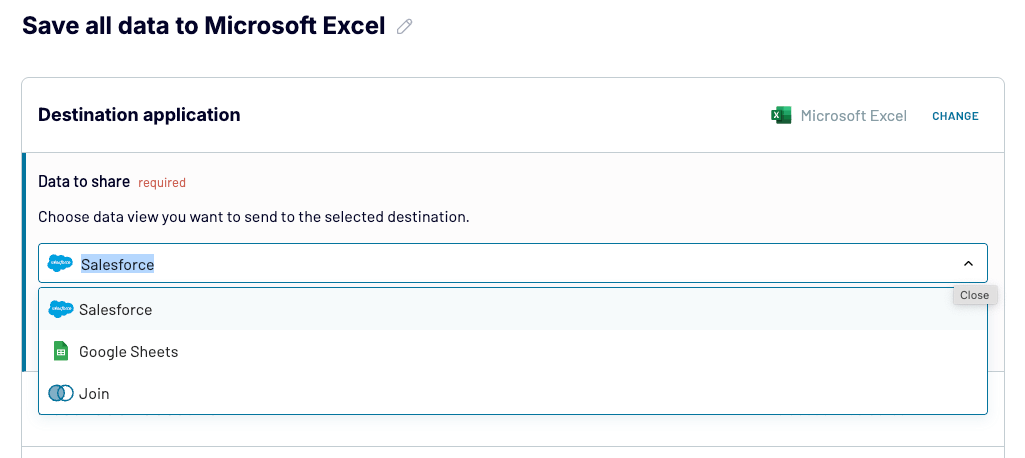
- Connect your Microsoft 365 account, then choose the destination Excel workbook. It needs to be saved to your OneDrive. Next, choose the sheet where the data will be imported.
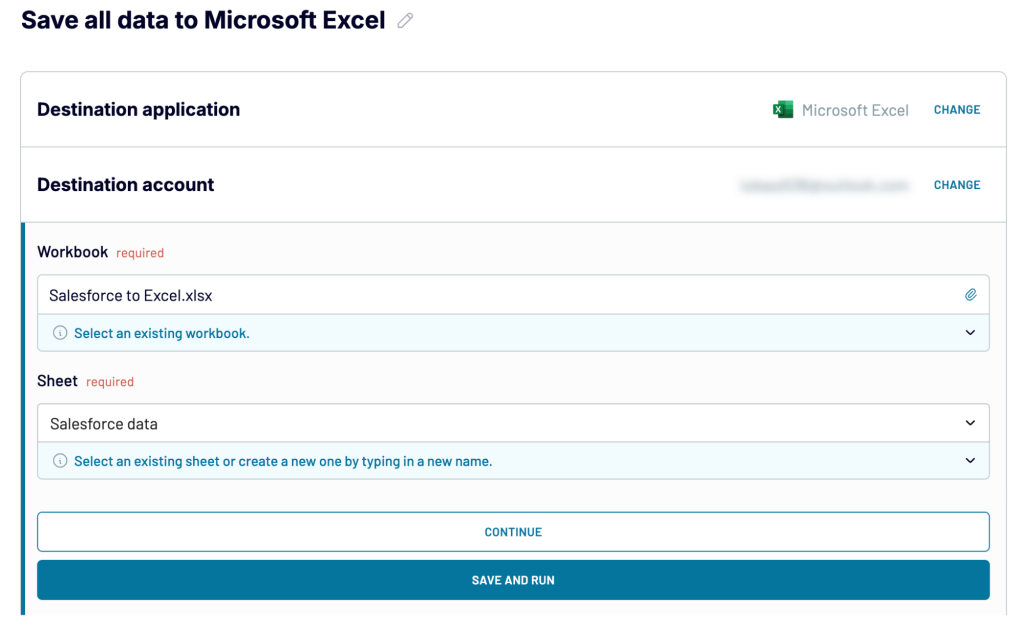
Note: In addition to Excel, Coupler.io also allows you to connect Salesforce to Google Sheets.
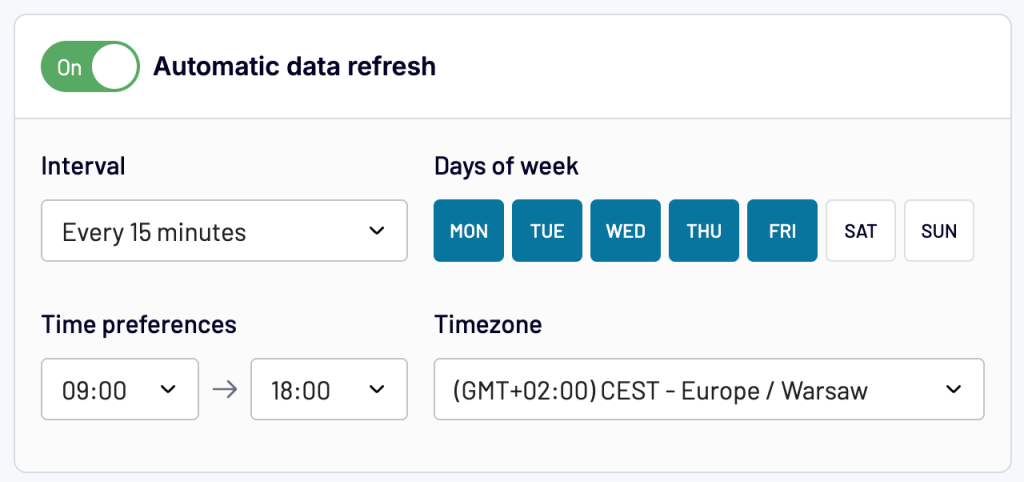
- Proceed to Flow settings to set up a schedule for an automated refresh of your data. This is optional but brings the convenience of working with up-to-date data in Excel. Just toggle Automatic data refresh on and specify time and date settings.
- Hit Save and run, and you’re done—the Salesforce data will now flow to your selected Excel workbook. All the transformations will be taken into account as well!
So, when you now open the Excel workbook, the Salesforce data will be there. With automatic data refresh enabled, the workbook will be automatically updated at a set interval (which can be as little as 15 minutes), once any change is made in Salesforce.
Use Coupler.io add-in in Excel to speed up your work even more
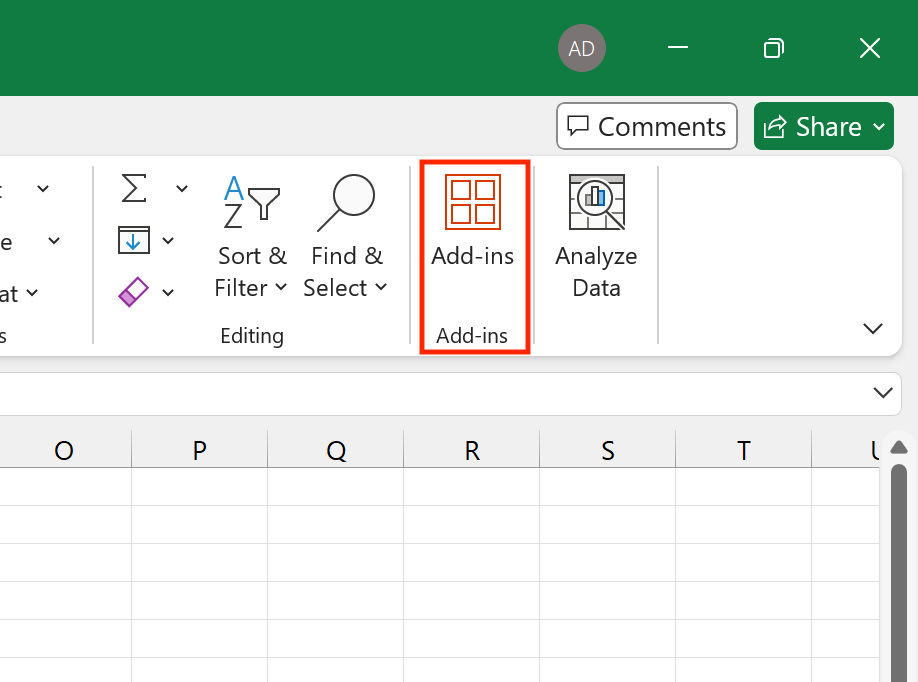
In addition to the Coupler.io web app, which is your usual go-to place to manage your data flows, there’s a dedicated Coupler.io add-in for Microsoft Excel. You can download it from Microsoft AppSource, the official Microsoft marketplace for approved add-in publishers. Alternatively, you can install the add-in directly in Excel, using the Add-ins option on the ribbon:
One more thing to know, the add-in supports the following Microsoft Excel versions:
- Excel for Windows (2013 and newer)
- Excel for Mac (2016 and newer)
- Excel for Microsoft 365 (Windows and Mac)
- Excel on the Web
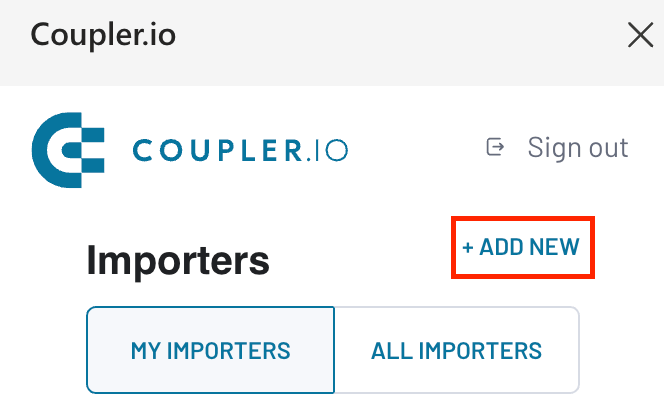
Once you finally have the add-in in Excel, sign in with your Coupler.io credentials and configure the dataflow from Salesforce to Excel as follows:
- Click the Add new button.
- Choose Salesforce as the data source.
- Set up the remaining settings in the same fashion as you did in the Coupler.io web app, beginning from step 2 of the dedicated section.
With the dataflow ready, you’ll be able to use the add-in to perform the following actions right from your Excel worksheet with Salesforce data:
- Use the Run button to instantly refresh the data, without the need to wait for the automatic data refreshes that take place at the interval you’ve chosen.
- Use the Edit button to quickly start editing your data flow (e.g. to add a new data source).
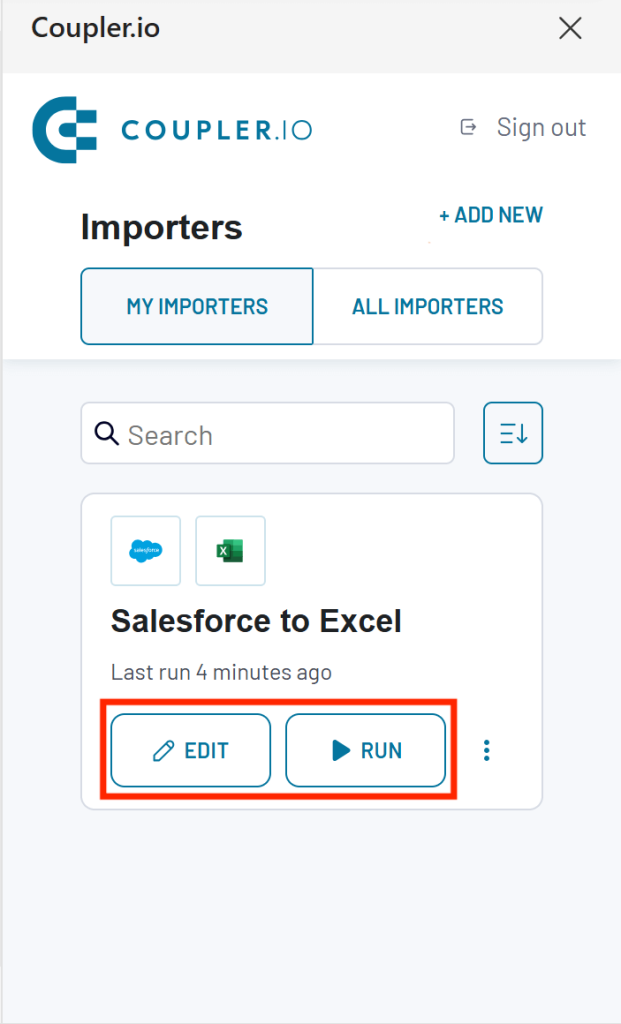
As you can see, the add-in complements the Coupler.io web app experience quite nicely, letting you manage your data refreshes and data flows directly from an Excel spreadsheet, thus speeding up your workflow.
Native methods to export Salesforce data to Excel
Coupler.io provides a one-stop-shop for Salesforce data export, allowing you to freely select objects, reports, or custom SOQL data range. On the other hand, each native method has been designed for different data export purposes:
- Salesforce Reports — with the Reports feature, you can granularly choose which objects (e.g. accounts, leads, etc.) to export by first selecting or creating a report relevant to them and then running an export.
- Salesforce Data Export Service — the service, on the other hand, is more data backup oriented, letting you bulk export all data. However, with some customization, you can also precisely export what you want and need.
Keep in mind that the export operations might require a specific Salesforce edition and/or user permission. For details, refer to the relevant subsection below.
Salesforce Reports
The Reports feature may be the best native option for exporting data related to specific object types, such as leads, accounts, and campaigns. It also provides a workaround for exporting Salesforce lists to Excel (by the way, a long-awaited feature among Salesforce users). You just need to recreate a desired list view using the filters available in Reports.
Note: The following restrictions apply to running exports with the Reports feature:
- Export Reports permission is required to complete the steps below.
- The resulting look of a report exported as raw data will be identical for both Salesforce experiences (Lightning/Classic), but will differ in the case of the formatted report option.
- It’s possible to export up to 5 reports at once.
- Raw data exports have a limit (100,000 rows and 100 columns) when you choose XLSX as the file type. XLS and CSV options are unlimited.
- The limit for the formatted report option in Lightning Experience is 2,000 rows and 100 columns.
- You cannot export historical trending reports.
- In joined reports, you can only use the formatted report option. The export limit of 2,000 rows applies.
Follow the steps below to export desired data with the Reports feature. The steps differ for Lightning and Classic experiences, so be sure to refer to the section that’s for yours.
Salesforce report export in Lightning Experience
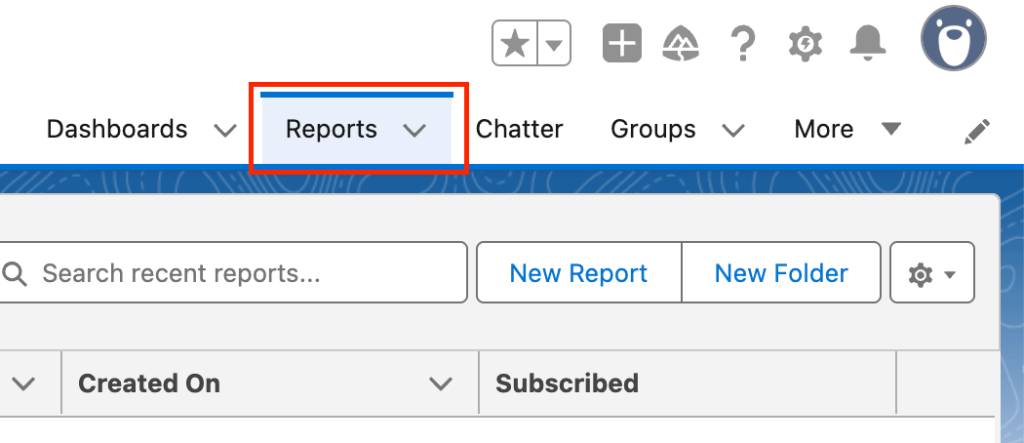
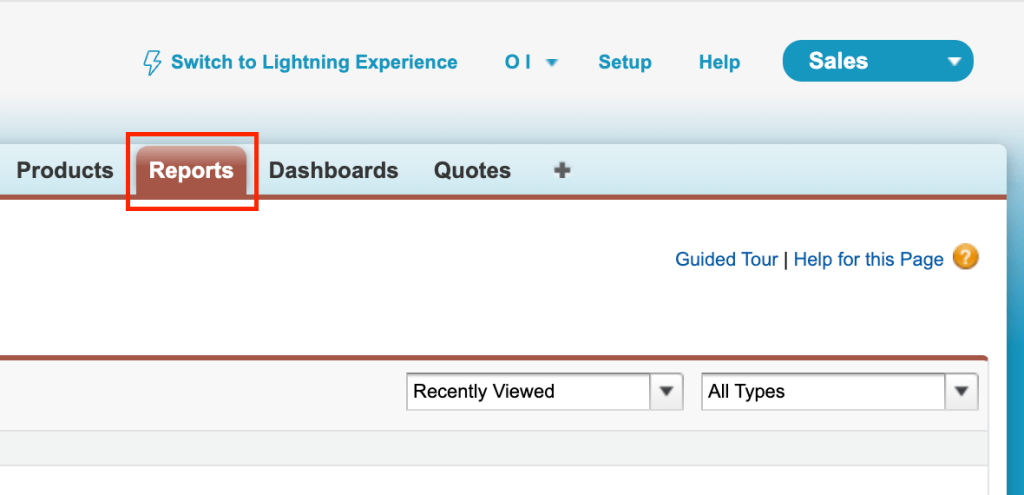
- Click the Reports tab.
- Open the desired report or create a new one, for example, to export leads from Salesforce to Excel.
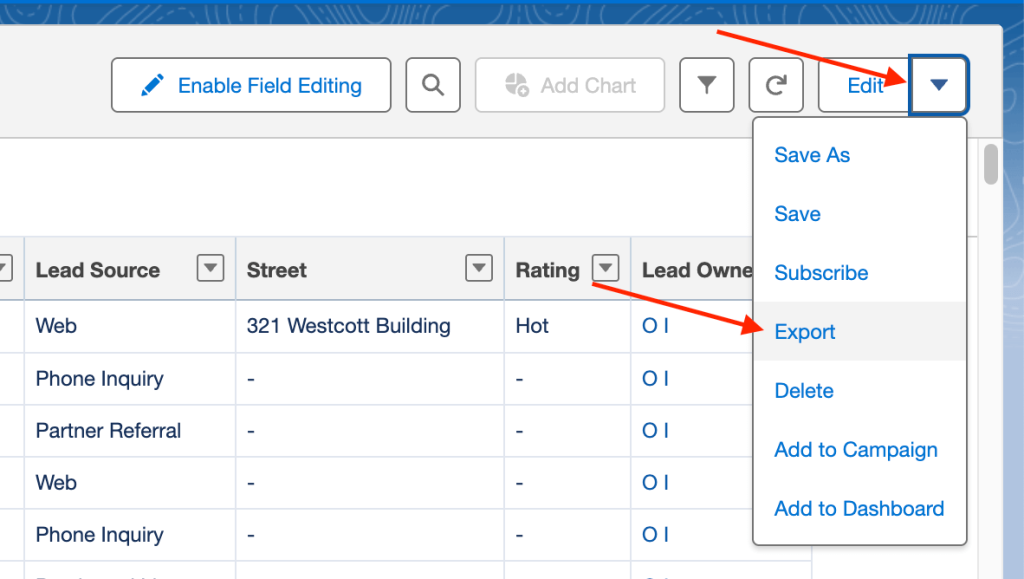
- Next, click the Edit drop-down menu on the right-hand side and select Export.
- Select the format of your export:
- Formatted Report — can be saved into an XLSX file and includes data together with report formatting (header, groupings, etc.).
- Details Only — can be saved into an XLSX, XLS, or CSV file and includes report data only (columns and rows).
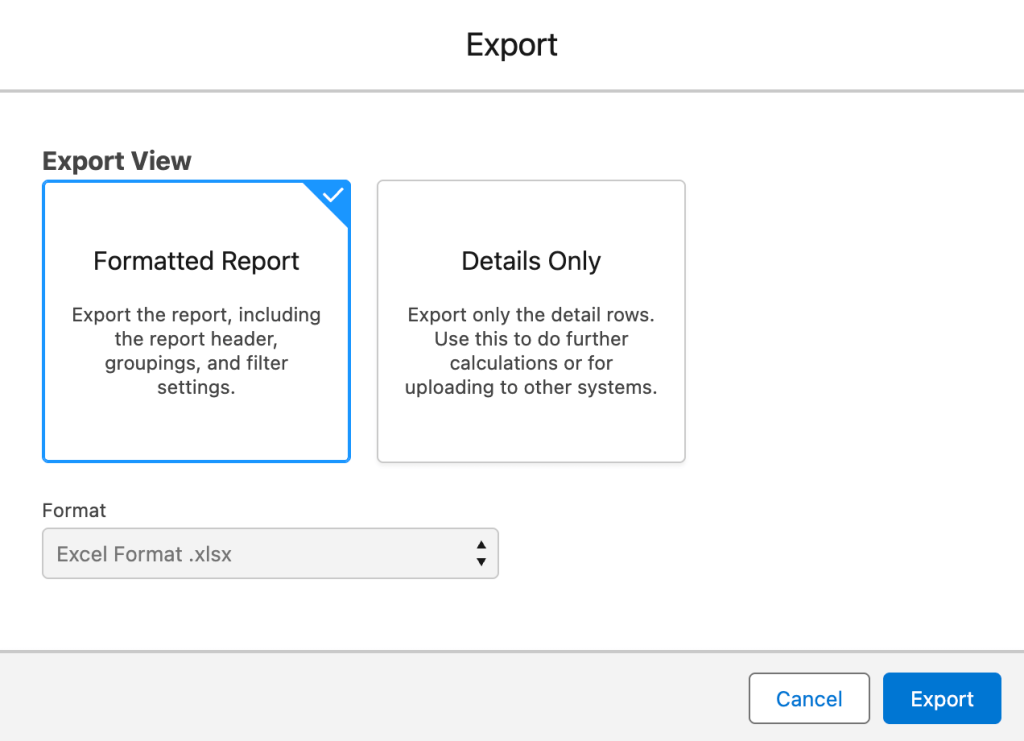
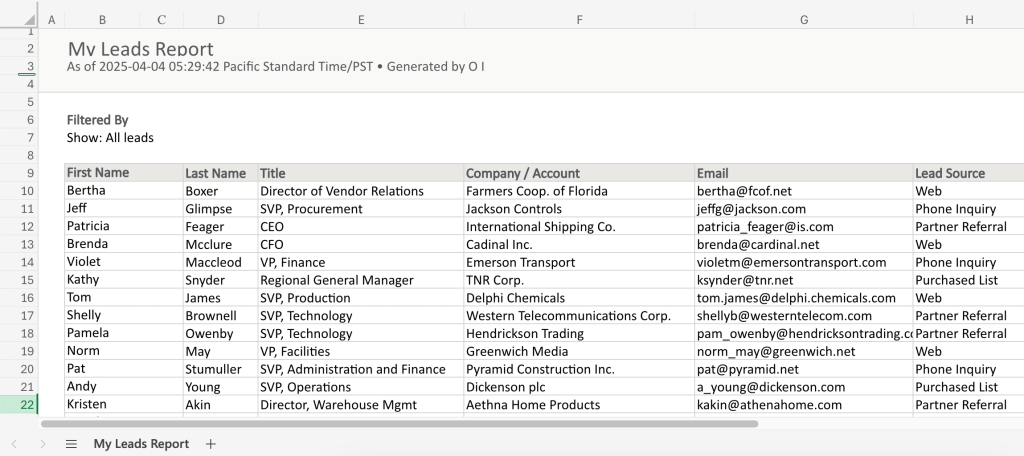
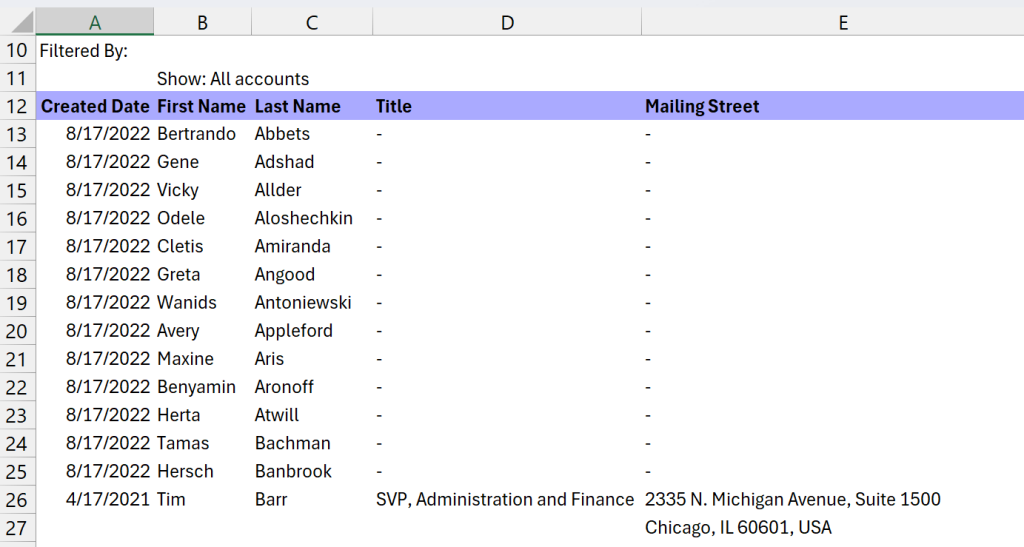
- Finally, click the Export button in the bottom right corner to generate and download the export file to your device. Below you can see a sample formatted report open in Microsoft Excel:
Export Salesforce report to Excel using Salesforce Classic
- Click the Reports tab.
- Open the desired report or create a new one, for example, to export Salesforce contacts to Excel.
- Click an appropriate button, depending on which format of the report you want to export:
- Printable View — to save the report as an XLS file and include data together with report formatting.
- Export Details — to save the report as an XLS or CSV file and include raw report data only.
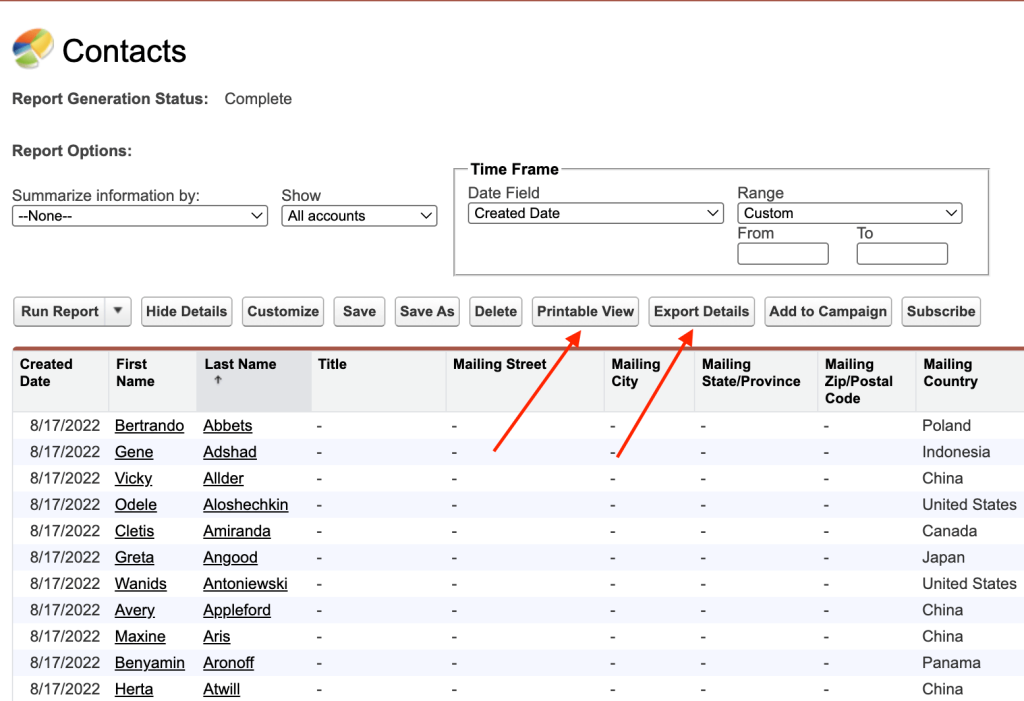
That’s it. Below you can see a Microsoft Excel view of a report exported using Printable View—note that it looks different than when exported in Lightning Experience (the Formatted Report option):
Salesforce Data Export Service
This method is more of a data backup option, as it allows you to export all your company’s data from Salesforce. The resulting files are CSVs, so you can readily import these to Microsoft Excel without any intermediaries.
Note: The following restrictions apply to the Data Export Service:
- Weekly Data Export permission is required to complete the steps below. This permission is often assigned to the System Administrator user role, as it provides access to all data. Only active users can run Salesforce data exports.
- You need the Enterprise, Performance, or Unlimited Salesforce edition to export data according to the weekly schedule.
To start exporting data from Salesforce, complete the steps below—these apply regardless of whether you’re using the Lightning or Classic experience:
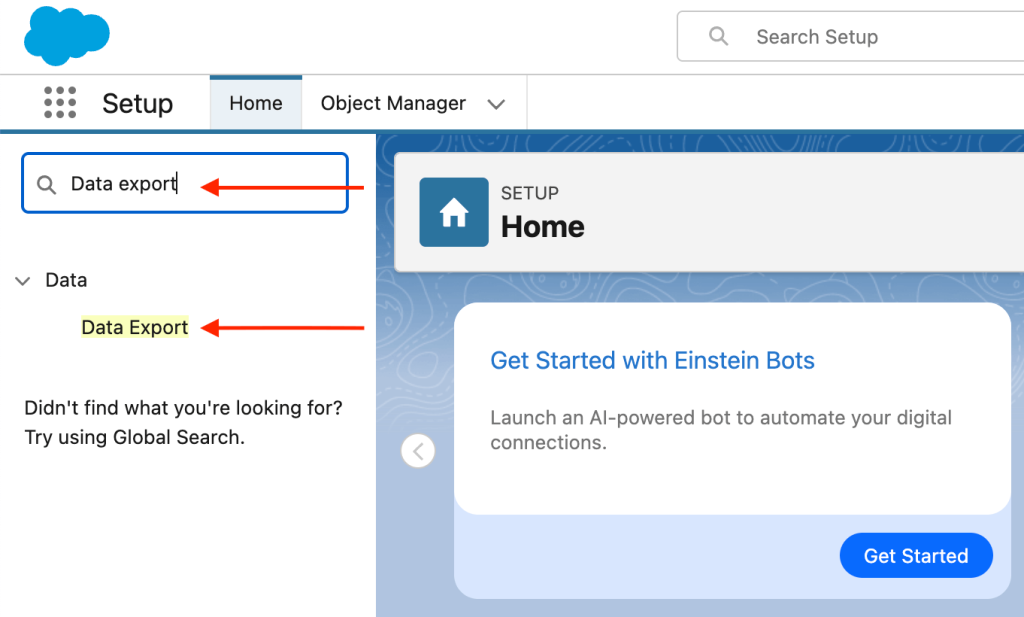
- Sign in to Salesforce and make sure you’re in the Setup view.
- Type Data export in the search bar and click the found item below.
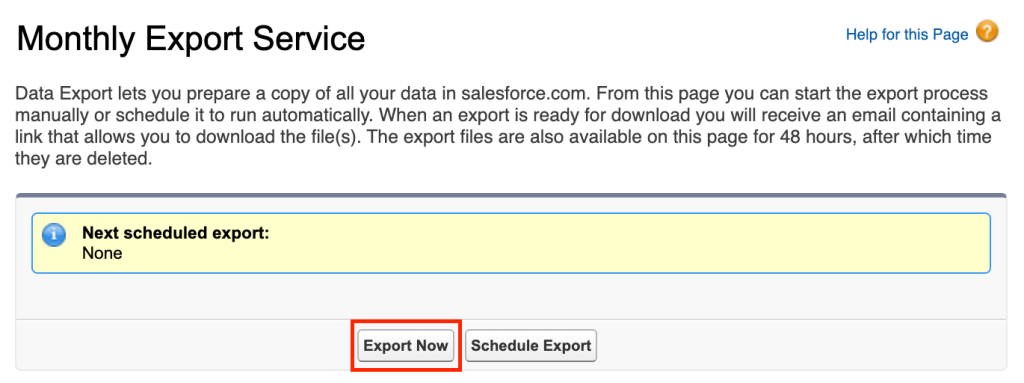
- Click Export Now to start configuring your export. If you want to schedule your report to run automatically later, you need to click Schedule Export.
Note: Depending on your Salesforce edition, you can run an export only once a week or a month. If Export Now is unavailable, it means not enough time has passed from the last time you or someone else in your organization ran an export.
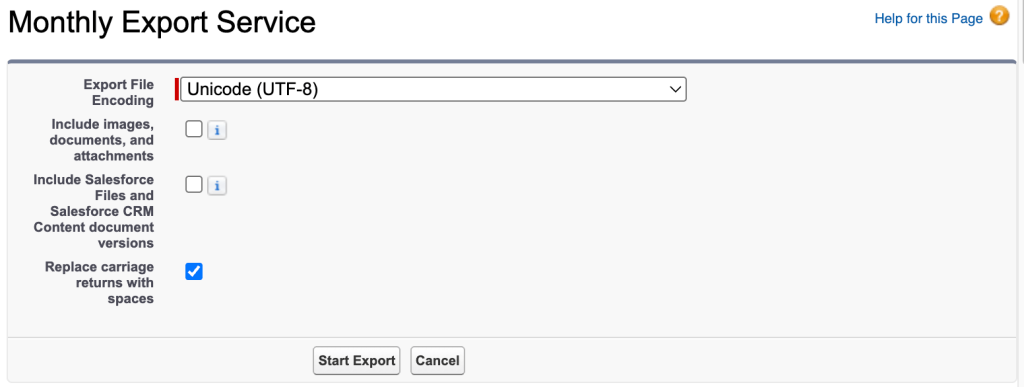
- Configure basic export options:
- Select the encoding that will be used for the resulting CSV files. With Excel as a destination, it’s best to use the most universal UTF-8 encoding that covers accented characters as well.
- Decide if you want to include special content like images, attachments, etc., in your export. If backup is your primary goal, it might be a good idea to enable the Include images, documents, and attachments and Include Salesforce Files and Salesforce CRM Content document versions option.
Note: This will increase the size of your export and export data processing time.
- Select Replace carriage returns with spaces to use spaces instead of carriage returns or line breaks in the exported CSVs—it might improve compatibility, especially if you intend to import the data into Excel.
- (Optional) If you clicked Schedule Export in step 3 above, set up start and end dates and the time.
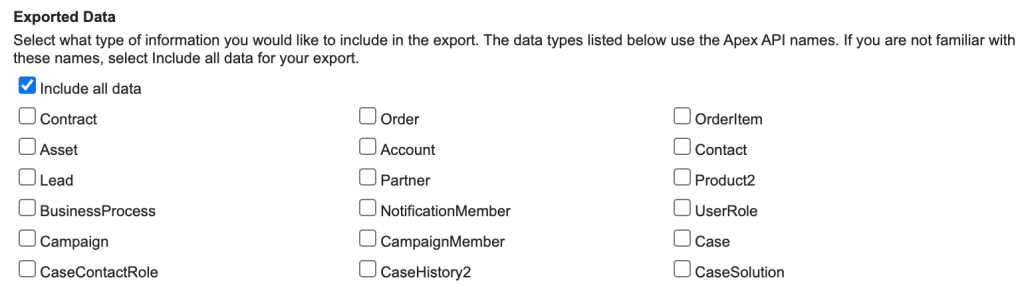
- Under Exported Data, select what objects you want to export. For example, you might want to export opportunities from Salesforce to Excel only. If you’re unsure, select Include all data. This option is also perfect for data backup.
- Finally, click Start Export. For a scheduled export run, click Save instead.
Once the export is complete, you’ll get an email with a link to the exported data. Alternatively, you can go to the Data Export page (see this step), where the link will also be available. Be sure to download the export data within 48 hours, as after this time, the file or files will be deleted.
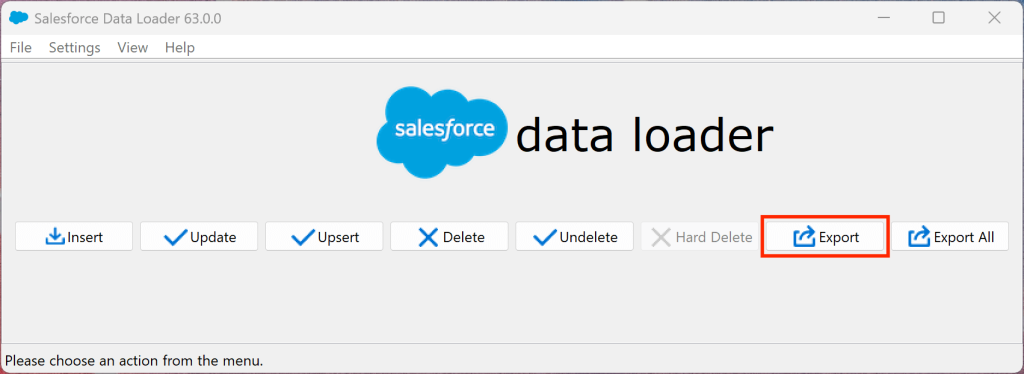
Data Loader: The export/import tool from Salesforce
Data Loader is a client application that you can use to bulk export data from Salesforce into a CSV file and then open it in Excel. The tool features an easy wizard-based user interface with drag-n-drop support for field mappings. Command line is also available for more advanced users (Windows only).
Note: The following restrictions apply to using the Data Loader tool:
- Data Loader supports the following Salesforce editions: Enterprise, Performance, Unlimited, and Developer.
- Modify All Data and specific object-level permissions are required.
- Salesforce API must be enabled.
Before you begin, install the tool from the Salesforce Developers website. It’s compatible with Windows 10 and later as well as macOS 13.x and later. Installing Java Runtime dependency might be required too.
When you’re ready, complete these steps:
- Launch Data Loader.
- Click Export in the main view.
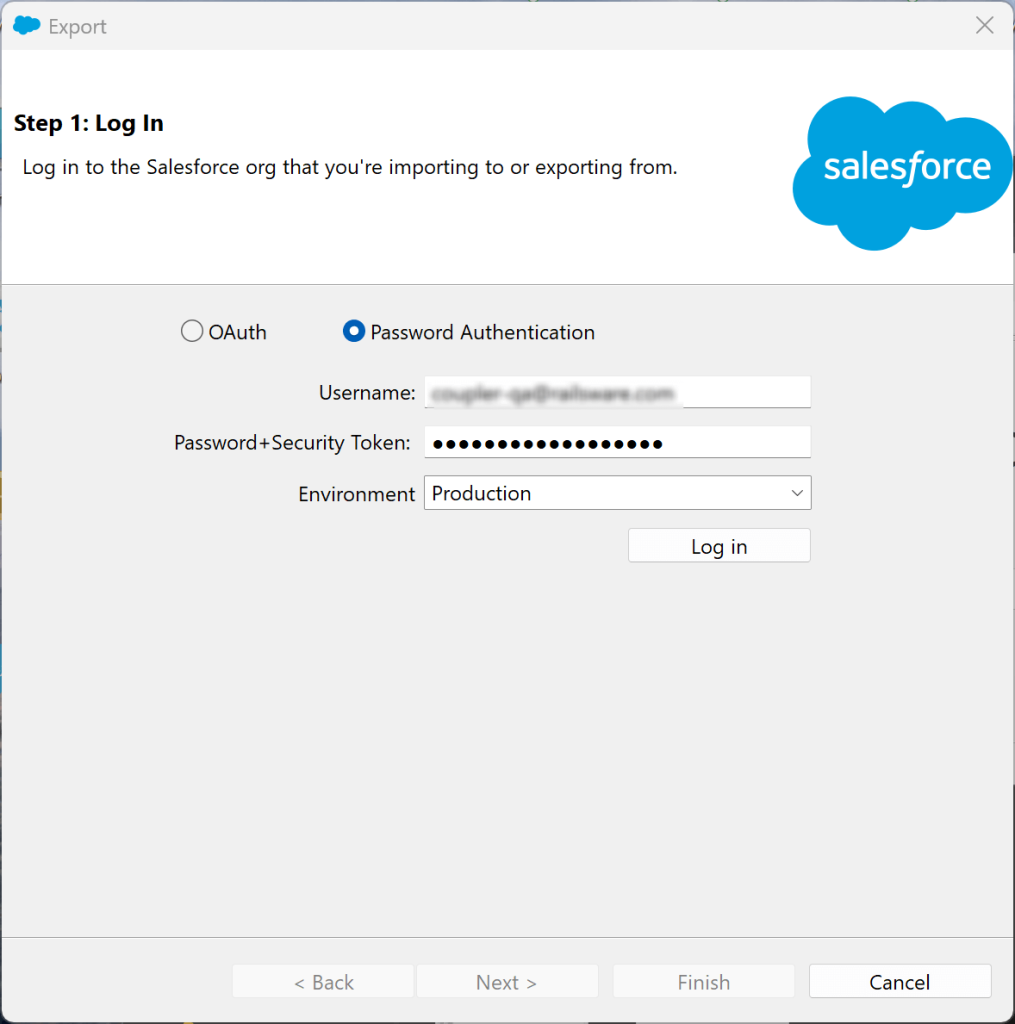
- In the popup that opens, choose your authentication method (OAuth or Password Authentication) and proceed as follows:
- OAuth: Click Log in and sign in in your browser, providing the 8-digit code sent to your email or authenticator app.
- Password Authentication: Provide username and password, and click Log in.
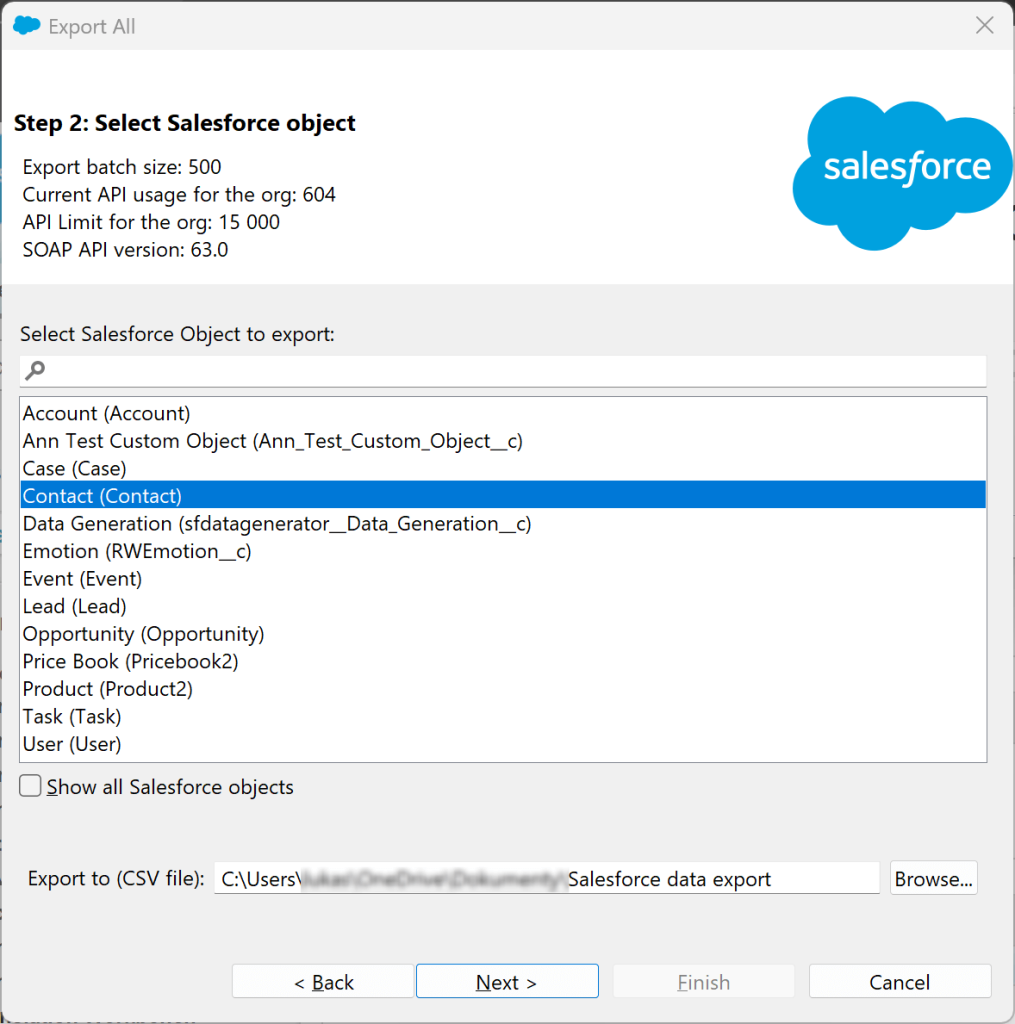
- Once connected, select the Salesforce object you want to export (e.g., Contact). Next, use the Browse button to rename your target CSV file and choose its location on disk. Click Next.
- Define your query by selecting fields (columns) that will be exported for your object type. Optionally, you might filter the exported data by choosing field(s) and value(s) that’ll be used for filtering.
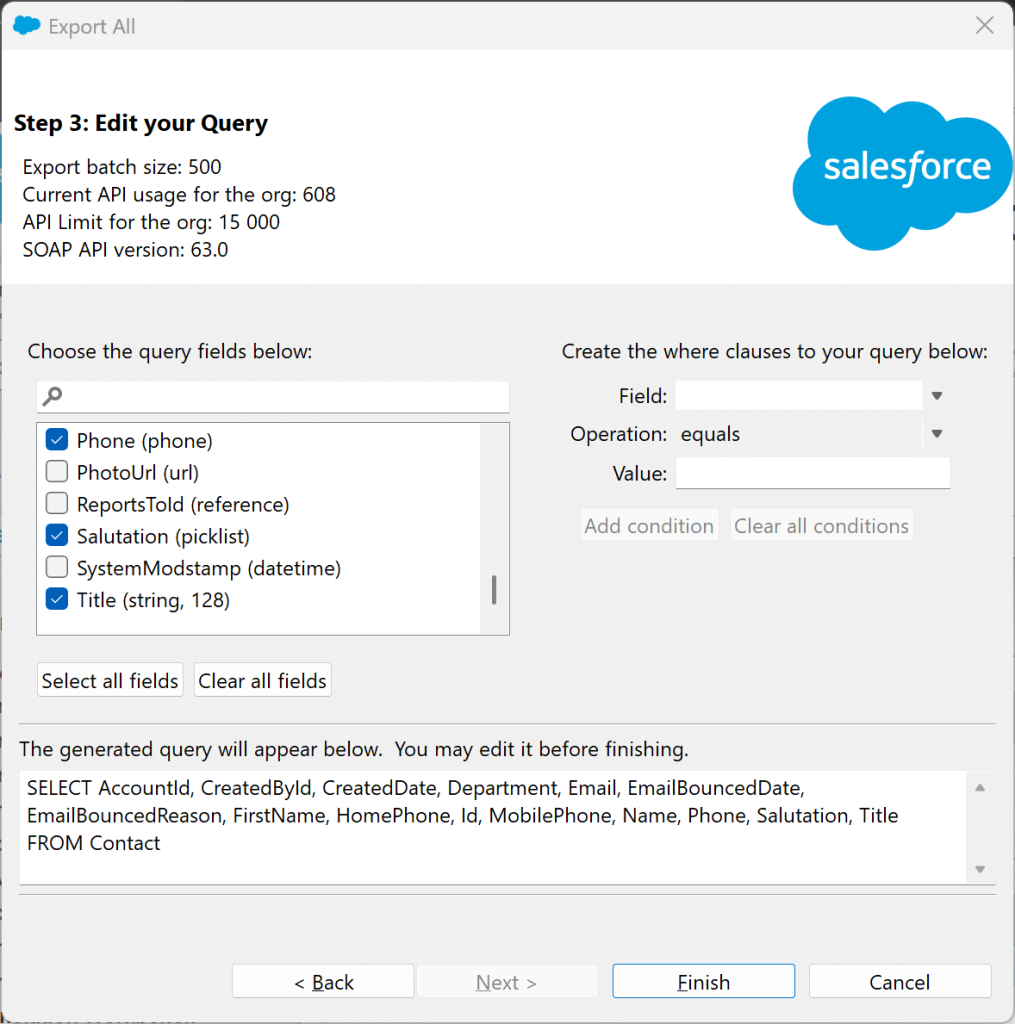
- Finally, click Finish to begin the export.
If you need more details on using Data Loader, simply consult its user’s manual.
Connect Salesforce using Power Query in Excel
Here, we’ll show you how to use the data transformation engine called Power Query in Excel to connect to your org’s Salesforce, select the required data, and load it. Later, you’ll be able to transform and adapt the data according to your needs.
Note: The following restrictions apply to this method:
- Power Query natively supports Salesforce as a data source in Excel for Windows only. Excel for Mac might require additional Open Database Connectivity (ODBC) drivers.
- Excel 2016 or newer, or Excel within a Microsoft 365 subscription is required.
- You need to enable API access in Salesforce.
- Specific object-level permissions are required to access the desired objects.
Coming back to Power Query, follow the instructions below to import the desired dataset from Salesforce:
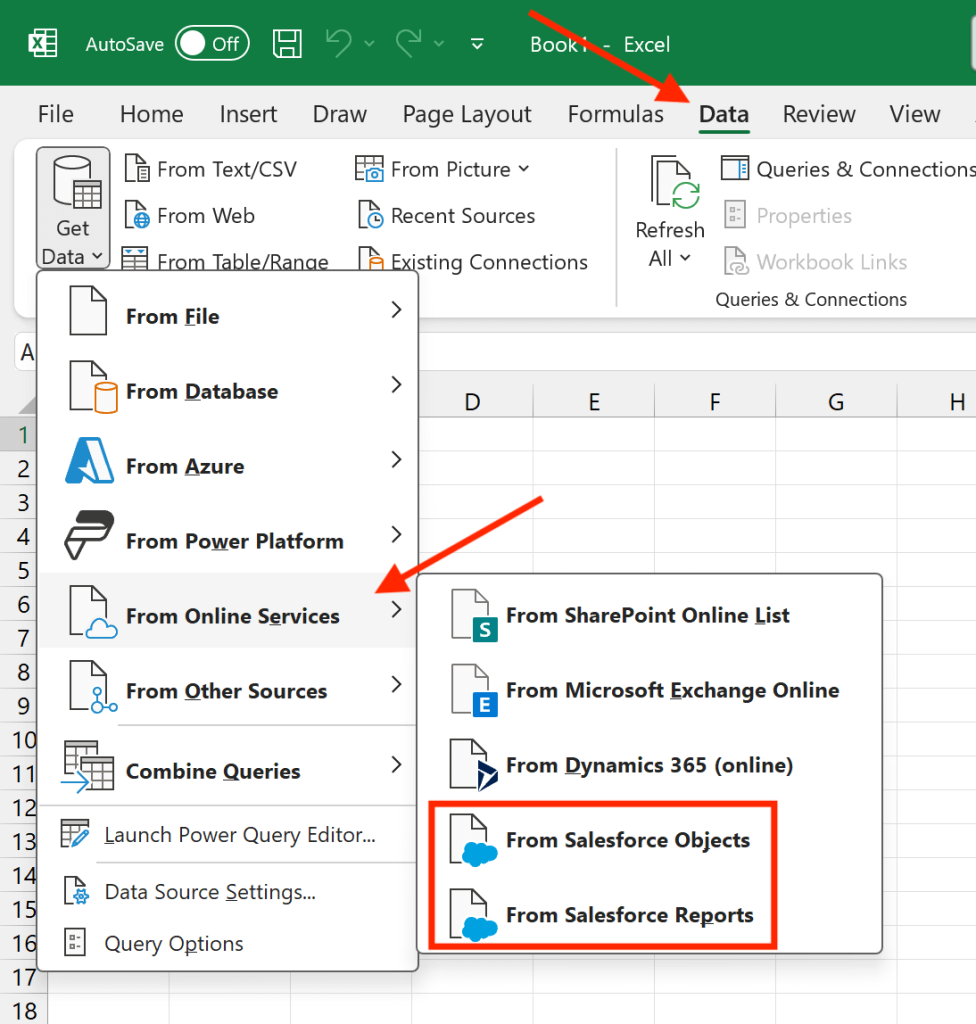
- Launch the desktop version of Microsoft Excel.
- Click the Data tab, go to Get data > From Online Services and choose either From Salesforce Objects or From Salesforce Reports, depending on what data you wish to import into Excel.
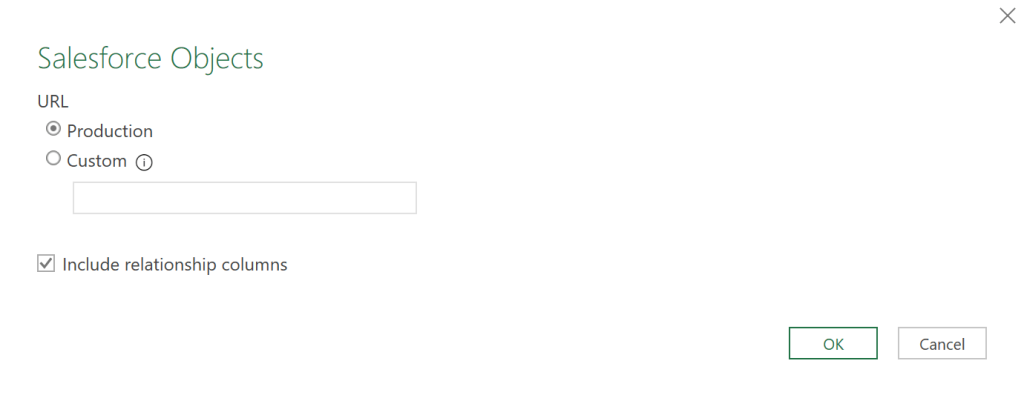
- In the popup that opens, select Production (or Custom if your organization has a custom Salesforce domain in place, e.g., https://my-organization.salesforce.com). Select the Include relationship columns checkbox if you want to include columns that have links to external tables. Next, click OK to proceed.
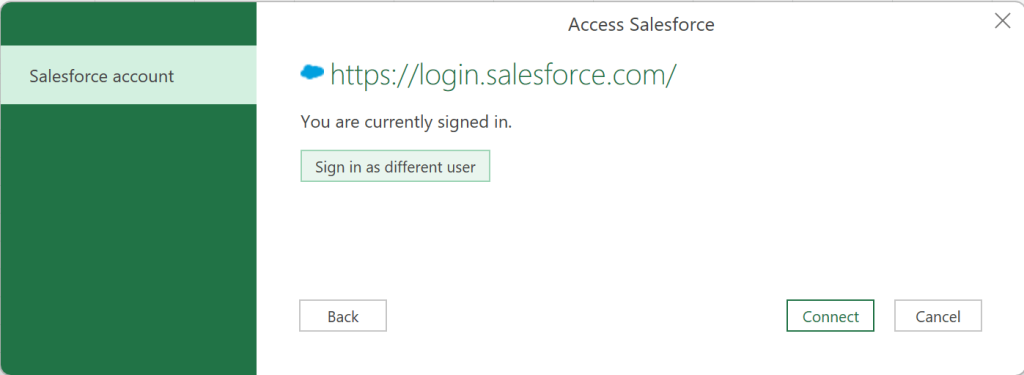
- In the next step, click Sign in to sign in to your Salesforce account. In the new popup window, provide your Salesforce credentials and verification code for multifactor authentication.
- Once you’re signed in, click Connect.
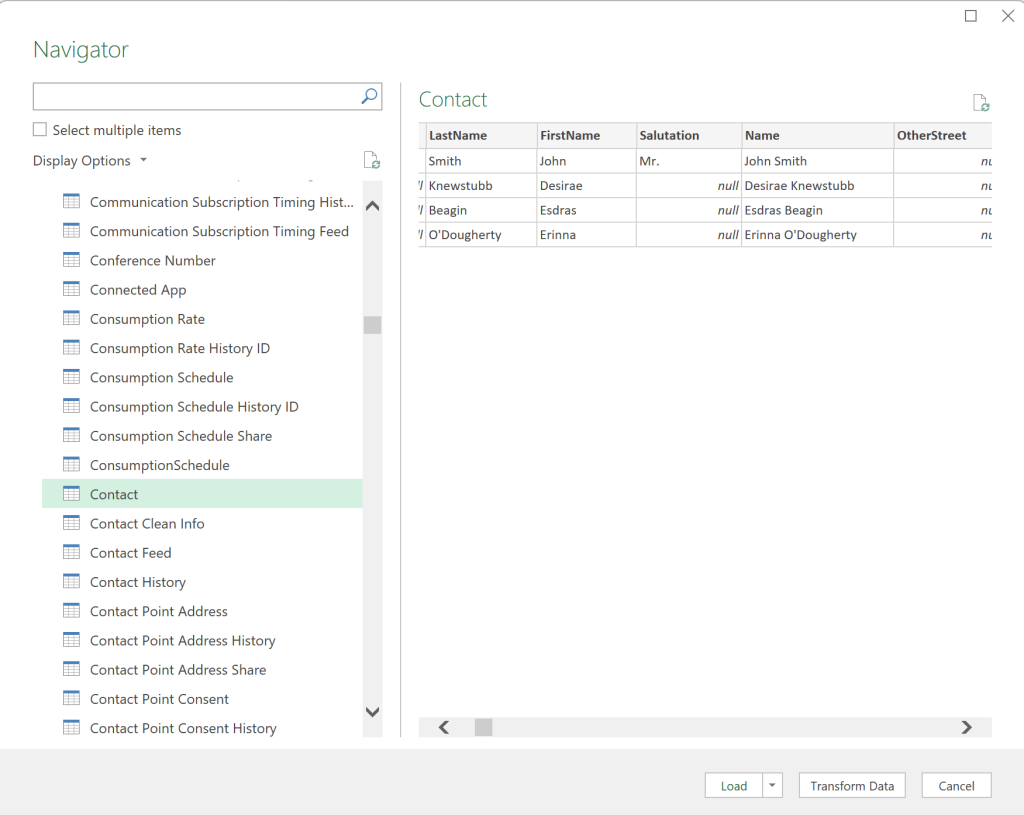
- Finally, use the Power Query Navigator to select the data you wish to import and proceed to transform your data according to your needs.
Turn your Salesforce data into visual insights with ready-made and attractive dashboard templates
Tweaking and visualizing the data in Excel is, of course, possible, but it takes some time. The time that you could easily be spending on something more beneficial, like deeply analyzing the exported Salesforce data or effectively presenting it to your co-workers.
But you know what? You can actually have it all, in no time! Just try our prebuilt professional dashboard templates, which we’ve prepared for you for free. First of all, thanks to interactive charts, tables, and more, the templates will make your Salesforce data much easier to understand for anybody. But more importantly, they’ll provide you and your colleagues with highly valuable insights to boost your sales analytics and let you make truly data-driven decisions.
Note that the templates shown below are designed for use in Looker Studio and Google Sheets. These are perfect alternatives to Excel that let you make the most of your Salesforce data.
Salesforce dashboard
The Salesforce dashboard is the easiest way to get the core Salesforce sales analytics data in one place to understand your sales activities, work on opportunities, etc.
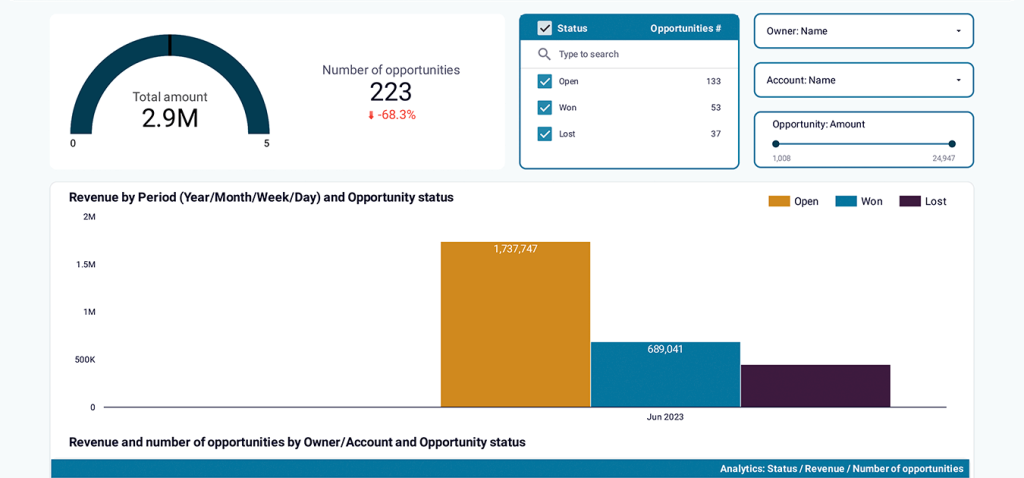
With this dashboard, you can, for example:
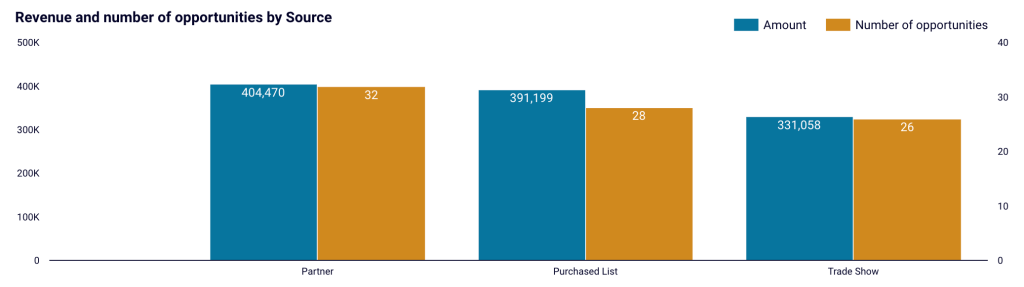
- Analyze which source brings the biggest and the smallest revenue for closed deals. Act on the insights to optimize your marketing spending and lead generation efforts:
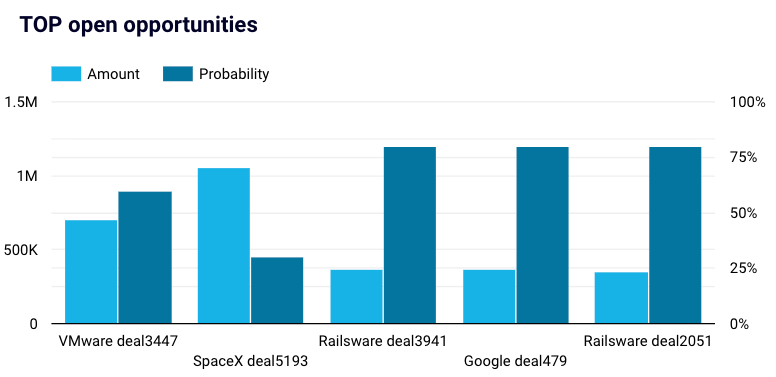
- Filter open opportunities by amount to prioritize the ones that will be the most profitable to your business:

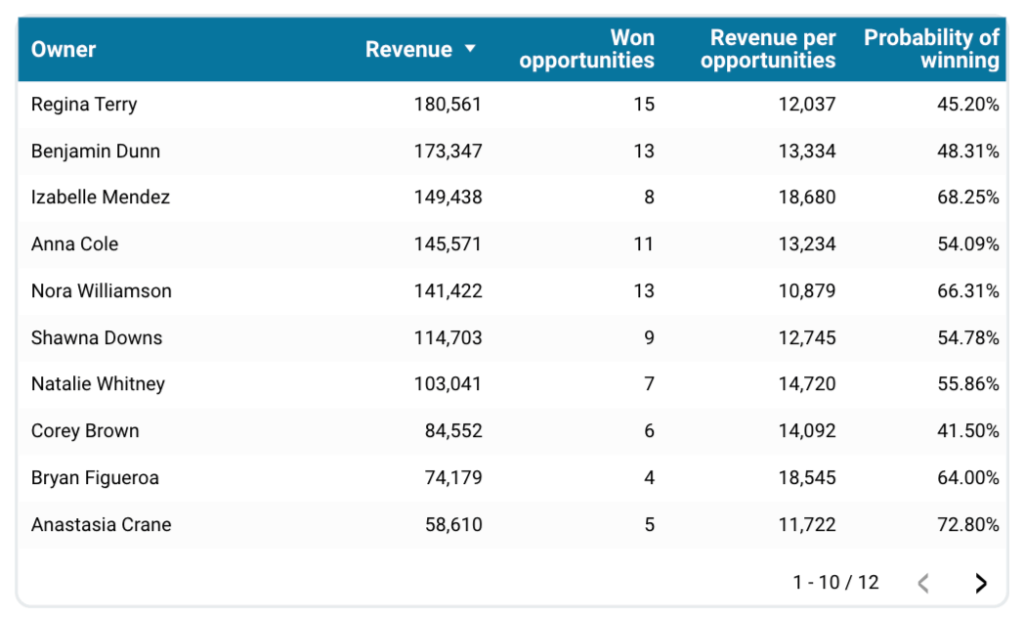
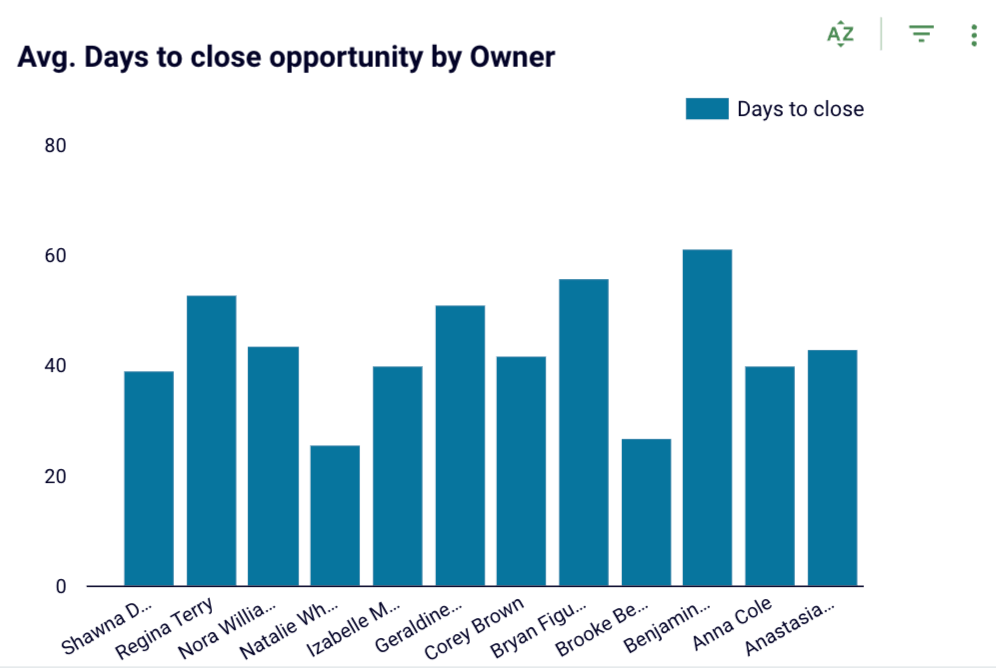
- Track won opportunities by owner to see which member of your team is the most successful at closing deals and which one does it the fastest:
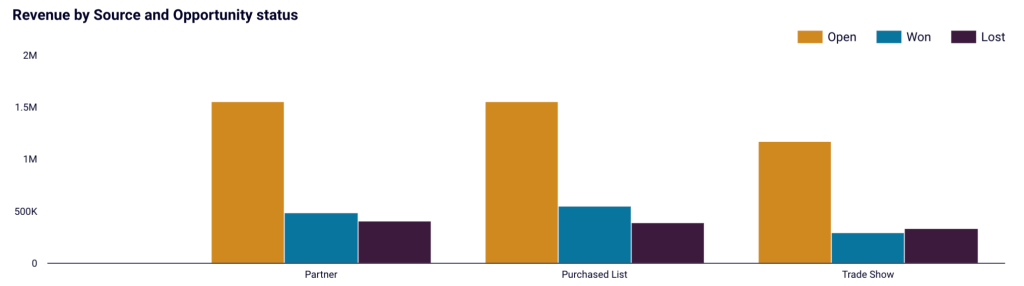
- Analyze lost opportunities by source to see which source brings the opportunities that are least likely to do business with you. Then, funnel your marketing efforts into this source:
The dashboard allows you to visualize Salesforce data in Looker Studio. It features a Coupler.io connector to fully automate your dataflow. To configure the dashboard, see instructions on the Readme tab.
Salesforce CRM dashboard
Try this dashboard to get diverse data and assess your sales pipeline both from the perspective of your team and your customers. See how your team members perform, learn which accounts are the most prospective ones, and much more.
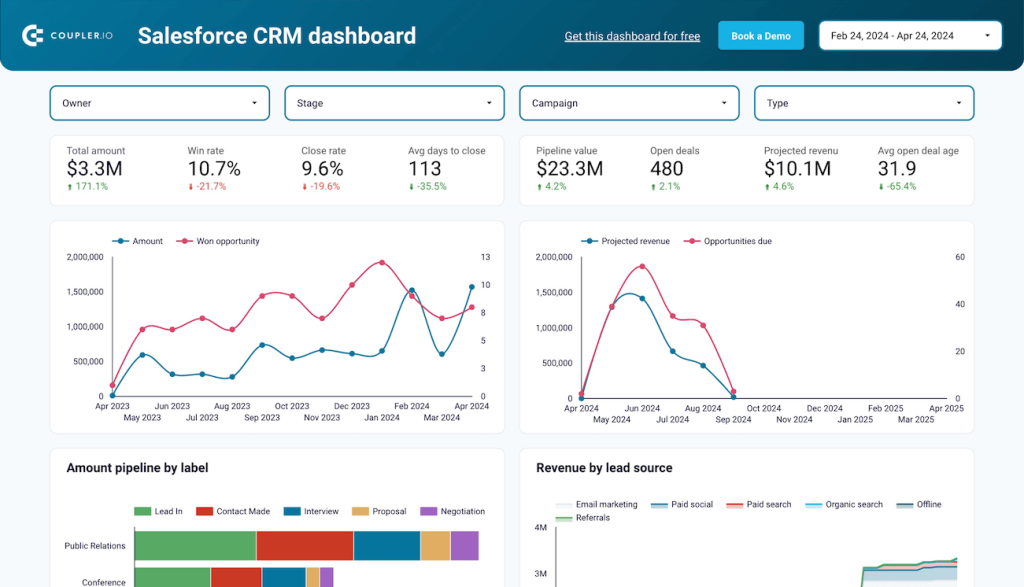
With the Salesforce CRM dashboard, you can, for example:
- Estimate your future revenue in 1 year based on opportunities due amounts in the months to come:

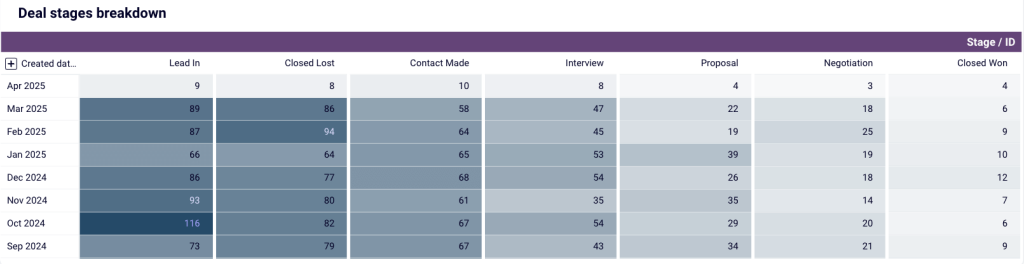
- See the exact numbers of opportunities for each deal stage to see how they are distributed. Then identify potential bottlenecks in the decision-making process:
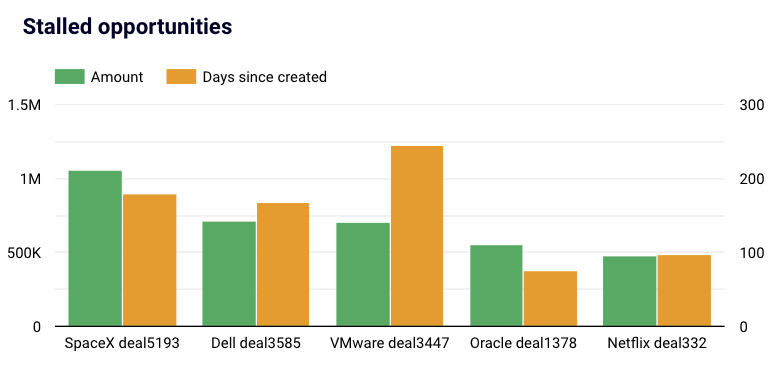
- Track stalled opportunities to see how many days they haven’t progressed for, identify issues, and facilitate task completion by your team members:
- Get to know which accounts you’re currently interacting with are the most prospective. Based on the insights, optimize and funnel your sales activities:
This dashboard is available for both Looker Studio and Google Sheets data destinations. Thanks to the bundled Coupler.io data connector, you can enjoy fully automated flow of your Salesforce data. Click a button below to get this dashboard. Learn how to implement it, reading the instructions on the Readme tab.
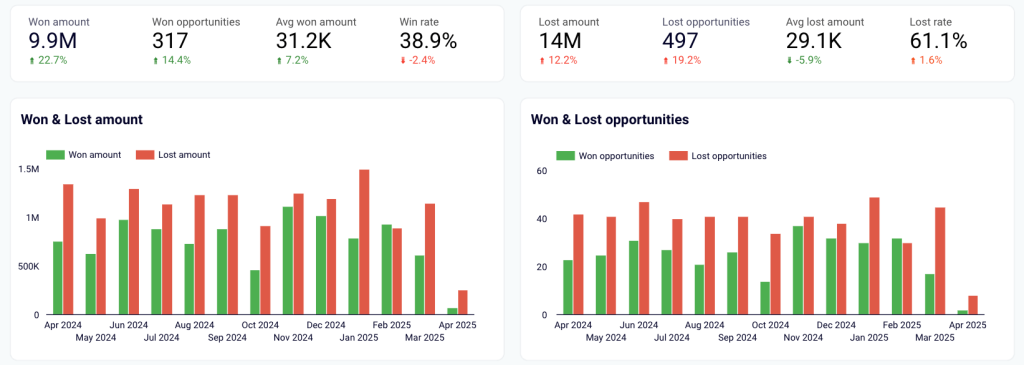
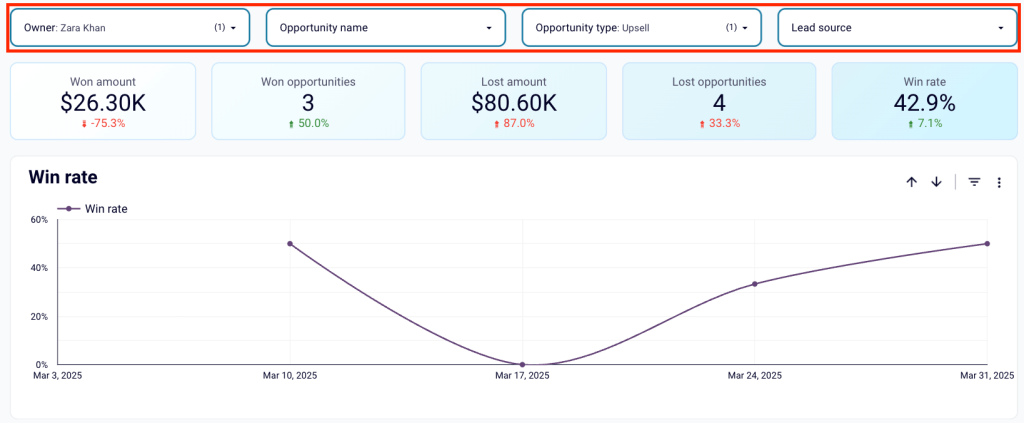
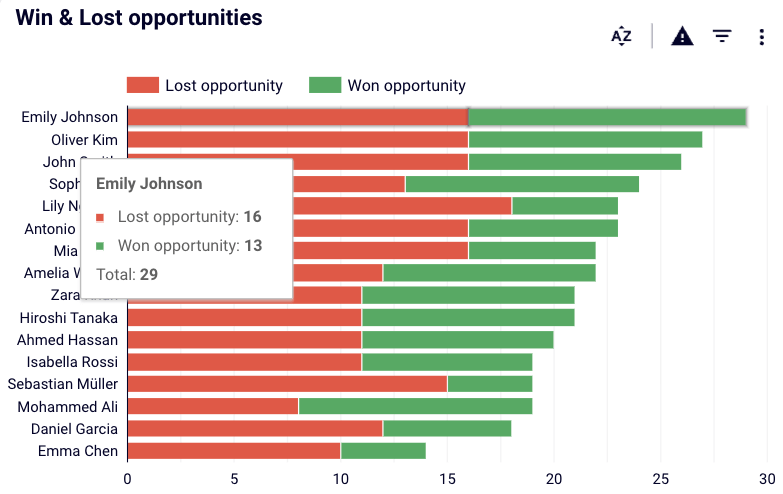
Salesforce Win Loss analysis dashboard
This dashboard template is based on a simple dichotomy but can be a powerful tool for insightful win-loss analysis. With its help, you can easily identify areas that work and the ones that require some reworking.
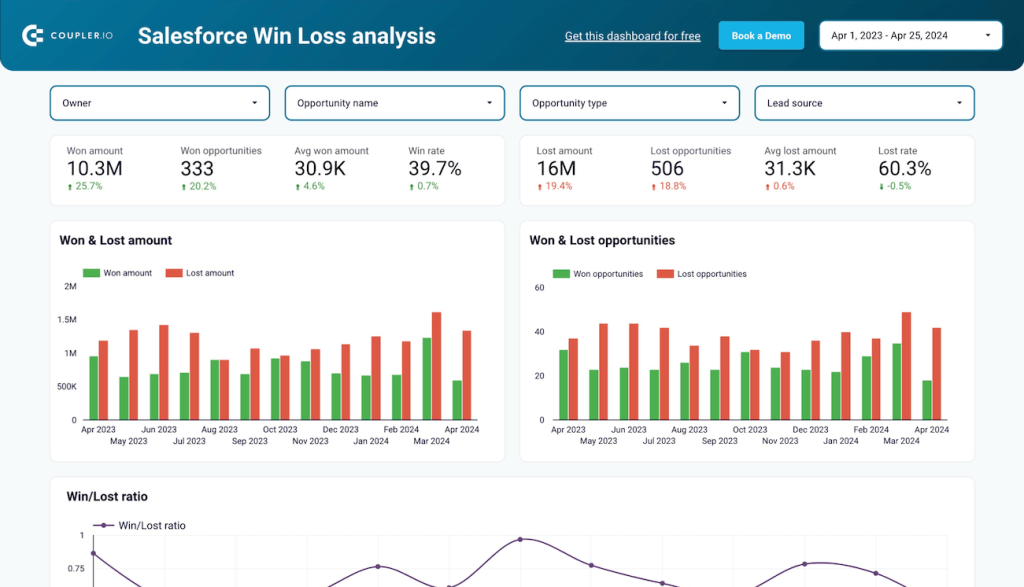
Use this template to:
- Quickly compare your core sales win/loss metrics to see how your business performs:
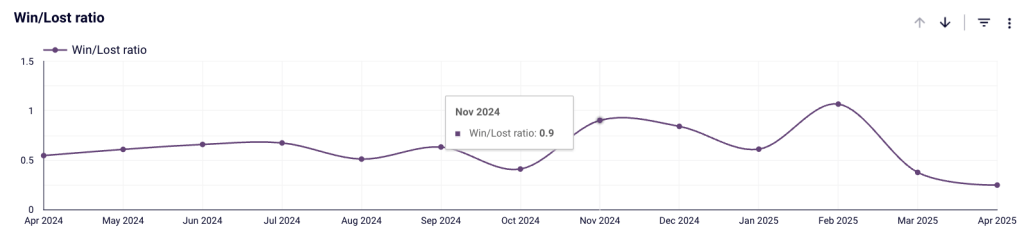
- Review the XY scatter plot detailing win/lost ratio to observe the general trend in your sales team performance and see if you’re going in the right direction:
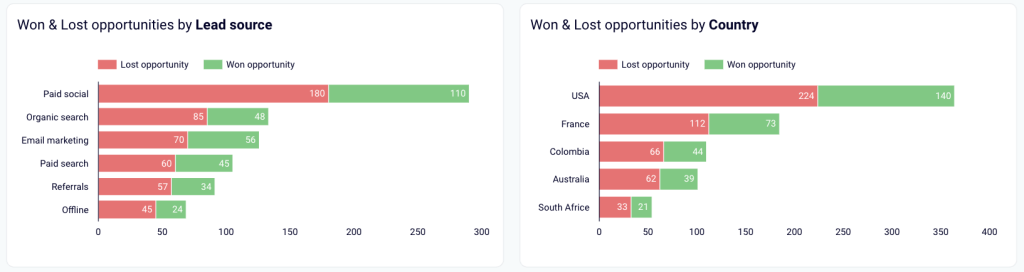
- Analyze won and lost opportunities against different parameters like lead source, country, etc., to precisely identify areas for improvement (e.g., allocate more funds to marketing activities in the worst performing countries):
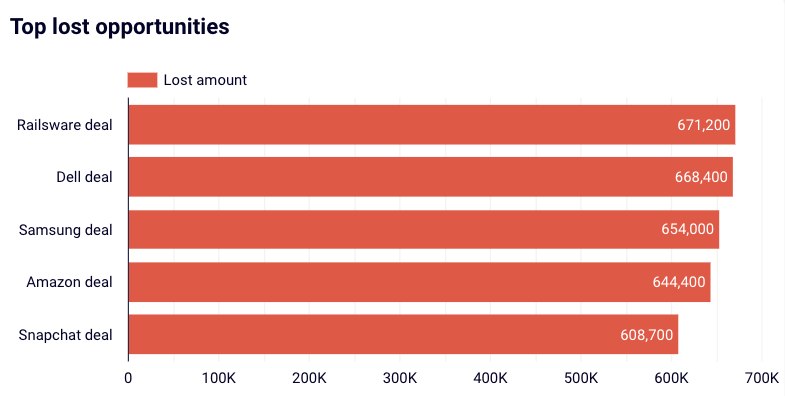
- Clearly see the top lost opportunities to discuss the reasons for failing to close deals with the team and draw conclusions for handling similar cases in the future:
You can use this dashboard template in Looker Studio. With the Coupler.io connector included, you’ll be able to fully benefit from automated data flow. Click the button below and go to the Readme tab to get easy setup instructions.
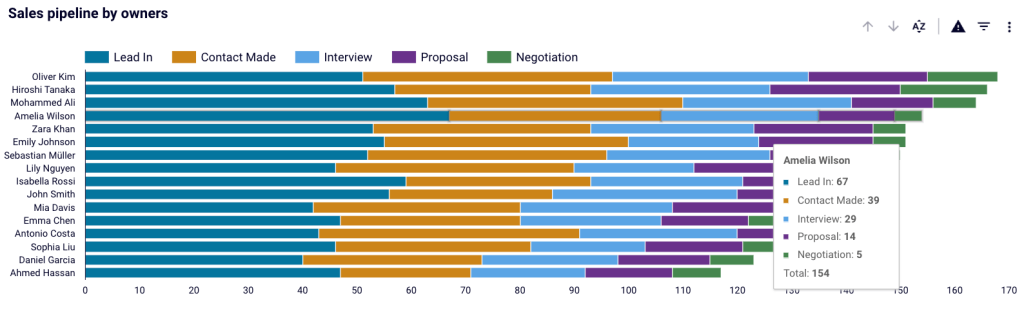
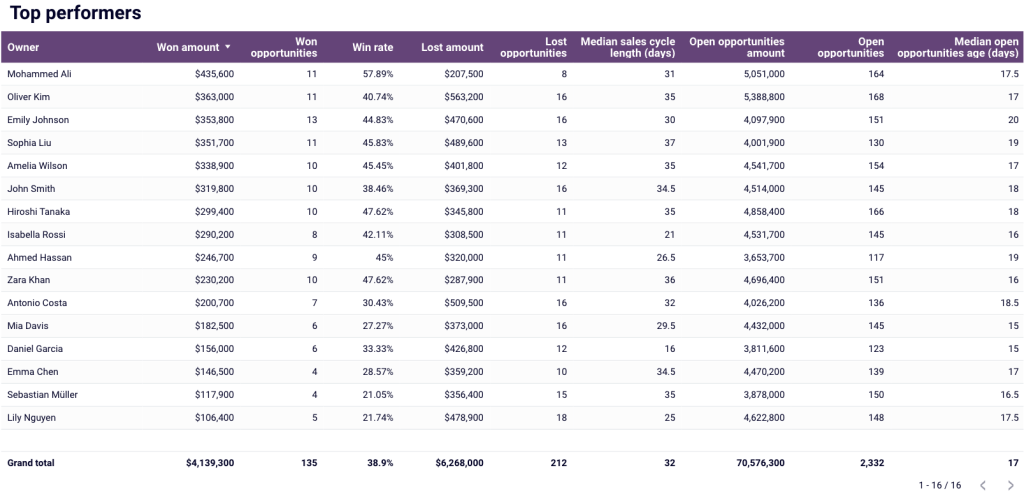
Salesforce sales team performance dashboard
This dashboard template is the most straightforward and efficient way to analyze the performance of each and every member of your sales team. It lets you focus both on won/lost opportunities as well as see who’s managing their tasks most effectively.
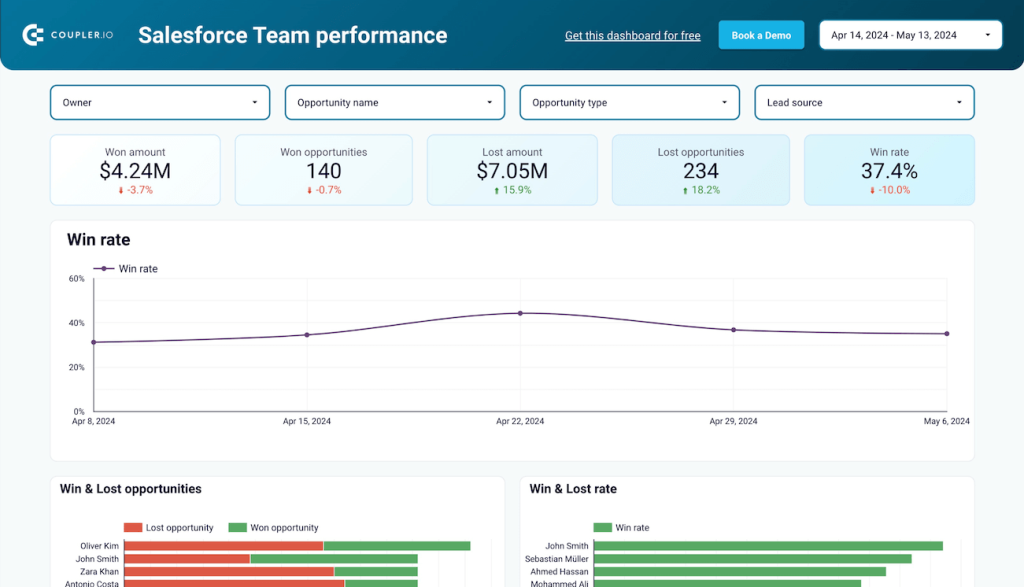
The dashboard lets you, for example:
- Break down sales metrics by owners to learn how they perform in terms of specific deal types (upselling, new deals, remarketing, etc.), sources, etc.:
- See the exact number of won and lost opportunities for each team member to award the best performers and coach the worst ones:
- Analyze the sales pipeline chart for each team member to identify bottlenecks (e.g., lots of customers identified but not contacted). Based on your insights, react quickly through reallocating tasks or coaching the members who struggle:
- Use the table with key sales metrics (e.g., won opportunities or won revenue) to identify top performers, calculate bonuses, etc.:
Use this dashboard template either in Looker Studio or Google Sheets. Enjoy a 100% automated flow of data from Salesforce thanks to the included Coupler.io data connector. Choose the destination that suits you the best and implement the template, using the instructions on the Readme tab.
Why actually export data from Salesforce to Excel?
We’ve briefly discussed the primary reason for moving Salesforce data to Excel, the more advanced and customized reporting capabilities, at the beginning. Let’s look deeper at this and other aspects that make people connect the two services.
- Advanced & customized analysis and reporting. Flexibility is the key. In contrast to Salesforce, Excel, whose primary purposes are data reporting and analysis, offers much more powerful & customizable tools like charts, pivot tables, and advanced formulas, to name a few. While these can yield excellent outcomes, you might also consider using our free dashboard templates to ease your burden, significantly speed up the process, and make it error-free.
- Advanced & customized data transformation capabilities. Rich transformation options are also a matter of flexibility. Excel has many data cleaning and preparation options, and Salesforce is not on par in this respect. Additionally, lots of options to aggregate or summarize data are available. Alternatively, the Coupler.io transformation module can lend you a helping hand, offering even such advanced options like transformation formulas.
- Data backup and archiving. Data security is crucial nowadays. That’s why you might consider Excel a backup solution for your Salesforce data. There are certain factors that promote such an approach, like multiple options to export entire data using compatible Excel file formats (XLSX, XLS, or CSV) or the offline availability of the data backup files.
- Easier data sharing and collaboration. It’s very likely that the access to your org’s Salesforce is restricted. It’s also true that Microsoft Excel is the most popular and go-to solution for businesses worldwide. Consequently, pulling data into Excel might be useful if you, for example, want to show or email some data fraction to a customer or partner who can’t or shouldn’t access your org’s Salesforce. But again, an even better idea might be to use Salesforce report templates so that you can prepare for your sales pitch meeting in no time.
As you can see, there might be multiple reasons why you would want to get your Salesforce data into Excel. It’s also quite possible that the list above is not exhaustive, so you can develop your own use cases that fit your organization’s very needs.
Which method to Export Salesforce to Excel should I choose?
There are multiple reasons and ways to move Salesforce data into Microsoft Excel.
Most approaches require manually initiating the export process and then opening XLSX, XLS, or CSV files in the target application. This process is not automated, and the same is true for handling data updates. After updating data in Salesforce, you must manually update it on the other side as well. Not a particularly elegant or convenient way of doing things, is it? Even the Power Query based method doesn’t offer a true auto-syncing solution, but requires Power BI or an ODBC as an intermediary. We don’t need to mention that it makes the entire setup much more complex.
To make the process seamless, pleasant, and hassle-free, you can go with Coupler.io’s in-built intuitive wizard. With it, you’ll be able to set up an automated Salesforce-to-Excel dataflow, quickly configure necessary transformations, and schedule auto data syncs at intervals as short as 15 minutes. Even better, look at our free salesforce report templates to save more time and become a true data presentation expert.
Automate Salesforce data exports for custom reporting with Coupler.io
Get started for free


