If your business has adopted the modern data stack, you’re likely juggling data from multiple sources. Collecting, analyzing, and extracting valuable insights from this data is crucial to stay ahead of the competition.
So how can you do this effortlessly? The solution lies in data connectors. Discover more about them and learn how to use this game-changer for your business.
What exactly is a data connector?
A data connector is a tool or software that enables seamless data transfer between different systems, applications, or databases. It serves as a bridge, ensuring data flows smoothly and efficiently from source to destination without manual intervention.
The data sources typically include a variety of cloud-based platforms (CRMs, ERPs, web analytics, social media, etc.) and might also have traditional on-premises databases.
Data connectors play a crucial role in efficiently moving your data from these diverse sources to a destination like a cloud-based data warehouse, data lake, spreadsheet, or BI tool.
Connectors are key players in data integration, especially in ETL (Extract, Transform, Load) and ELT processes (Extract, Load, Transform). ETL tools depend on them to work efficiently. Data connectors specifically handle the “Extract” and “Load” tasks, pulling data from different sources and loading it into a destination. As integral components of ETL tools, they make moving data between systems much easier for users.
Typical features of a data connector
Some of the key features of a data connector are as follows:
Connectivity features: Data connectors should effortlessly connect with multiple data sources and destinations. This connectivity ensures businesses can pull data from various platforms into a unified location.
Real-time data transfer: The ability to update data in real-time ensures that decisions are based on the most current information. New and updated data gets synced from source to destination, typically following a schedule that fits your business’s operational needs—daily, hourly, or even every minute.
Data quality features: Data connectors often include basic data transformation and cleaning capabilities. With these features, you can map data to specific columns and formats, standardize dates, and fix typos, ensuring your data is consistent and reliable. This way, you’re left with reliable data, making your analytics trustworthy and decision-making easier.
Scalability: A data connector should efficently handle varying data volumes. This flexibility means you won’t face performance issues no matter how much data you handle, keeping your operations running smoothly.
Security features: With security features like encryption, user authentication, and secure data channels, you can trust that your data is protected from unauthorized access. These tools ensure safe transfers, giving you peace of mind as your data moves from source to destination.
How does a data connector work?
A data connector operates through a series of key stages to ensure smooth data integration and transfer. Here’s a detailed look at how it works:
Connection establishment: The initial step involves connecting the data connector to the data sources and the intended destination. This connection creates a bridge for data to travel seamlessly between systems.
Data extraction: Once connected, the data connector pulls data from the source. The extraction process varies depending on the data source (structured or unstructured) and the method used. Connectors typically support various extraction methods, including full data extraction and incremental batches.
Data transformation: The extracted data is then transformed to fit the target system’s format and requirements. This transformation is crucial for maintaining data consistency and usability across different platforms.
Data loading: The final step involves loading the transformed data into the destination system. This allows for seamless analysis, reporting, and decision-making based on up-to-date information.
Error handling and monitoring: Throughout the process, data connectors manage any errors that may arise. This includes reporting issues, retrying data transfers, and sending alerts to administrators to any concerns. Continuous monitoring ensures that data transfers are successful and any interruptions are rapidly addressed.
Common types of data connectors
Here’s a breakdown of the common types of connectors based on data sources and nativity.
Data connector types based on data sources
1: API connectors
APIs often serve as the primary method for connecting various software systems. They function as accessible endpoints within applications, especially SaaS, enabling efficient data exchange.
Let’s say you need to analyze your sales team’s performance using Salesforce data. A connector can tap into your Salesforce data via API, ensuring you gather the necessary information quickly and efficiently.
Example connectors that rely on API access:
- Coupler.io.
- Google Analytics connector in Power Query.
- Twitter connector in Tableau.
2: Database connectors
These connectors are designed to access and integrate data stored in databases and warehouses. They simplify the process of extracting large amounts of structured data from a relational Database Management System (DBMS) like SQL Server, MySQL, and PostgreSQL.
Database connector examples:
- OLE DB: Versatile and widely used for accessing different databases such as SQL Server, Oracle, and MySQL.
- JDBC: Commonly used for Java applications needing database connectivity.
- Oracle Database Connectors: Optimized for Oracle database interactions.
You can also use these connectors within tools such as Microsoft SQL Server Integration Services (SSIS), Power Query, and Oracle Data Integrator (ODI).
3: Flat-file connectors
These connectors can extract data from various flat-file types such as CSV, XML, and JSON. For example, if you have sales data exported daily from an e-commerce platform in CSV format, a flat-file connector can automate the extraction of these files into your analytics tool or other destinations.
Example file connectors:
- JSON connector in Microsoft Power Query
- CSV connector in IBM DataStage
- XML connector in SSIS
4: Cloud object storage
Cloud object storage connectors provide access to data stored in cloud services like AWS S3 and Google Cloud Storage. They provide scalable, reliable, and cost-effective solutions for handling vast amounts of unstructured data.
Example cloud object storage connectors include:
- Amazon S3 connector in AWS Glue
- Google Cloud Storage connector in Google Cloud Dataflow.
- Azure Blob Storage connector in Azure Data Factory
Data connector types based on nativity
1: Platform native connectors
These connectors are built directly into platforms, allowing seamless integration with other native applications and services. They are optimized for performance and reliability, ensuring smooth and efficient data integration.
Example:
Connectors in Microsoft Power Query allow users to pull data from various sources directly into Excel or Power BI.
2: Third-party connectors
Developed by external providers, these connectors offer broad compatibility across various platforms. They are ideal for businesses using multiple systems, providing the flexibility to connect disparate technologies and data sources.
Example:
Connectors within Coupler.io enable data import from over 60 data sources, including CRMs, project management apps, e-commerce platforms, marketing automation tools, and many more to spreadsheets, data warehouses, and BI tools.
3: Custom connectors
Custom connectors provide ultimate flexibility for businesses with unique requirements. They can be tailored to meet specific needs.
Example:
If you’re a retailer with an old inventory system and need to connect it to a new e-commerce platform, building a custom connector may be your choice. You can work with a developer to connect both systems, for example, with eAPIs, and ensure your inventory and order processing are always up-to-date.
Data connectors in action
Here’s a closer look at how you can use different connectors in different tools.
Cloud connectors by Coupler.io
Coupler.io is a reporting automation and analytics platform that leverages APIs to facilitate seamless data integration without coding. It provides data connectors that automatically pull data from a wide range of data sources.
In this example, we’ll show you how to pull Google Analytics 4 (GA4) data to Google Sheets with a Coupler.io’s Google Sheets connector. However, you can use your source and destination right away.
Use the form below to get started. Select your data source and data destination and click Proceed. You’ll be prompted to create a Coupler.io account for free.

The steps are straightforward. You can complete them in just a few minutes.
Step 1. Extract data from your source
- Connect to your data source and grant access permissions. The configuration for each data source can be different. You just need to follow the app instructions.
For example, for the GA4 data source, connect to your GA4 account then select one of the Analytics accounts available. Next, choose the metrics and dimensions you want to import from GA4. You can also specify the period for your report. By default, Coupler.io will export data for the last 30 days.

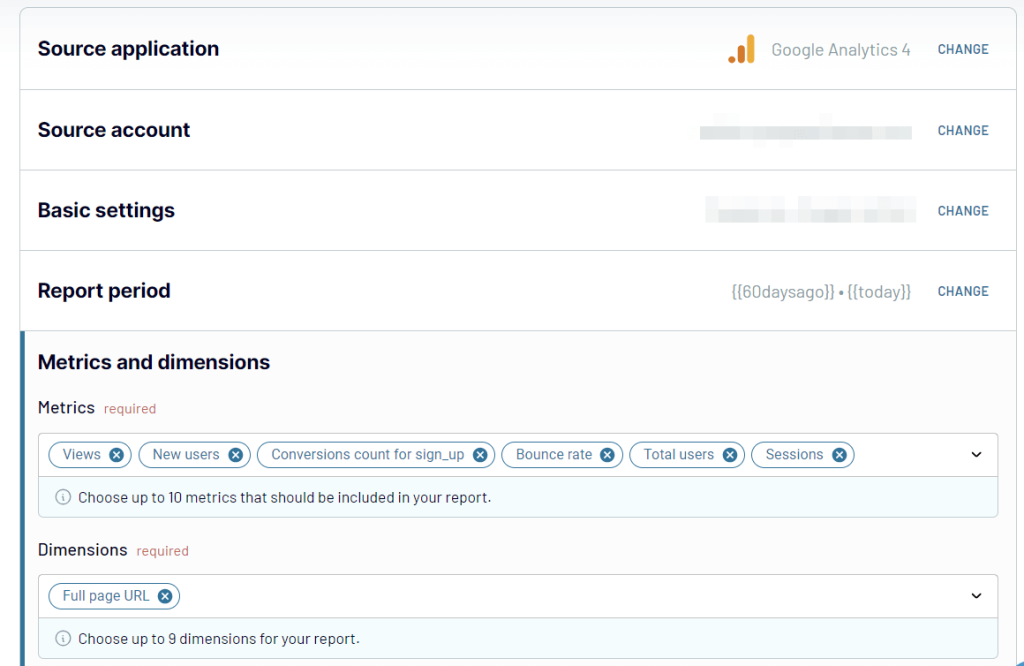
Note: Once the source is configured, you can include data from another account or property or data for other GA4 dimensions and metrics in the same report. To do so, click the Connect one more source button and configure the additional connection.
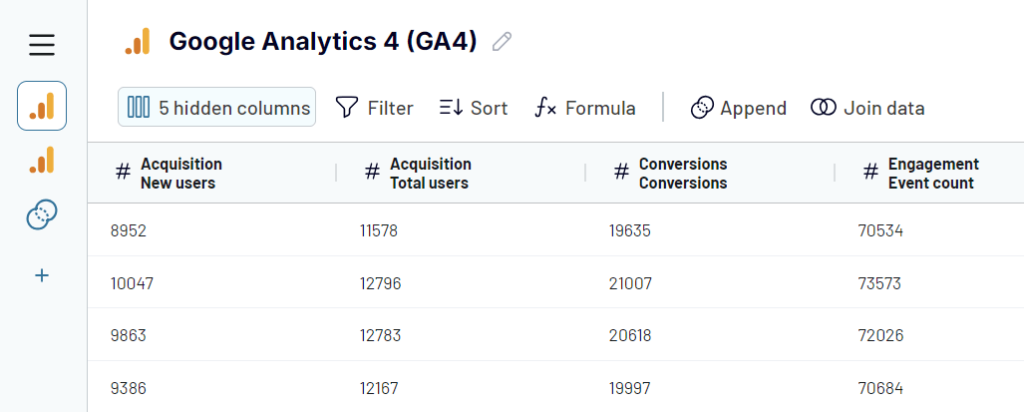
Step 2. Transform data
Before the data from your source is loaded to the destination, you can preview and even transform it.
If necessary, you can:
- Hide, rename, and reorder columns. You can also change a column’s data type.
- Add new columns using formulas.
- Sort and filter data.
- Aggregate data from multiple GA4 properties, different applications, and sources.
Here is an example of what it may look like for GA4:

Step 3. Load data and schedule refresh
Load the data to your preferred destination. Options include popular destinations like Excel, Google Sheets, BigQuery, Looker Studio, and Power BI.
For example, for Google Sheets, you need to connect to your Google account and select a spreadsheet to import your data. Specify an existing sheet or create a new one by typing a name.
You can toggle the Automatic data refresh button and configure your desired schedule. This will automate data exports at the selected intervals.


Congratulations! You’re ready to create reports with data that’s always up-to-date.
Instead of starting from scratch, you can use dashboard templates for faster results. Coupler.io offers ready-to-use templates in BI tools like Looker Studio, Power BI, and Google Sheets. These templates make report creation simple and save you a significant amount of time.
ODBC connectors
ODBC connectors, such as those from CDATA, differ from cloud connectors like Coupler.io. Cloud connectors use API access to fetch data from cloud services, whereas ODBC connectors provide SQL-like access to databases and apps. This allows you to read, write, and update data directly.
Moreover, ODBC connectors need to be installed on your operating system for it to work. Using them requires more technical know-how compared to the simpler setup of cloud connectors.
Let’s look at an example.
We’ll demonstrate how to use an ODBC connector with Power BI to extract data from Pipedrive. This connector can integrate various data sources, such as Pipedrive, MySQL, QuickBooks, etc., into your Power BI reports.
The steps are as follows:
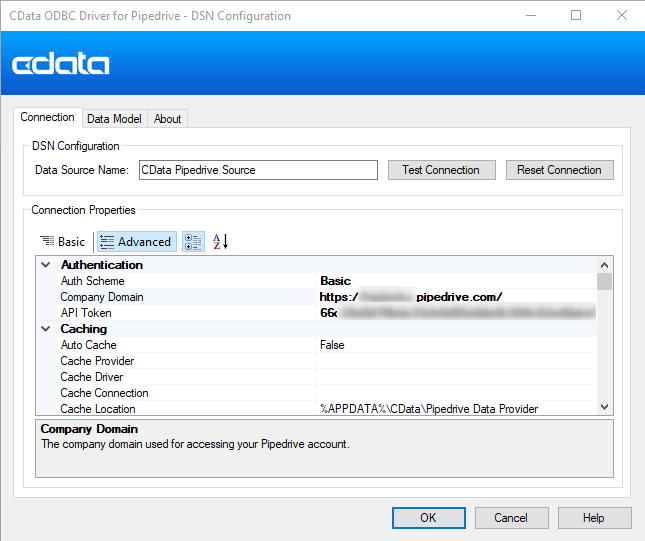
- Download the CData ODBC driver for Pipedrive and install it.
- Navigate to your Pipedrive personal profile and copy your API token. This will be necessary to configure the driver.

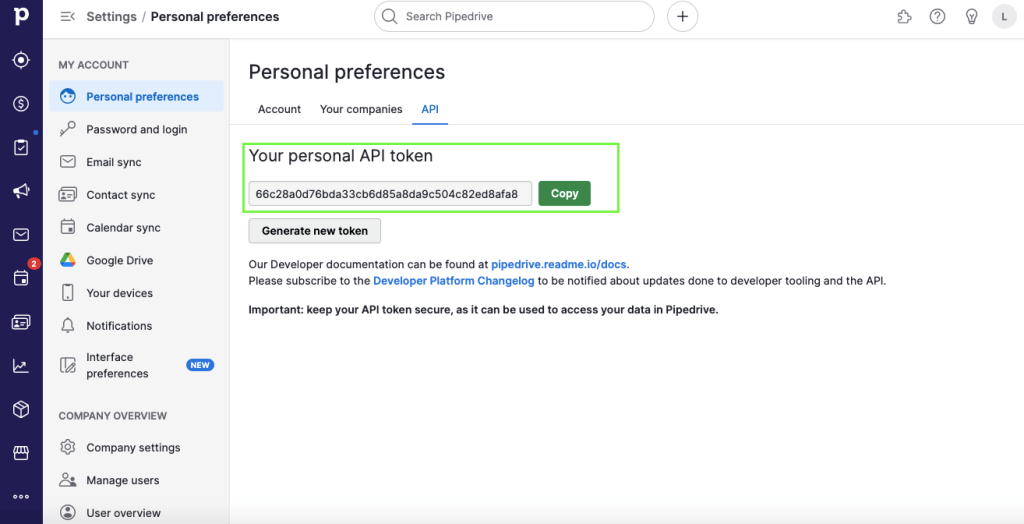
- Open the ConfigureODBC.exe file from the ODBC driver installation folder. In the Advanced tab, enter your company domain URL and paste the API token you copied before. Test the connection to ensure everything is set up correctly.

- Open Power BI, expand the Get data dropdown, and select More…. Type ODBC in the search bar, and you’ll see a list of apps you can connect to using ODBC.
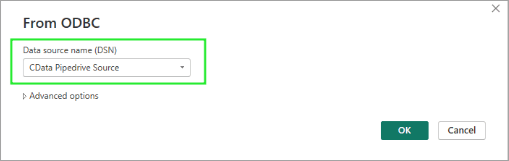
- Select the CData Pipedrive Source from the list of available connections.

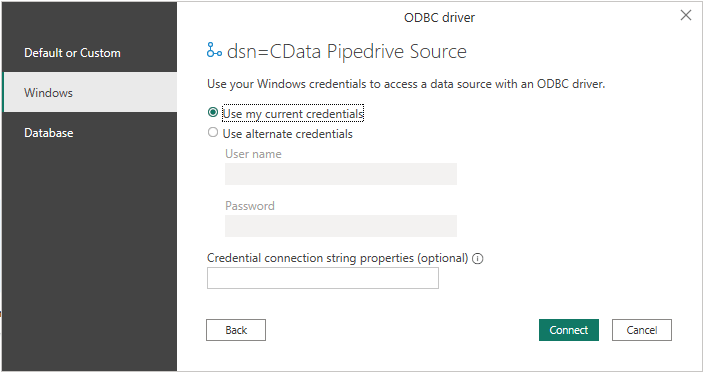
- Power BI will ask you to select the preferred way to connect to Pipedrive: using either Windows login details or Pipedrive credentials. For ease of use, opt to connect with your Windows credentials, which simplifies things later on.

- Once connected, the Navigator window will show the data schema. Select the tables you wish to import for data preview and subsequent analysis.


- Optionally, you can perform various data transformations in Power Query Editor to tailor the data for your specific analysis needs.
While this process is designed to be straightforward, individuals without an IT background might find it a bit tedious. If you’re unfamiliar with these tasks, consider seeking assistance or referring to detailed guides to ensure a smooth setup.
Power Query connectors
Power Query connectors are built into tools like Excel and Power BI. They offer an easy way to pull and clean data directly from multiple sources, especially Microsoft products. These tools are perfect for anyone already using the Microsoft ecosystem.
In this example, we’ll use the CSV connector in Excel Power Query to get data from a CSV file into a new worksheet.
The steps are as follows:
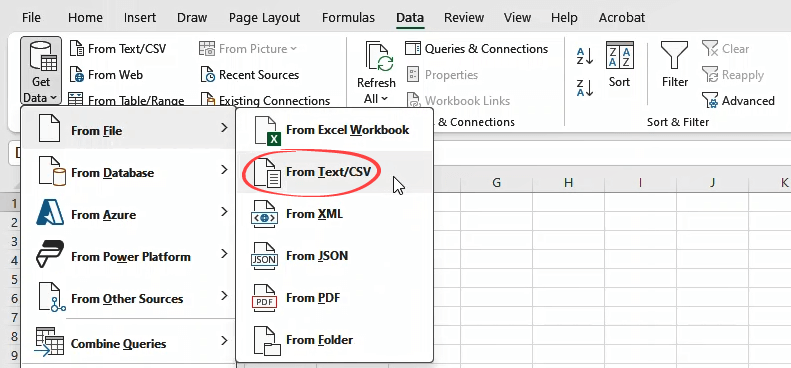
- Open a new blank Excel workbook.
- In the Data tab, locate the Get & Transform Data section and expand the Get Data dropdown. Then, select From File > From TXT/CVS.
Note: The Get Data option shows all data sources supported by Power Query.

- Browse the folder where your CSV file is located. Select it and click Import.
- In the Preview window, click Transform Data. This will open the Power Query Editor in a separate window, as shown in the screenshot below.

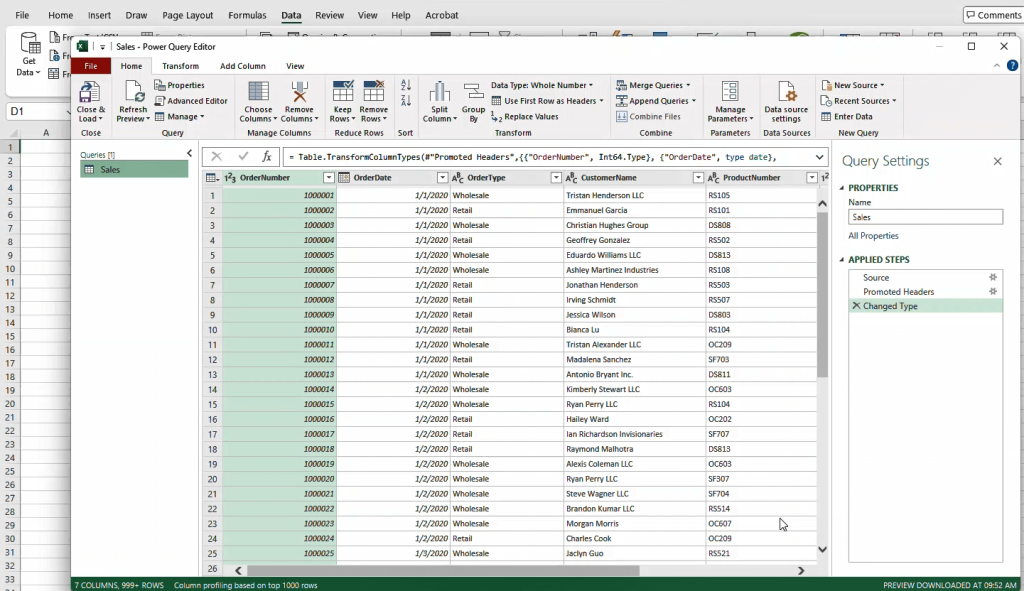
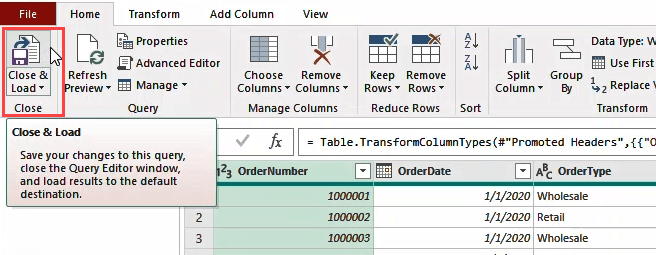
- Use the Power Query Editor to transform your data before loading it into a new worksheet. For example, you can remove duplicates, select only necessary columns to load, and add new columns using formulas. All the steps you applied will be listed in the Applied Steps pane on the right.
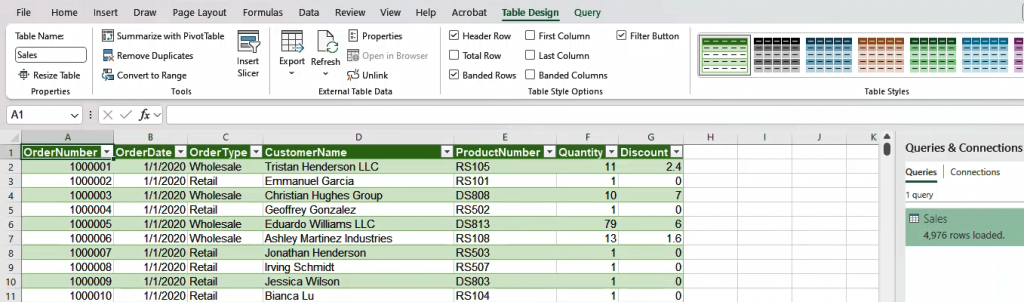
- When your data looks good, click the Close & Load button in the Home tab.

- As the final result, you will see a new worksheet containing the imported data.

That’s it!
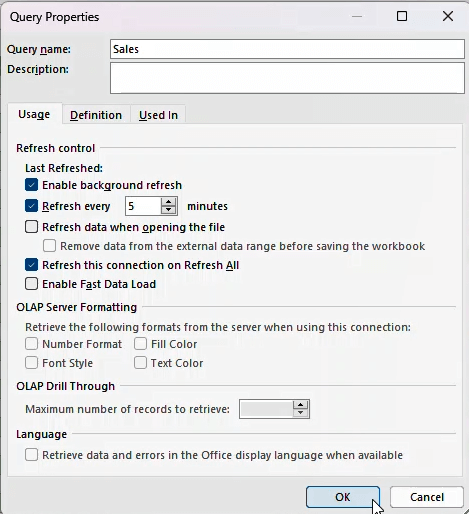
If you want, you can automate data refresh to ensure your data remains current without the need for manual intervention. Excel Power Query offers an easy way to do this:
Expand the Refresh button and select Connection Properties. You’ll find options to control the refresh, such as an option to refresh every x minutes.

How can your business benefit from a data connector?
The primary benefit of a data connector is the automation of data ingestion. This automation streamlines operations, boosts efficiency, saves time, and cuts down on tedious manual work.
The following examples illustrate how businesses can benefit from a data connector.
1: Reduce manual work and enhance efficiency
Data connectors can automate labor-intensive tasks, which is vital for boosting efficiency and accuracy.
Take Habitium, for example. They struggled with managing data for over 200 distributors and 400,000 products, especially in synchronizing stock and pricing. With Coupler.io’s built-in CSV and JSON integrations with Prestashop, Habitium streamlined its data management. This change reduced manual work from 50 hours a month to just 10! For Habitium, automation not only improved efficiency but also enhanced the overall customer experience with real-time product availability and optimal pricing.
2: Save time and reduce cost
Data connectors can help save time by reducing manual labor. This will lead to efficiency and significant cost savings for any organization.
United Way NWI, for instance, faced challenges in managing data across siloed marketing and CRM applications. They used Coupler.io to set up data pipelines and automate reporting workflows. The connectors automatically pull data from Facebook Ads, Google Ads, Google Search Console, and Google Analytics 4 into pre-built Looker Studio templates. This automation saved them approximately 80 hours a month and $20,000 a year on manual labor.
3: Enhanced data analysis and reporting workflows
Data connectors revolutionize business data analysis by automating integration and updates. They eliminate manual handling, reduce errors, and free up time for strategic tasks.
Bulungula Incubator struggled with dispersed data across platforms and inefficiency in data management. Using the Airtable connector, they automated data flow into BigQuery, powering Google Looker Studio dashboards with real-time data. This cut reporting times by 70% and enhanced their data analytics, enabling better decision-making and program monitoring.
4: Seamless integration across platforms
Data connectors simplify integration from multiple sources, facilitating seamless access and transfer to a designated destination. This efficiency enables businesses to maintain a cohesive data ecosystem, where data flows effortlessly between different platforms and systems.
Verizon, a leader in broadband and telecom services, showcases how seamless integration can transform operations. By using Tableau connectors, they merged data from various platforms, like Hadoop and Oracle. This integration enabled them to build over 1,500 dashboards, streamlining their customer service processes.
5: Real-time data synchronization
Data connectors enable near real-time data synchronization by automating processes to run on a schedule. This ensures that businesses have up-to-date data at their fingertips for quicker and more informed decision-making.
For example, Edgio, a digital content delivery company, struggled to build comprehensive financial reports in Excel. To address this, they leveraged the JDBC connector to connect QuickBooks Online directly to Excel, enabling real-time data updates. These real-time data updates gave Edgio live data access and enhanced their ability to make timely financial decisions.
How to choose the data connector for your business?
When selecting the right connectors for your data integration project, consider several factors. These include the data sources, target destination, data integration project’s requirements, overall features of the connector, and the organization’s budget and IT expertise.
Here are a few illustrative examples to help you with the decision.
Example 1: A small project connecting Google Ads in Looker Studio
If you’re working on a small project where your main goal is to create a report on your Google Ads performance, using a Google Ads connector directly in Looker Studio is a straightforward solution. The setup is simple, cost-effective, and requires minimal technical know-how.

Example 2: Larger project with multiple PPC platforms
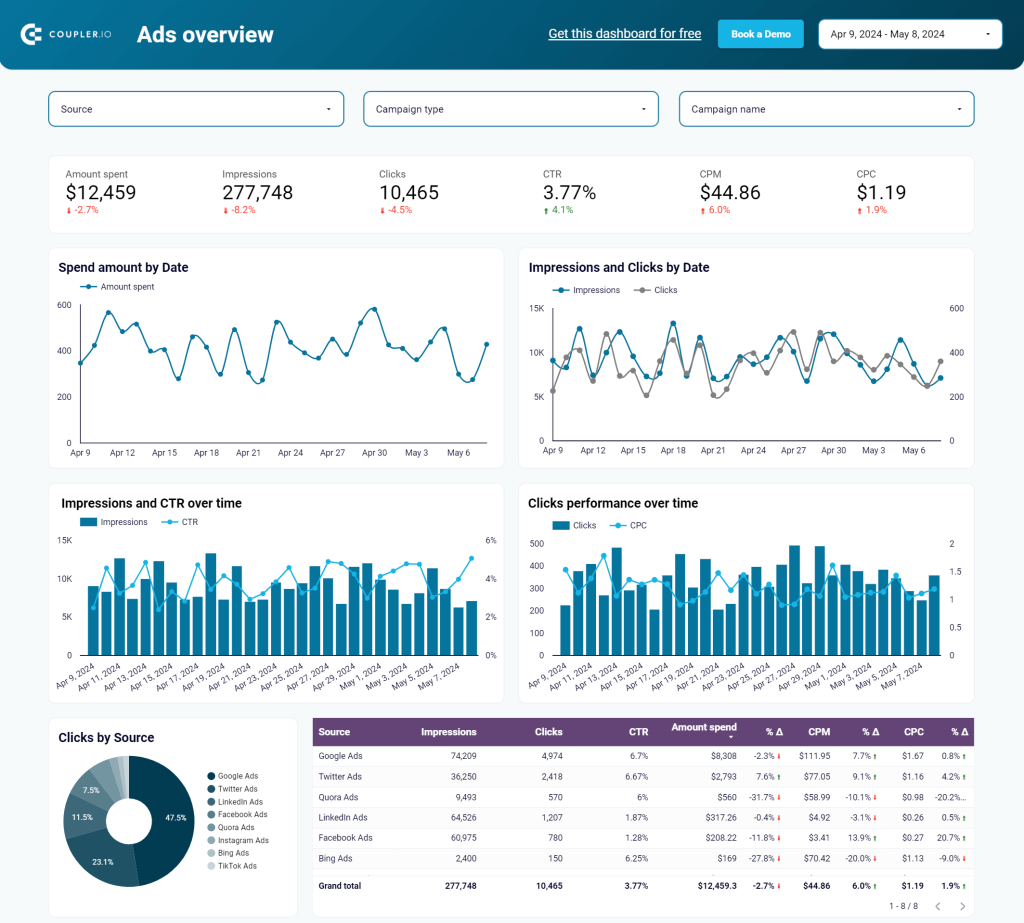
If your business needs to track performance across multiple PPC platforms, using a powerful tool like Coupler.io will be highly beneficial. It provides a wide range of data connectors for spreadsheets, BI tools, and data warehouses that let you access marketing, sales, accounting, and other data. This makes it easier to compile comprehensive reports to gain holistic insights into your marketing efforts.
With Coupler.io, you can seamlessly integrate data from different platforms and get many other benefits from automation. Moreover, its PPC multi-channel dashboard templates enable you to quickly visualize performance across multiple ad platforms. Below you can see this dashboard version in Looker Studio. The template is equipped with a Looker Studio connector that automates data load from multiple ad sources to the very dashboard.

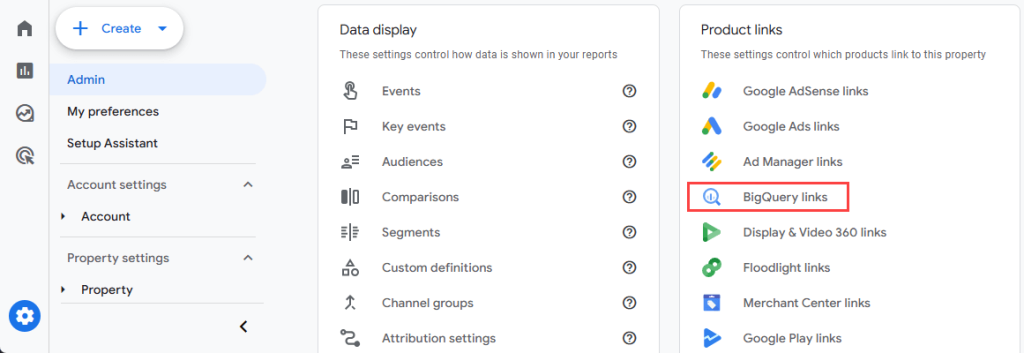
Example 3: Linking GA4 data to BigQuery
A more complex scenario may involve handling large datasets, such as connecting Google Analytics 4 (GA4) data to BigQuery. For this case, you may want to set up a BigQuery link from Google Analytics 4 (GA4). This will enable GA4 data to be exported to BigQuery at your specified frequency, whether daily or within seconds.

You can then perform advanced analysis in BigQuery or create visualizations in Looker Studio or other business intelligence tools.
Unlock insights from 60+ cloud data sources with Coupler.io
Data connectors are crucial for achieving business success as they provide streamlined integration and powerful automation benefits. With the insights from this guide, you are now prepared to select the ideal connector for your needs.
Coupler.io greatly simplifies this process with its robust collection of connectors, automating data integration from over 60 cloud data sources into your preferred destination. This ensures your data flows seamlessly and securely, always ready for analysis.
But that’s not all — Coupler.io also offers free dashboard templates. These templates simplify setup and boost your reporting efficiency, allowing you to generate insightful reports in no time.
Dive into a smoother data management experience and start making informed data-driven decisions with Coupler.io today!
Explore data connectors by Coupler.io
Get started for free