To measure your WooCommerce online store’s performance effectively, you need more than just default metrics. Exporting WooCommerce to Google Sheets enables you to create custom reports for tracking KPIs, analyzing the sales funnel, and discovering other valuable insights.
This step-by-step tutorial will guide you through different methods to pull your store data into spreadsheets.
WooCommerce export to Google Sheets: 3 methods to choose from
1. Coupler.io
This is a no-code platform for automating data exports and building reports. You can connect WooCommerce to Google Sheets once and configure automatic refreshes to run on your preferred schedule.
It also lets you combine data from multiple stores or apps and transform it on the go to create custom reports tailored to your needs.
Additionally, Coupler.io provides a Google Sheets add-on that allows you to set up and manage your connection directly from your spreadsheet.
2. Manual data export methods
If you only need to export data occasionally, then you can use the WooCommerce native export options or plugins to download your store data in CSV, XML, or XLS formats. Once downloaded, the file can be imported into Google Sheets for analysis. This method of WooCommerce export to Google Sheets, while simple, lacks automation and can quickly become time-consuming if done regularly. So, it’s not an actionable choice for WooCommerce accounting, for example.
3. Automated export with a custom API integration
If you’re a developer or have a technical support team, you can use the WooCommerce REST API to build a custom integration that sends store data to Google Sheets. This gives you complete control over what you export and how it’s structured. However, you’ll need to know Google Apps Script or another programming language and be prepared to handle ongoing maintenance. This method allows you to connect WooCommerce to Google Sheets, but it is usually not flexible for non-technical users or small teams.
Now, let’s go a bit further and walk through each of these methods in detail, starting with the most user-friendly option: Coupler.io.
How to connect WooCommerce to Google Sheets with Coupler.io
The WooCommerce connector by Coupler.io enables you to pull data from your store, combine it with other sources, and send it to Google Sheets on a schedule. In addition to Sheets, you can also connect WooCommerce to Looker Studio, BigQuery, Excel, and other destinations.
To automate your WooCommerce reporting with Coupler.io, here are the three steps to follow:
Step 1: Collect data from WooCommerce
Start by clicking Proceed in the form below.

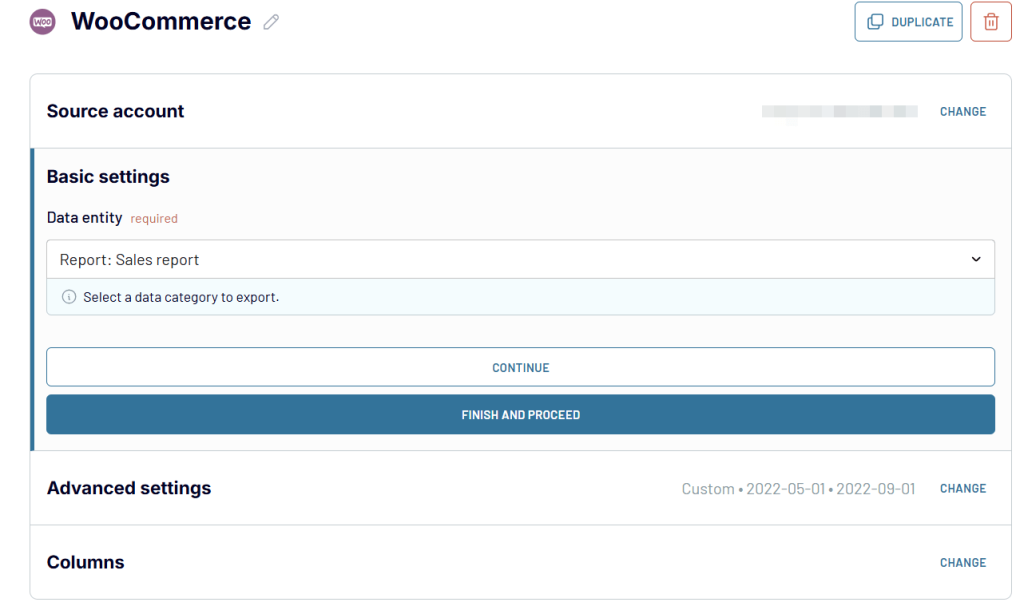
Sign up for Coupler.io; it’s free, and no credit card is required. Then, connect your WooCommerce account by following the in-app instructions and grant the necessary permissions to access your store data.
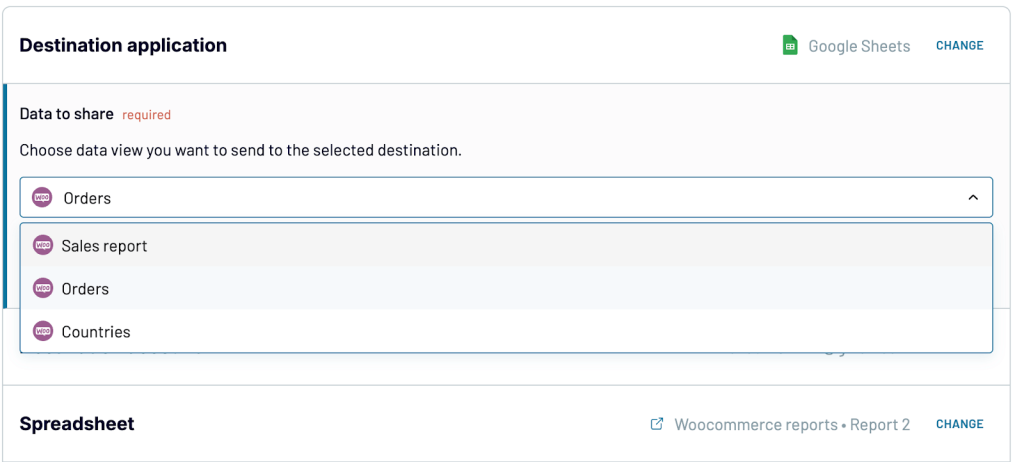
Next, choose the data entity you want to export from the dropdown list.

Here’s a list of data types you can transfer from WooCommerce to Google Sheets:
| Raw data entities | Report entities |
|---|---|
| Customers Orders Orders with line items Products Product attributes Product categories Product reviews Product shipping classes Product tags Coupons Currencies Countries Continents Shipping zones Tax classes Tax rates | Sales report Order totals Product totals Customer totals Coupon totals Review totals Top sellers report |
Optionally, you can go to Advanced settings to specify your reporting period and define the start and end dates for the data you want to export.
If you want to fetch data from multiple entities or connect additional apps, you can add more sources to your flow. Simply use the search bar to find the source, connect it, and repeat the steps above.
In the example below, we’ve added multiple data entities (Sales report, Orders, and Countries) from the same WooCommerce store.


Once your source(s) are connected, move on to the next step to transform your data before exporting it.
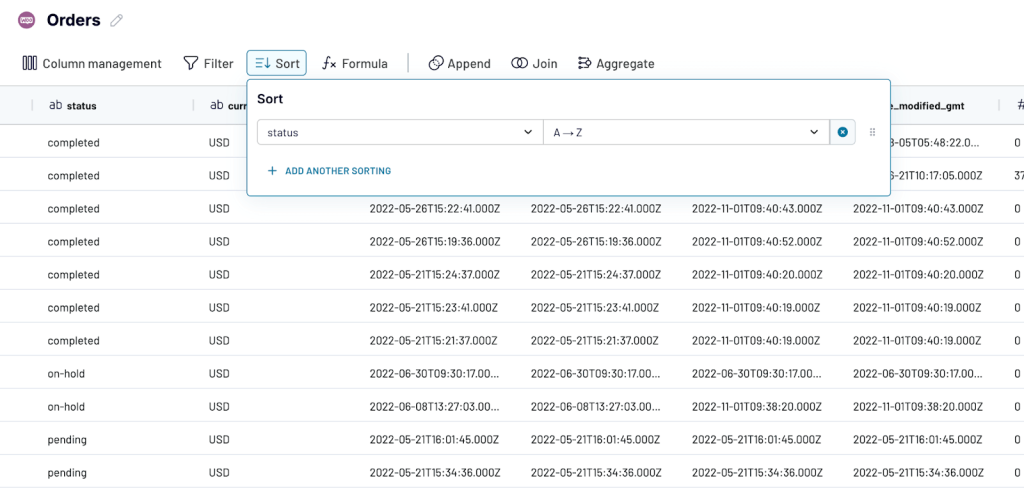
Step 2: Transform your data
At this stage, Coupler.io generates a preview of your data. You can review it and apply transformations before running the WooCommerce export to Google Sheets. These transformations include:
- Managing columns by hiding, renaming, reordering, or changing their data types
- Creating new columns using custom calculation formulas
- Sorting values in ascending or descending order
- Filtering data based on specific criteria
- Aggregating data using operations like sum, average, count, min, or max
For example, you can sort your WooCommerce orders by status to quickly see which orders are completed, pending, on-hold, etc.

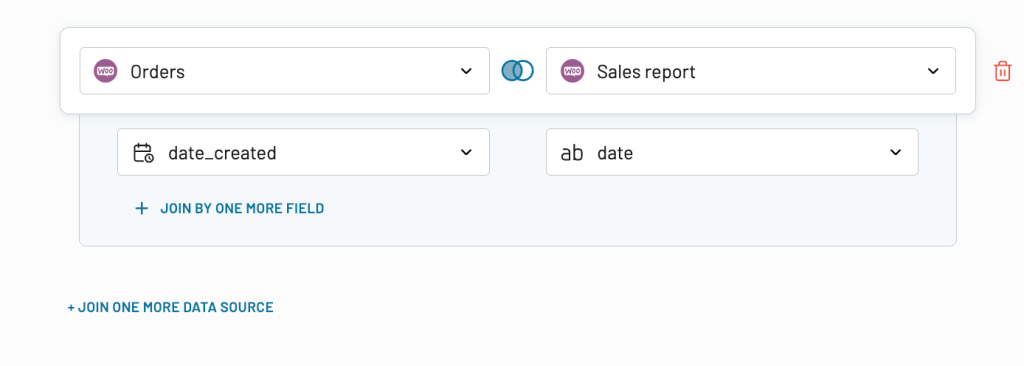
If you’ve connected multiple sources, you can also blend your data using either:
- Append: merge datasets with similar structures and columns matched by name, or
- Join: combine datasets with different structures using a shared column

Once you’re satisfied with your data, move on to the next step to set up your destination.
Step 3: Load data to Google Sheets and schedule automatic updates
Connect your Google account and select a spreadsheet stored in your Google Drive and the specific sheet where the data should go. You can either choose an existing sheet or type in a new name to create one.

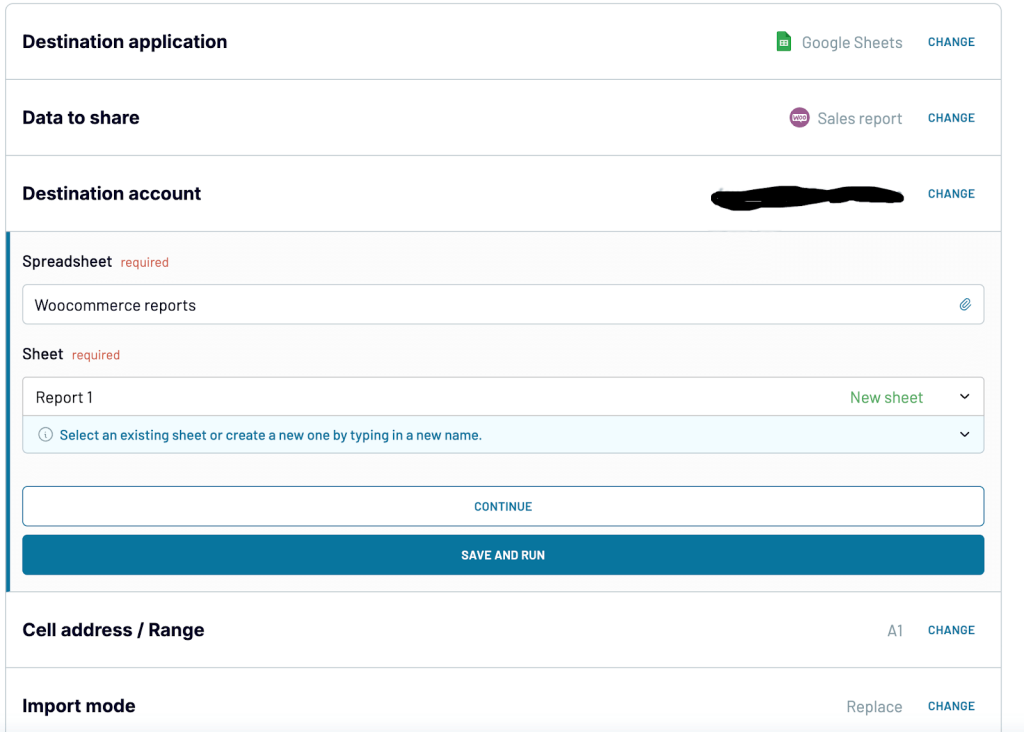
If you have multiple data entities, you can load each into a separate sheet tab within the same Google Sheets spreadsheet. This keeps your reporting organized and easier to navigate.

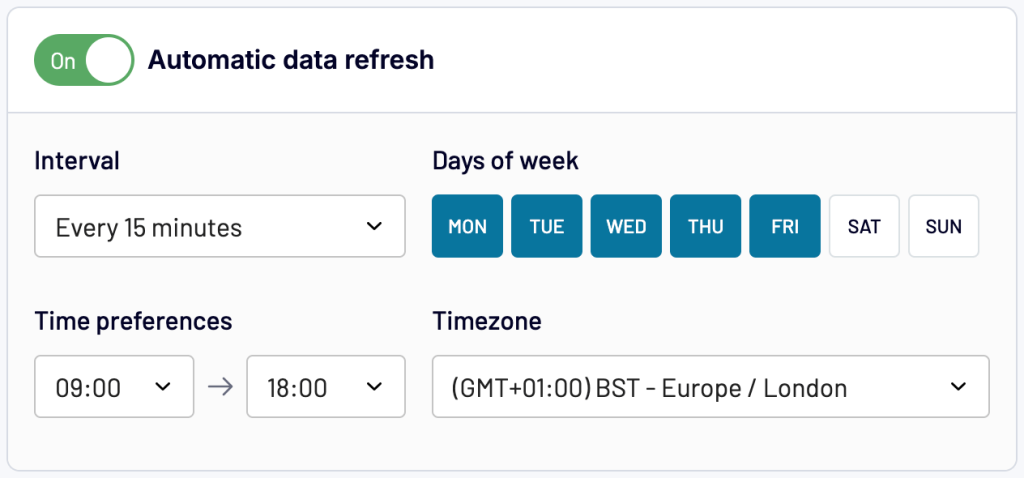
Next, enable Automatic data refresh and set your preferred update frequency. You can set it to every 15 minutes, hourly, daily, or weekly. If you leave this disabled, the importer will run only once. Activating it ensures your integration runs according to the schedule you choose.

That’s it!
Once connected, your WooCommerce data will be available in your Google Sheets spreadsheet, ready for further analysis. Coupler.io will keep it updated automatically, so your reports always reflect the latest data.
Load data from WooCommerce to Google Sheets manually
As mentioned earlier, this method does not allow you to connect WooCommerce to Google Sheets directly. Instead, you need to first download your WooCommerce data and then import the file into Google Sheets. It’s a straightforward two-step process, though you’ll need to repeat it every time you want fresh data.
Step 1: Download WooCommerce data
You can download your WooCommerce data in two ways:
- Using the WooCommerce native export tool
- Using a WooCommerce export plugin
Option 1: Export through native WooCommerce tools
Depending on the format you need, WooCommerce offers the following export options natively:
Export as CSV
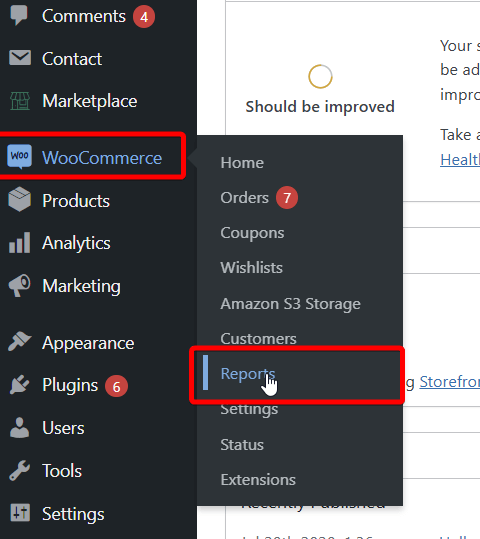
- In your WordPress Admin dashboard, go to WooCommerce > Reports

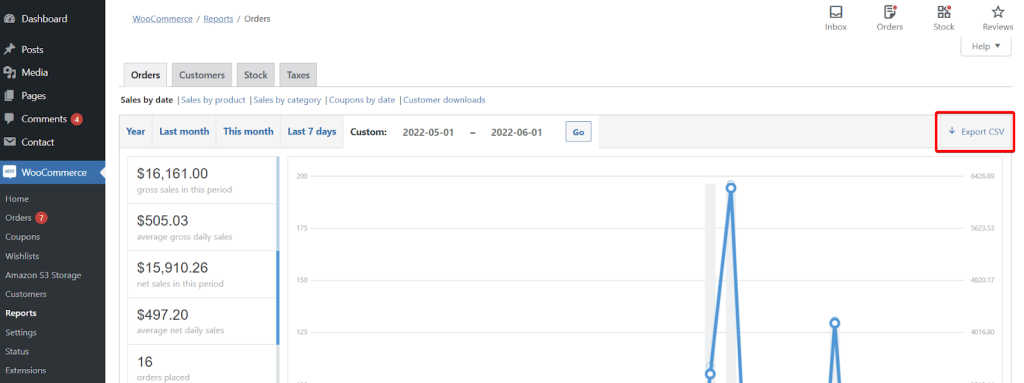
- Choose a report tab (e.g., Orders, Customers, Stock), set the time range, and click Export CSV to download the file.

Export as XML
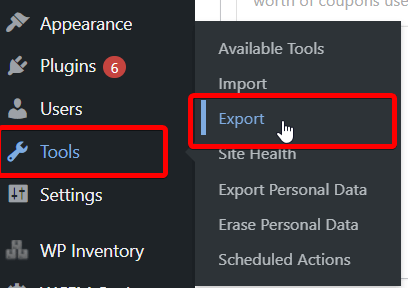
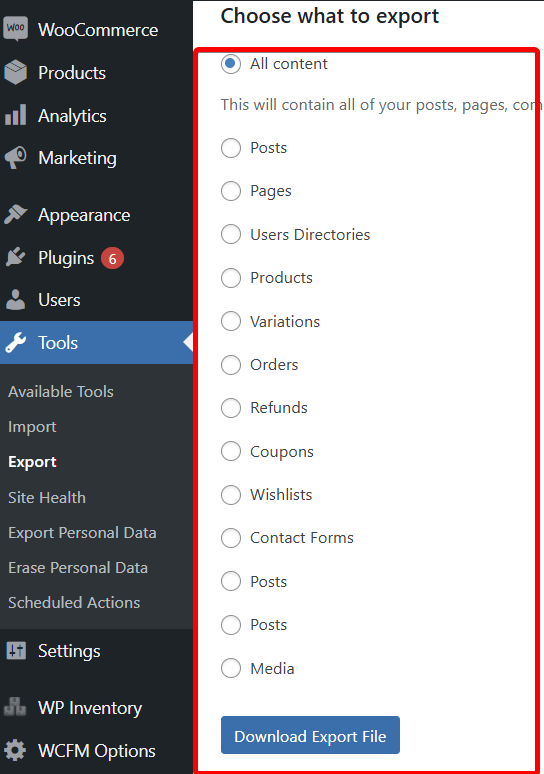
- In your admin dashboard, go to Tools > Export

- Select the content type you want to export, then click Download Export File to get your data.
Your data will be downloaded in XML format as a .xml file inside a ZIP folder.

Option 2: Use a WooCommerce export plugin
You can also export your data using a WooCommerce plugin from the WordPress directory. Just search for “WooCommerce export” and install one of the free tools available.
These plugins typically support more file formats than the native export, including XLS. They often allow you to filter by order status, customer details, product type, or set a specific date range. You can also customize the file name and choose which data fields to include.
Step 2: Load exported WooCommerce data to Google Sheets
Once you’ve downloaded your data file, open a Google Sheets document.
- Click on File > Import

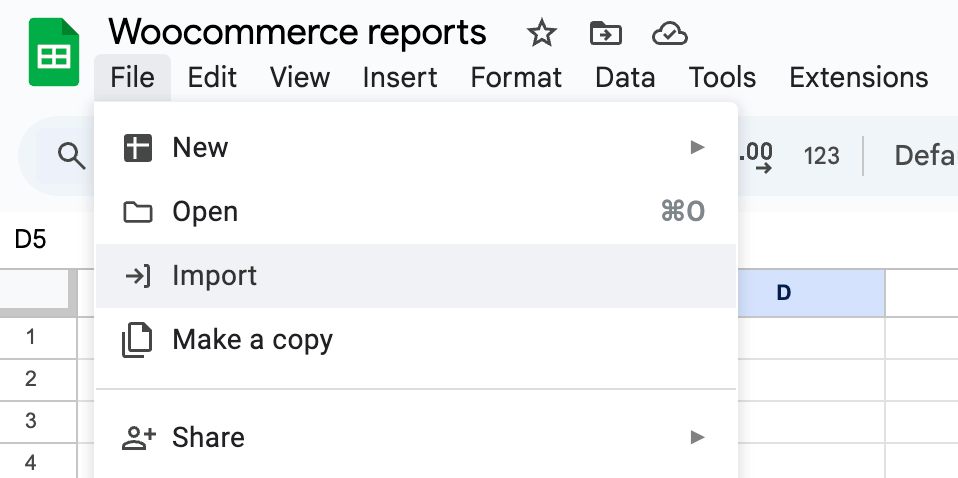
- Upload your exported file (XML, CSV, or XLS).
- Choose whether to load the data into a new spreadsheet, replace existing content, or append it as a new row.
- Adjust import settings (like separator type) and click Import data.
Your WooCommerce data will now appear in your spreadsheet. Aside from the manual method not being suitable for timely exports, it also has a few limitations, such as:
- There’s limited control over your data, which makes it difficult to filter or customize the fields you want to export.
- The export plugins may conflict with other plugins you’ve installed.
- Exporting large datasets can cause your WordPress admin to lag, hang, or crash temporarily during the export process.
If you want a more scalable and flexible solution, it’s worth switching to an automated workflow.
Export with a custom API WooCommerce integration
With the WooCommerce REST API, you can build a custom integration to handle your WooCommerce export to Google Sheets. This method gives you complete control over the data you pull but requires technical proficiency and familiarity with APIs.
The example below shows how to generate WooCommerce API keys and create a Google Apps Script that pulls your WooCommerce data to Google Sheets.
1. Generate your WooCommerce API key
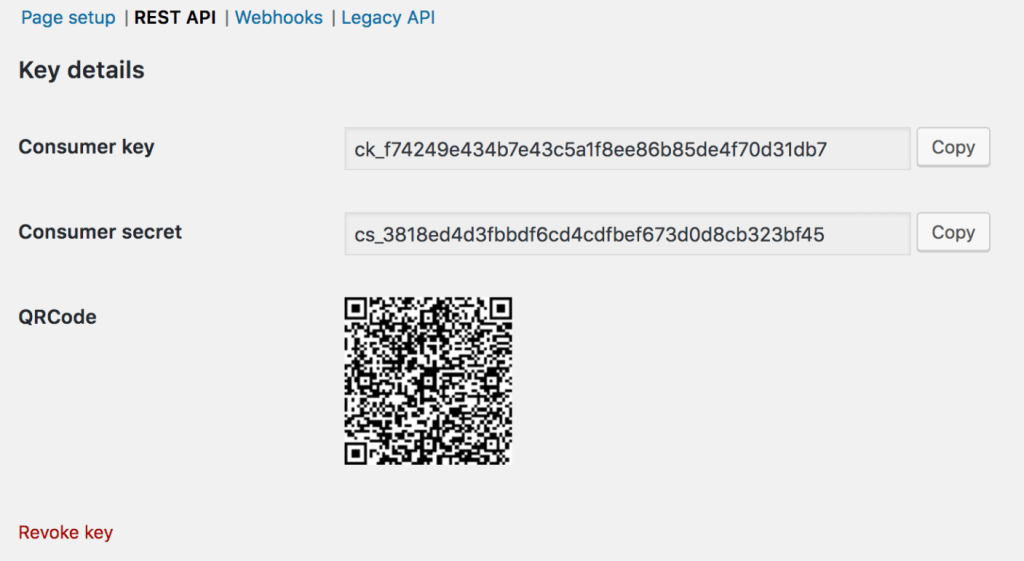
Your API key acts as a password to authenticate your request. WooCommerce uses basic authentication with a consumer key and consumer secret generated from your store to verify your identity and authorize access to your data. To generate your API key:
- In your WordPress Admin panel, go to WooCommerce > Settings > Advanced > REST API.
- Click Add Key, provide a description, select a user with appropriate permissions (usually admin), and set Read or Read/Write access.
- Click Generate API Key to create the API keys.


You’ll see your Consumer Key and Consumer Secret. Copy and save these credentials securely for future use.

To test your connection, you can send a GET request using curl. Open your terminal (Mac/Linux) or Command Prompt (Windows), and run:
curl https://yourstore.com/wp-json/wc/v3/orders \
-u consumer_key:consumer_secret
In this command:
https://yourstore.com/wp-json/wc/v3/ordersis the full API URL. It includes your store domain and the /orders endpoint, which fetches WooCommerce order data.
Make sure to replaceyourstore.comwith your actual WooCommerce store domain.-uenables basic authentication using your API credentials.consumer_key:consumer_secretshould be replaced with the API credentials generated from your WooCommerce store.
To fetch other WooCommerce data types, all you need to do is change the endpoint:
/products— Get WooCommerce products/customers— Get WooCommerce customer data/coupons— Get active or expired coupons
For a full list of endpoints and filters, refer to the WooCommerce REST API docs.
2. Write a Google Apps Script to load data into Sheets
To pull this data into Google Sheets, you’ll need to write a script using Google Apps Script:
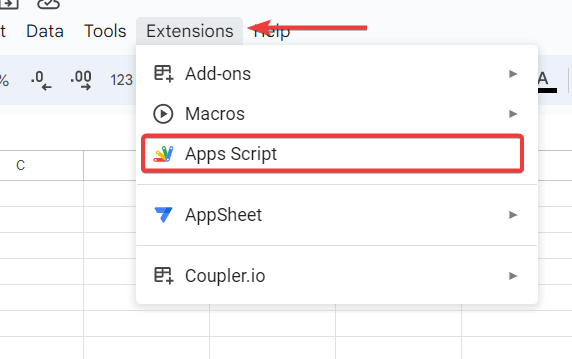
- Open the Google Sheet and go to Extensions > Apps Script.

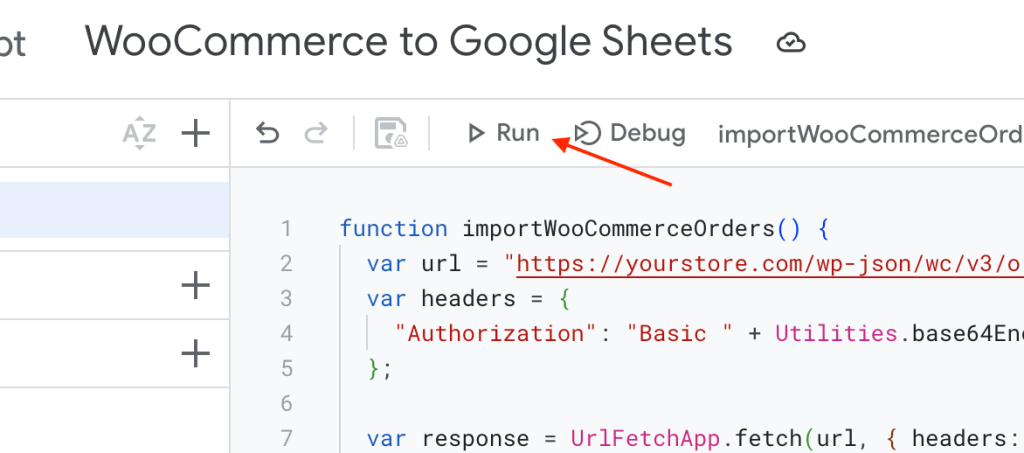
- In the editor, copy and paste the following code:
function importWooCommerceOrders() {
  var url = "https://yourstore.com/wp-json/wc/v3/orders";
  var headers = {
    "Authorization": "Basic " + Utilities.base64Encode("consumer_key:consumer_secret")
  };
  var response = UrlFetchApp.fetch(url, { headers: headers });
  var data = JSON.parse(response.getContentText());

  var sheet = SpreadsheetApp.getActiveSpreadsheet().getActiveSheet();
  sheet.clearContents();

  // Write headers
  var headersRow = ["Order ID", "Customer Name", "Total"];
  sheet.appendRow(headersRow);

  // Write data
  data.forEach(function(order) {
    sheet.appendRow([order.id, order.billing.first_name, order.total]);
  });
}
Note: Replace consumer_key:consumer_secret with your actual WooCommerce API credentials, and update the url with your actual store domain.
- Next, save and click Run to execute the script.

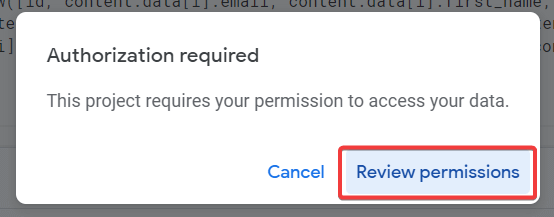
- A pop-up will appear asking for authorization to run the script. Click Review Permissions and select your Google account

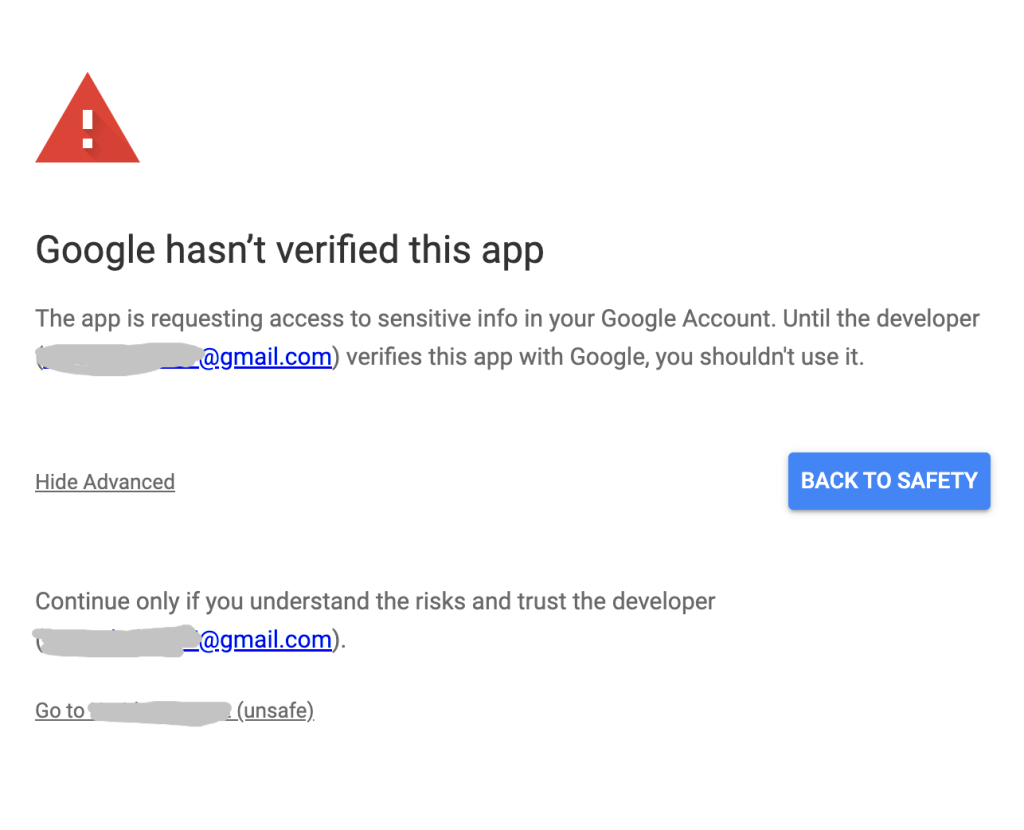
- You’ll see a warning that the app isn’t verified. Click Advanced and then the link that says Go to [App Name] to continue.

- Finally, click Allow to grant app script access to your Google account data, which is required to import WooCommerce data to Google Sheets.
Once authorized, the script will run and fetch order data from your WooCommerce store into your Google Sheet.
The script above is just a basic example of fetching WooCommerce order data. You can tweak it or change the API endpoint depending on what data you need. Alternatively, you can ask AI tools like ChatGPT to help you generate a custom script. Here is an example prompt you can use:
“Write a Google Apps Script that fetches WooCommerce products using the REST API and displays them in a Google Sheet.”
Just keep in mind that even with AI help, you will still need to troubleshoot and adjust the code to make it work for your setup. You’ll also need to watch out for rate limits, which can cause data inconsistencies or failed imports.
Overall, this method is time-consuming, complex, and prone to errors. We do not recommend it unless you’re tech-savvy.
Optimize your reporting workflow with an automated WooCommerce to Google Sheets integration
We’ve explored three ways to pull data from WooCommerce to Google Sheets.
Manual exports work for one-off reports but require ongoing effort and aren’t built for scale. A custom API integration offers flexibility but demands technical skills and regular maintenance.
Coupler.io, on the other hand, is a user-friendly solution for automating the export of your WooCommerce data to Google Sheets. It supports automatic data refreshes on a set schedule, allows you to transform your data before export, and helps you build custom reports for efficient WooCommerce analytics.
You can also take it further by connecting your Google Sheets spreadsheet to BI tools like Looker Studio, Power BI, or Tableau. Coupler.io supports all these platforms, allowing you to build an inventory management dashboard, track key metrics at scale, and share insights across your team.
Automate WooCommerce data exports with Coupler.io
Get started for free