Setting up accounts payable in Xero can be overwhelming, but with the right approach and tools, you can optimize your workflow and easily stay on top of incoming bills.
This guide will show you how to manage and save time on the accounts payable (AP) process. You’ll also find a free dashboard template for keeping track of your debt, spending habits, and AP trends.
How to manage the accounts payable process in Xero
Let’s start at the very beginning. You receive an email from a vendor with an invoice attachment, download the document to your computer, and log in to your Xero accounting software. What happens next?
1. Record bills
The first step is to record the invoice as a new bill. The easiest way to do this is with Hubdoc, Xero’s built-in feature for document capture:
- Go to the Business tab in Xero and select Bills to Pay from the drop-down menu.
- Select Automate bill entry from the 3-dot menu in the top-right corner. Email the invoice to Hubdoc using the email address provided in the pop-up window.
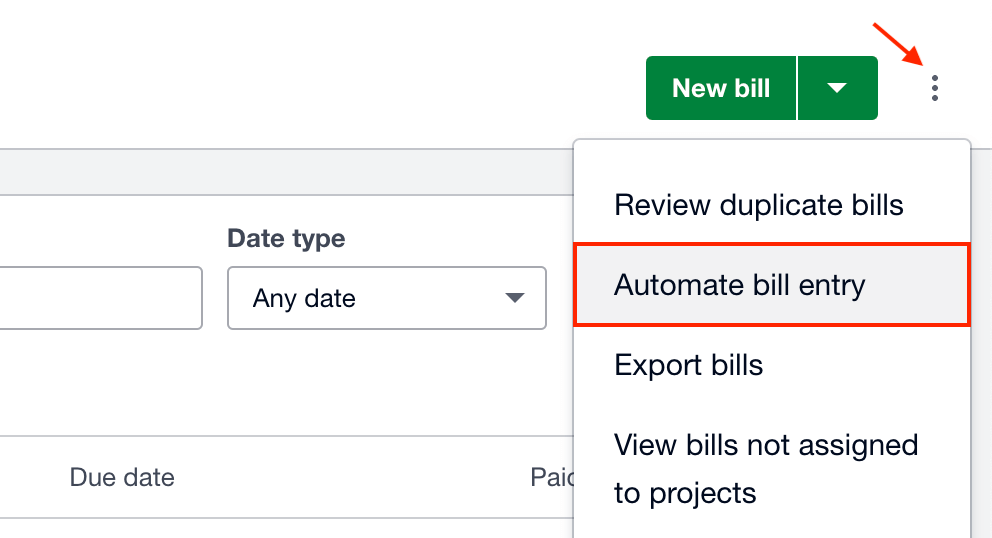
- Alternatively, upload it as a PDF, JPG, or PNG file by selecting Upload a Bill from the New Bill button drop-down.
Hubdoc’s OCR (Optical Character Recognition) functionality records key details from the document and save it as a bill in Xero.
If you don’t have Hubdoc enabled, you will need to input this information manually.
- In the Business tab, select Bills to Pay from the drop-down menu.
- Click on New Bill in the top-right corner. This will generate an empty draft bill.
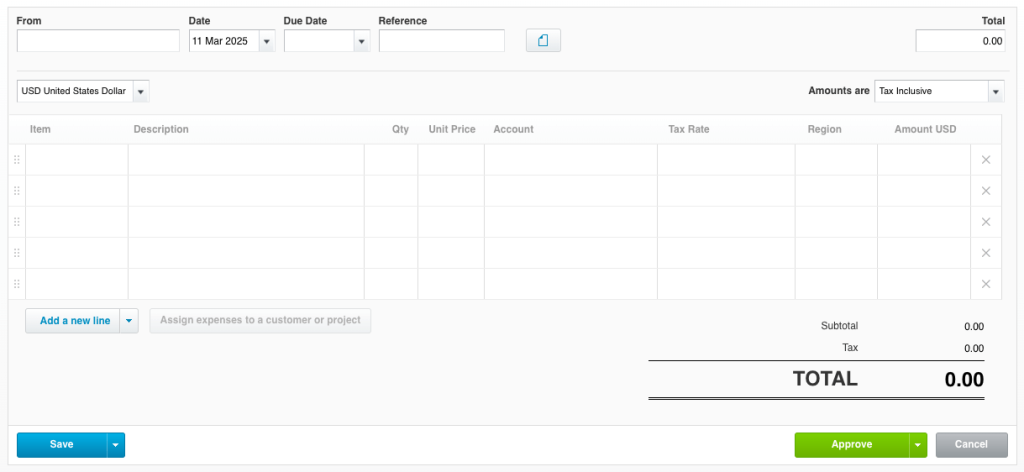
- In the provided fields, enter invoice data such as who it’s from (vendor), due date, currency, items & description, and any other details that are important for your business. Once finished, click Save. The bill will appear as a ‘draft’ in the bills to pay.
2. Approve bills
If you haven’t done so already, you will need to set up an approval workflow based on your business hierarchy. There is no right or wrong approach here. The length and complexity of this stage depend on your business’s size, industry requirements, invoice volume, and internal rules.
For instance, if you are a small business owner responsible for the company’s finances, a multi-step approval workflow may not be necessary.
For larger businesses and teams, it might look something like this:
- The bookkeeper/accountant submits the bill for approval in Xero.
- A department manager reviews the draft bill, checks its accuracy, adds notes, then approves it.
- If it’s a costly purchase, someone in upper management (e.g., business owner, managing director) also reviews and approves it.
- The finance manager or business accountant provides the final sign-off and moves the bill to Awaiting Payment status in Xero.
Important note: Xero does not have features for tracking approvals. You will need to use add-ons or other external tools (e.g., Slack, spreadsheets) to manage this part of the process.
3. Schedule and process payments
The next step is arguably the most important – paying off your pending bills. To do this, simply:
- Navigate to Bills to Pay and click Awaiting Payment in the top menu.
- Tick the checkboxes next to each bill to select the ones you want to pay.
- Click Make Payment to generate a batch payment file that you can export from Xero and upload to your banking platform.

If you’d rather schedule bills for payment, click the Add Planned Date button instead. This will open a calendar where you can handpick a date that aligns with the supplier’s payment terms.
4. Reconcile payments with bank accounts
You’ve paid off your bills – congrats! That’s half the battle won. Now it’s time to reconcile bank transactions with Xero records to ensure everything lines up perfectly.
The first step is to connect your bank account(s) to Xero and set up a bank feed. This will semi-automate the reconciliation process by matching bills with corresponding bank transactions.
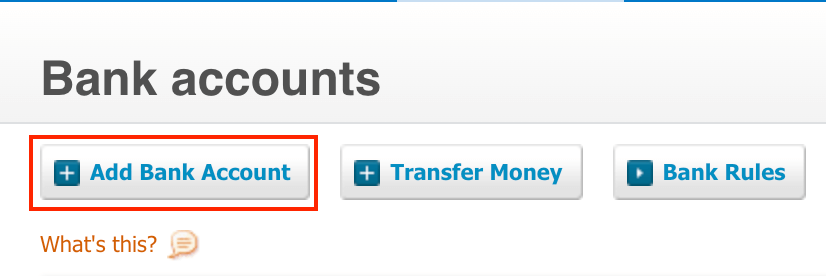
- Navigate to the Accounting tab in the main menu.
- Select Bank Accounts from the drop-down, then Add Bank Account.
- Search for your bank provider, filtering by country if needed. Follow the instructions to connect your account, configure a conversion date and opening balance, and activate a bank feed. It can take up to 10 days for all your transactions to appear in Xero, so it’s best to complete this process several days in advance.
Note: If your bank doesn’t appear in the search box, select Add without bank feed in the top right corner. You’ll be able to add the details manually, but you will not be able to create an automated bank feed.
To understand if your transactions have been synced with Xero, return to the Bank Accounts page. Click Reconcile X items within the relevant listed account.
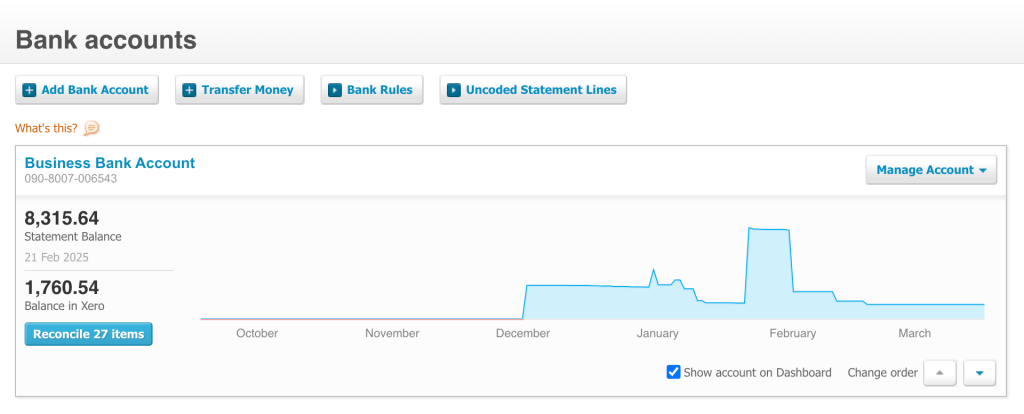
This will open a new page with bank statement lines and Xero records displayed side-by-side. You will automatically see matching pairs and have the option to OK them (reconcile). Be sure to double check if they are indeed a correct match, as the algorithm can make mistakes.
If Xero fails to identify a match, you can use the Find & Match function to track down a corresponding bill.
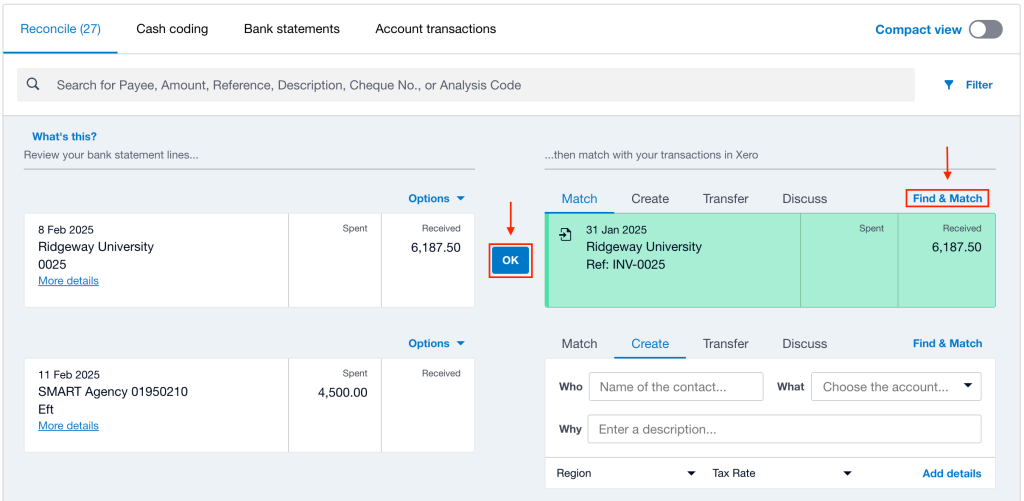
- Click on Find & Match and search by the invoice name, reference, or amount. If nothing shows up, it probably means the bill doesn’t yet exist in Xero.
- To quickly resolve this, select Create from the options on the right-hand side of the screen. Add transaction details (Who, What, Why, and more) and click save to create a reconcilable record.
For statement lines indicating bank transfers, use the Transfer option to properly reconcile them. Select a connected bank account and add a reference if needed.

There may be issues with certain transactions, such as when you accidentally overpay a vendor.
- Use the Find & Match function to identify the overpaid bill.
- Click on New Transaction and select Spend Money from the drop-down menu.
- Next to Spent as, click Direct Payment and choose Overpayment from the list of options.
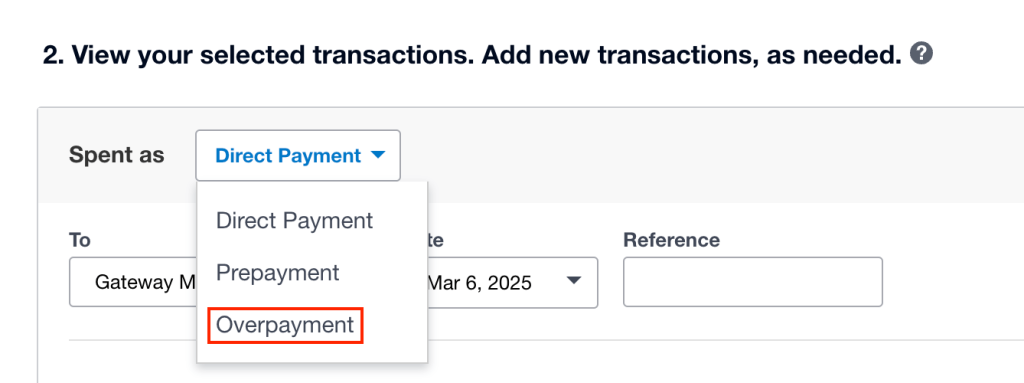
- Don’t forget to press save to finalize the changes.
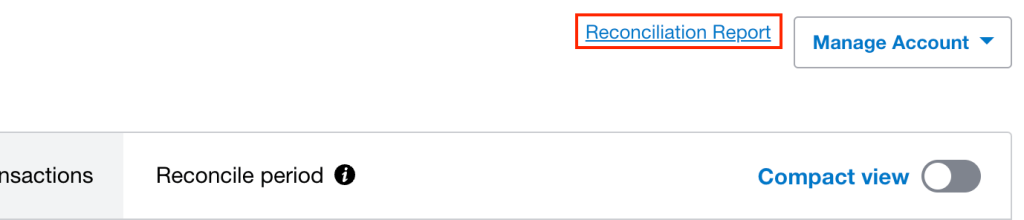
Finally, you can generate a reconciliation report to confirm that everything checks out. You’ll find it next to the Manage Account button at the top of the page.
5. Track and report accounts payable
The Xero accounts payable process doesn’t end with payments and reconciliation. It’s an ongoing cycle that involves analyzing data and tracking your financial evolution over time. The more you know about your debts, recurring bills, and vendor relationships, the more informed your business decisions will be.
Xero provides a few rudimentary reports for AP analysis. These can be found under Reports in the Accounting tab and include:
- Accounts payable aging summary
- Accounts payable aging detail
- Payable invoice summary
- Payable invoice detail
Here’s a snapshot of the aged payables summary report:
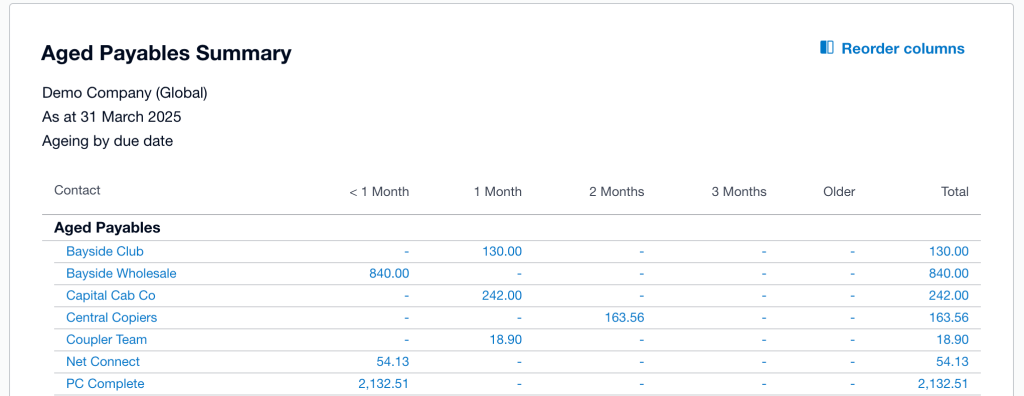
It’s worth noting that the reports – while intricate – aren’t ideal for quick analysis or sharing insights with stakeholders. They also don’t give you a sense of the bigger picture. For that, you’ll need to create custom reports with external software.
Coupler.io is one such tool that seamlessly integrates with your Xero accounting software. It allows you to collect Xero data on a schedule and create shareable, automated reports with aggregated insights. For instance, you can view invoices, payments, and bank account data in one place. I’ll show you some templates later, but first, let’s discuss why automation is so critical.
The problem with a manual approach
While it’s possible to manage the AP process using only Xero’s built-in features – and minimal automation – it’s not exactly straightforward or efficient. As you can see, many key steps depend on manual inputs and follow-ups, which can easily cause delays and avoidable errors. Let’s look at a few examples:
- A typo or missed zero while manually recording a bill results in an incorrect payment, damaging your relationship with the vendor.
- You accidentally duplicate a payment, which causes issues and wasted time on account reconciliation.
- An important bill gets stalled at the approval stage simply because someone forgot to address it before going on vacation.
- Xero’s reporting limitations prevent you from identifying trends in your AP data or areas needing optimization, perpetuating poor decision-making.
Not to mention, the manual AP process is a huge time sink. Why spend 2 hours processing bills on a Wednesday when you could be focusing on tasks that actually drive business growth?
That’s where automation comes in. A highly automated approach allows you to save time on tedious aspects of the process, such as data entry, invoice approvals, and payment scheduling. It helps you cut overall processing time (from invoice received ? payment made) by about 60-80%. And thanks to reduced human interference, it minimizes the chance of errors and costly mistakes.
So, where do you even start? Learning about Xero’s basic AP automation features (e.g., Hubdoc, auto-matched bills during reconciliation) is one step forward. But you can go so much further with the help of external tools and integrations.
Xero accounts payable reporting automation with Coupler.io
Coupler.io is a reporting automation tool that gives you greater control over the Xero accounts payable process. Instead of trying to make decisions with disconnected charts in Xero, you can use Coupler.io’s pre-built template for AP financial performance analysis and reporting.
Accounts payable dashboard for Xero in Looker Studio and Google Sheets
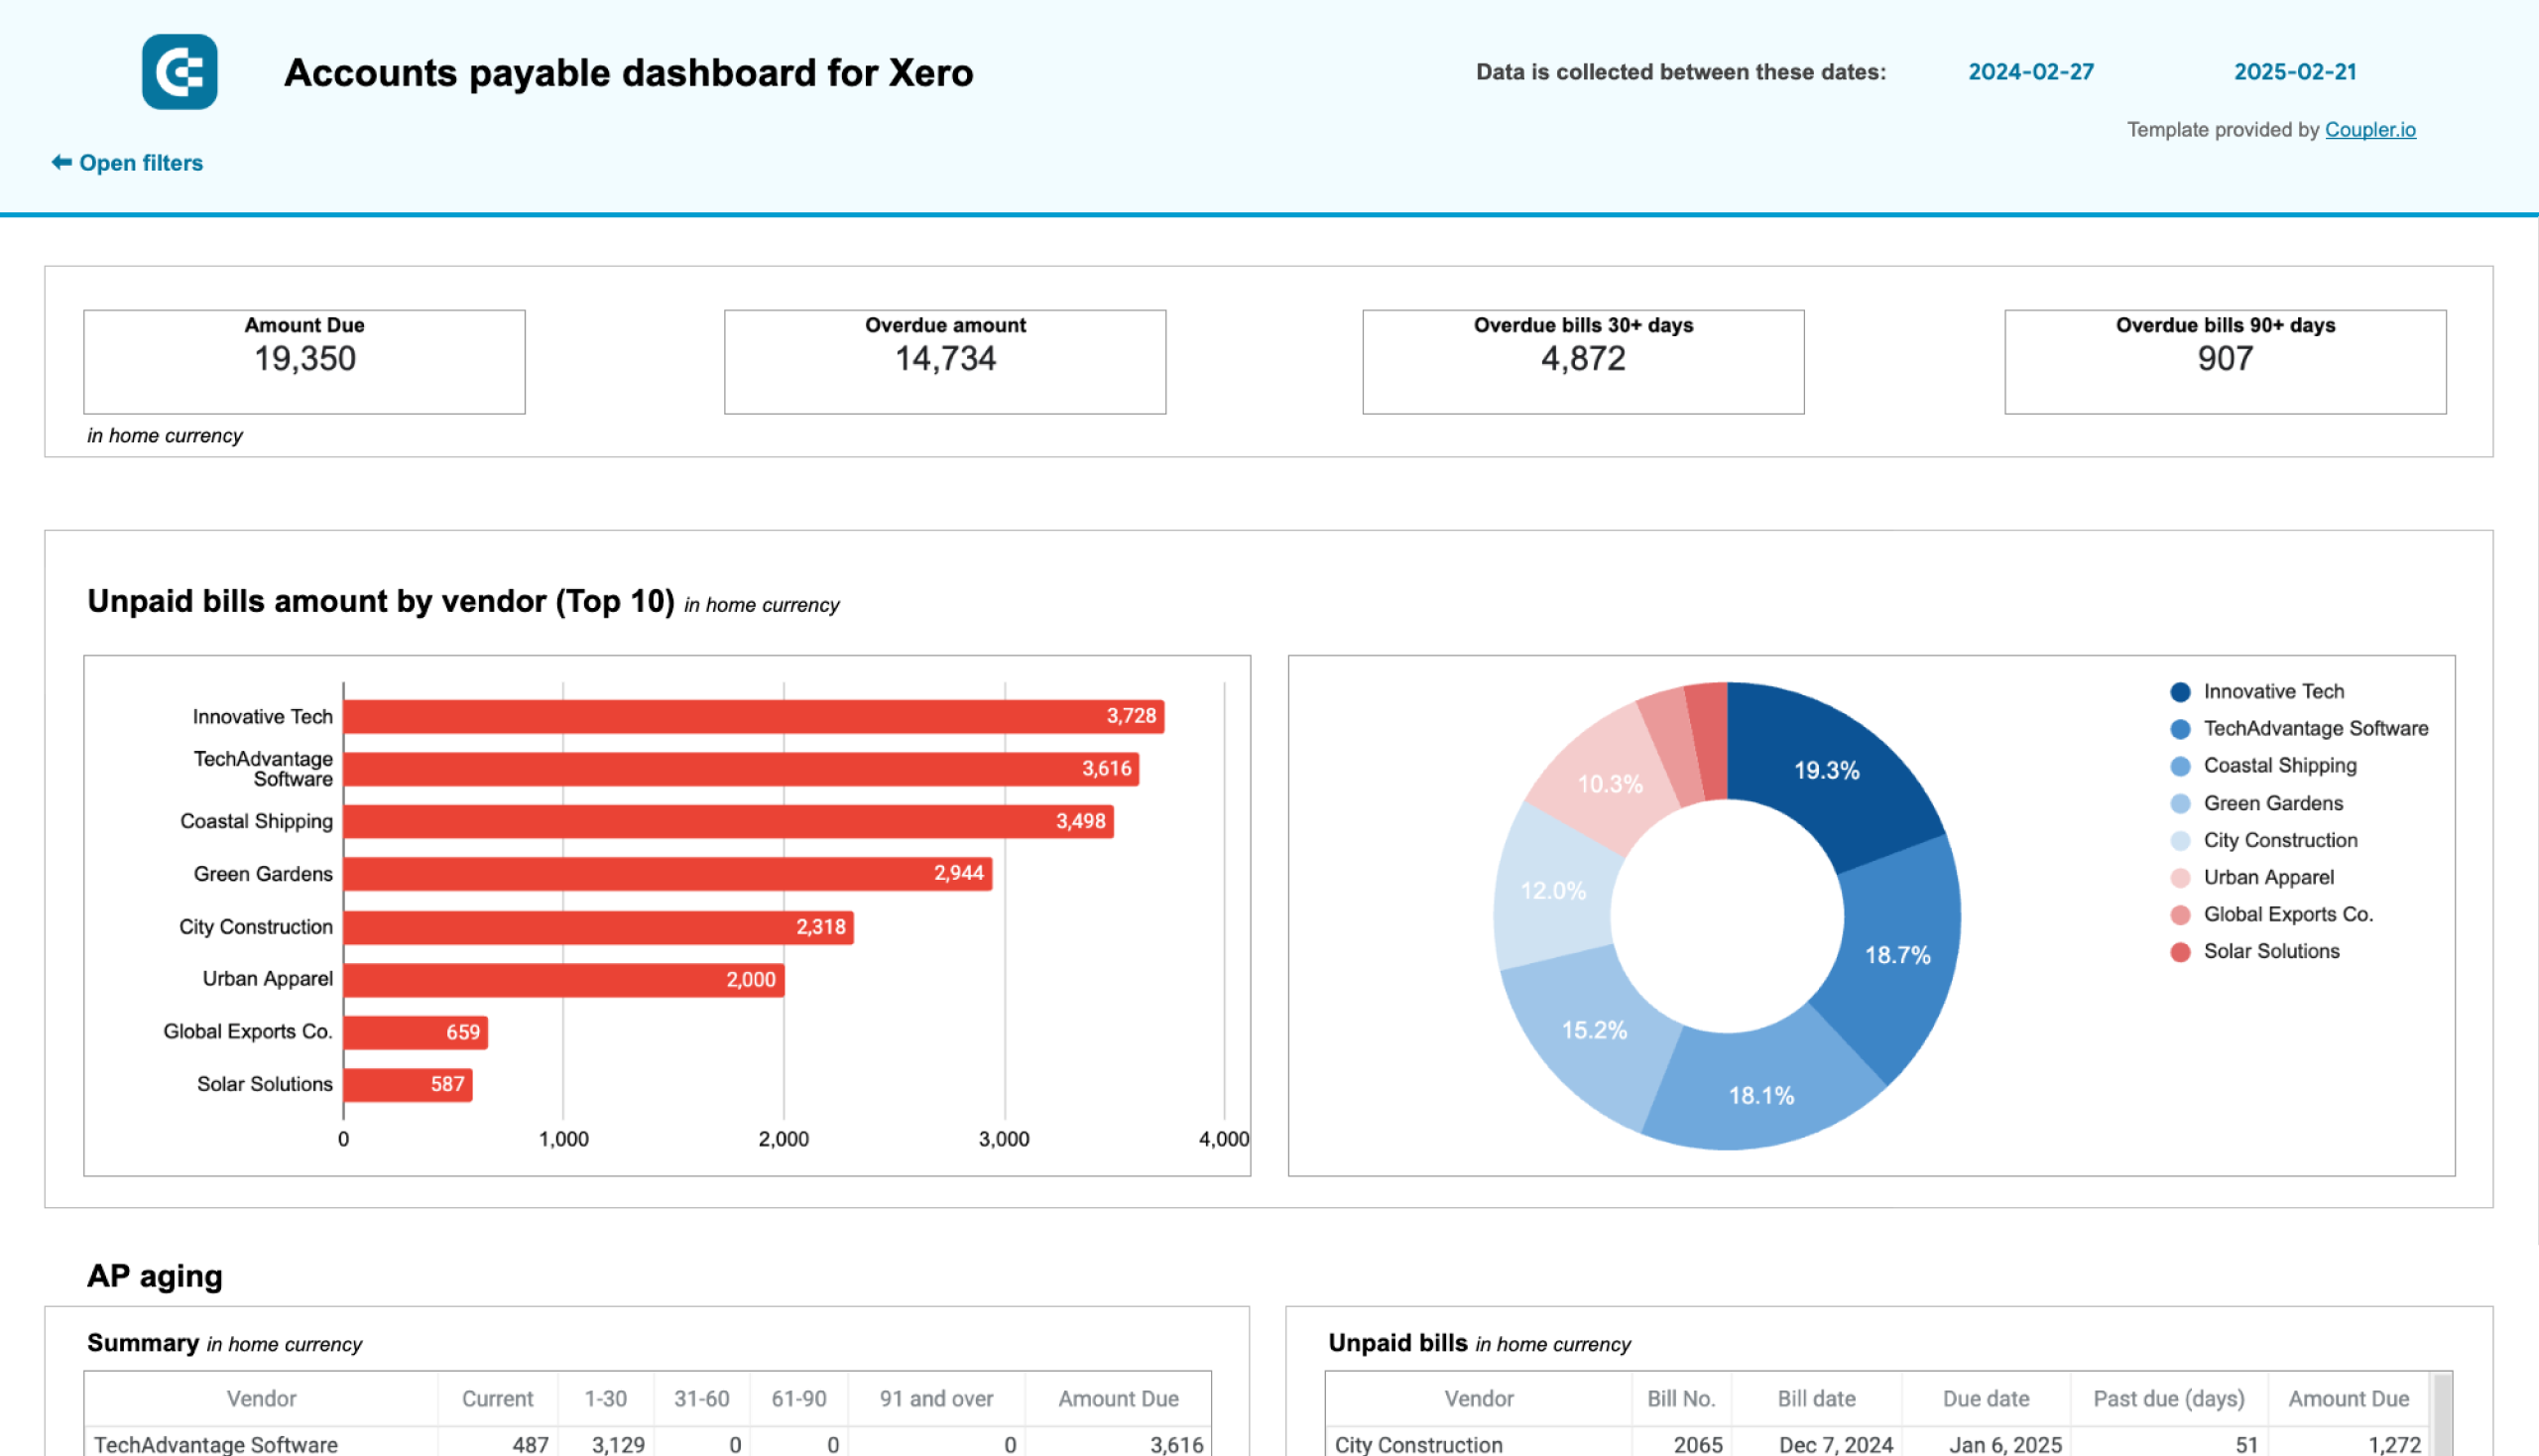
This dashboard allows you to analyze all your AP data on a single screen without clicking between various reports in the Xero interface. You can open it every morning for an up-to-date overview of how much you owe, who you need to pay, and the cash at your disposal.
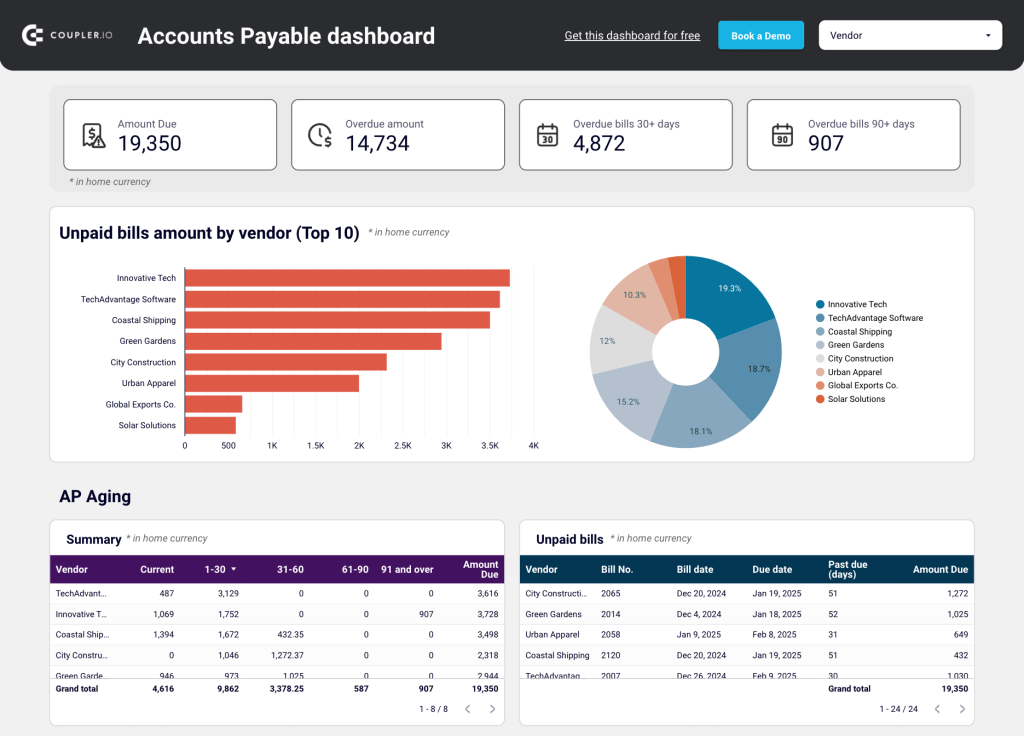
Insights the dashboard provides:
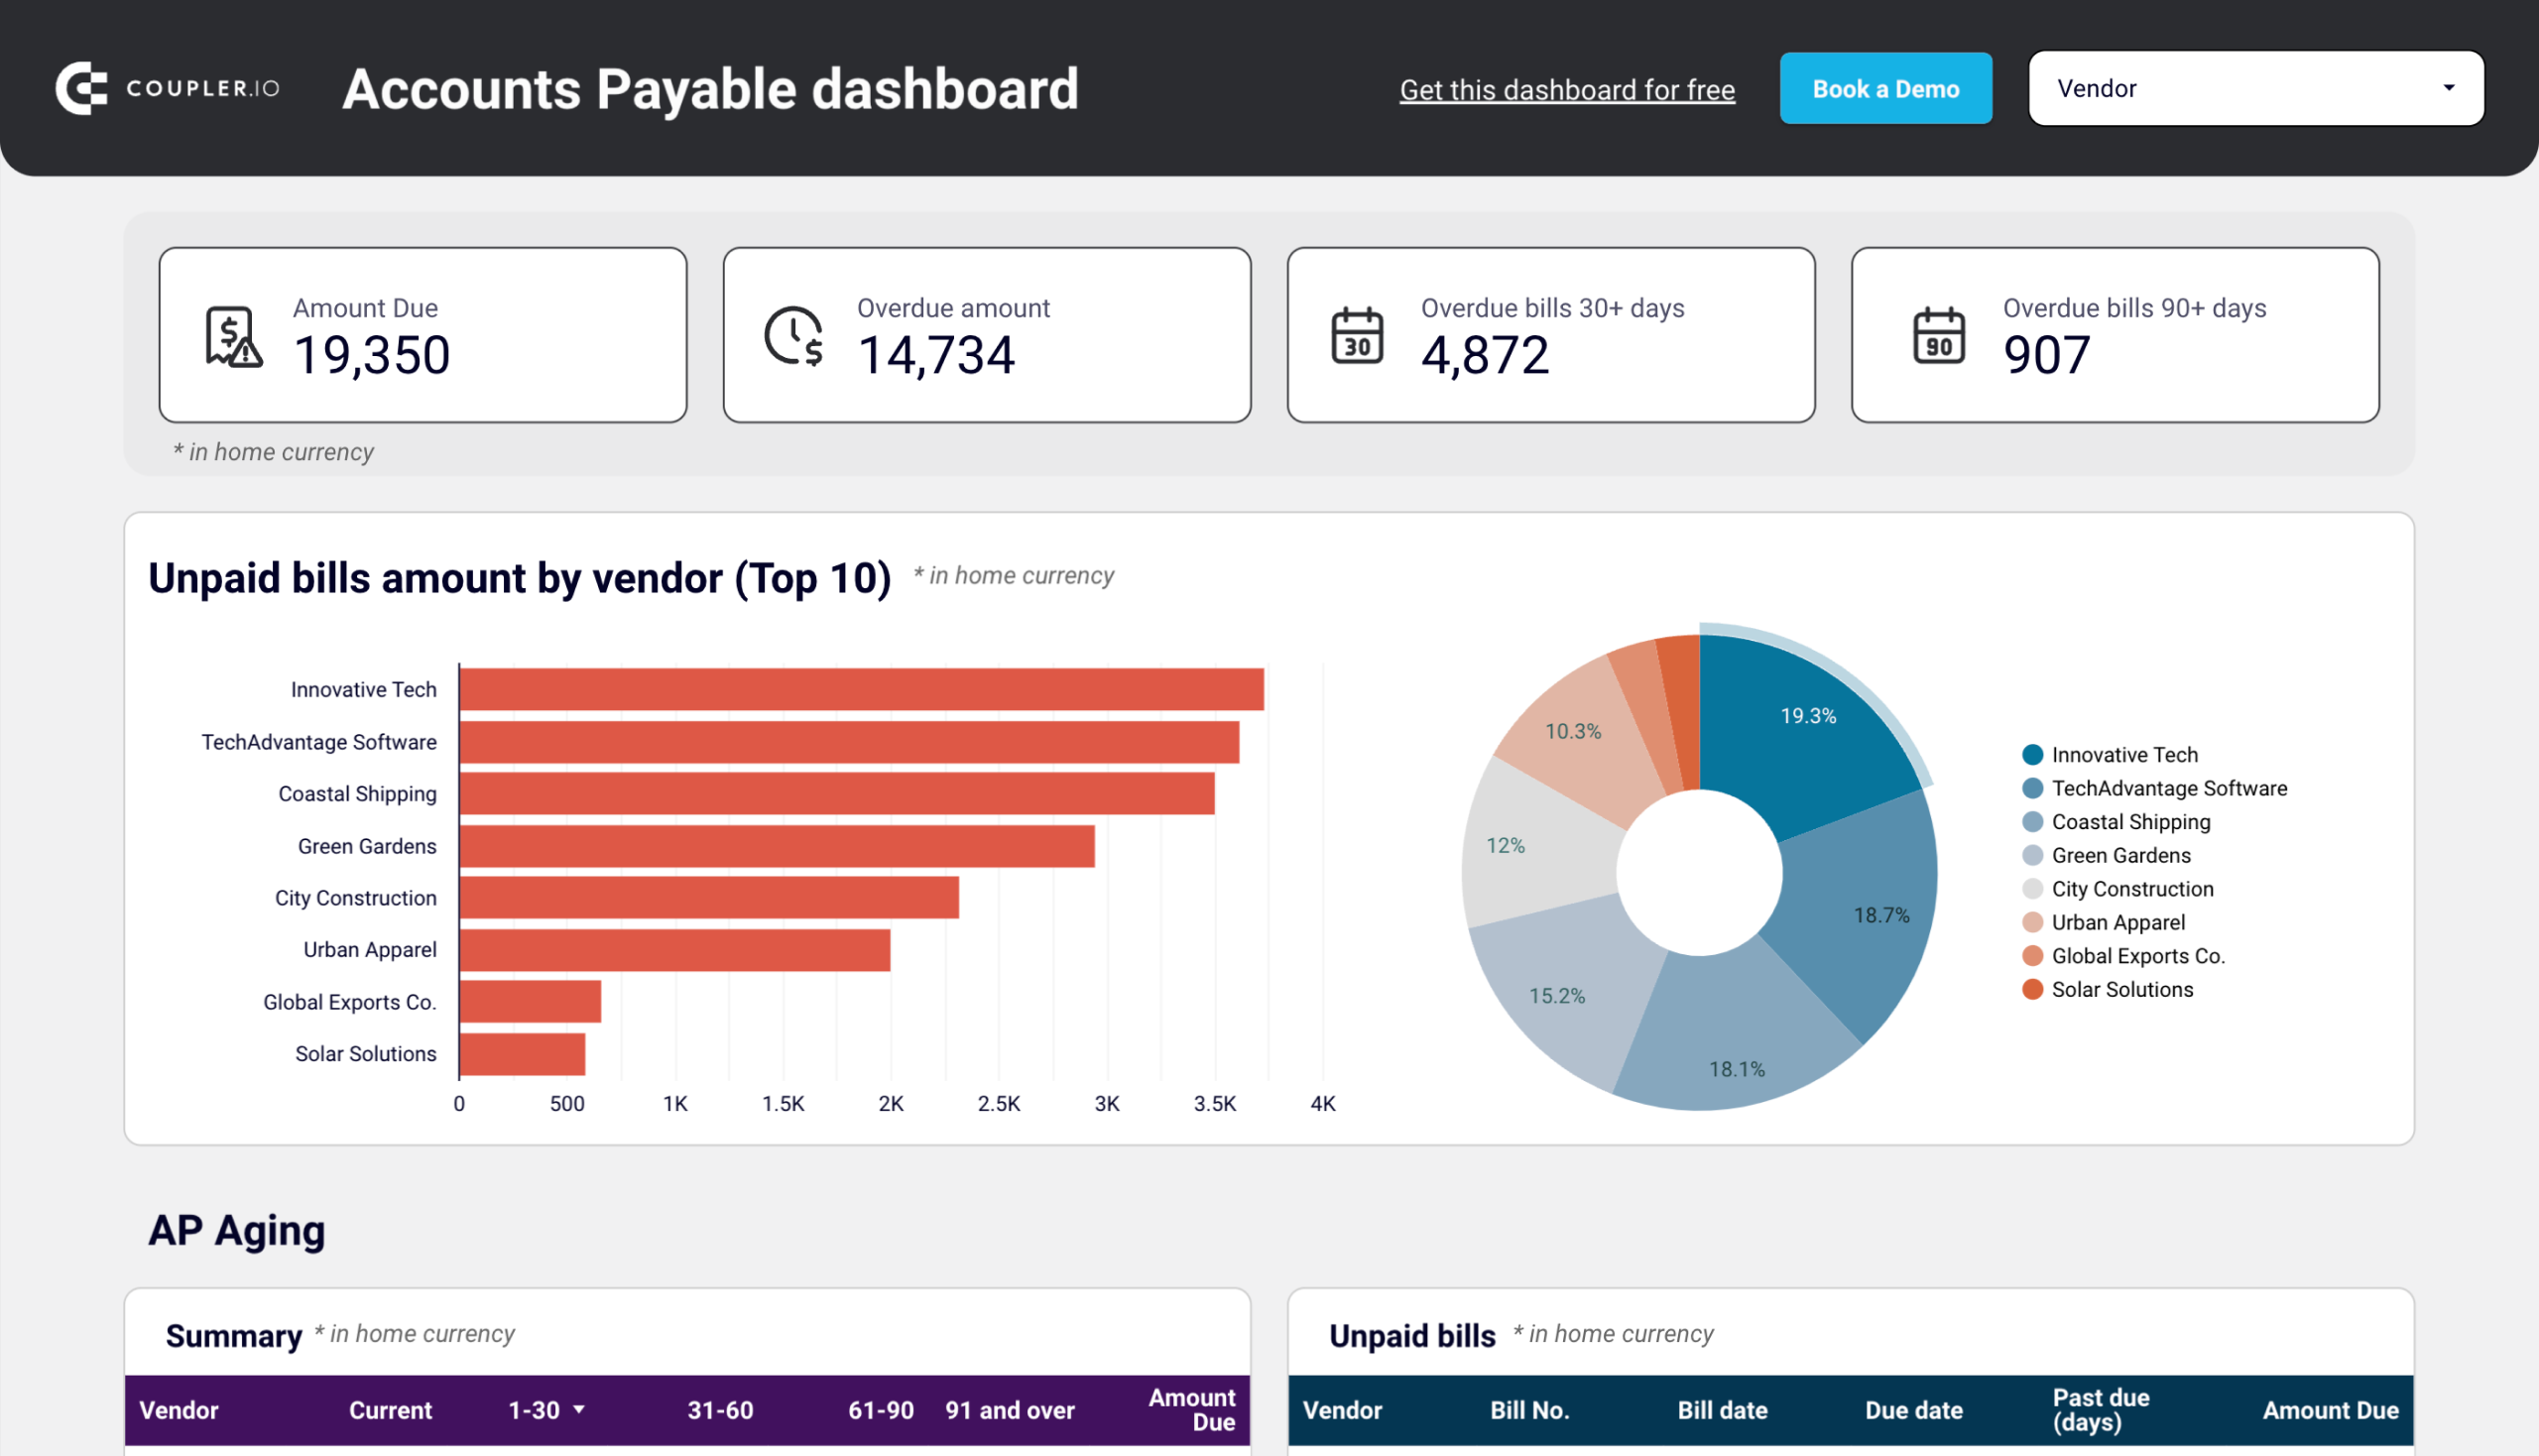
- Unpaid bills overview – scorecards and charts help you quickly determine the total amount owed to vendors, your top 10 vendors by credit debt, and total overdue amounts for 30+ and 90+ days. This allows you to prioritize payments based on who you owe the most money to.
- AP aging summary – review pending bills in an interactive table view. Avoid late fees by tracking due dates and the number of days past due for unpaid bills.
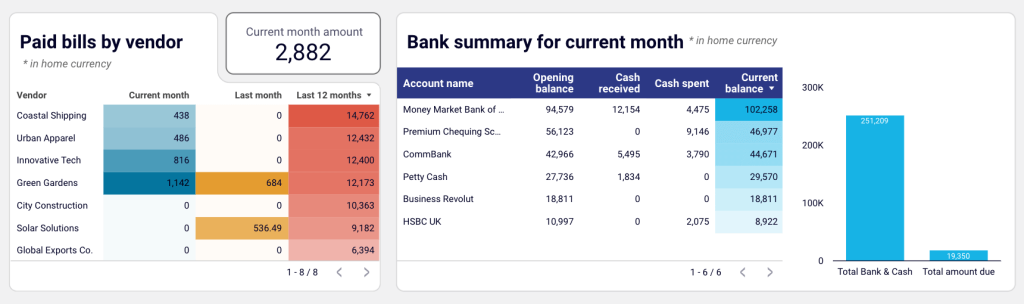
- Paid bills summary – evaluate vendors by how much you have paid them this month and over the past 12 months. This is useful for identifying high-cost suppliers and making strategic budgeting decisions.
- Available cash – track the balance of your bank accounts in one place. A comparison chart displays total cash vs total amount due, ensuring you stay on top of cash flow and prevent shortfalls.
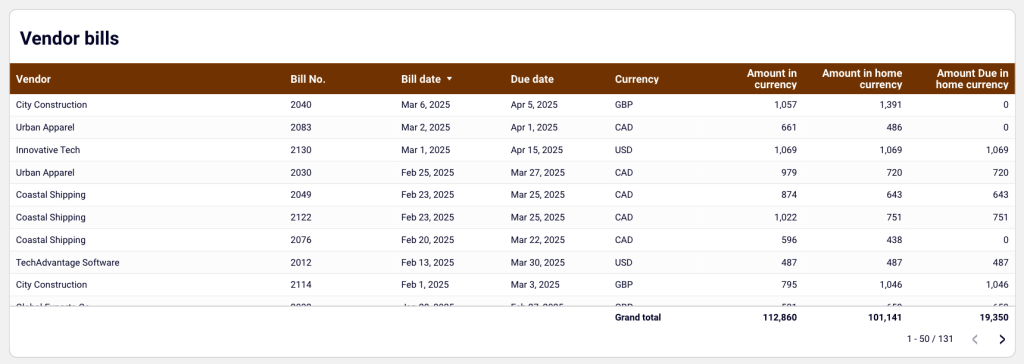
- Vendor bills – get a complete breakdown of all bills (paid & unpaid) recorded in Xero, organized by issue date, due date, currency, amount in home currency, etc. It’s handy for spotting trends in vendor spending, tracking granular AP data, and helping you pay bills on time.
This Looker Studio dashboard template is available with a free Coupler.io account. It takes less than 5 minutes to sync records from Xero and visualize your AP data in a centralized report. A version of the template is also available in Google Sheets:
Accounts payable dashboard for Xero in Looker Studio
Track outstanding, overdue, and paid bills to optimize payment schedules, manage vendor relationships, and ensure smooth cash flow.


Accounts payable dashboard for Xero in Google Sheets
Monitor vendor payment deadlines, track aging bills, and analyze payment history to optimize cash flow management and maintain healthy supplier relationships.

To automate other aspects of financial reporting, such as accounts receivable or sales revenue, explore free Xero dashboards and templates.
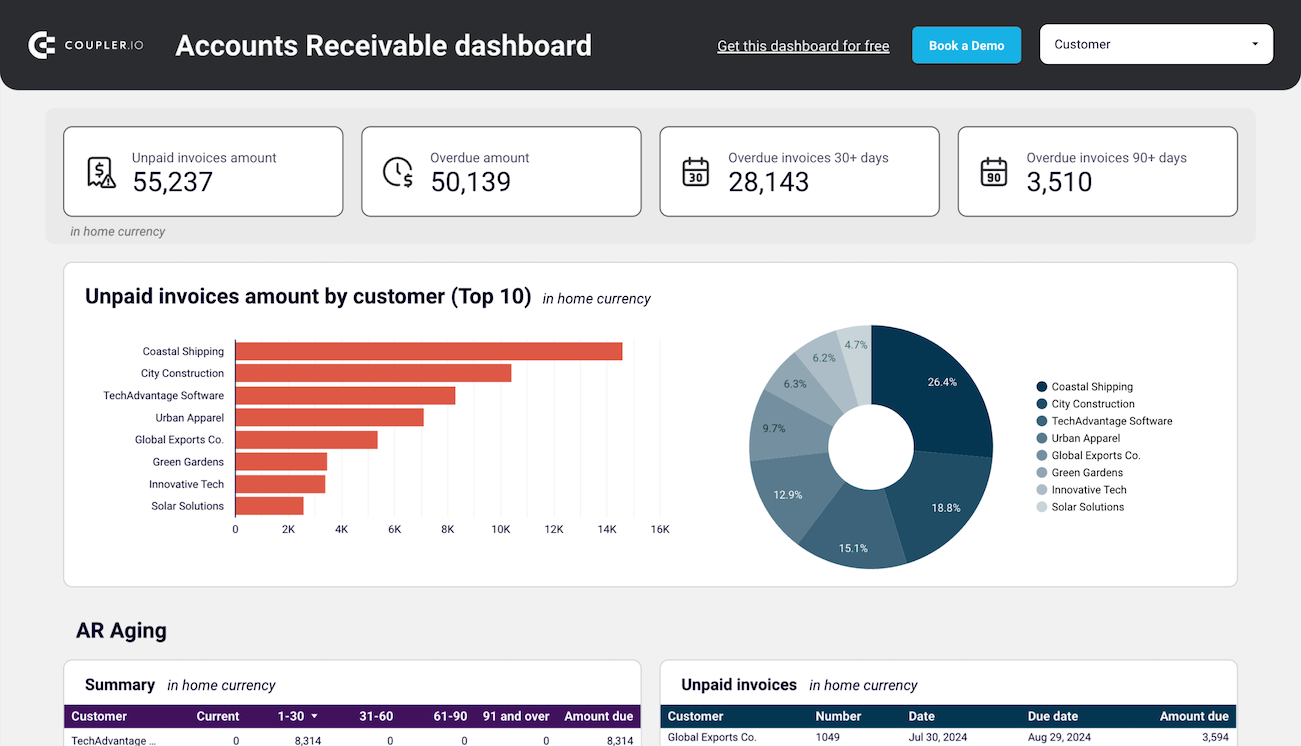
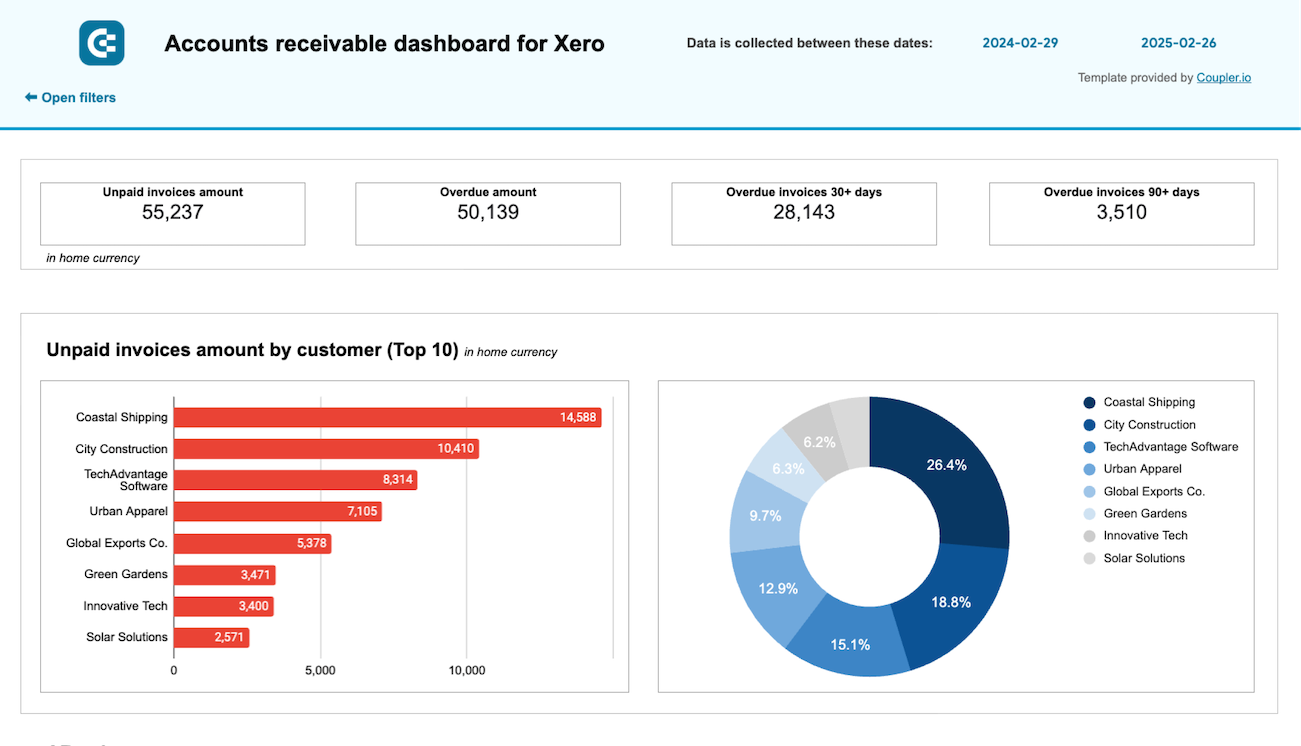
Accounts receivable dashboard for Xero in Looker Studio
See which customers accumulate unpaid and overdue invoices, analyze AR aging, and track changes over time.
Accounts receivable dashboard for Xero in Google Sheets
Track outstanding customer payments, monitor aging receivables, and analyze the correlation between paid and unpaid invoices to improve cash flow management.
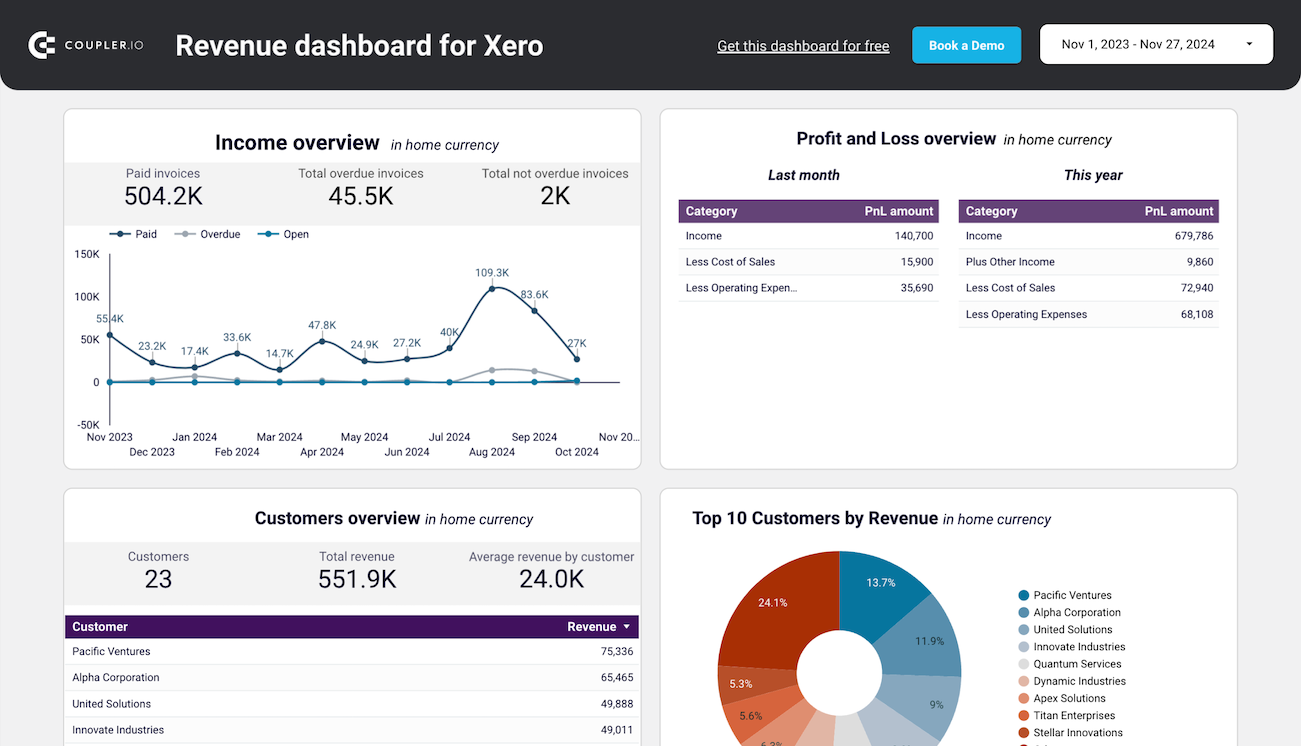
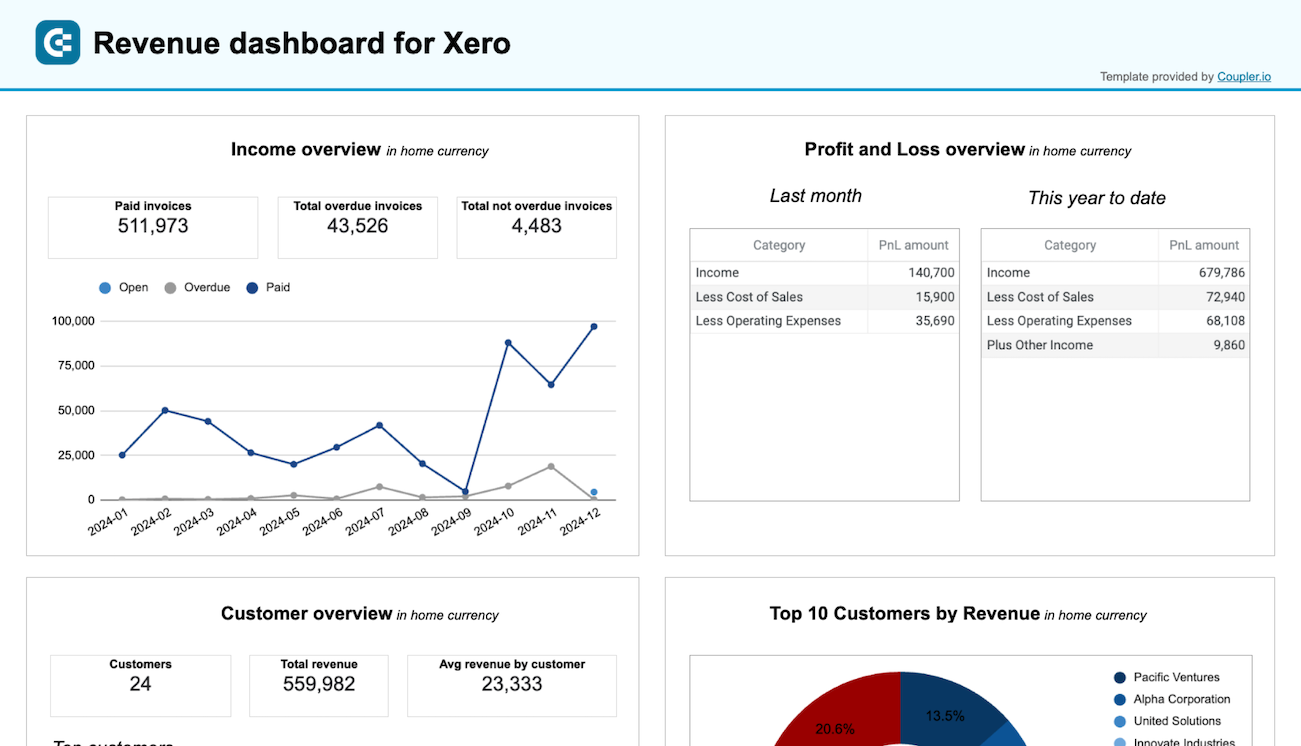
Revenue dashboard for Xero in Looker Studio
Get an overview of your profit and loss, products, and customers through a set of reports collected from Xero.
Revenue dashboard for Xero in Google Sheets
Track your revenue, costs, and customer insights with a comprehensive dashboard connected to your Xero account.
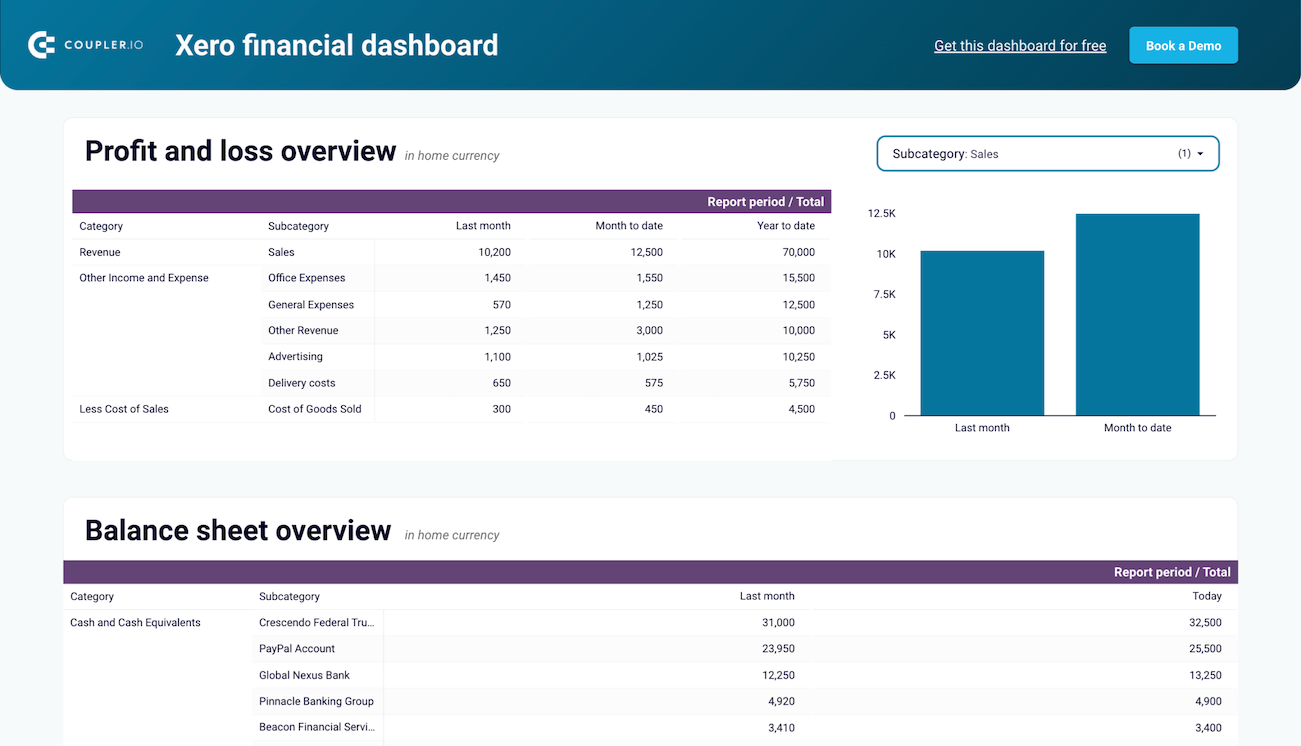
Xero financial dashboard in Looker Studio
Analyze your financial performance with a unified dashboard featuring key reports from Xero like cash flow, profit and loss, balance sheet, and others.
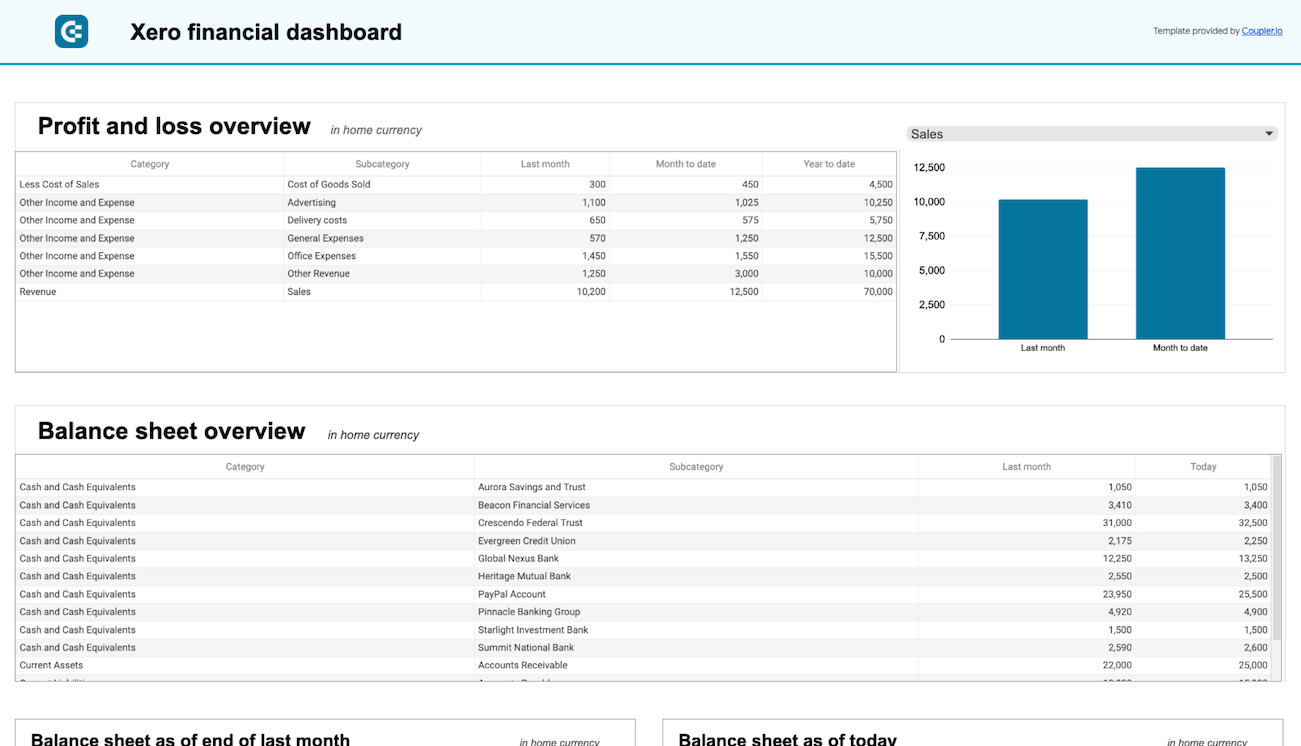
Xero financial dashboard in Google Sheets
Get instant visibility into your company’s financial health through key performance reports from Xero such as cash flow, income statement, and balance sheet.
Automating data collection for enhanced Xero reporting
As I mentioned earlier, Xero’s built-in reporting features leave much to be desired. The platform also lacks native integration with visualization tools and other business sources, such as CRMs, HR, and ERP systems. To collect and visualize your data in custom-made reports, you need to export and upload files from different tools or copy and paste between tabs. It’s a complicated and time-consuming job!
Thankfully, Coupler.io makes the whole process much easier with a dedicated Xero connector. It automates data collection from your Xero account, allowing you to create custom reports in a spreadsheet or BI tool of your choice. You can also combine data from multiple sources to gain a better understanding of your business’s financial position. Choose from over 60 sources, including HubSpot, Excel, Salesforce, Shopify, or Stripe.
Here’s an example of preparing a report in Coupler.io with several sources. Note that you can refine your data (sort, filter, join similar columns, and make aggregations) before visualizing it in a dashboard:
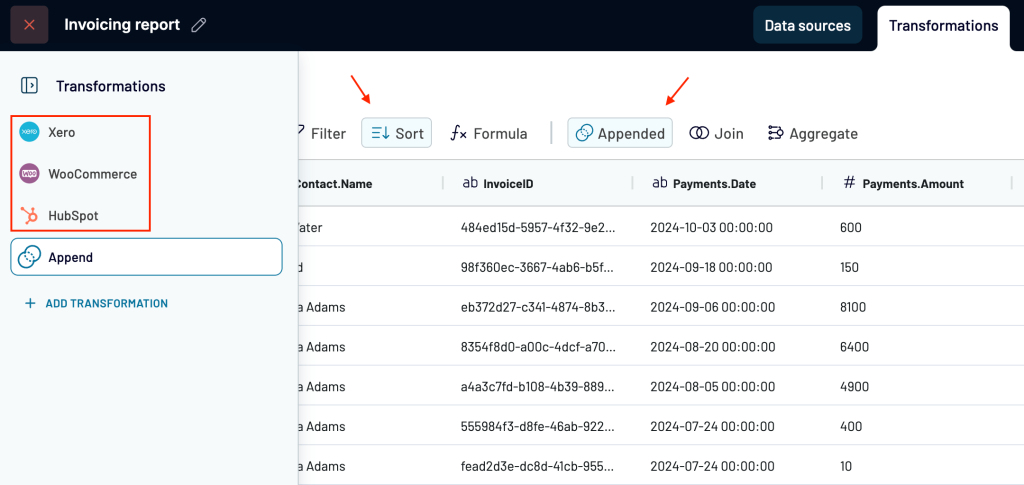
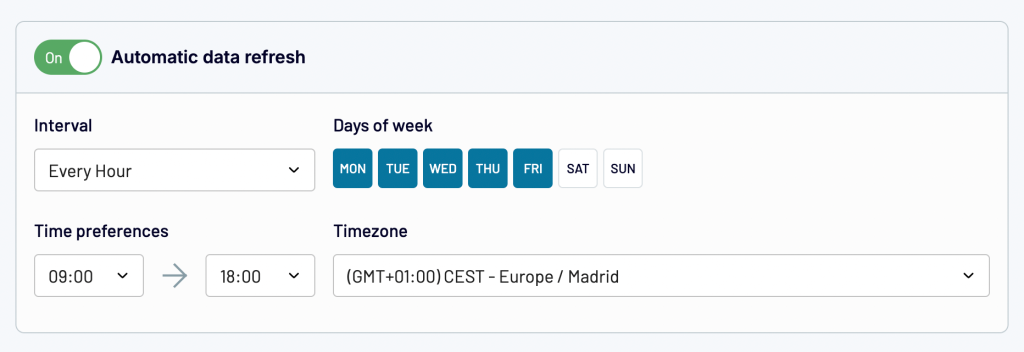
Crucially, reports powered by Coupler.io update automatically. Once connected to your account, the tool will fetch your data on a customizable schedule, such as every hour or day. This ensures you have access to the latest information in near real-time (e.g., who has or hasn’t been paid, upcoming due dates) without needing to log in to Xero.
If you’re unsure where to start with automated Xero reporting, feel free to schedule a call with our data experts. They can help you identify the best approach and build reports that deliver real business value.
Tools for automating AP workflows
Hubdoc for recording bills
A built-in Xero feature that lets you scan and upload financial documents. Instead of manually adding details from a new bill (description, unit price, tax rate, etc.), Hubdoc extracts key information from the invoice and automatically completes the main fields. It also categorizes the billing data as transactions that can be easily matched with your bank feed.
This means you can record several bills in a row without needing to set aside time for manual data entry. Hubdoc is included in all paid Xero plans from starter to enterprise. You only need to set it up once.
ApprovalMax for managing approval workflows
ApprovalMax is an optional Xero add-on that streamlines the AP and AR approvals process. It allows you to create multi-step, automated workflows with various assignees all in one place. In other words, there’s no need to communicate with approvers in external channels or track progress in spreadsheets. You can approve or reject bills via email or mobile app without even logging in to Xero.
ApprovalMax is available as an add-on in the Xero app store. Pricing starts at $54 per month following a 14-day free trial.
Coupler.io for data analysis and AP reporting
As I explained earlier, Coupler.io is a reporting automation tool that helps you transform your Xero data into insightful, actionable reports. You can easily transfer AP data from Xero to spreadsheets or other data visualization tools, eliminating the need to download and upload CSV files or perform regular, manual updates.
Coupler.io provides dashboard templates for financial analysis, including the purpose-built AP report template you saw above. It’s designed to save you time on the AP process and help you make faster decisions about vendor cooperation, cash flow management, etc. Setting up a Coupler.io account is free and takes less than 5 minutes!
Read about the specifics of accounting reporting and templates to streamline your workflow. We also recommend this article on financial data analytics for tips on how to analyze your data.
Lightyear for an all-round solution
Lightyear is a Xero accounts payable automation solution that enables you to automate multiple elements of the AP process. You can speed up invoice processing with the help of AI, design custom approval workflows, and automatically match purchase orders to bills. You can also add supplier details to Lightyear, and the platform will sync them with relevant bills in Xero.
Test the Lightyear integration for free with a 30-day trial. Keep in mind, however, that the cheapest plan starts at $189 thereafter.
Benefits of automating accounts payable
What can you gain from automating the AP process? Let’s explore the key benefits:
Reduces the risk of error
Anyone can make a mistake while entering invoice details or processing a payment. A bill of $1,000 can easily become $10K with an accidental keyboard stroke. Ultimately, even the simplest of errors can affect your business reputation and the reliability of internal reports.
Automated bill recording and payment scheduling minimize the risk of human errors. It eliminates common data entry mistakes, ensures accurate AP reporting, and helps you maintain positive vendor relationships.
Saves time on manual work
The AP process – and bookkeeping in general – is notoriously time-consuming. The most productive organizations can complete an AP cycle in 2.8 days, but many businesses take a week or more. That’s countless hours of administrative work that could be saved through automation.
For example, Xero’s HubDoc feature lets you automate document collection and data entry, saving precious hours of processing time. On a similar note, our accounting firm client saved 40 hours a month by automating weekly financial reporting with Coupler.io. You can spend this time on more important aspects of running and growing your business.
Prevents late or missed payments
Watching supplier bills and late fees pile up can be stressful, especially if you’re a small business with limited cash reserves. Yet it’s easy to overlook invoice due dates when you have dozens of other priorities to manage.
Automated payment processing allows you to stay on top of recurring bills and take advantage of early payment discounts. For instance, Plooto is a payment automation platform that enables you to schedule payments directly in Xero or other accounting software. Meanwhile, an AP dashboard (like the one above) can help you keep track of due dates.
Makes financial decision-making more efficient
The last thing you need when under pressure from unpaid vendors is to wade through Xero reports, receipts, and email attachments in search of answers. There simply isn’t enough time in the day, week, or month for slow decision-making.
Comprehensive automated reports – like the ones we mentioned earlier – cut through the clutter to help you make decisions quickly. They display up-to-date information about your financial position and allow you to create more accurate forecasts.
Want to automate your financial reporting from the get-go, including accounts payable? Check out Coupler.io’s pre-built Xero report templates or create custom dashboards with your preferred metrics.
Automate reporting with Coupler.io
Get started for free