Xero is an excellent accounting software, but to truly maximize its potential, you need to understand how to use it to optimize your operations. Read the guide below to learn how to implement Xero automation and save time, money, and resources.
Why you need Xero accounting automation
Xero automation is the process of applying non-manual workflows to Xero data to optimize repetitive tasks and execute financial management functions in a time-efficient manner.
More specifically, let’s consider Xero automation within two broader processes:
- Data export and reporting.
- Accounting itself.
Both break down into smaller tasks. To help you clearly understand why these processes should be automated, see the table below:
| What to automate | Why automate | |
Data export and reporting | Creating automated Xero data flows and reports | To build reports quickly, ensure they reflect the latest data and tailor them to meet your business needs with minimal manual intervention. |
| Self-updating Xero data backups | To safeguard your data and reduce the risk of loss by creating regular, secure copies without manual scheduling. | |
| Visualizing Xero data with dashboards | To bring complex financial data from Xero to Looker Studio or other dashboards, making it easier to track KPIs and base decisions on these insights. | |
Accounting | Accounts payable | To optimize invoice processing and make timely payments to maintain good vendor relationships and support cash flow management. |
| Bank reconciliations | To match transactions with corresponding records, minimize manual checks, and uphold accuracy in financial data. | |
| Invoicing | To send reminders and update records when payments are received, which contributes to smooth cash flow and prevents overdue invoicing. | |
| Payroll and expense management | To process payroll and expenses without delays and, respectively, guarantee proper employee compensation and reimbursements. | |
| Tax calculation | To avoid mistakes in tax filings, use the most recent rates, make all calculations precise, and save time on manual compliance. | |
Now, let’s first review how to set up and use Xero automation to create automated data flows and reports.
Creating automated Xero data flows and reports
To report on your Xero data, you must pull records from the system and load them into a spreadsheet app or BI platform. However, Xero lacks native automation for integrating with these tools, forcing you to repeatedly download and upload data. This makes the process overly time-consuming, plus updates must be performed manually each time. As a result, you struggle to make swift decisions and face increased operational costs due to inefficient resource allocation.
To create reports based on data automatically extracted from Xero, use Coupler.io. It lets you combine multiple Xero data entities and enrich them with records from CRMs like Salesforce, Pipedrive, or HubSpot in a single view. You can then load the ready-to-go report into Google Sheets, Excel, Looker Studio, and more. Plus, your report will auto-update on your chosen schedule to reflect the recent changes in the source.
Here’s more on how you’ll benefit from Coupler.io automated reporting:
- Time savings: Eliminate the need to manually export data from Xero and significantly decrease the time spent on repetitive tasks.
- Improved data consistency: Ensure uniform data formats across financial reports from different team members to minimize the risk of inconsistencies.
- Reduced human error: Lower the chance of errors in data collection and calculations and enhance the accuracy of your analysis.
- Faster financial insights: Move records from Xero to Power BI or other reporting tools to quickly generate financial insights and speed up decision-making.
- Cut operational costs: Free up resources to improve efficiency and bring down costs associated with manual processes.
To gain a broader perspective on how Coupler.io can impact your business performance, let’s review the case of Project Alfred, an accounting firm among our clients. With Xero as its primary software, it faced challenges such as the need for custom reports and cash flow forecasting, unsupported natively, the inability to merge data with HubSpot records, and time-intensive manual exports.
To tackle these challenges, Project Alfred initially relied on multiple tools to connect Xero and HubSpot to Google Sheets, but none offered a unified solution for managing cross-platform data. That changed when the firm adopted Coupler.io, which replaced previously used tools.
The benefits Project Alfred received from implementing Coupler.io included:
- Total monthly time savings of 20-40 hours (equivalent to a full-time workweek).
- Combined HubSpot and Xero data, which enabled accurate forecasting with scenario analysis and 12-24 months of visibility.
- Enhanced team collaboration, allowing several members to work with integrations without incurring additional costs.
How to automate reporting with Coupler.io
To enjoy similar advantages for your own business, you simply need to follow three easy steps to automate and schedule Xero data exports.
Step 1: Collect Xero data
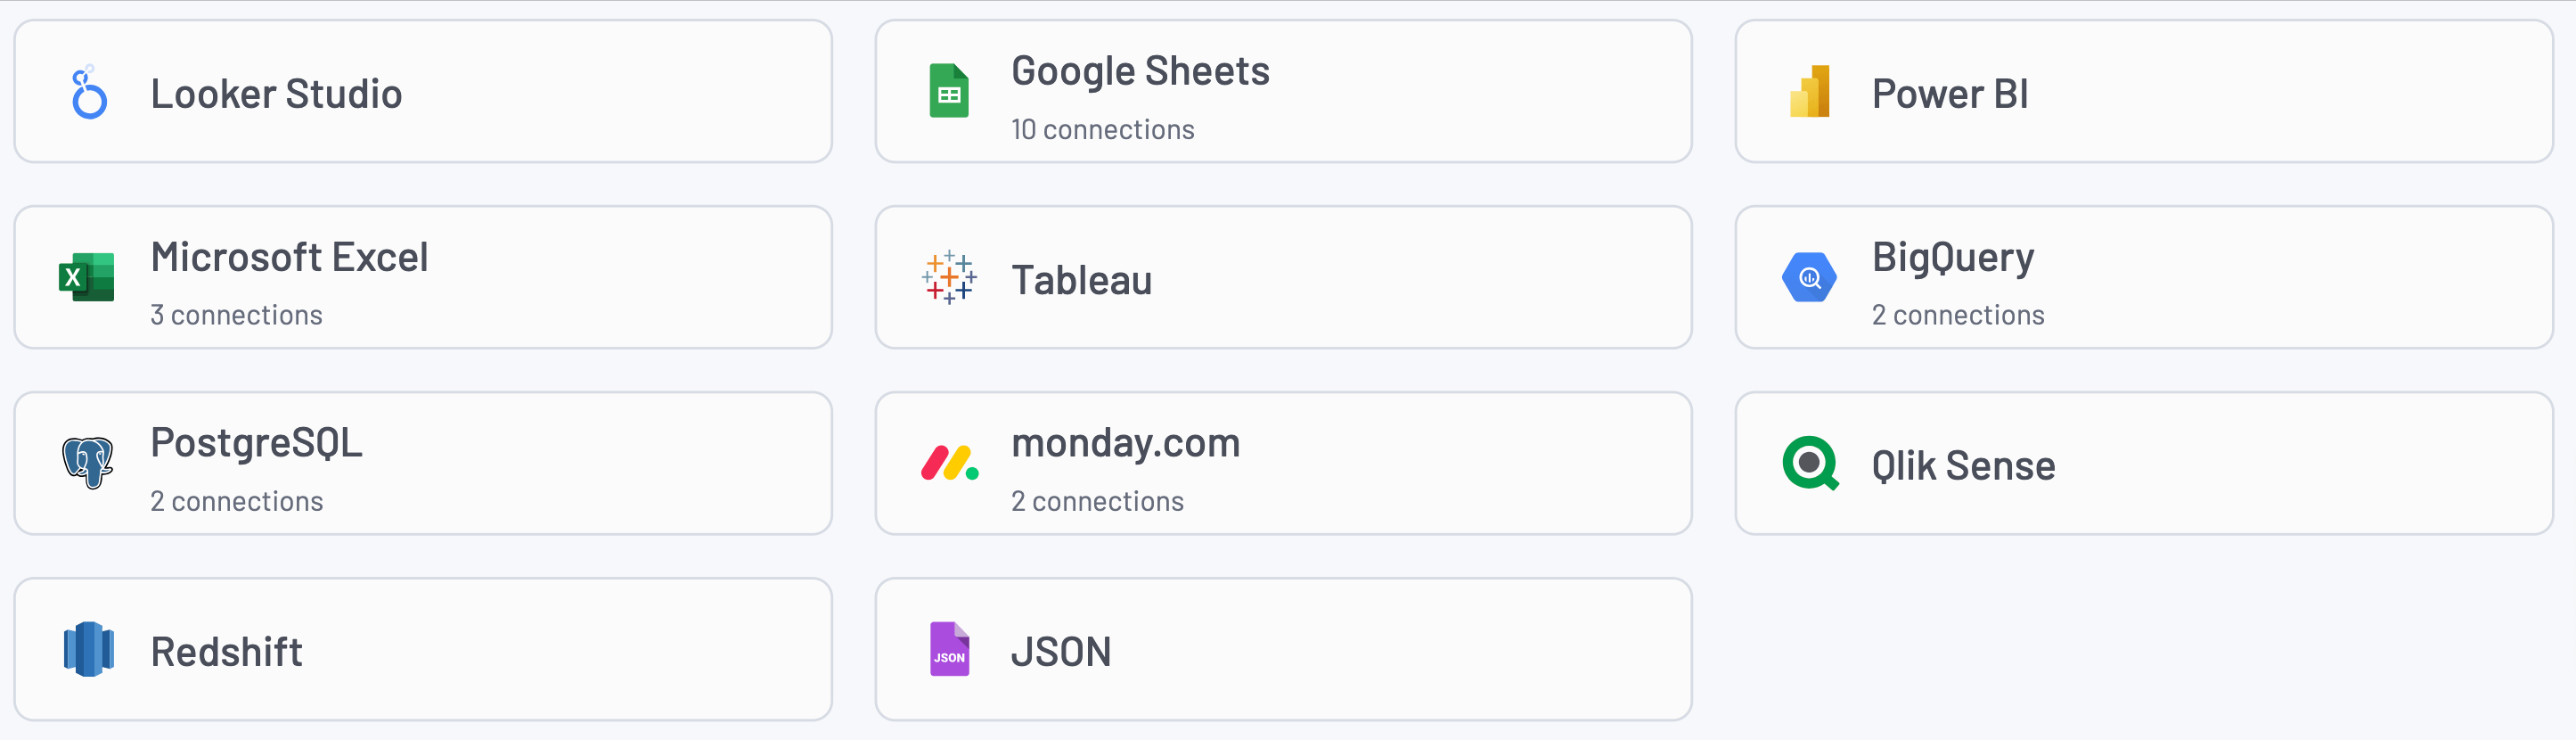
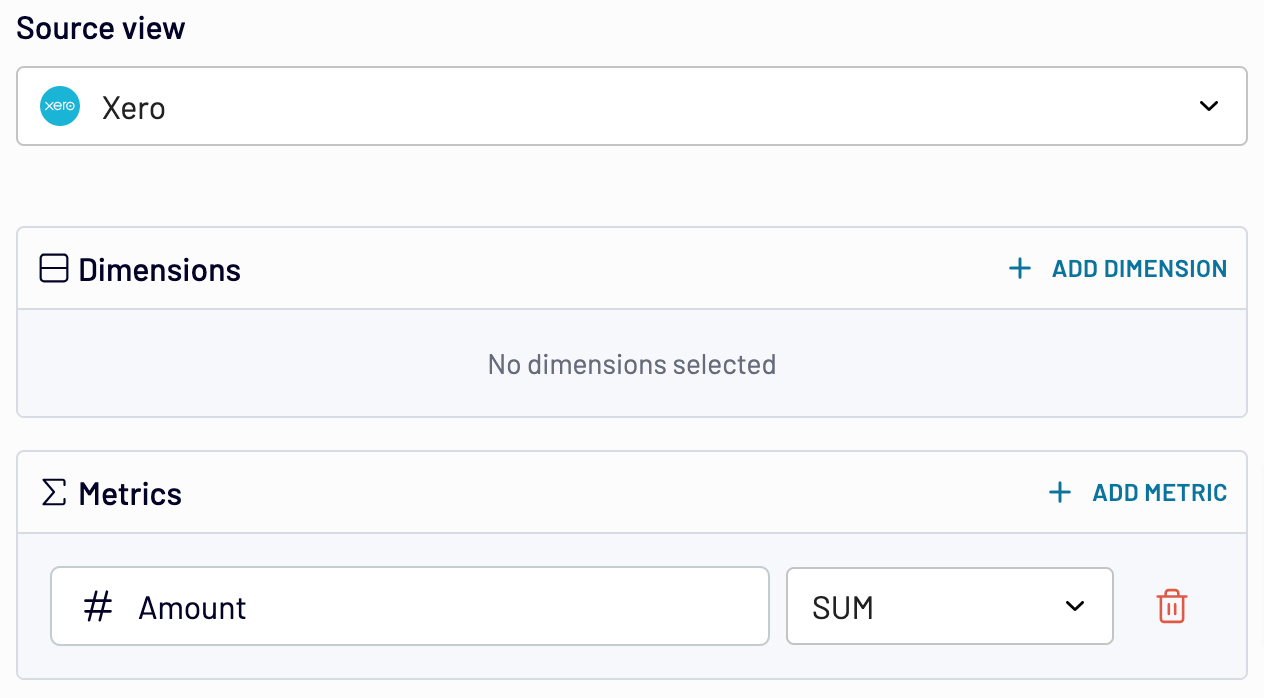
Get started with the form below. Choose the preferred destination for your Xero data from the dropdown list and click Proceed.
Note: In addition to raw data, you can export specific Xero reports by selecting the source labeled Xero Reports instead of just Xero.
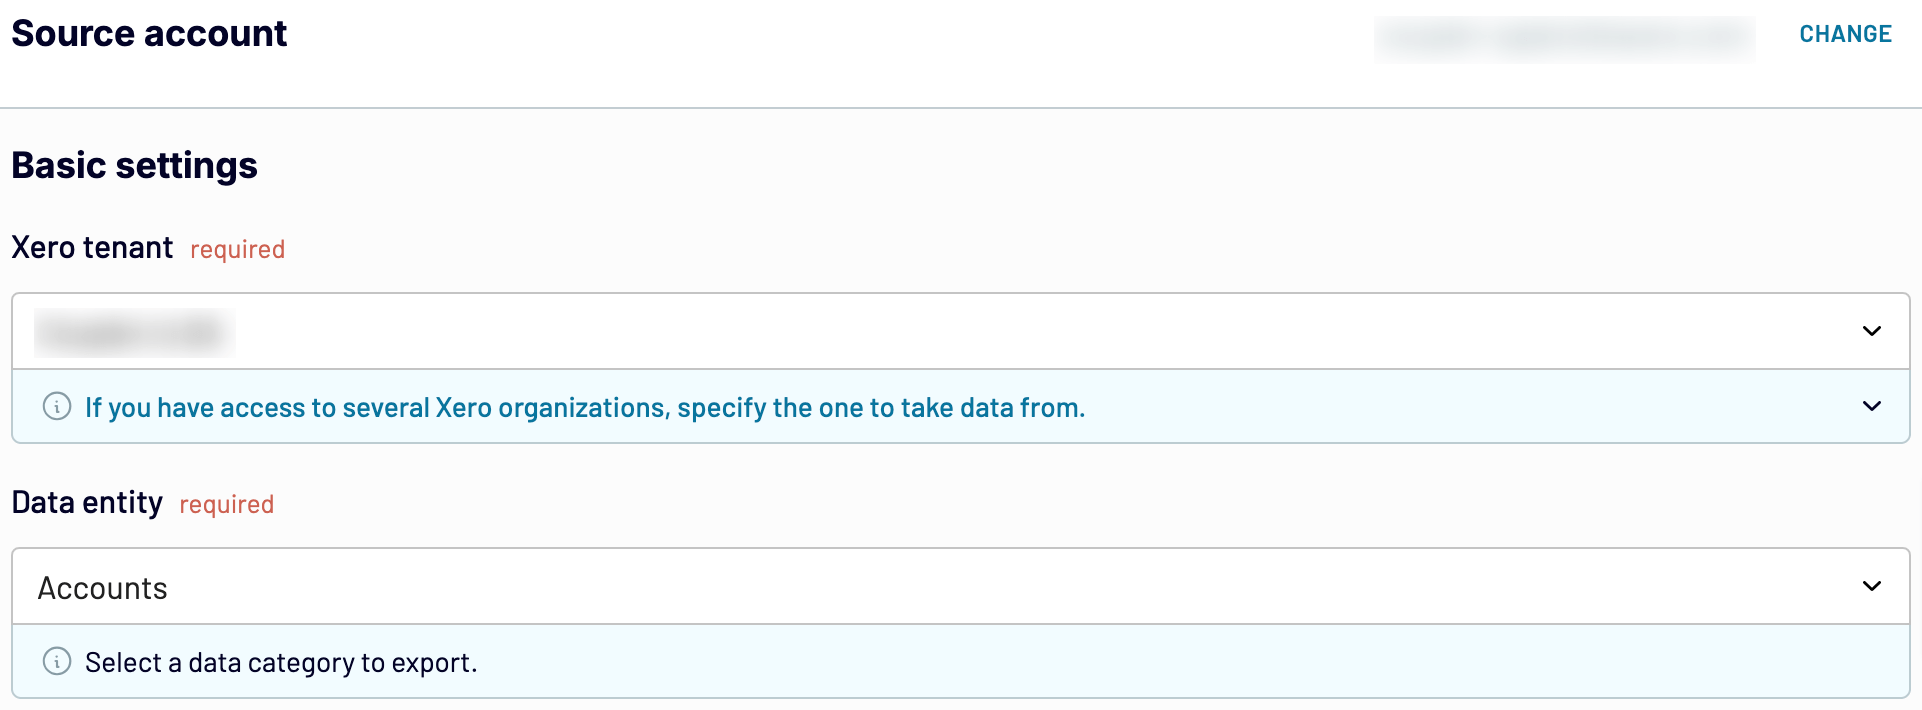
Now, sign up for Coupler.io at no cost. After that, authorize your Xero account and configure the source settings:
- Specify the Xero tenant from where you’d like to pull data.
- Pick the particular data entity you will export. Accounts are preselected by default, but you have 20+ other options, such as bank transactions, payments, purchase orders, and more.
Move forward, and if you need to fetch more than one data type, simply add Xero as an extra source and follow the same steps. A similar process applies when you need to load records from other kinds of sources, such as HubSpot. Once you’ve configured your source settings, proceed to the next step.
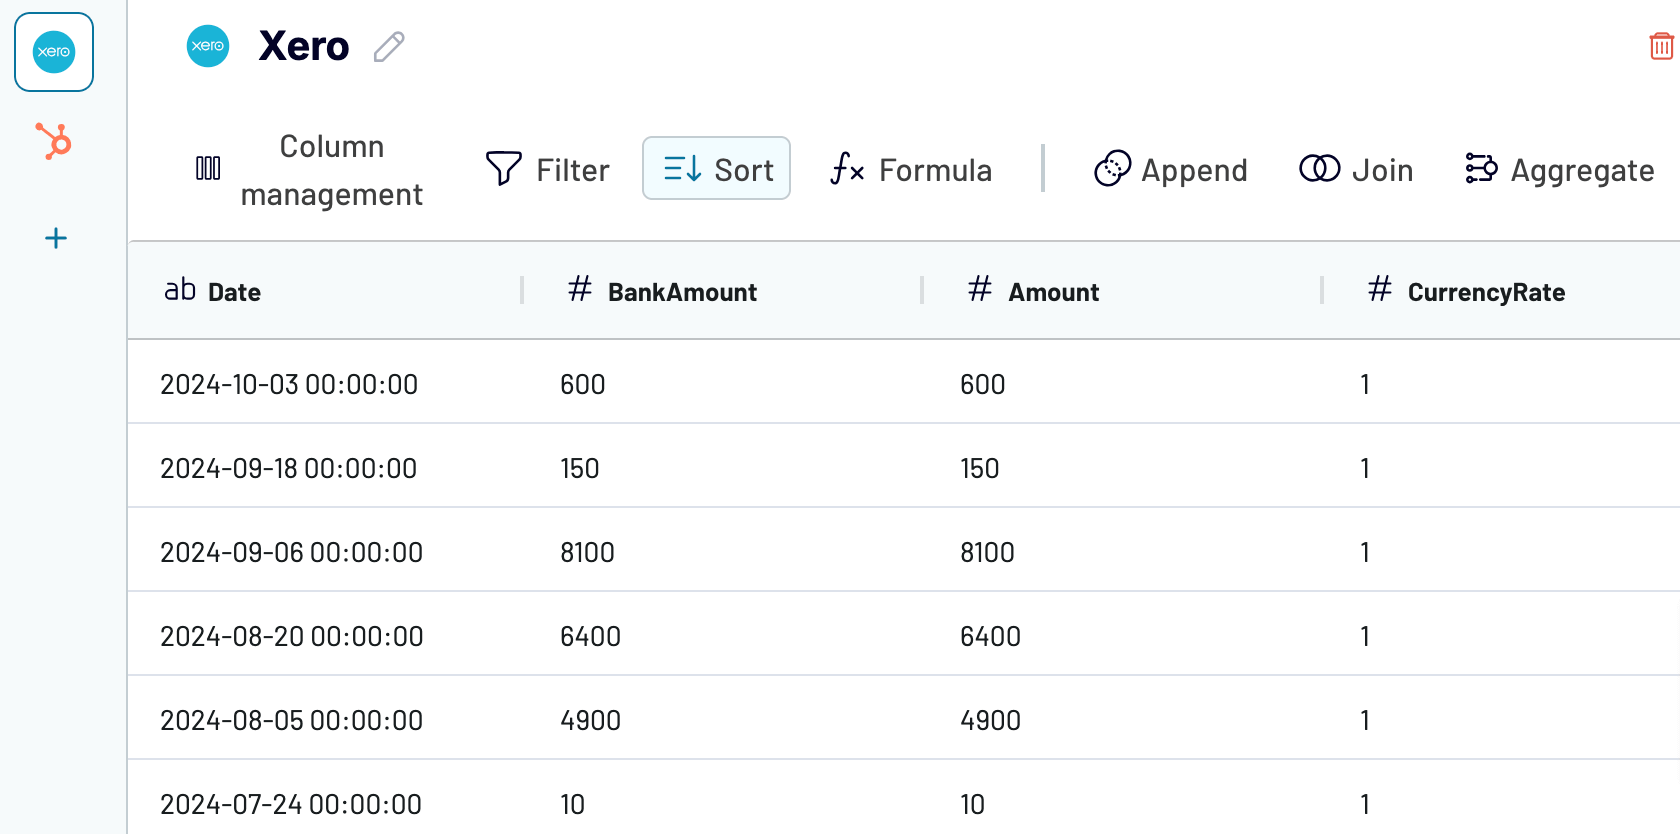
Step 2: Organize and transform data
Preview your data and transform it if necessary. Here’s what you can do:
- Rename, rearrange, hide, or add columns.
- Sort data in ascending or descending order.
- Create customizable columns with formulas.
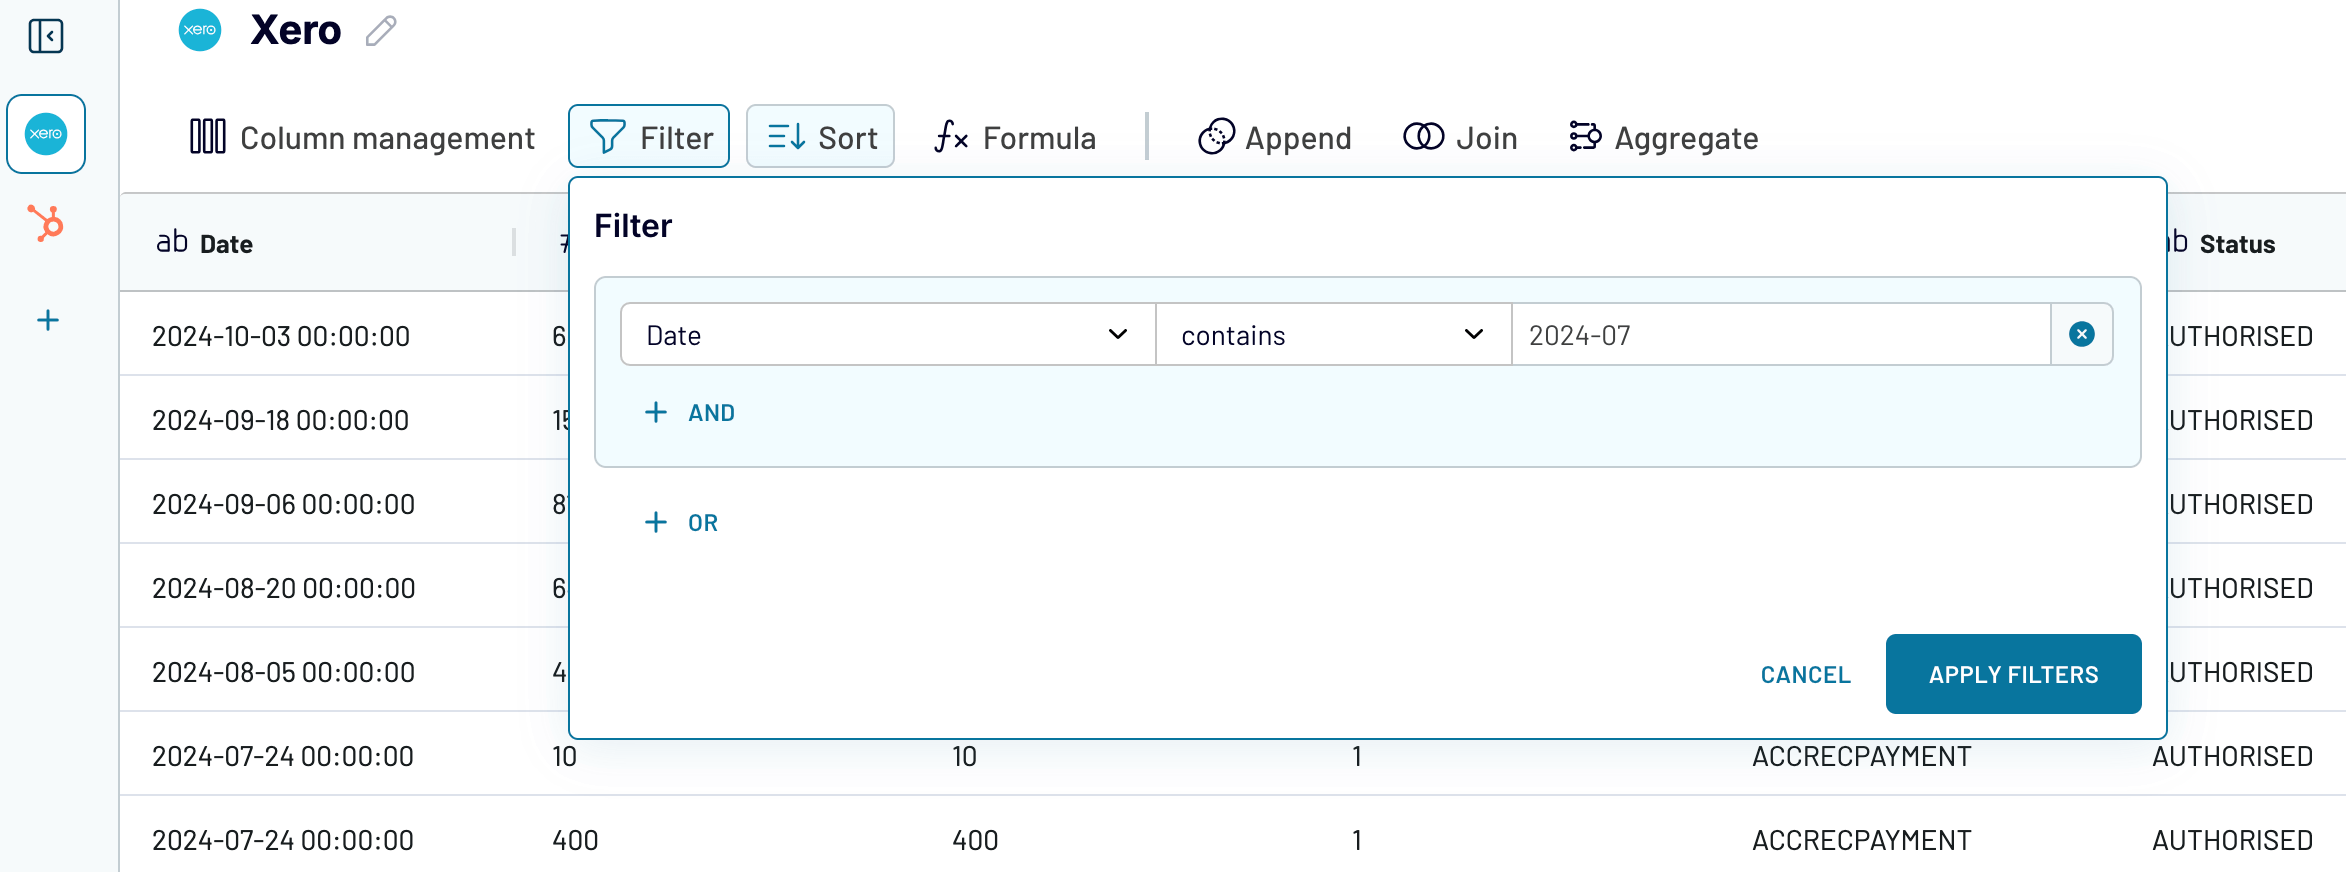
- Filter data to extract it based on required criteria. For instance, you can narrow your data to the specified month, as shown in the example below.
- Aggregate data using operations like sum, avg., count, min., or max. For instance, you can sum up the payment amounts just like in the example:
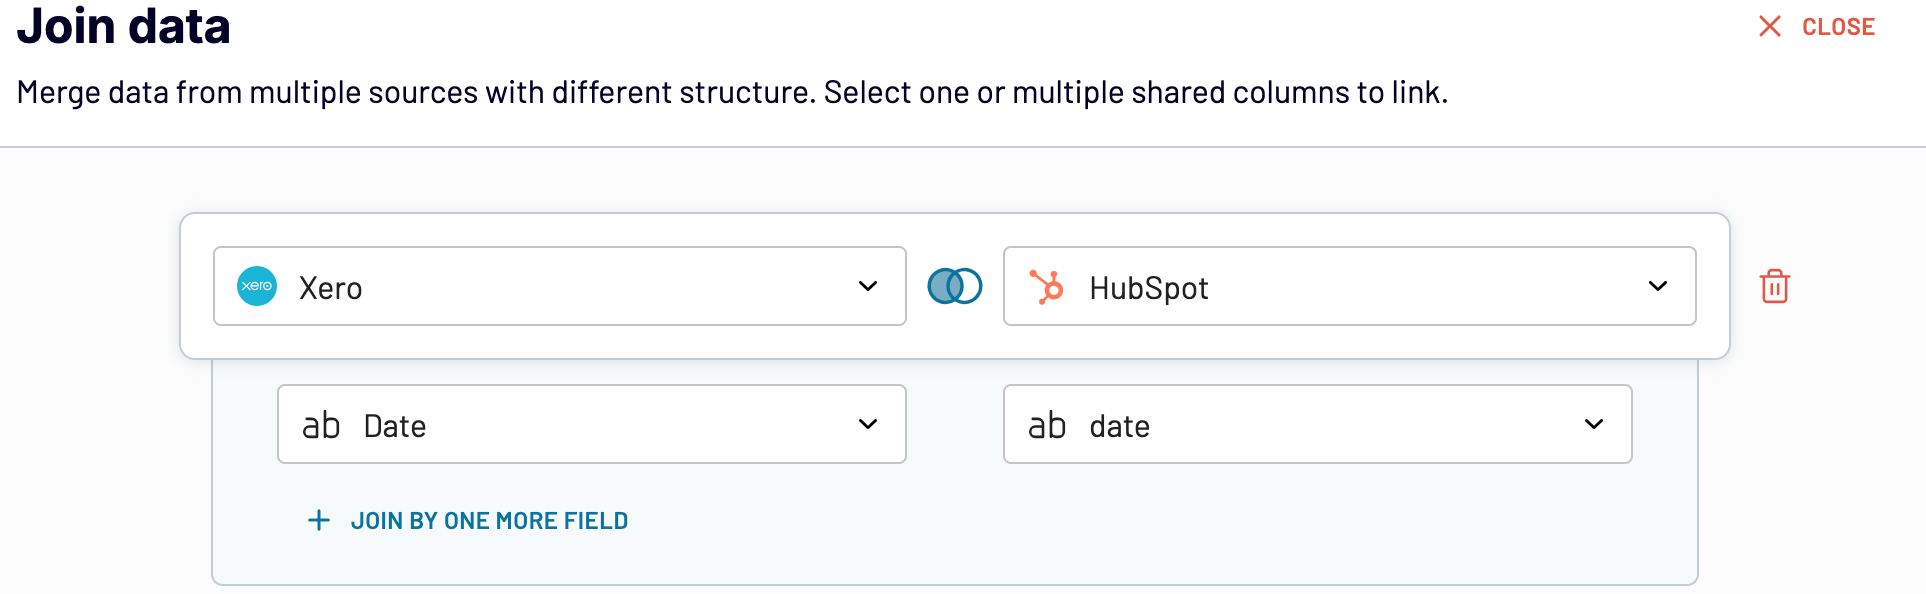
- If you’ve previously connected several sources, blend data in the chosen manner:
- Append – merge datasets with similar structures and columns matched by name.
- Join – combine datasets with different structures and at least one matched column.
Once the report is ready, proceed to the next step.
Step 3: Load data and schedule refresh
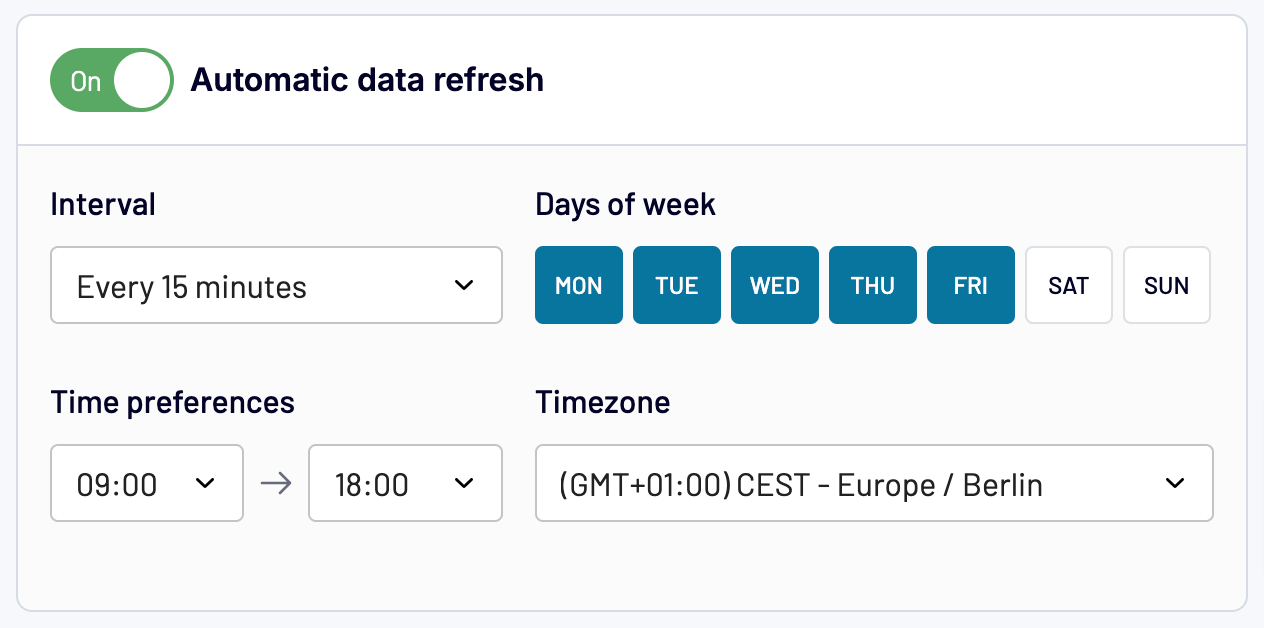
Connect the account of your destination app and select the file where you’ll upload your report. Next, turn on automatic data refresh. Specify the preferred interval, days of the week, hours, and time zone. By default, your report will be updated daily. So, if you need this done more frequently, choose from hourly to every 15 minutes, making it near real-time.
Save and run the data export – and that’s it.
Try Coupler.io for free to discover how it can benefit your unique case and let your Xero accounting reporting go fully automated!
Alternative option: Xero API integration
Another way to automate data flow is to build an integration tailored to your reporting needs. This requires writing a script to pull the necessary records from the Xero API. The script then sends these records to a database (such as MySQL or PostgreSQL), warehouse (like BigQuery), or spreadsheet (Google Sheets or Excel). Finally, you export the data into a BI tool using a built-in connector or continue working with it in the spreadsheet app. During this process, you can transform your data in the script or within the database, warehouse, or spreadsheets.
This method demands coding skills in Python, JavaScript, SQL, or other programming languages, as well as knowledge of databases. If you lack these skills, you’ll need assistance from data analysts or developers, who may not always be readily available. Additionally, custom Xero integrations involve occasional maintenance to keep up with platform API updates. To avoid these pitfalls, you’d best automate reporting using Coupler.io.
Self-updating Xero data backups
Suppose you need to back up your Xero records to create a recoverable copy in case of a primary data failure. In such a scenario, you would typically need to build a custom API integration with scheduled automation. You already know that this process is technically demanding, as it requires programming skills and database knowledge or reliance on those with the appropriate expertise.
Instead, use Coupler.io to automatically load data from Xero directly into spreadsheets, databases, or warehouses and have them self-update on your chosen schedule.
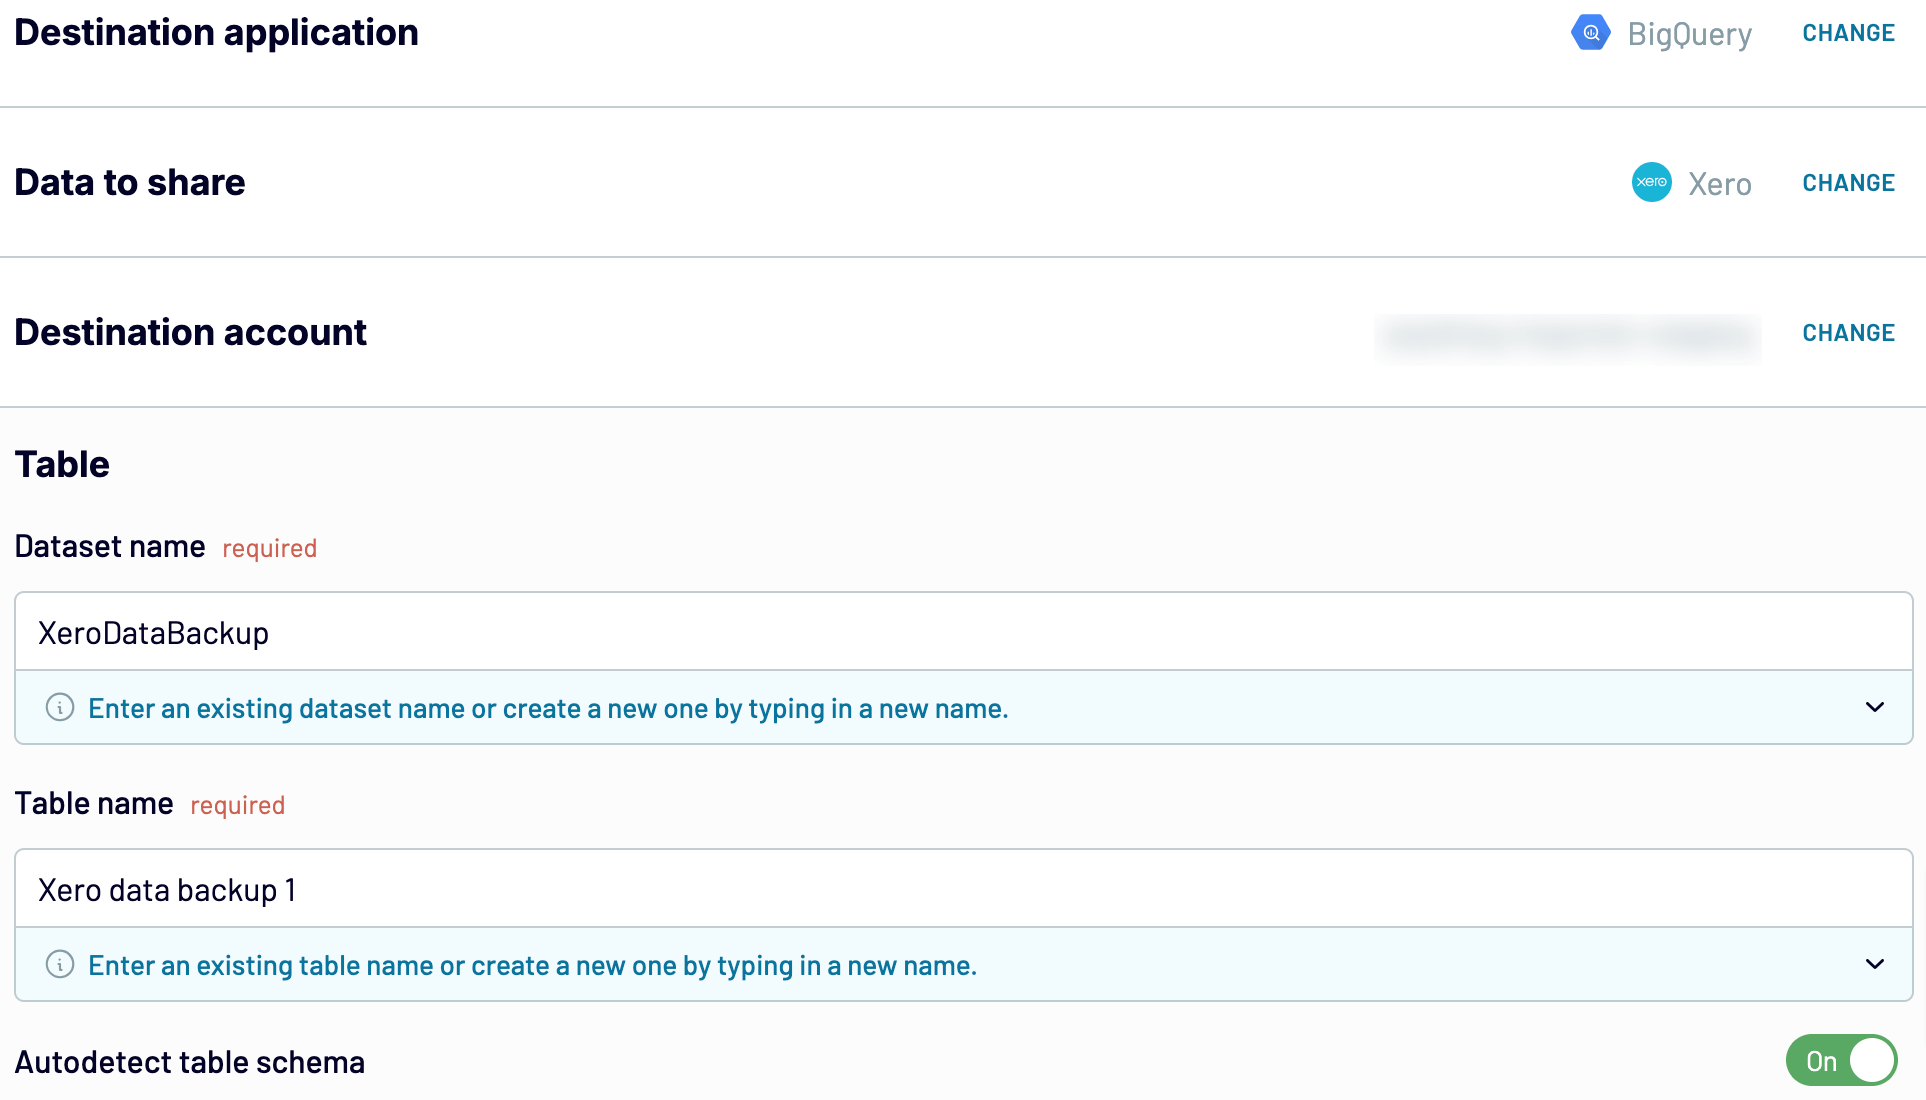
Suppose you need to back up your data to BigQuery. In that case, connect your BigQuery account, extract the necessary data entity, and proceed to specify the dataset and table where your Xero records will be stored.
Next, set up a refresh schedule and run the data flow. For more details, refer to our dedicated guide on automatic Xero backup.
Note that you can also back up your Xero records to other tools, such as data warehouses like PostgreSQL and Redshift, or spreadsheet apps like Google Sheets and Excel.
A data flow exports a single data entity. To back up all your data entities, set up a separate flow for each. To do this, once the export for your first entity is completed, go to the data flows tab on the left sidebar.
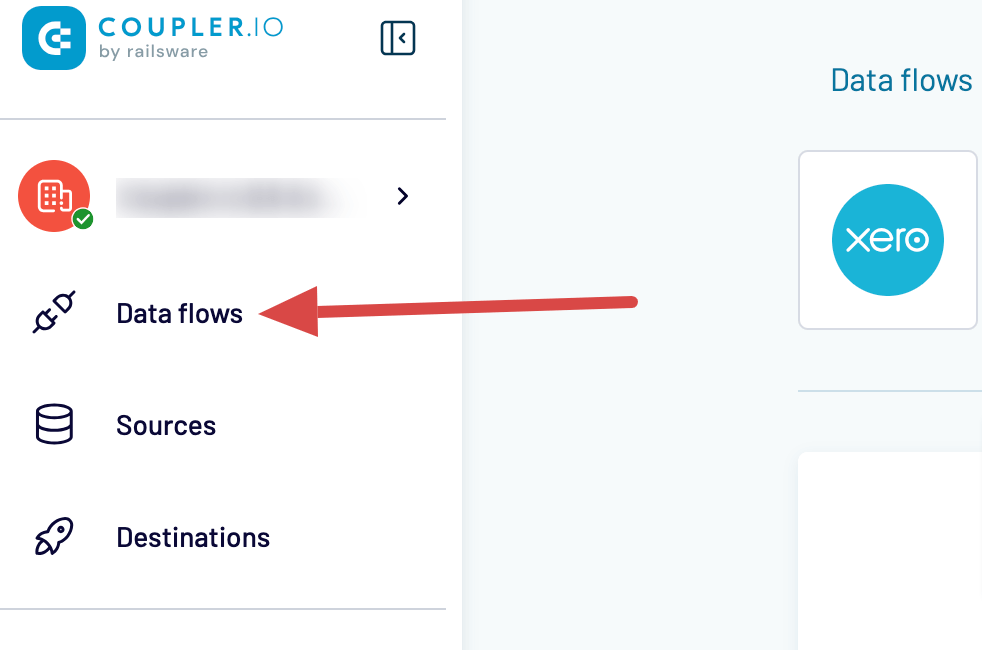
Next, create and set up data flows for the remaining Xero entities.
Automate Xero data backup with Coupler.io
Secure data for freeVisualizing Xero data with dashboards
As you know, to report on your Xero data, you need to collect it and make the necessary transformations to prepare it for analysis. But what if I told you that you can save time and effort with prebuilt reports? Coupler.io offers a gallery of free Xero report templates for you to use. Each has a built-in Coupler.io connector, ensuring the data is automatically loaded into the dashboard and visualized. Let’s take a look at some of the templates.
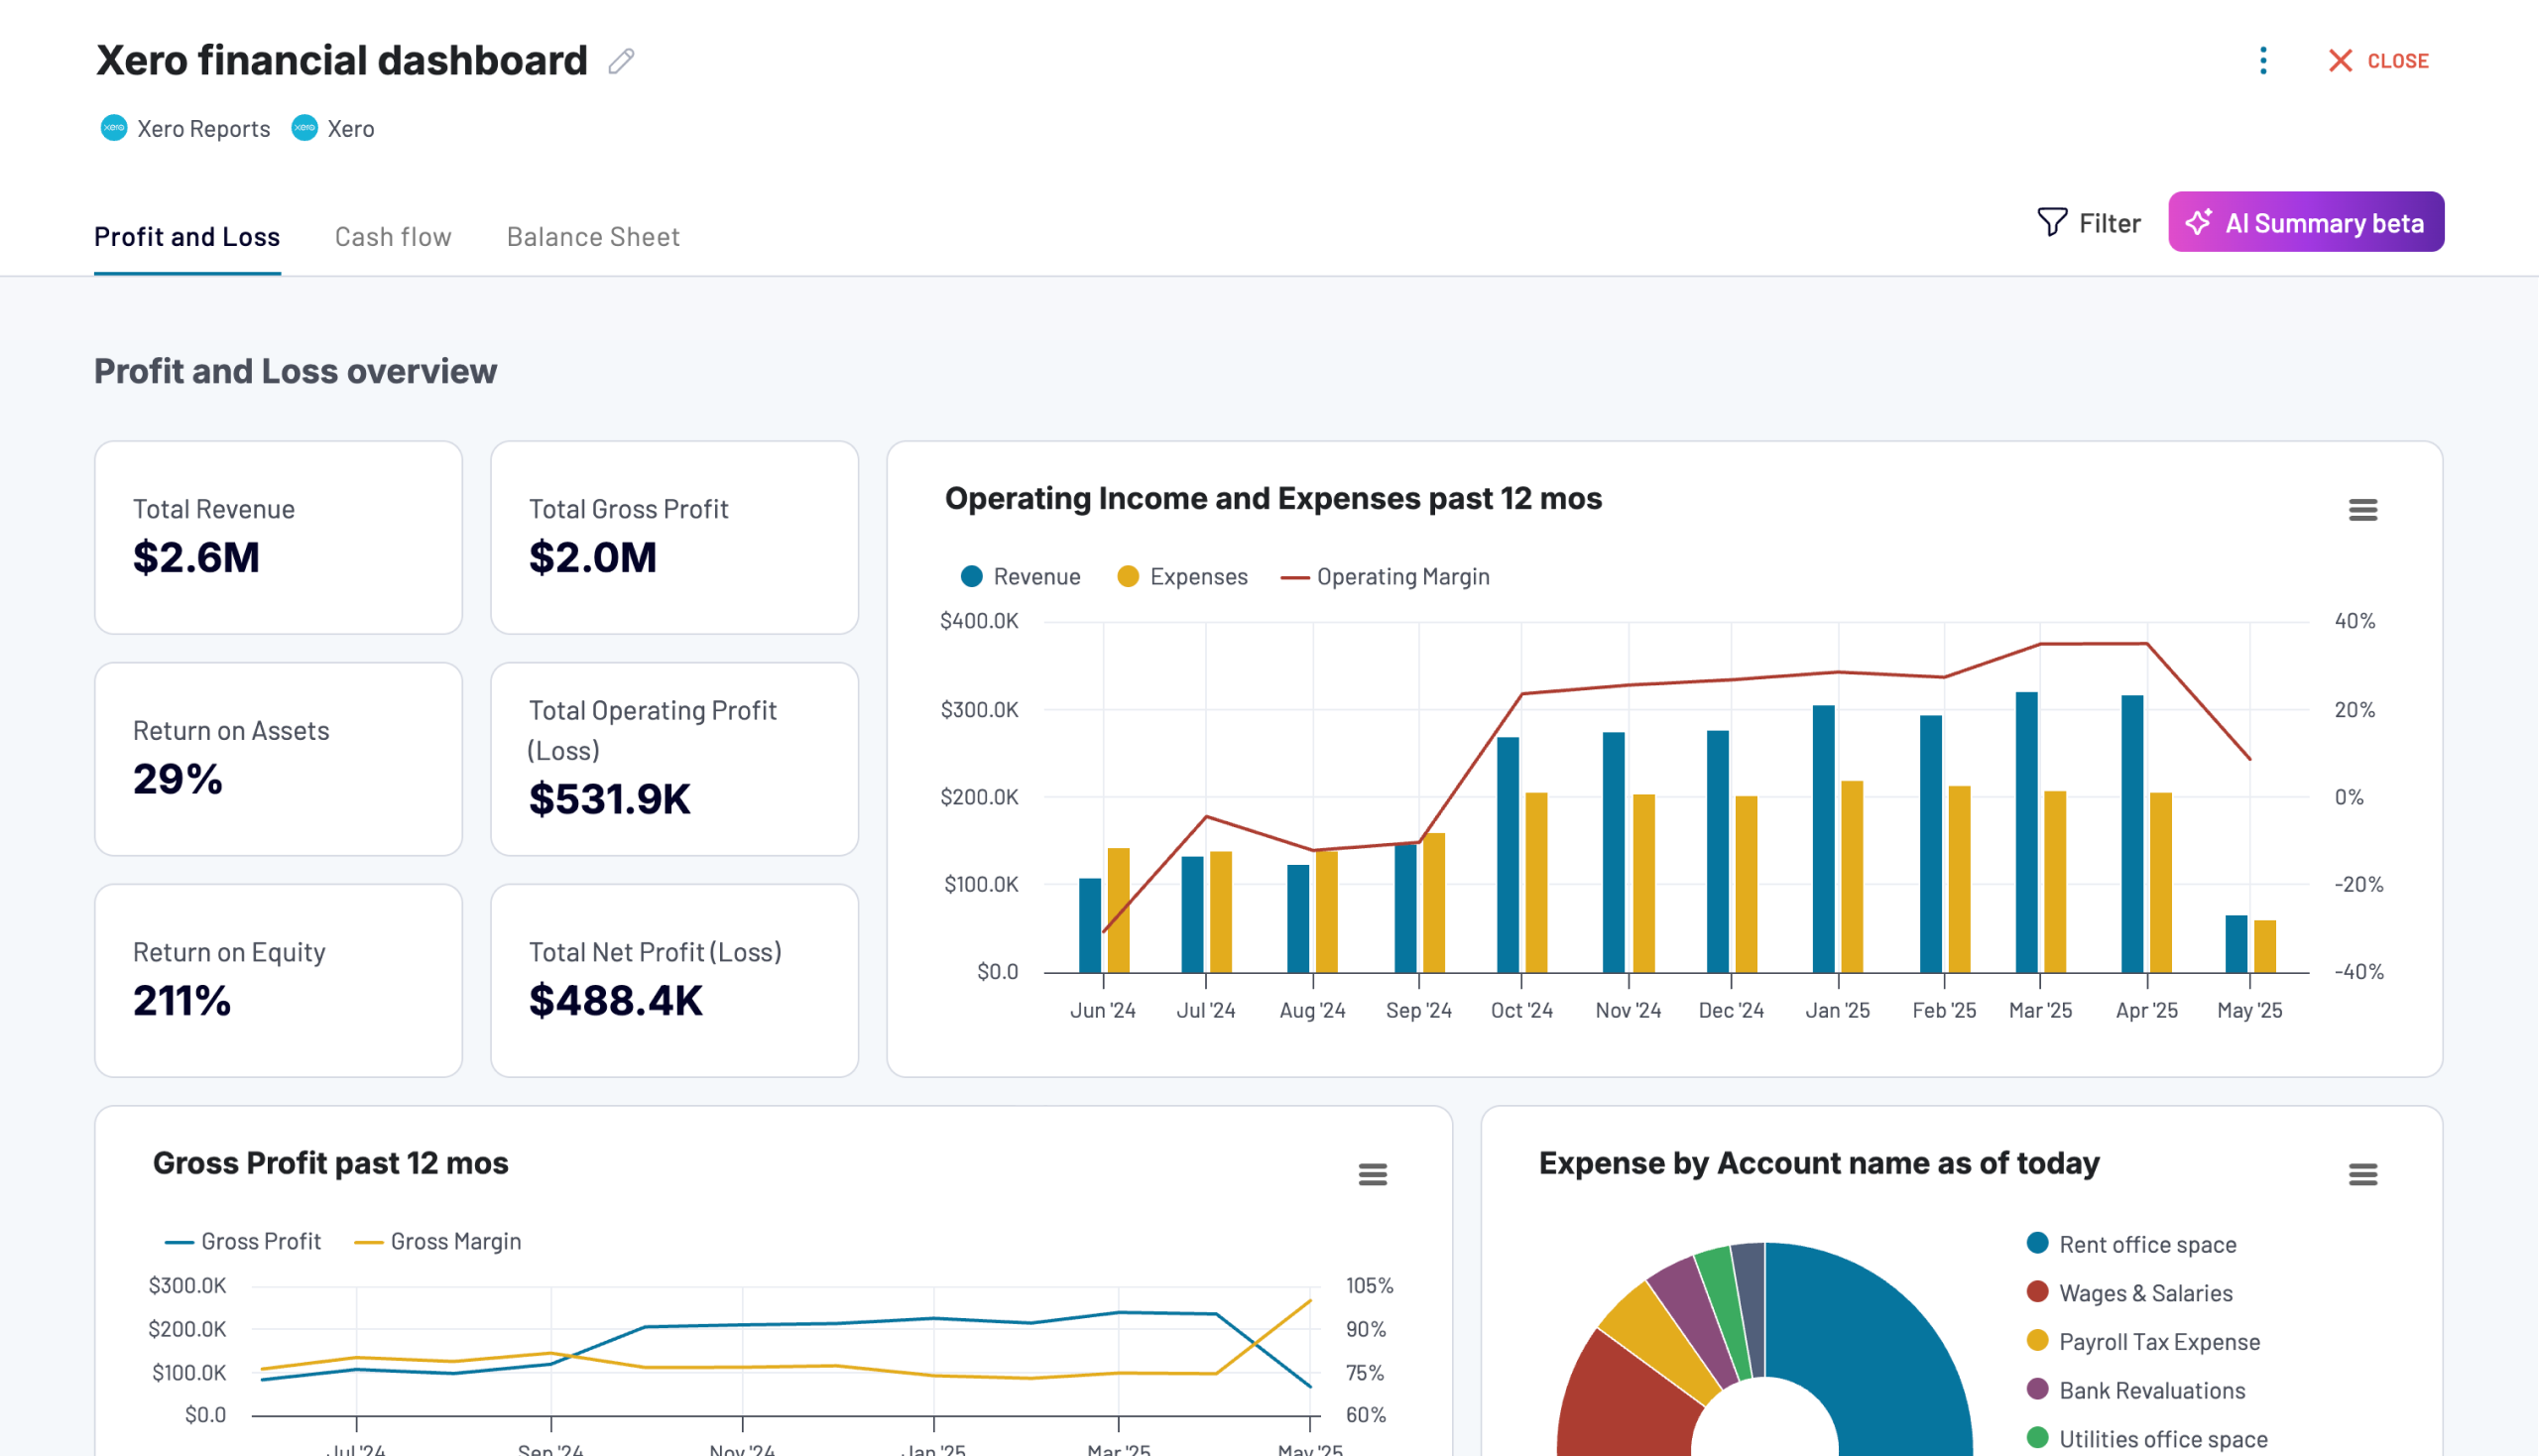
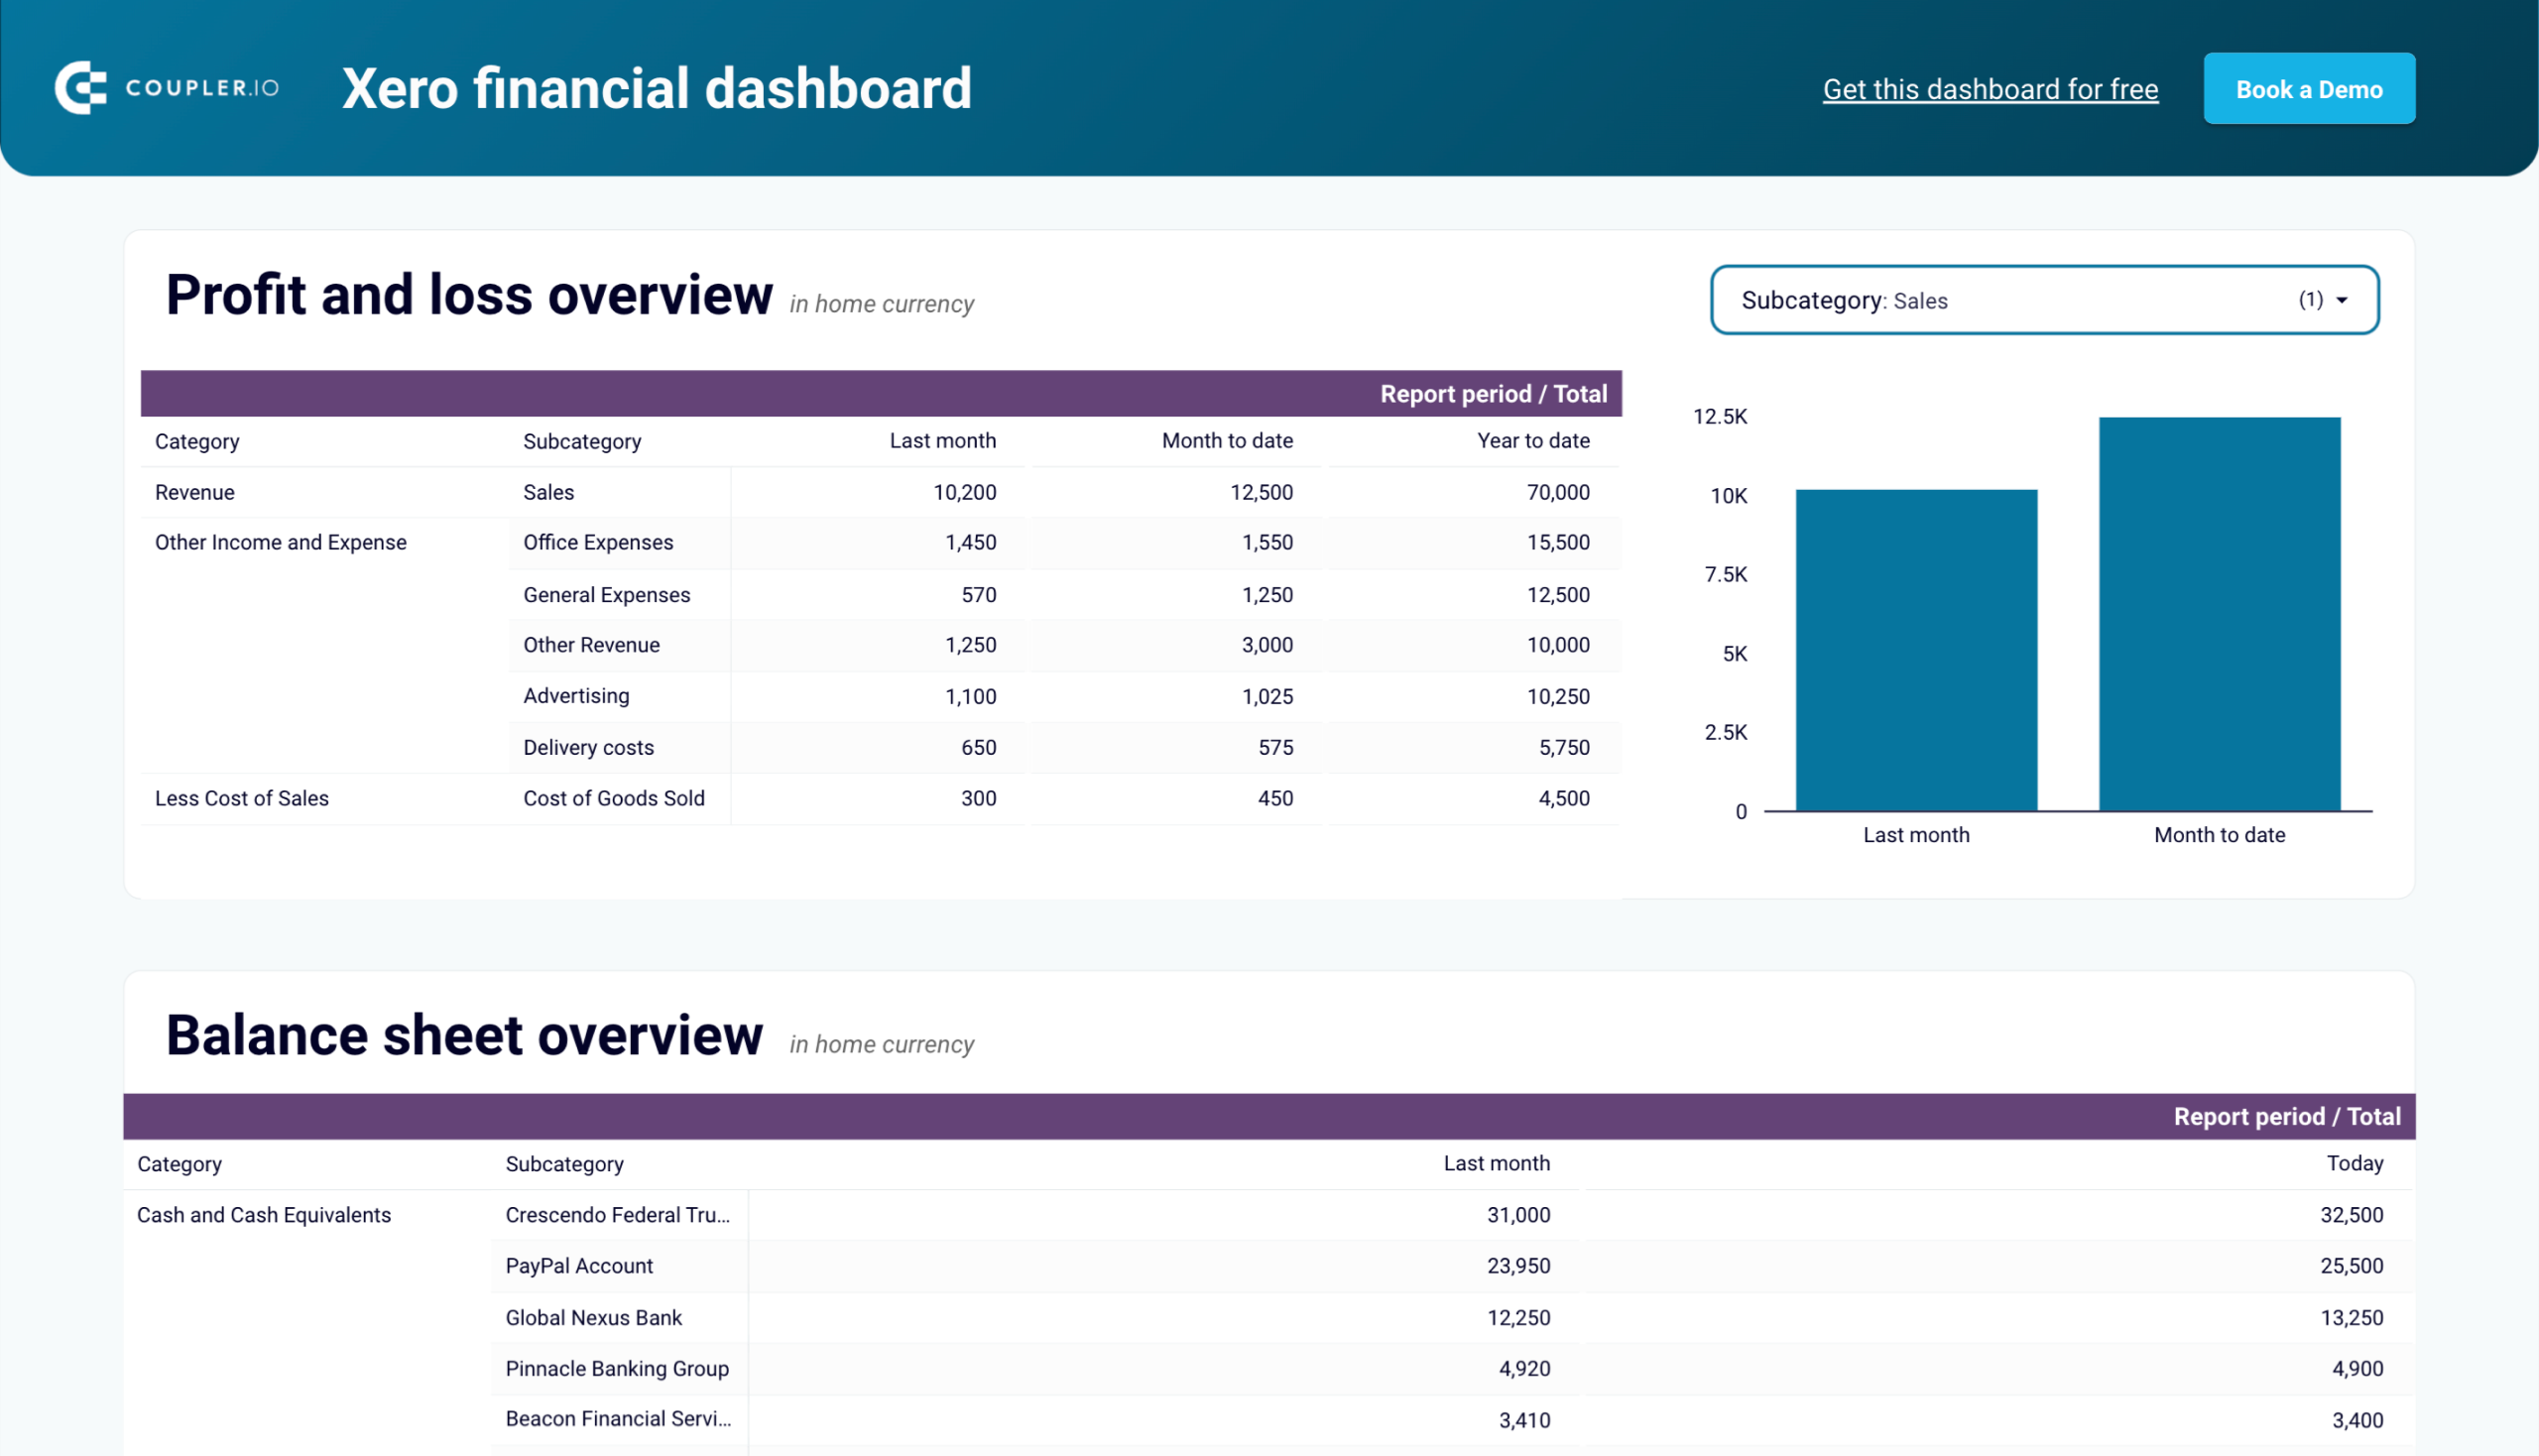
Financial dashboard
The financial dashboard lets you track the company’s earnings, cash flow, and balance sheet changes. It’s perfect for understanding your financial health without diving into detailed spreadsheets or reports.
Use this dashboard to gain the following insights:
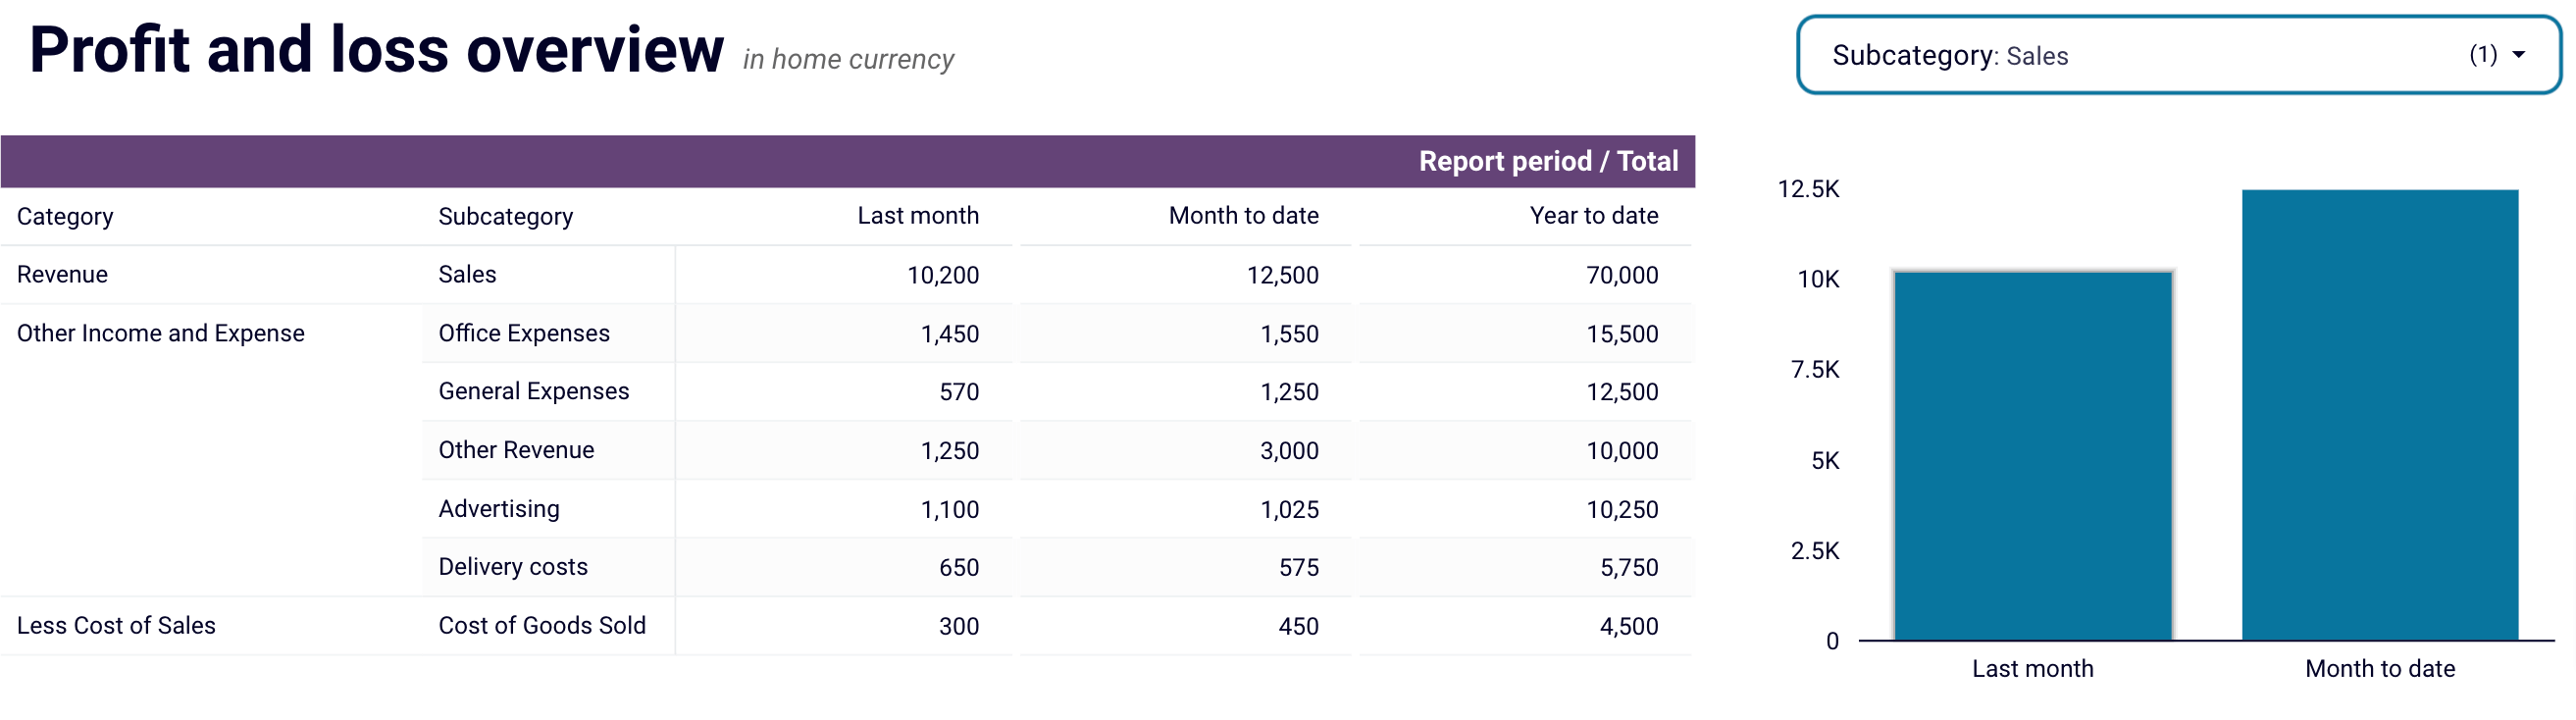
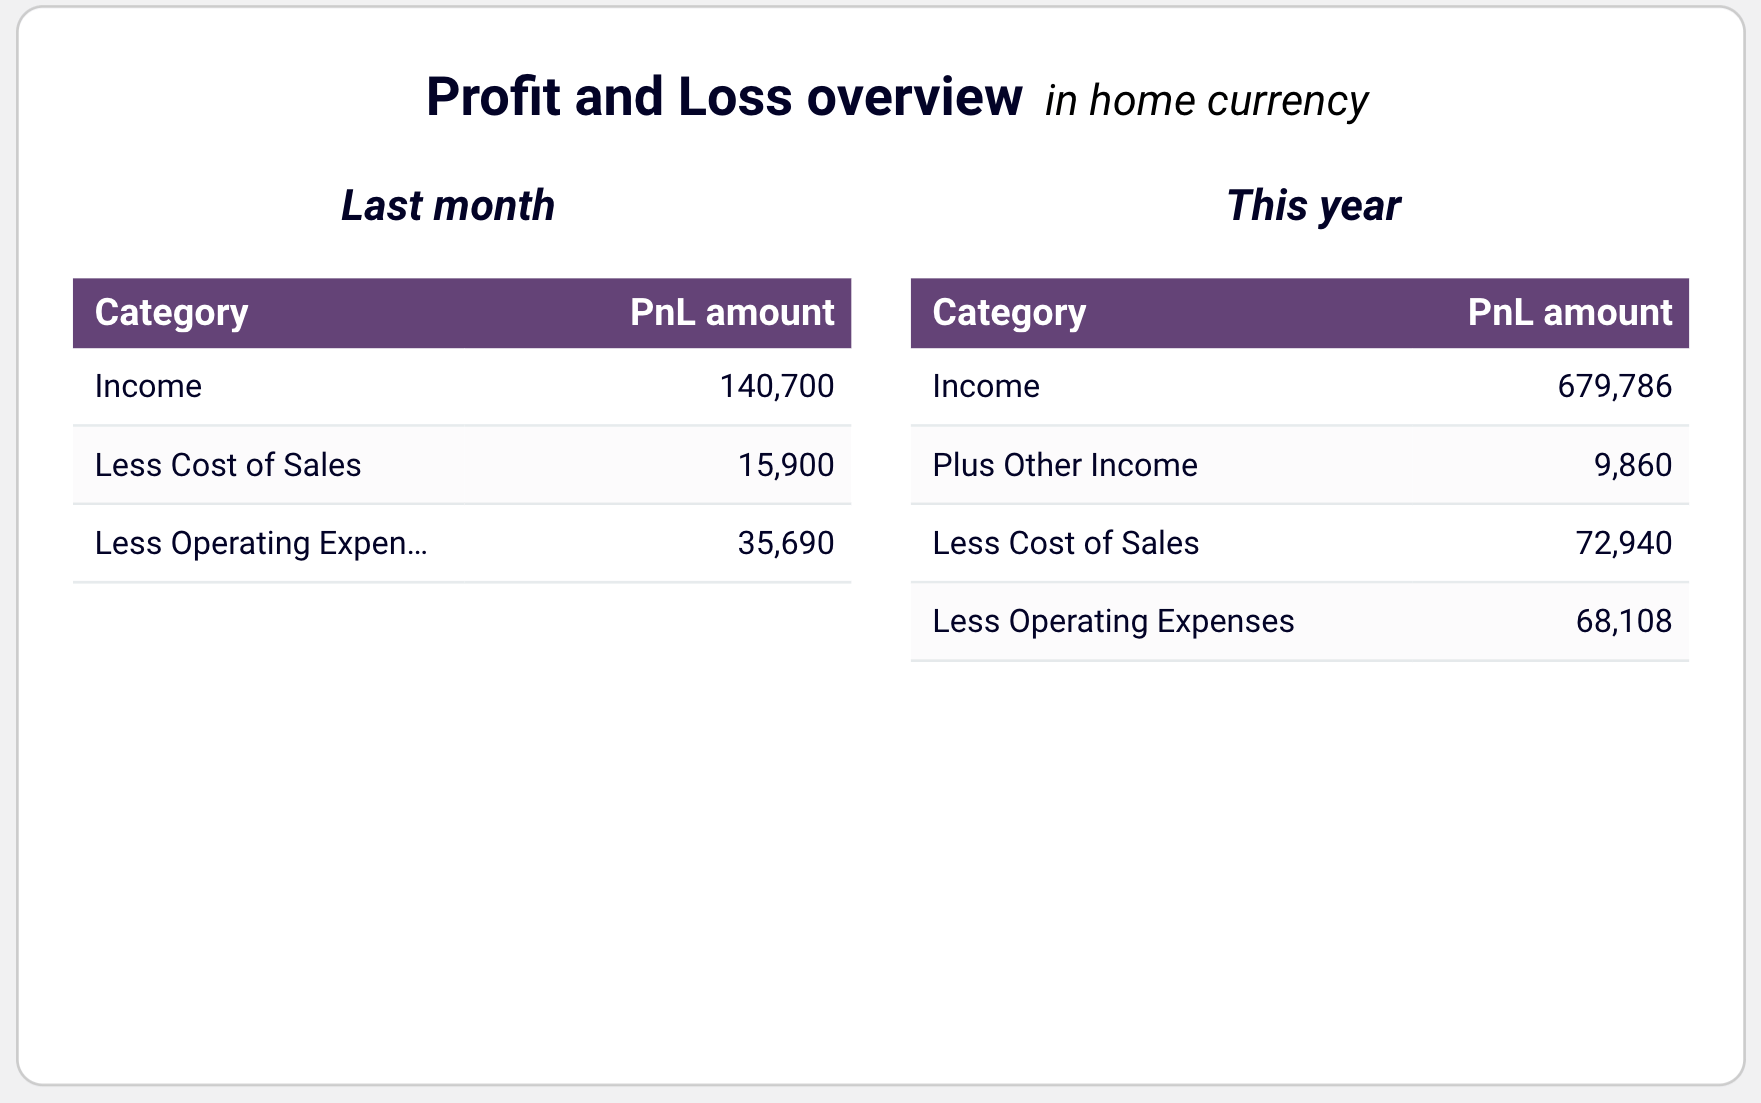
- Profit and loss overview: Get a summary of the company’s revenue and expenses for the last month, month-to-date, and year-to-date to monitor profitability and control your costs.
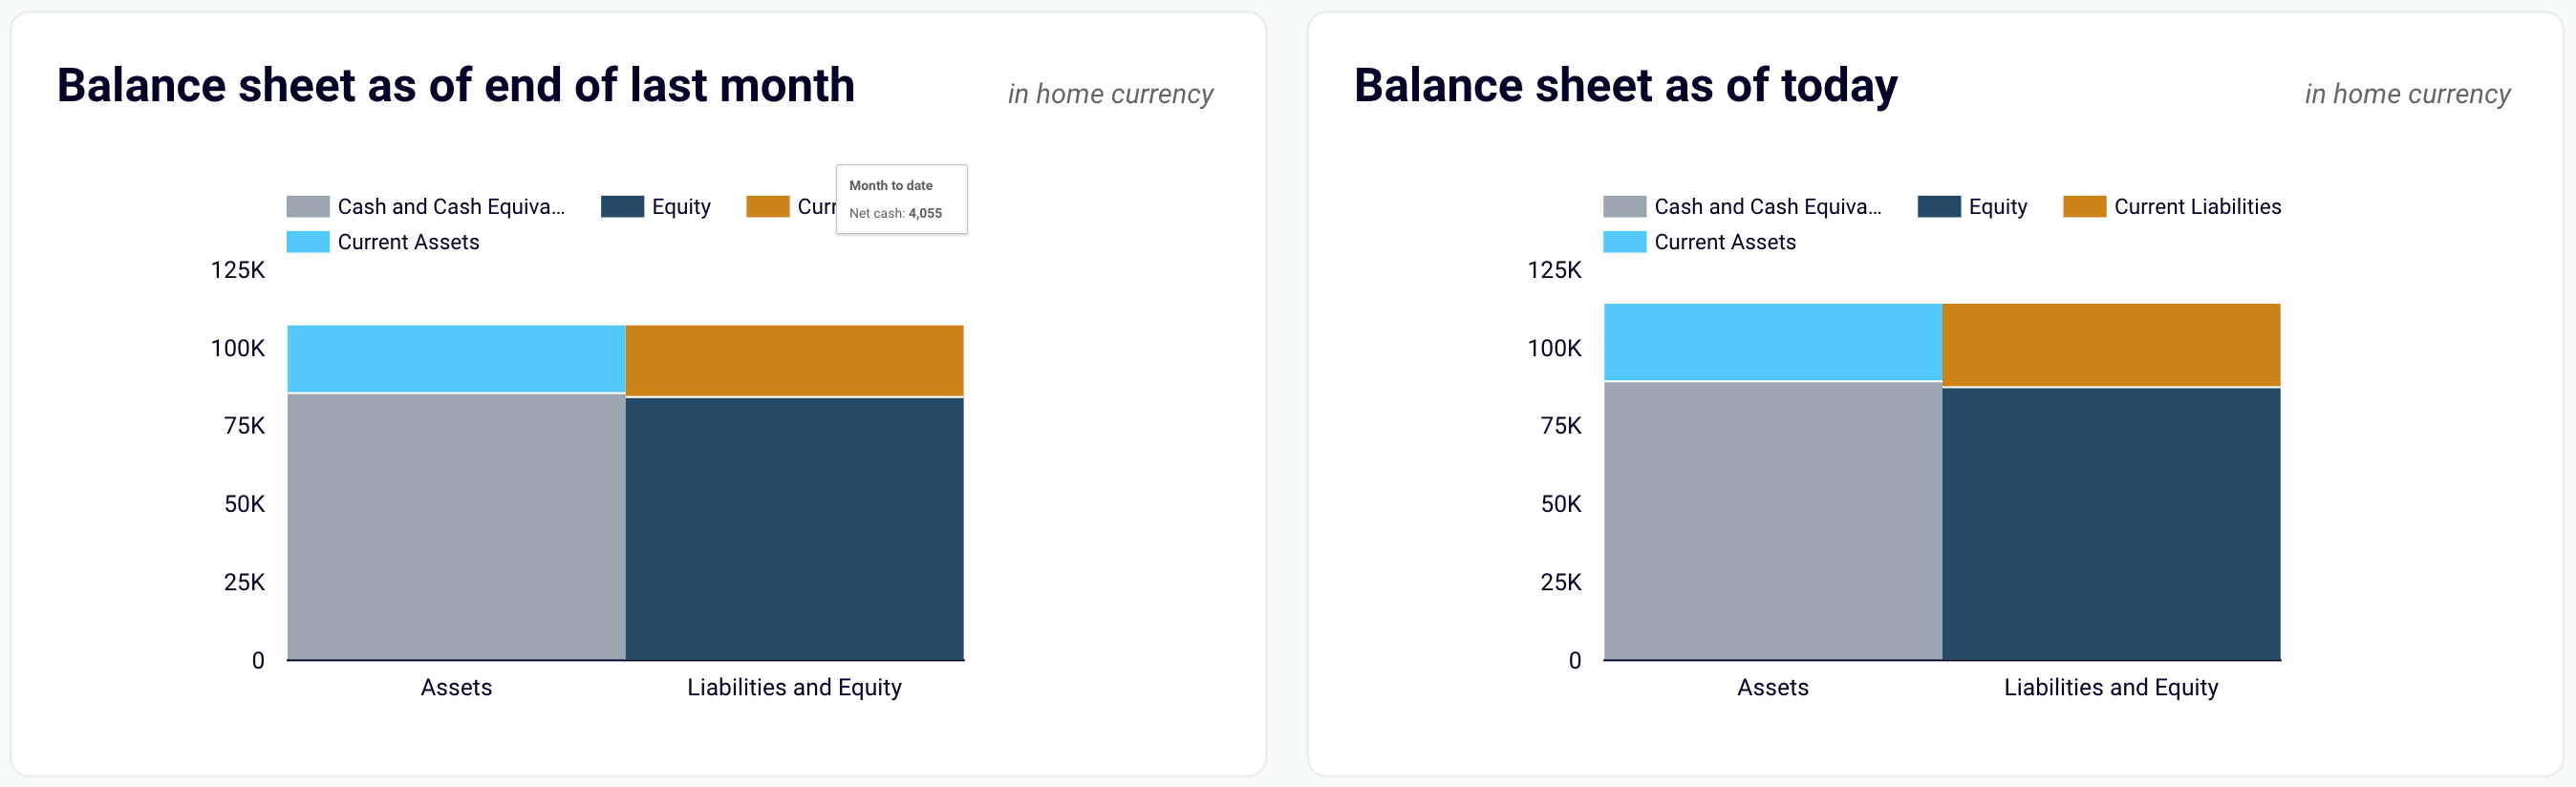
- Balance sheet overview: Take a snapshot of your assets, liabilities, and equity to understand your company’s financial position, liquidity, and business health. Place your balance sheet assets alongside liabilities and equity for the last and current month.
- Cash flow overview: Look at net cash changes over the reporting period to ensure effective liquidity management. Discover the cash position at the end of the period and the changes in net cash to check your financial stability.

The dashboard is available natively in Coupler.io and as a template in Looker Studio and Google Sheets with a built-in Xero connector. To set up this dashboard, go to the template’s Readme tab and follow the instructions.
Xero financial dashboard
Get comprehensive financial insights from your Xero account with key performance metrics, balance sheet analysis, and cash flow projections. Quickly assess your business health and make informed financial decisions.


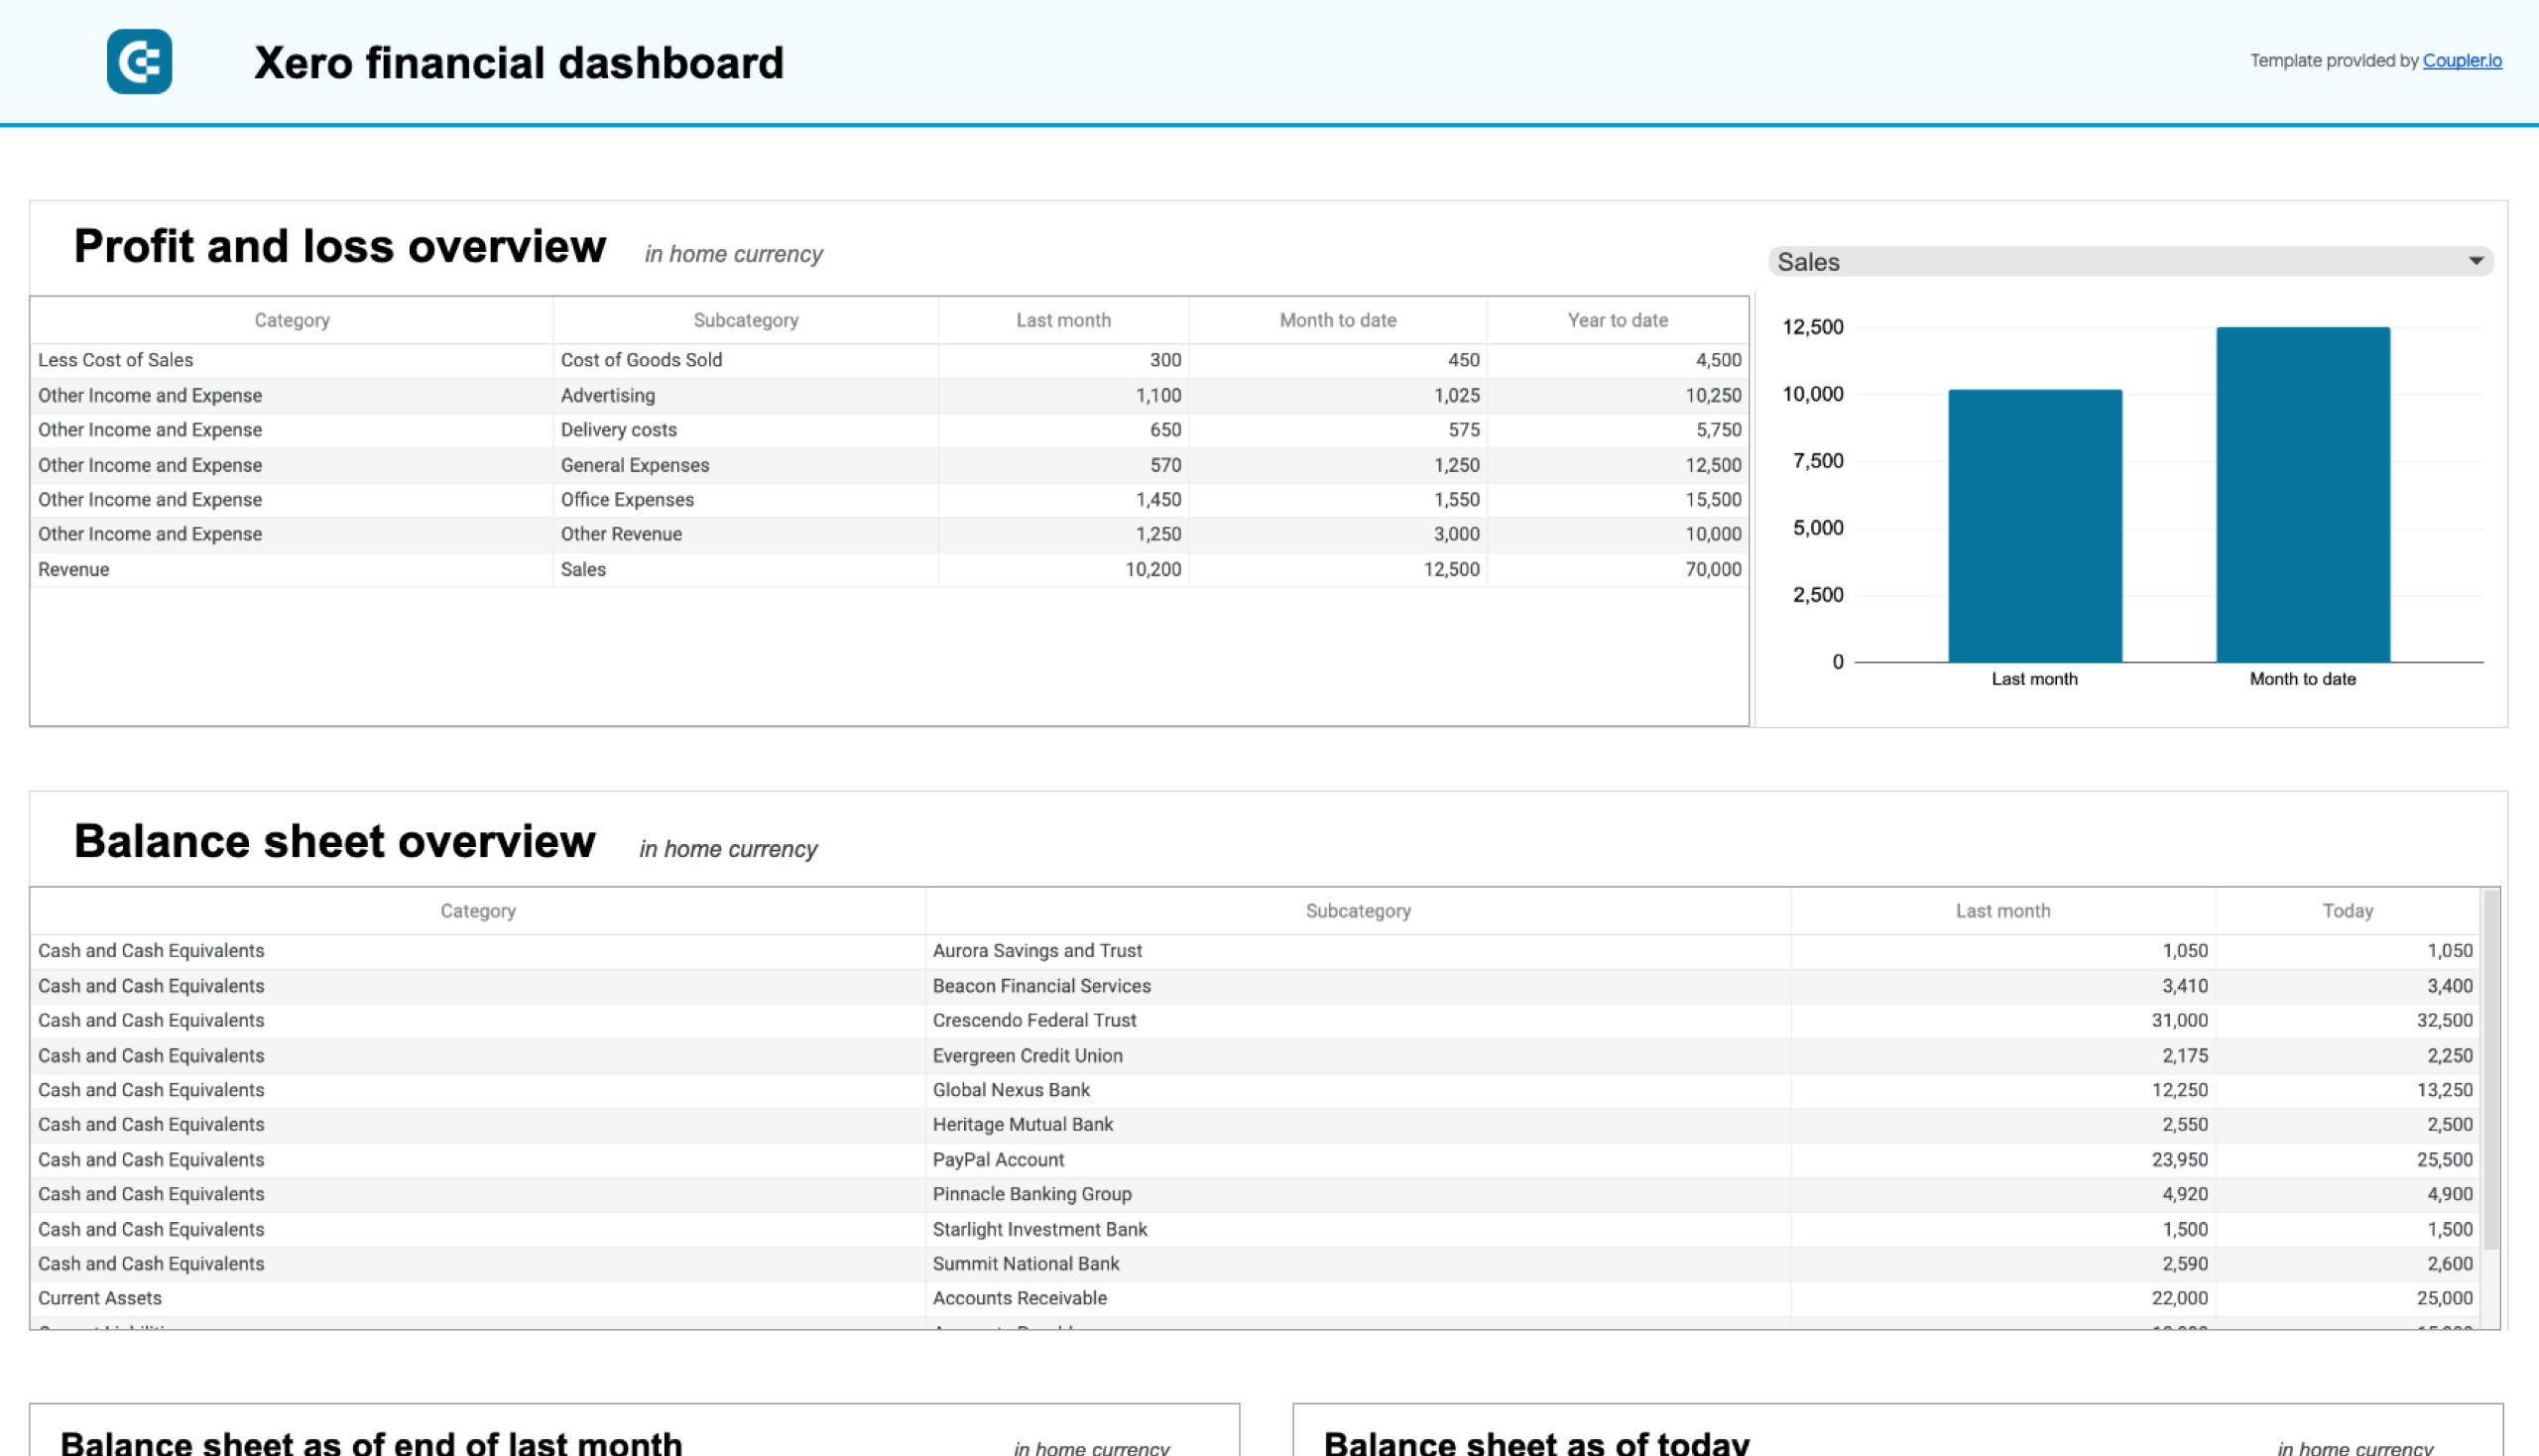
Xero financial dashboard in Looker Studio
Analyze your financial performance with a unified dashboard featuring key reports from Xero like cash flow, profit and loss, balance sheet, and others.

Xero financial dashboard in Google Sheets
Get instant visibility into your company’s financial health through key performance reports from Xero such as cash flow, income statement, and balance sheet.

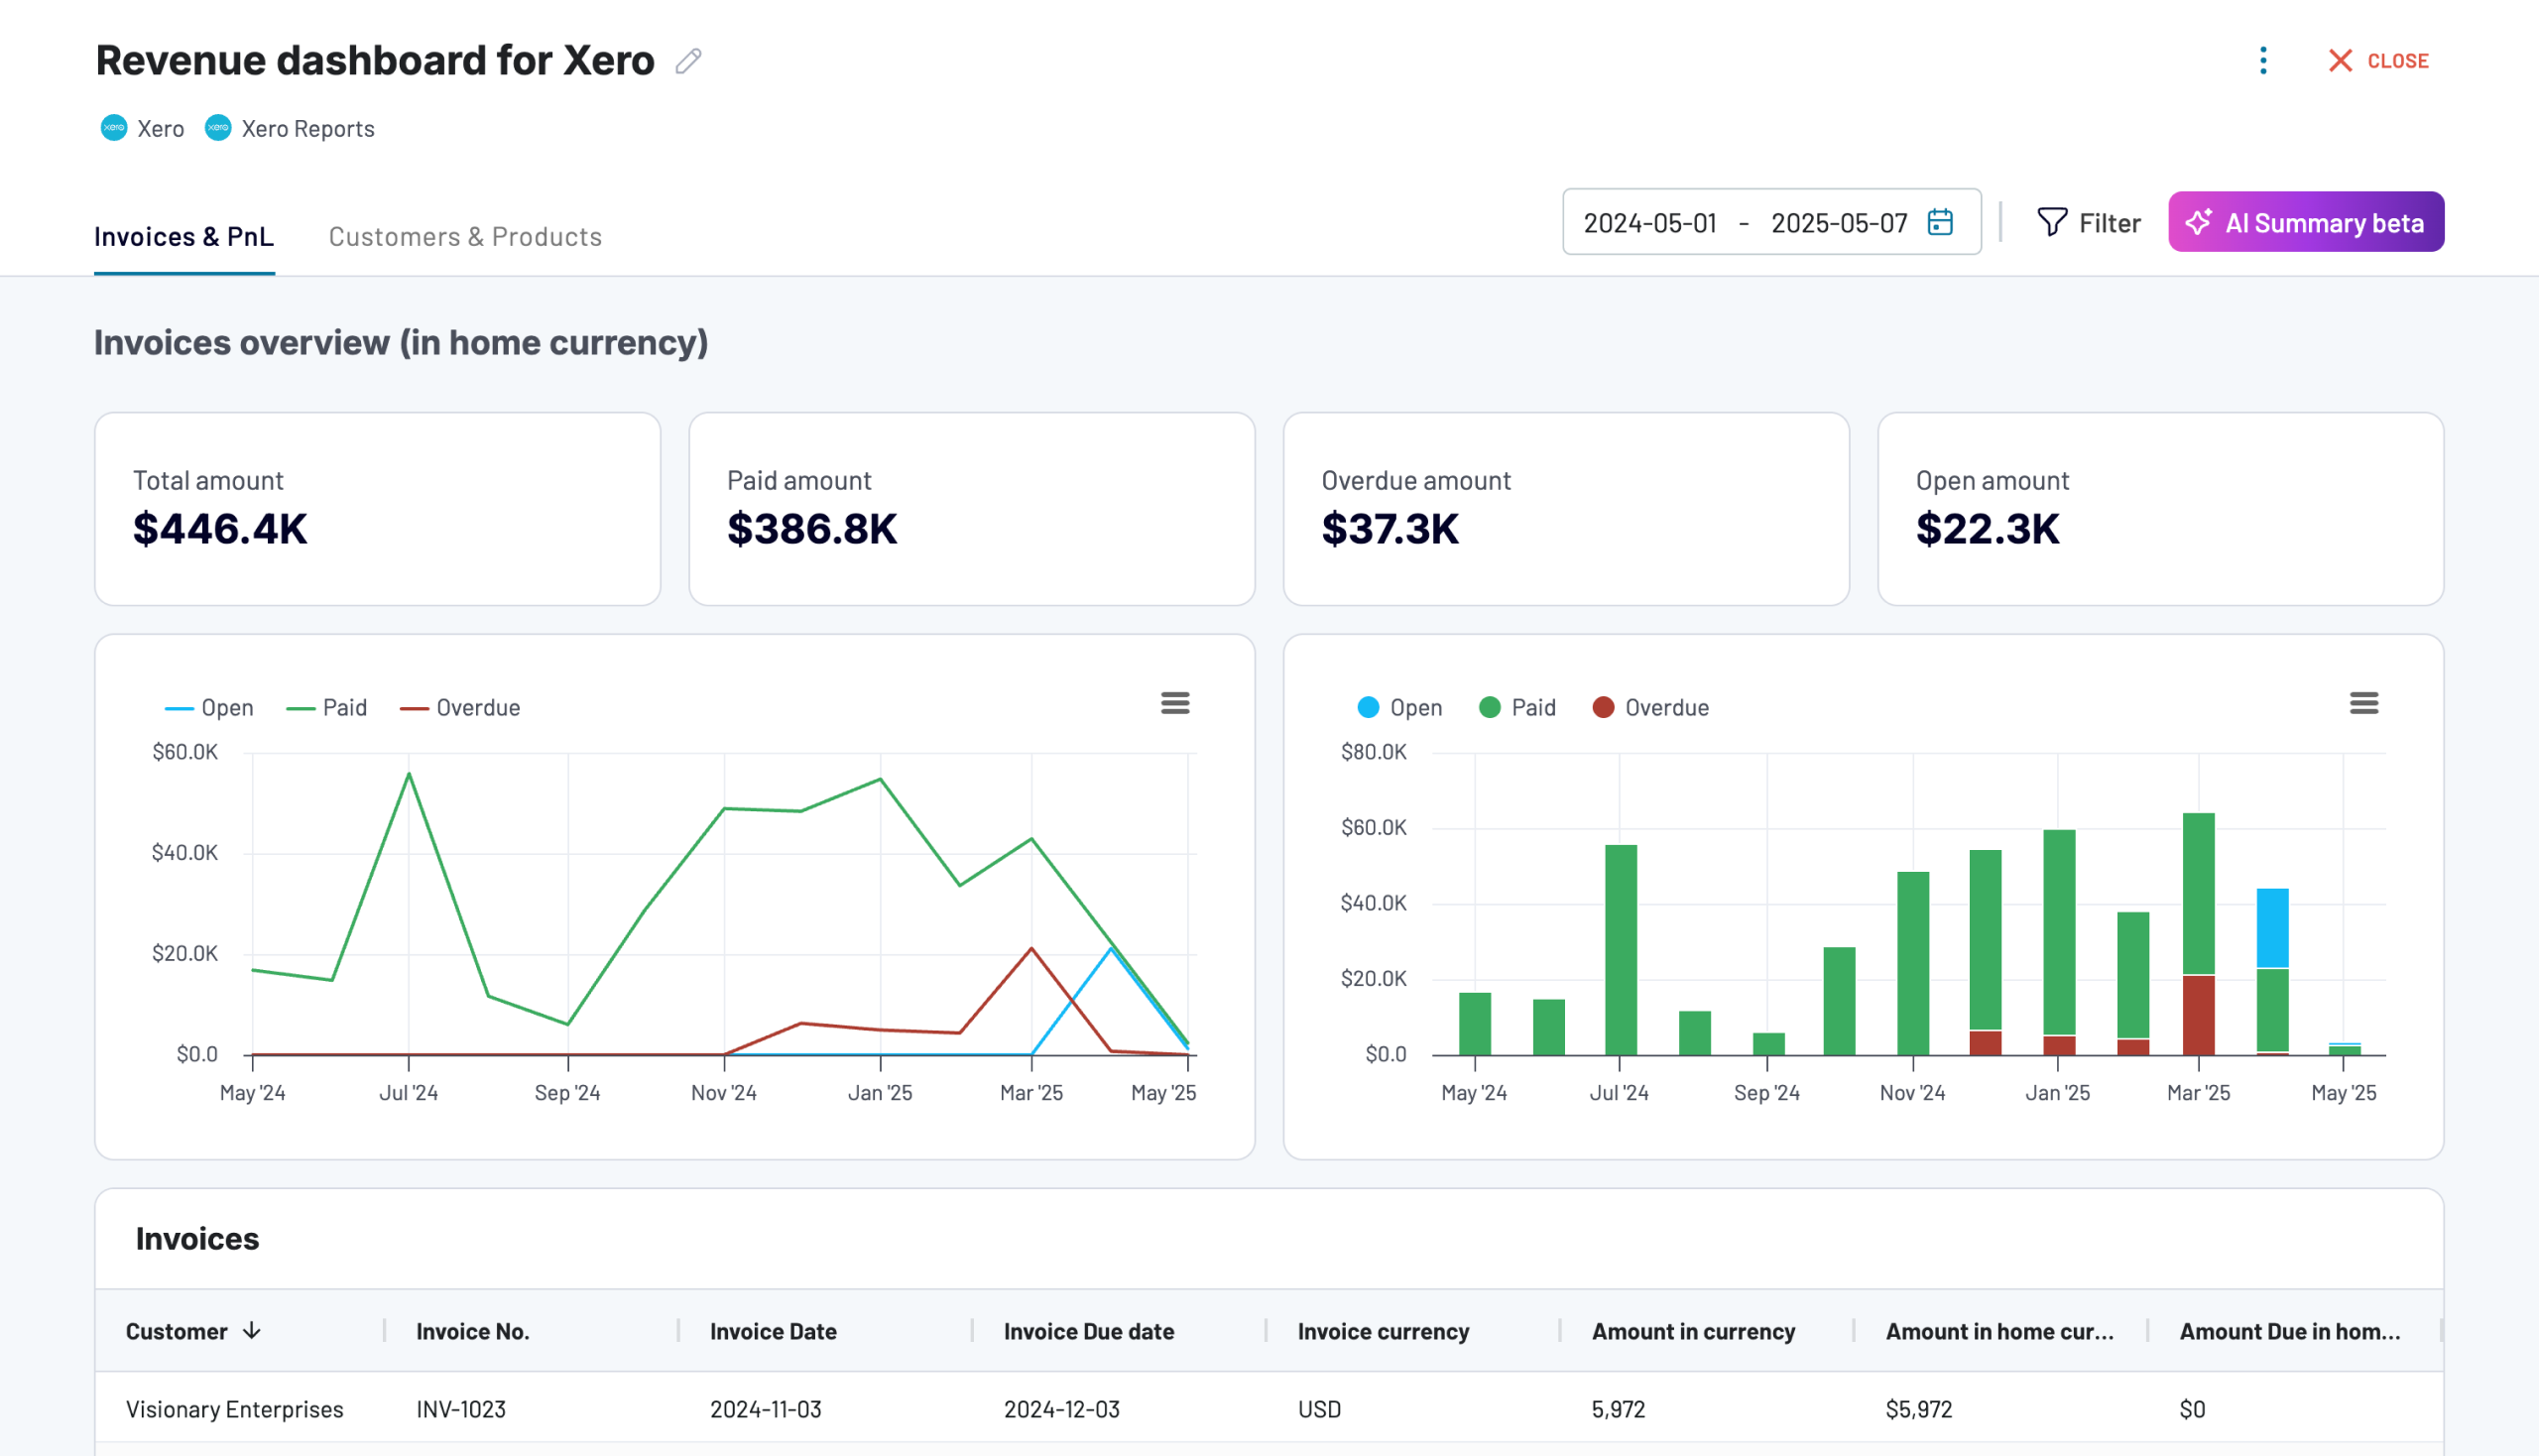
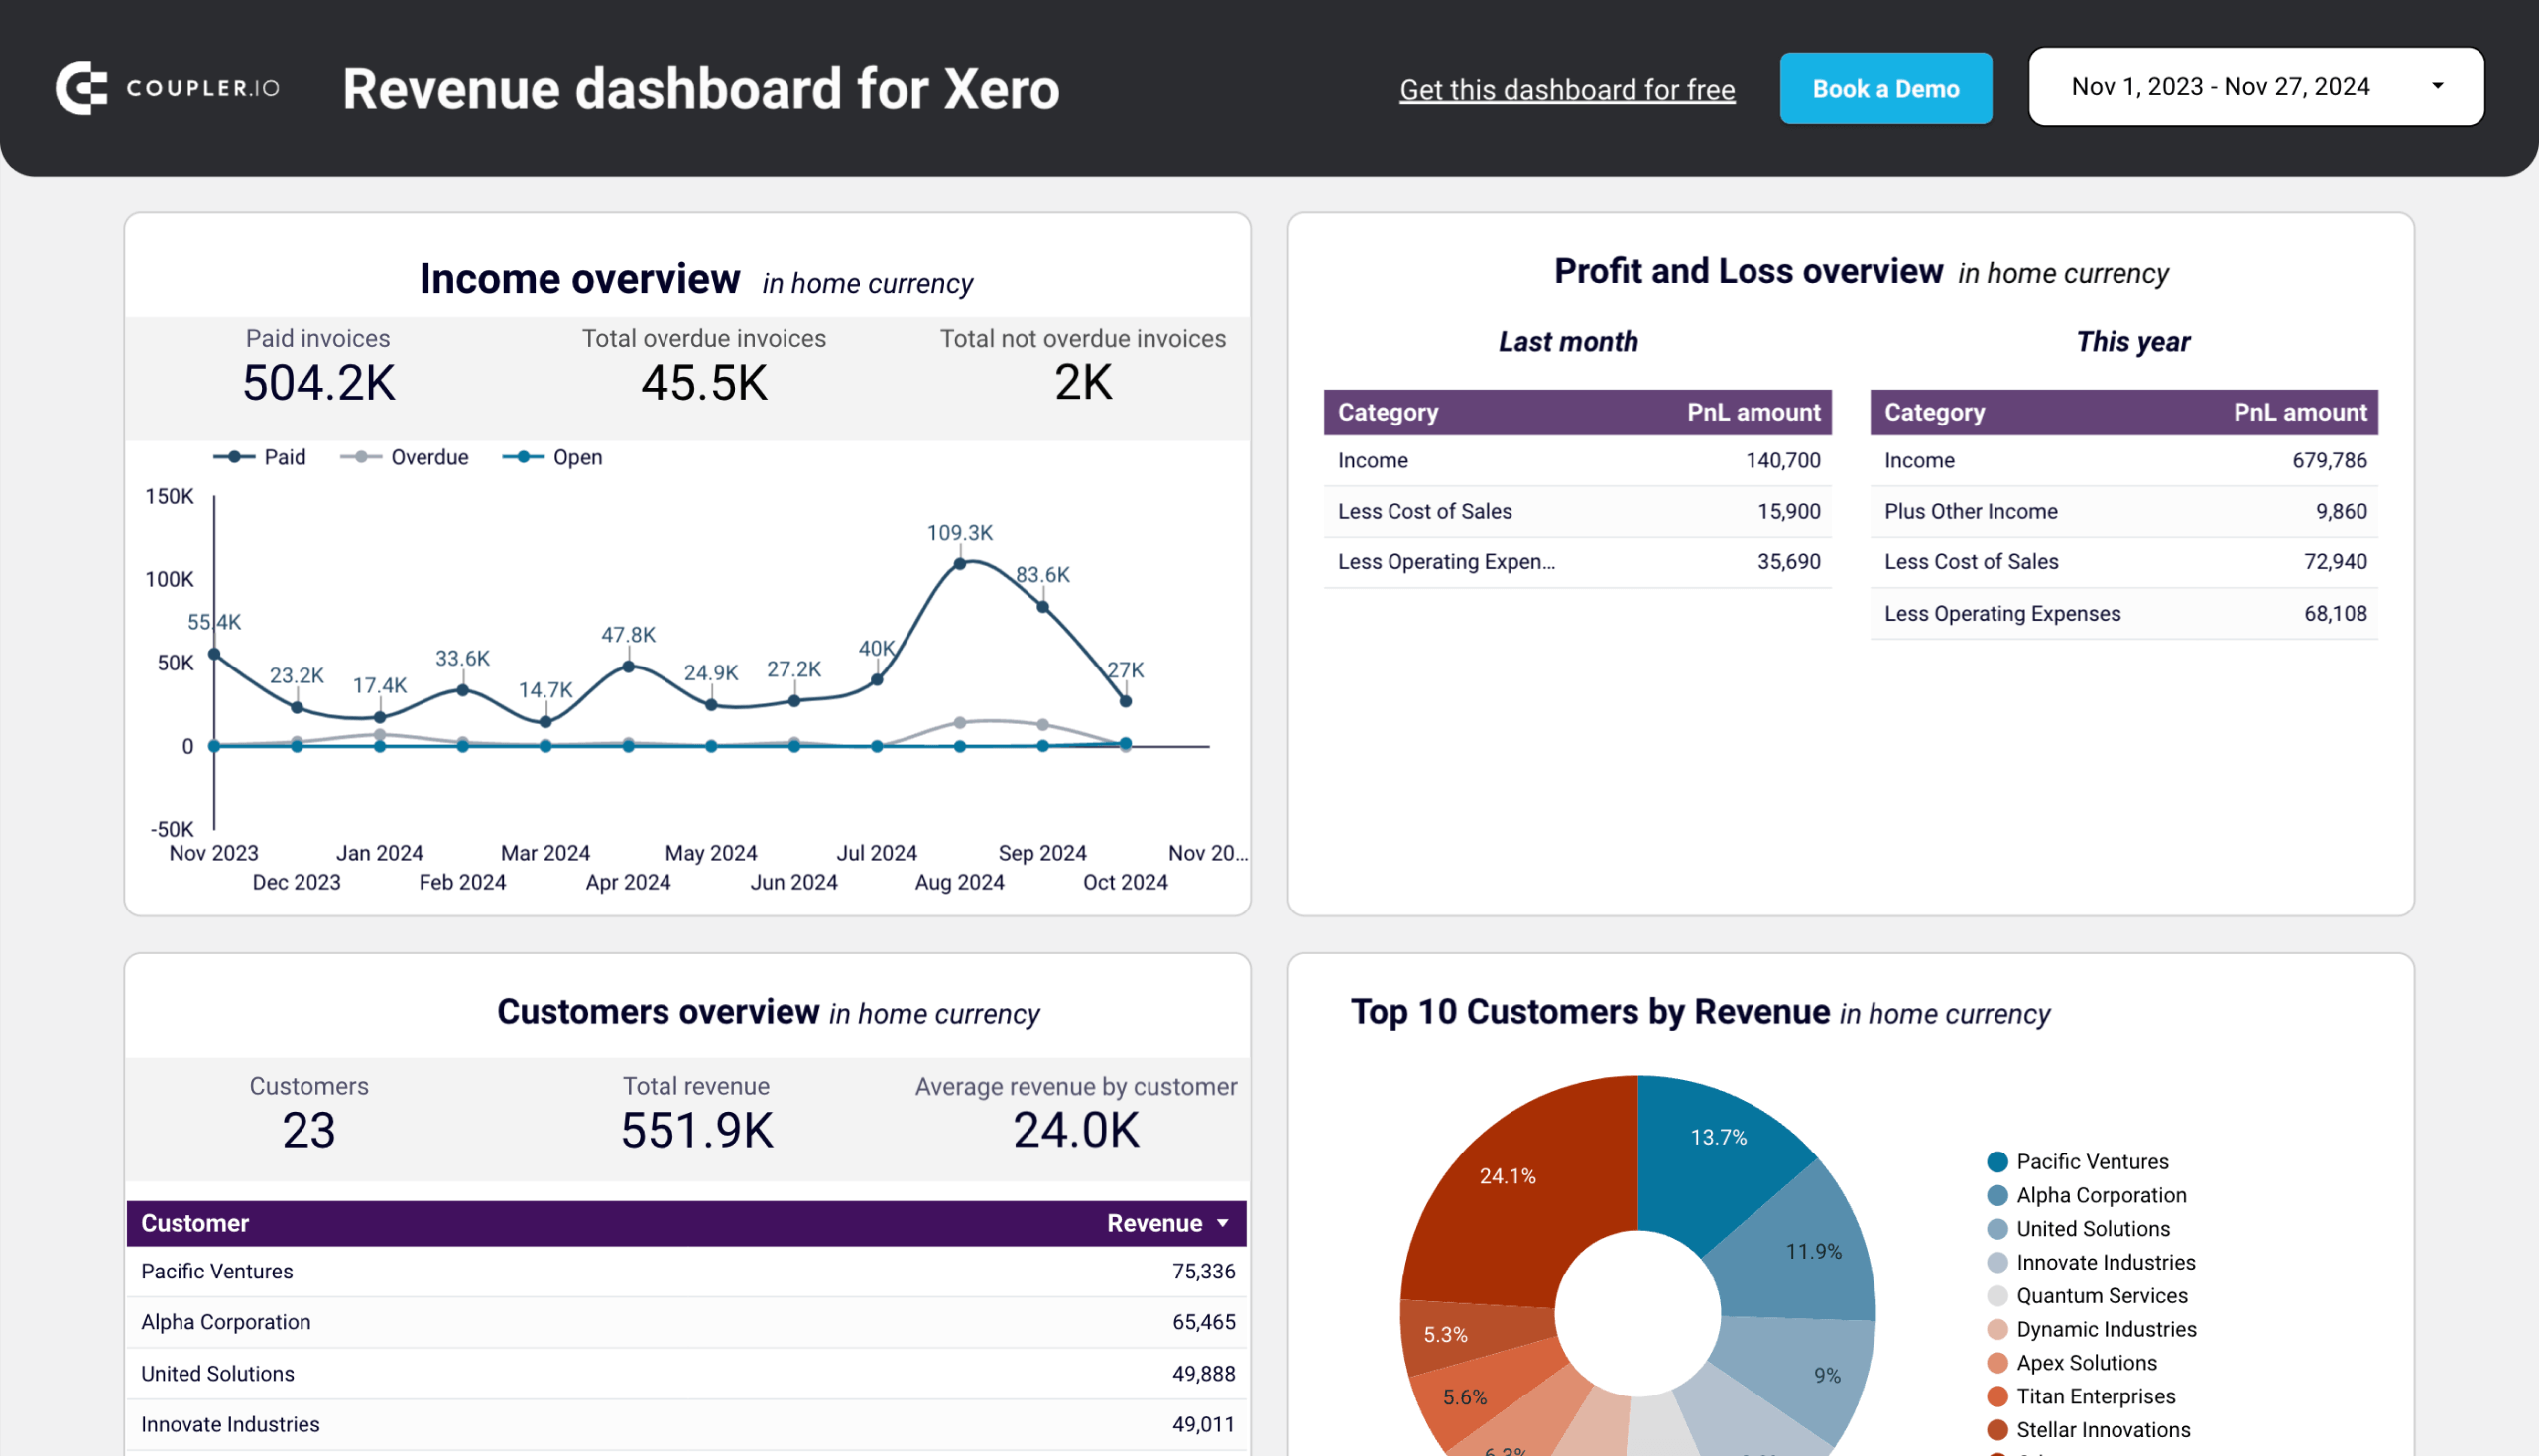
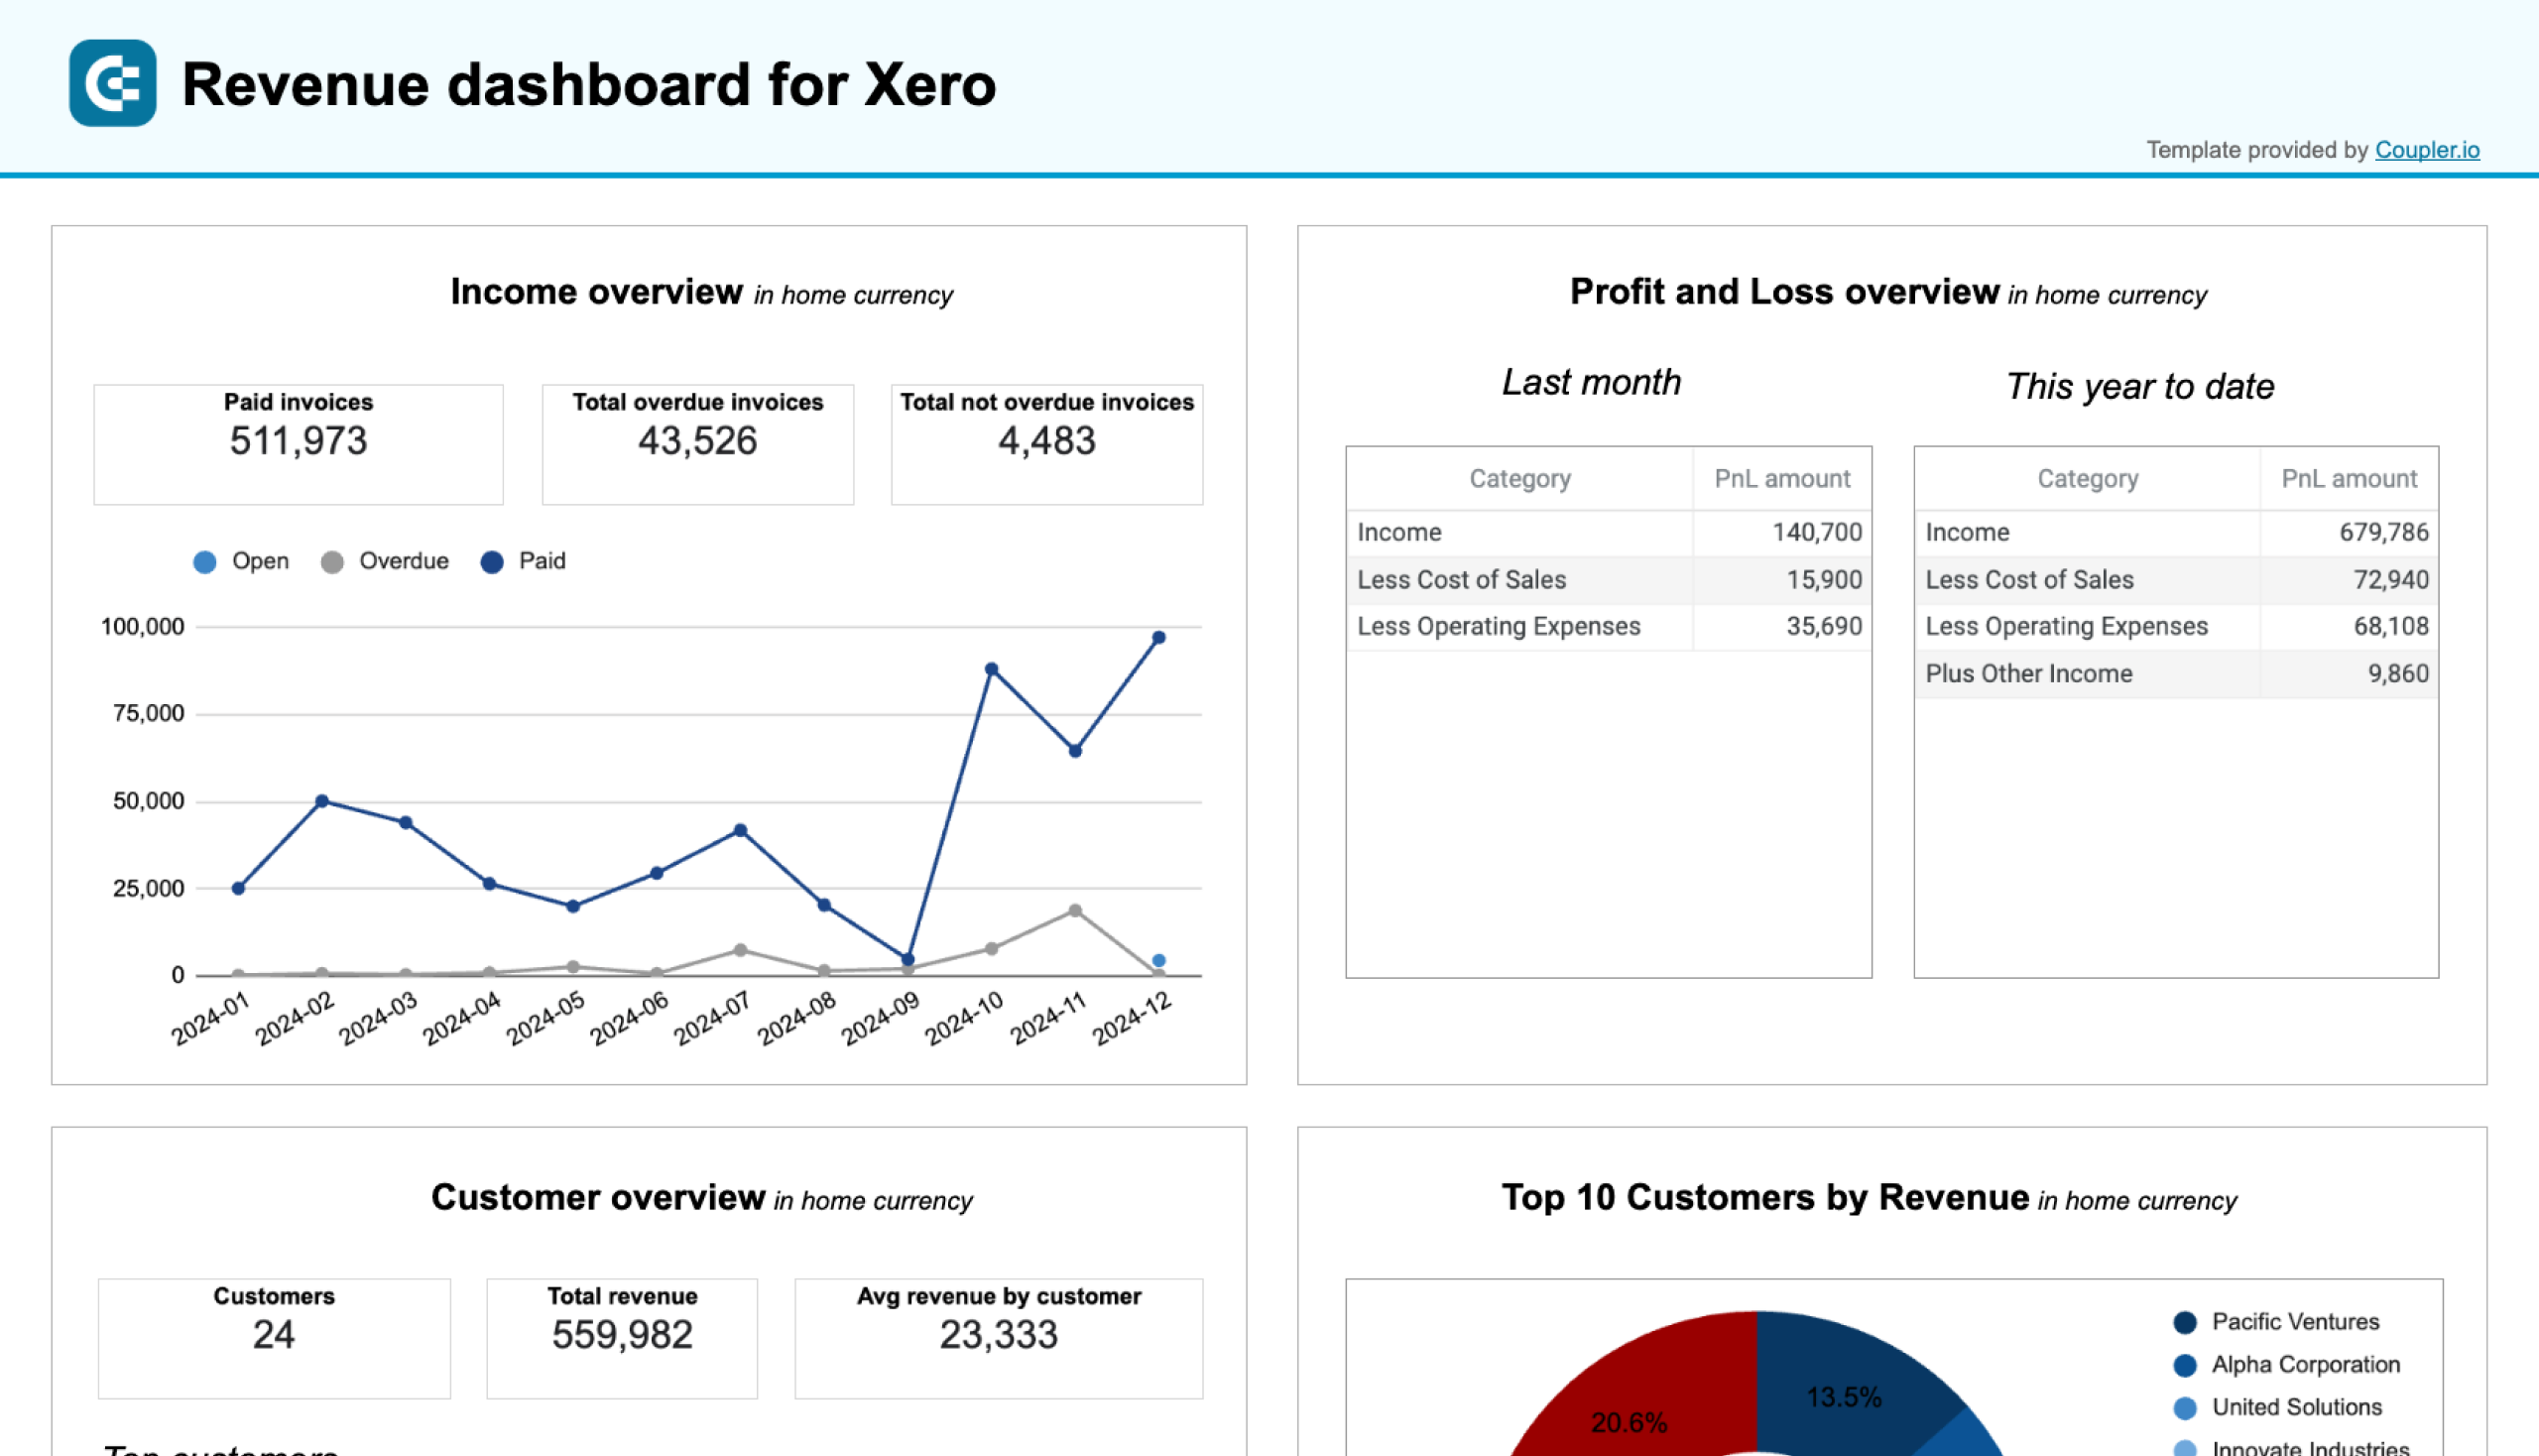
Revenue dashboard
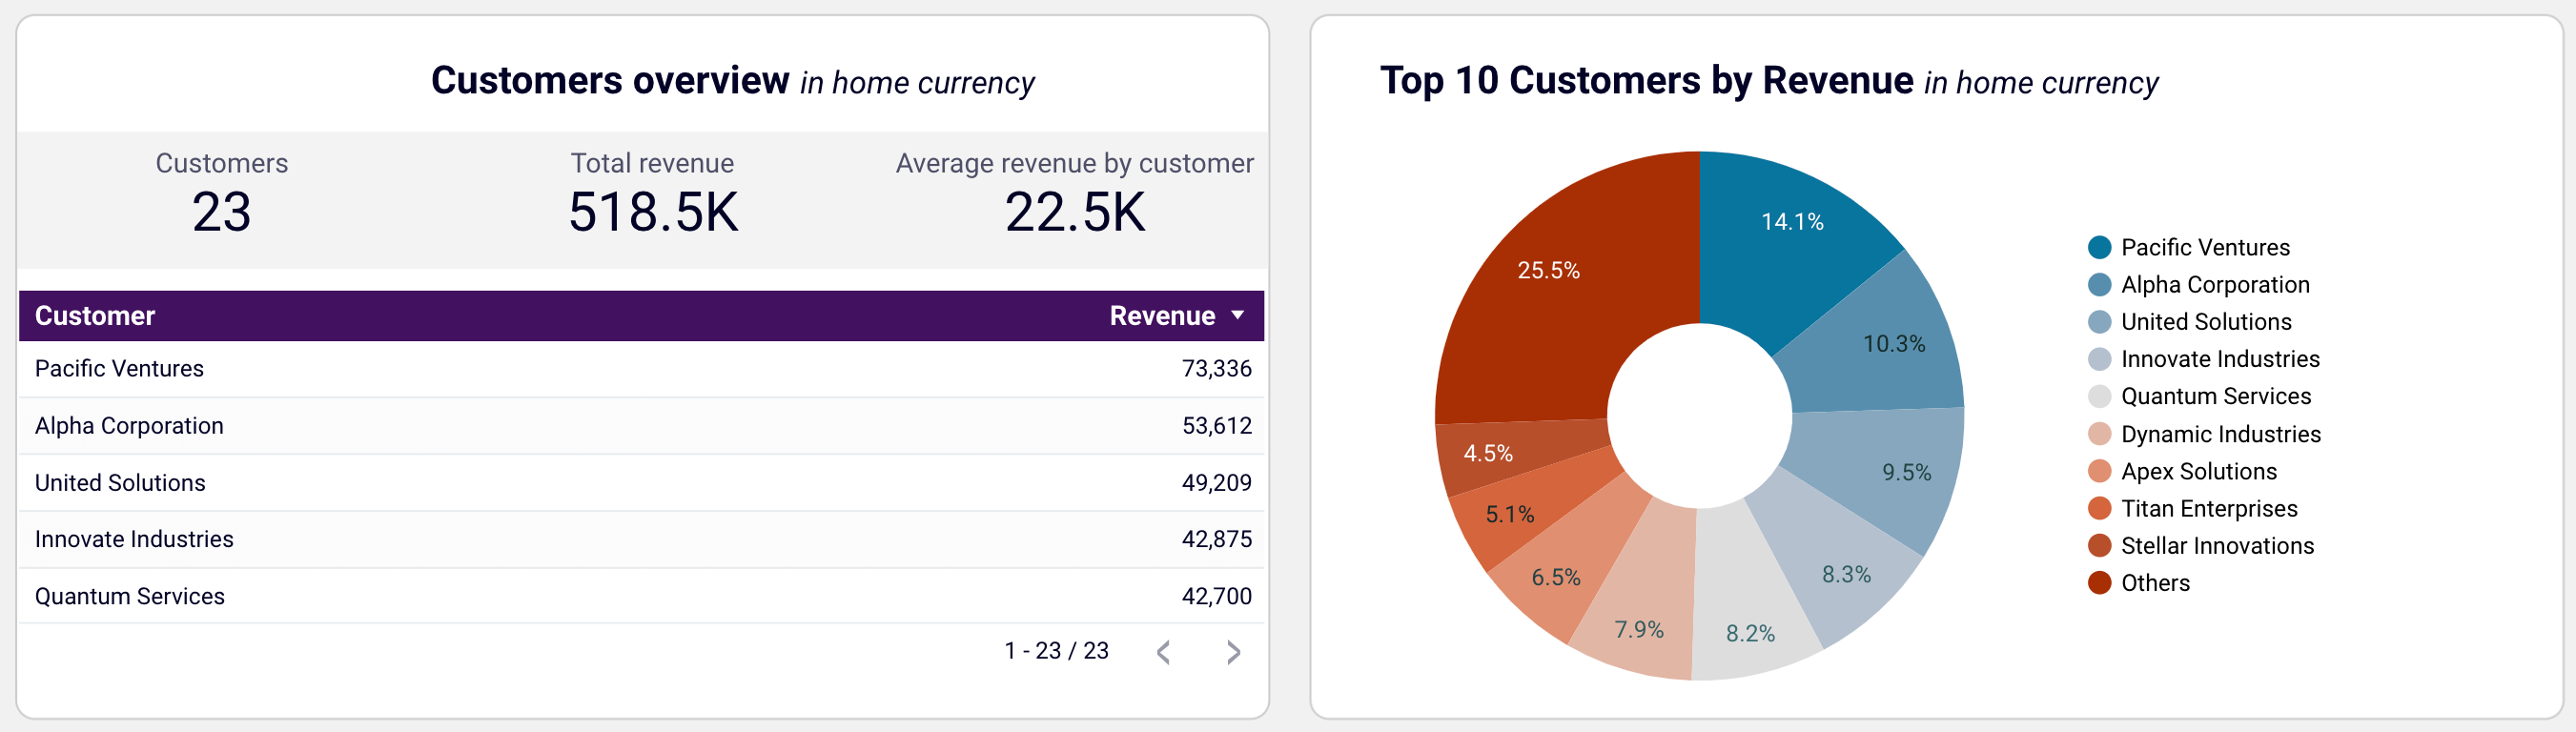
This Xero dashboard helps you monitor your income and expenses. It shows revenue distribution by customer, aggregates key metrics, and displays your top customers.
What reports the dashboard provides:
- Income overview: Track overall revenue trends for the last 12 months. Identify seasonal fluctuations, peak revenue periods, and any unexpected dips.

- Profit and loss overview: Compare revenue and expenses to gain insights into net income. Assess how well your business manages costs relative to income to support your budgeting and financial planning.
- Customer overview: See your most valuable customers by revenue contribution to inform targeted marketing efforts and retention strategies. For example, you can offer loyalty incentives to high-value customers.
- Product overview: Figure out which products generate the most revenue. Using this information, you can adjust your sales strategies based on the results of high- or low-performing products.
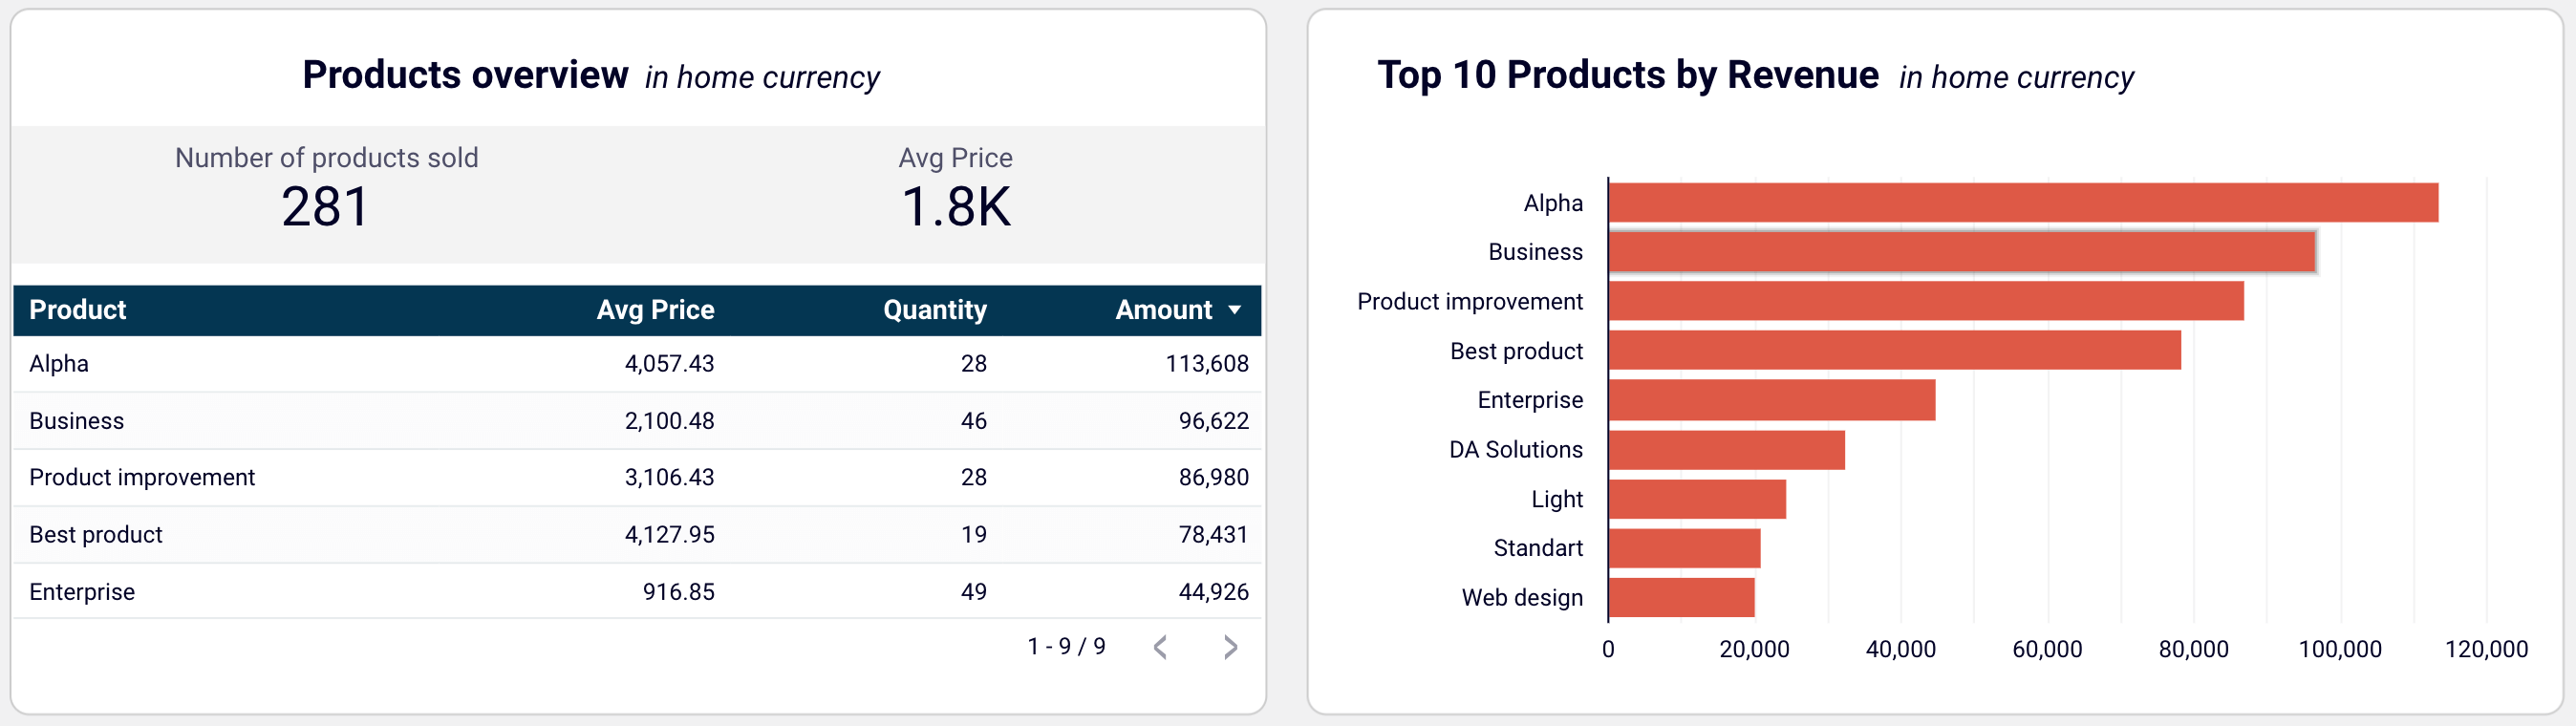
You can use the dashboard right in the Coupler.io UI or try the Looker Studio and Google Sheets versions. Navigate to the Readme tab inside the chosen template for step-by-step setup instructions.
Revenue dashboard for Xero
Analyze revenue streams, customer spending patterns, and product performance with data automatically synced from Xero. Gain actionable insights into sales trends, top-performing products, and high-value customers to drive growth strategies.
Revenue dashboard for Xero in Looker Studio
Get an overview of your profit and loss, products, and customers through a set of reports collected from Xero.
Revenue dashboard for Xero in Google Sheets
Track your revenue, costs, and customer insights with a comprehensive dashboard connected to your Xero account.
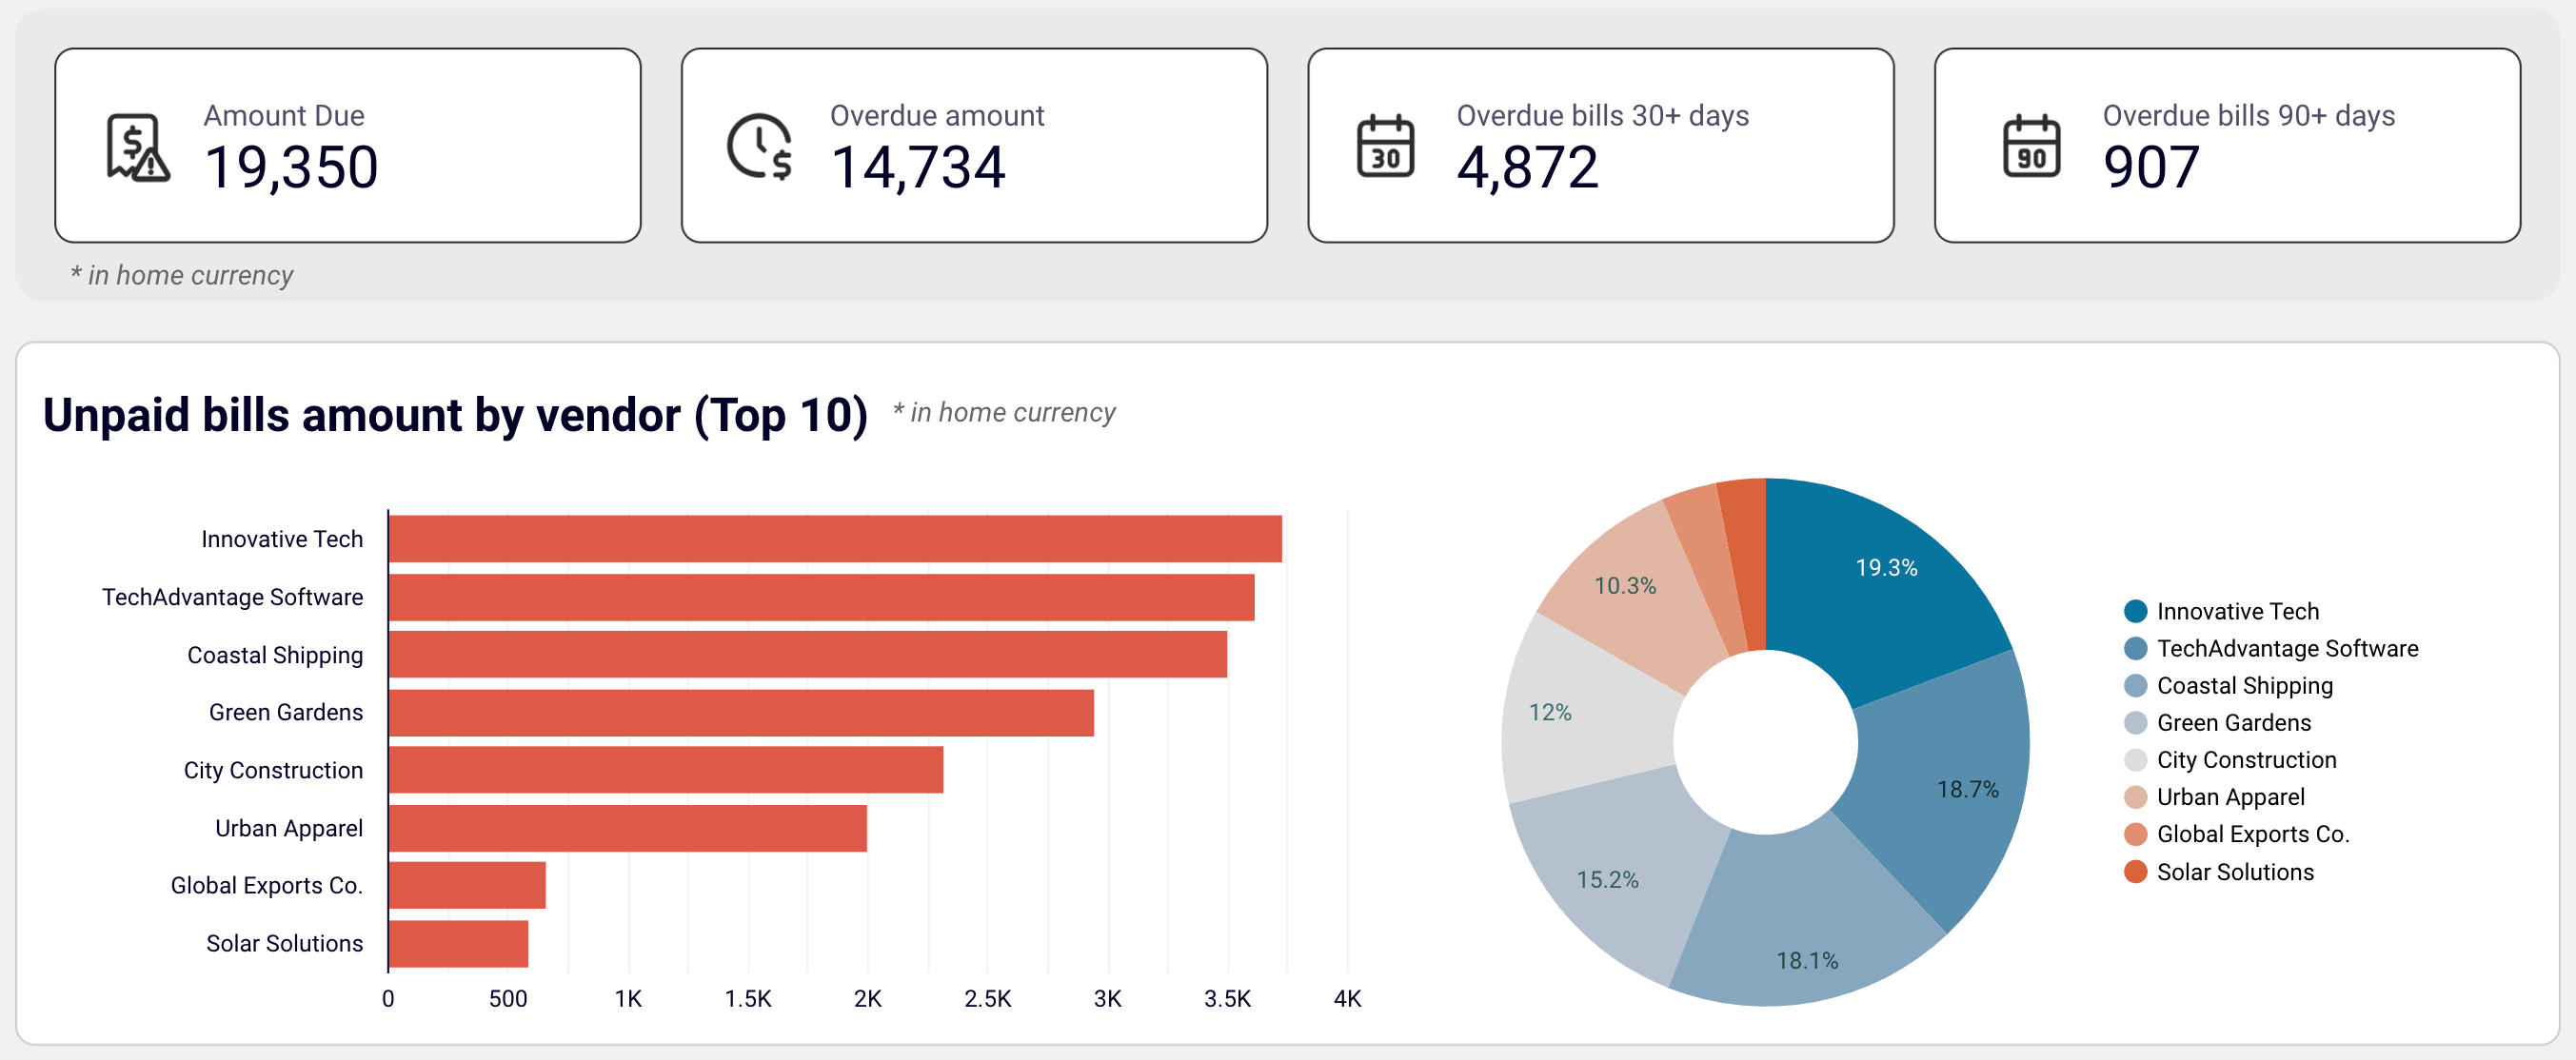
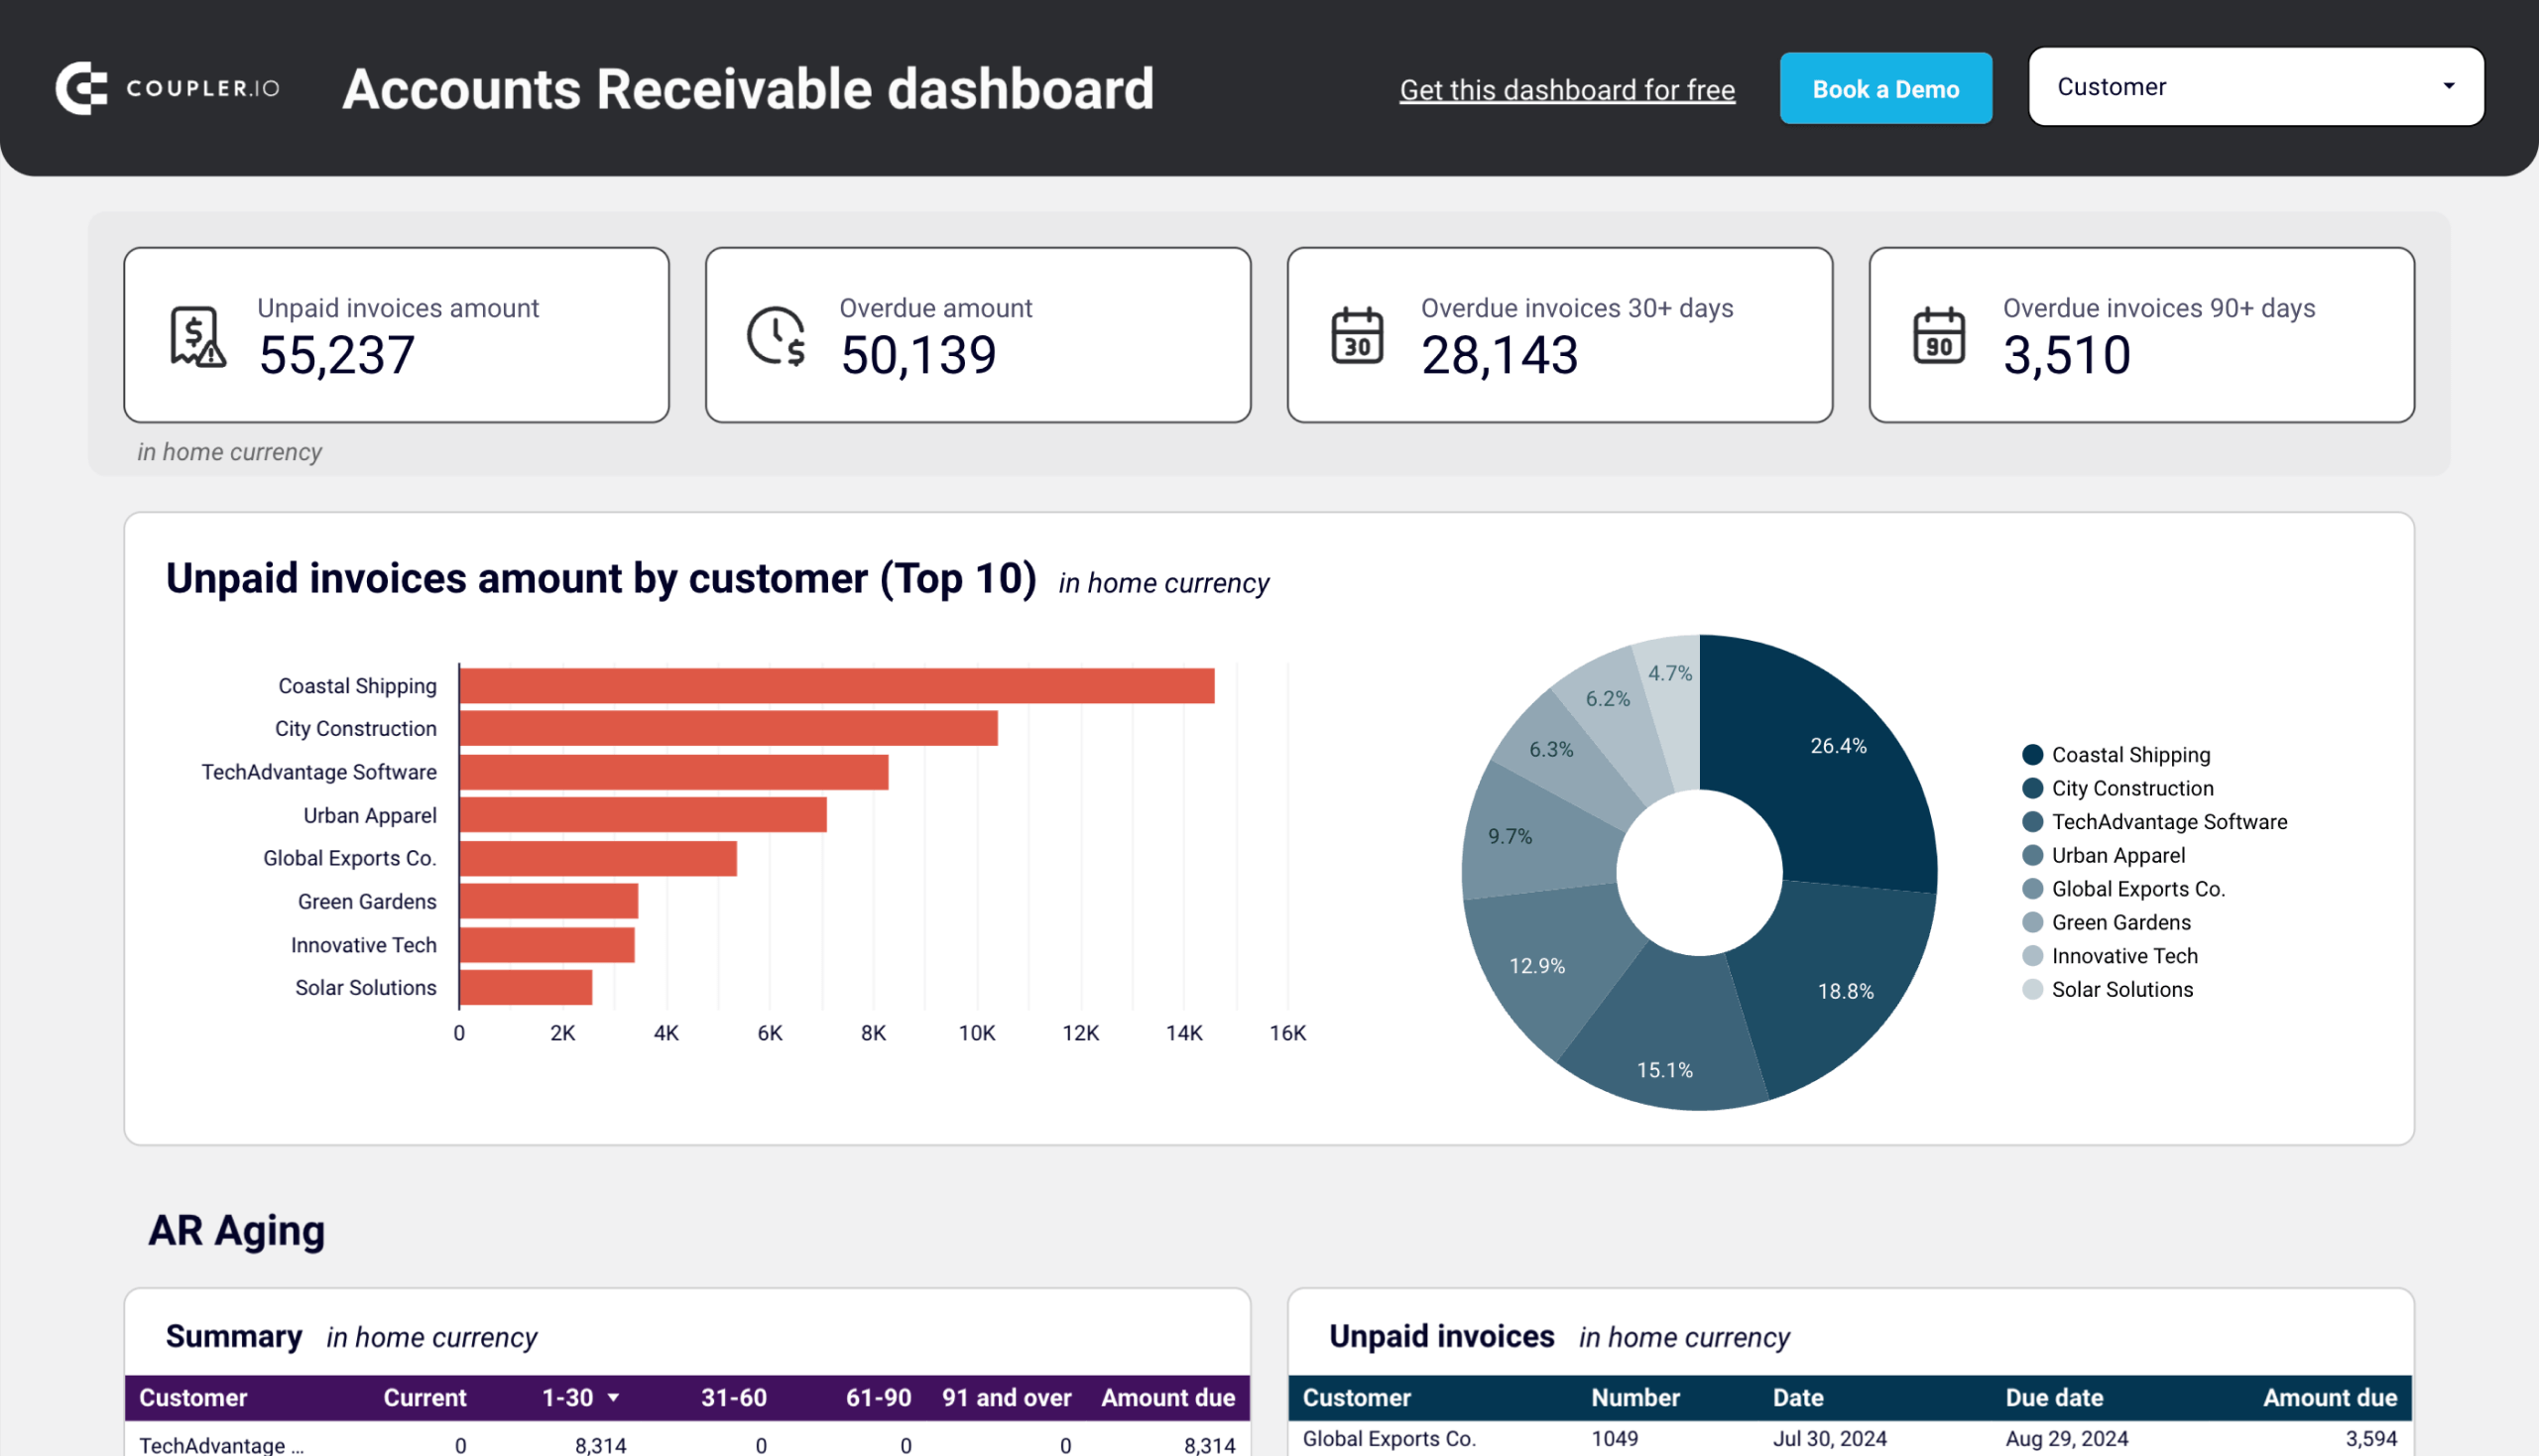
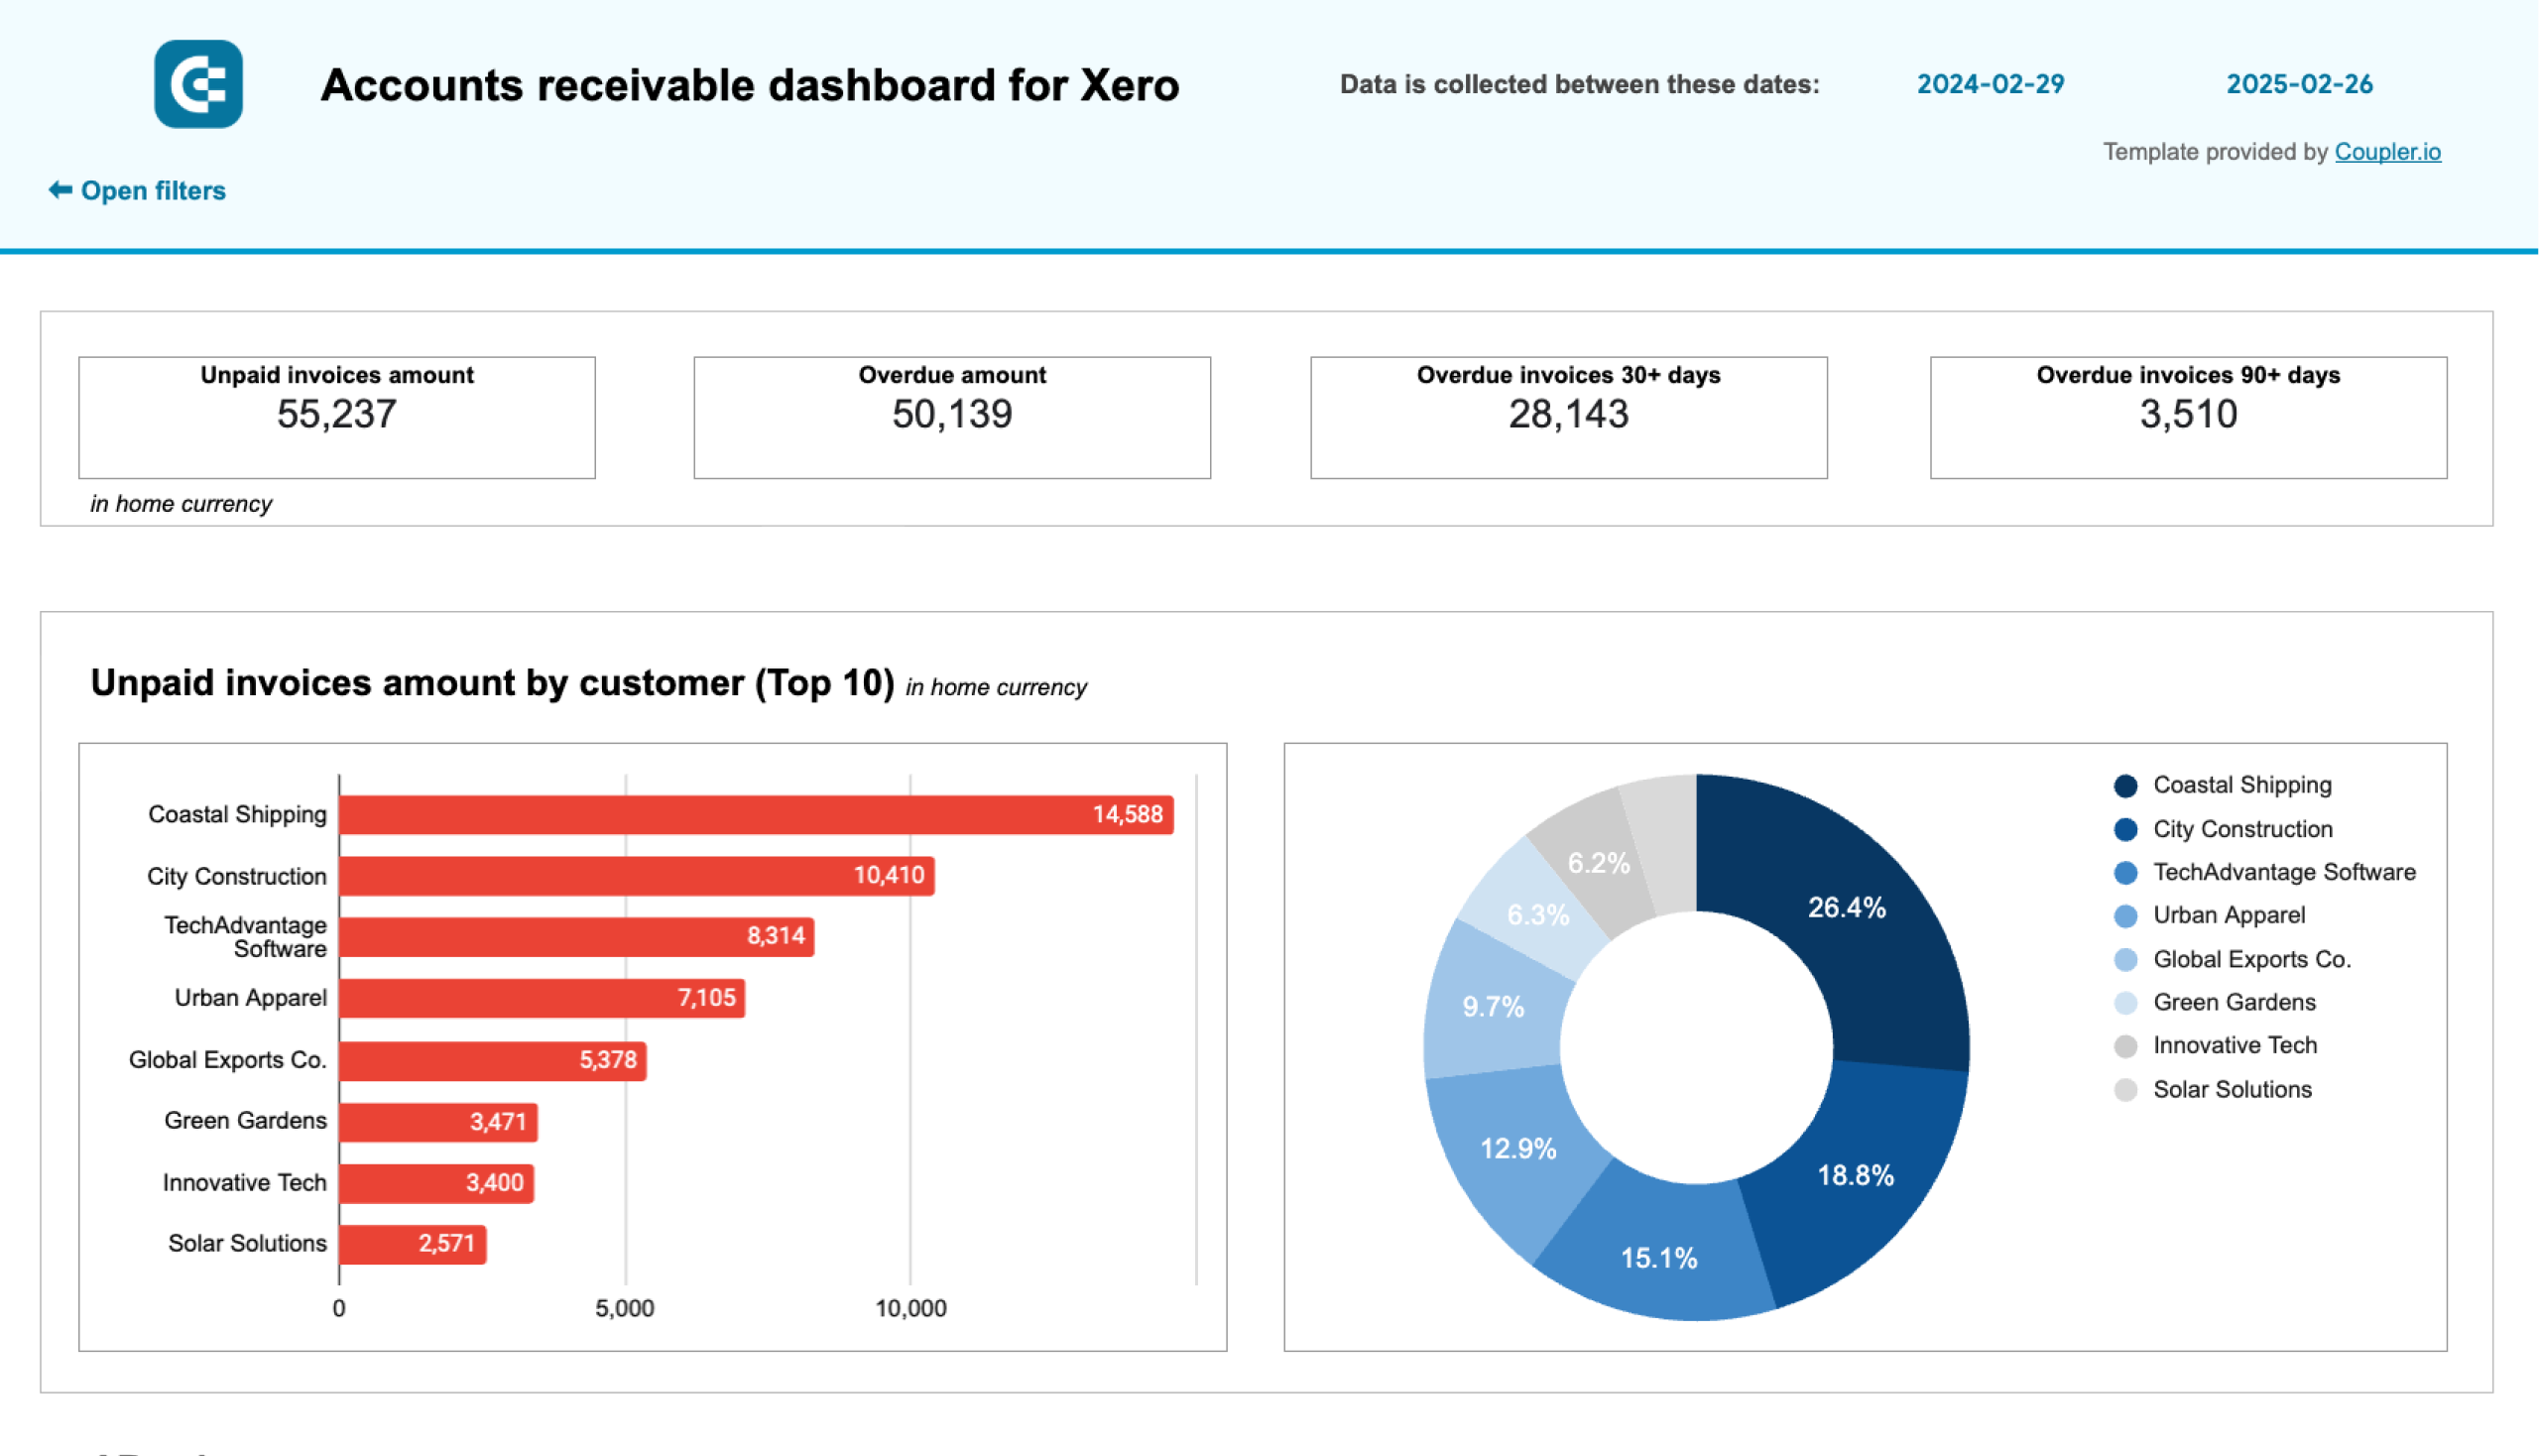
AP automation for Xero: Dashboard with near real-time insights
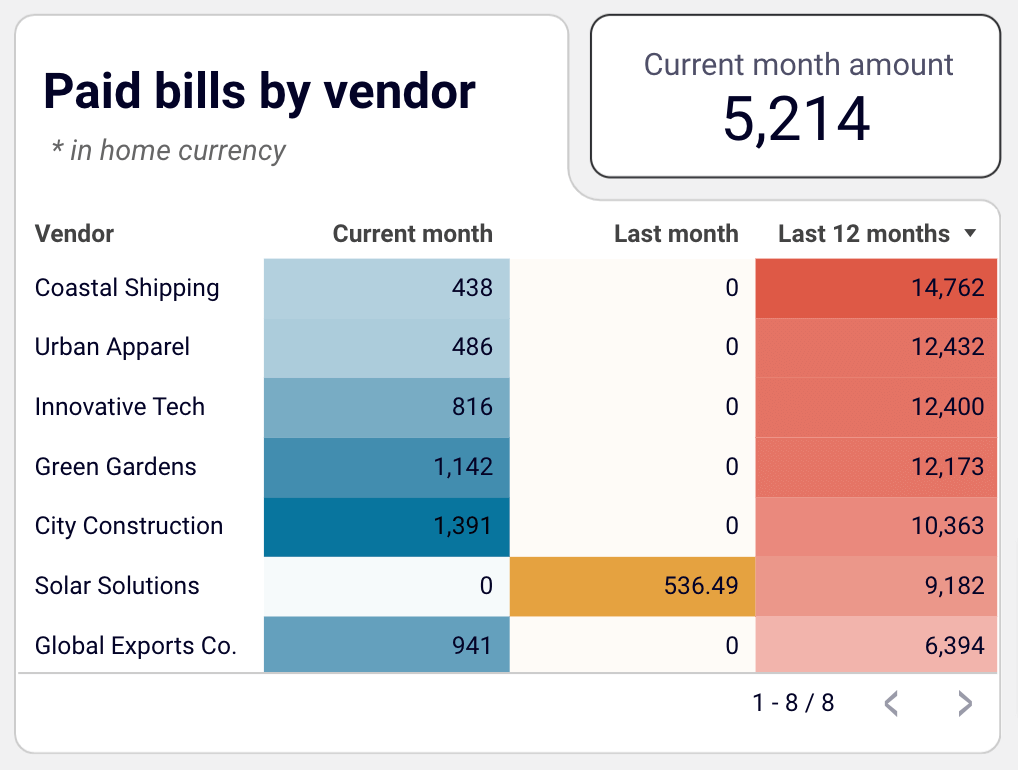
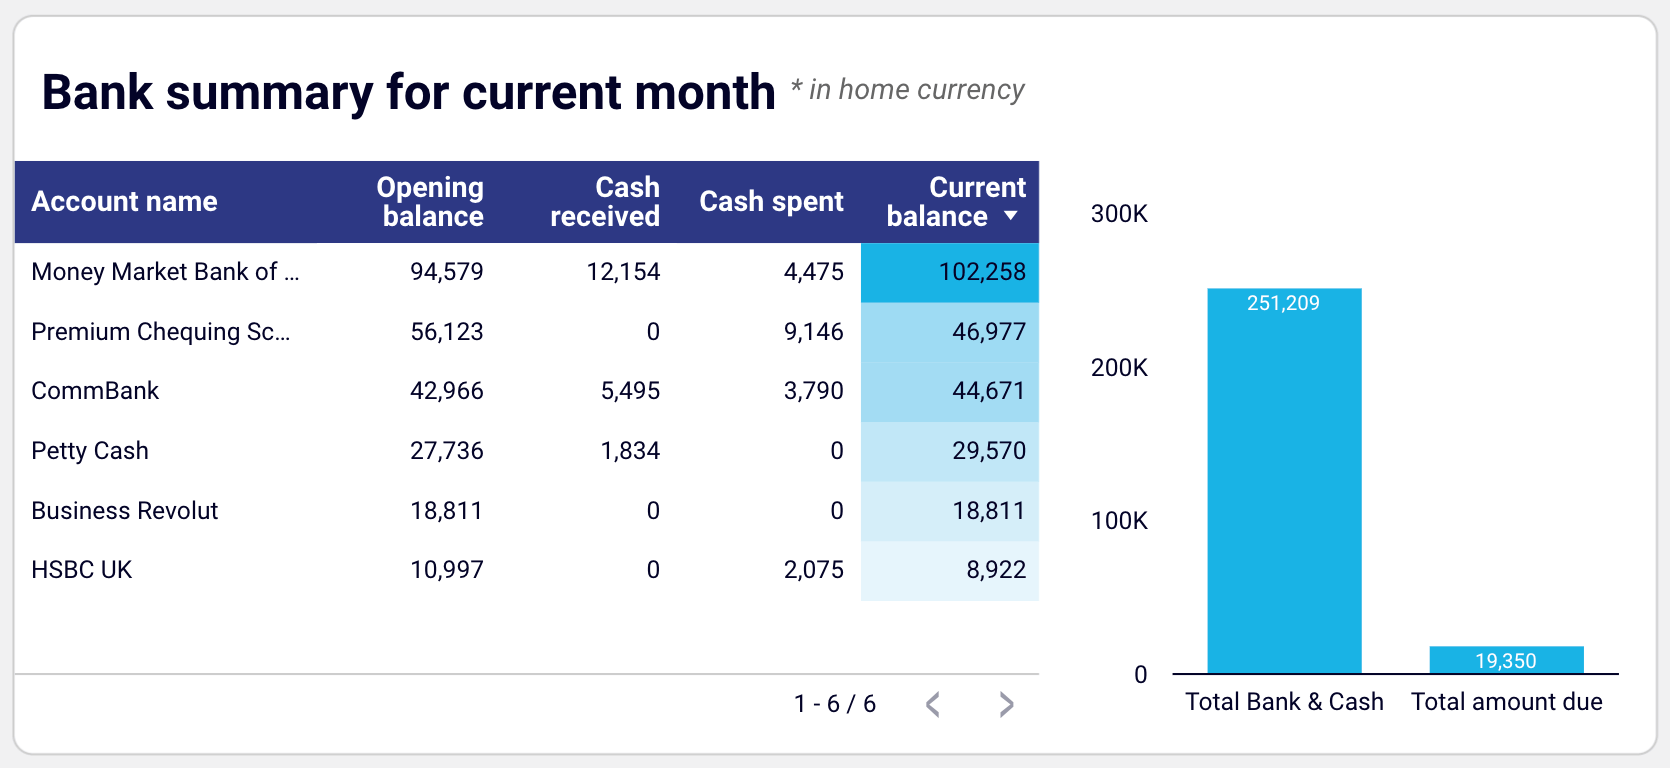
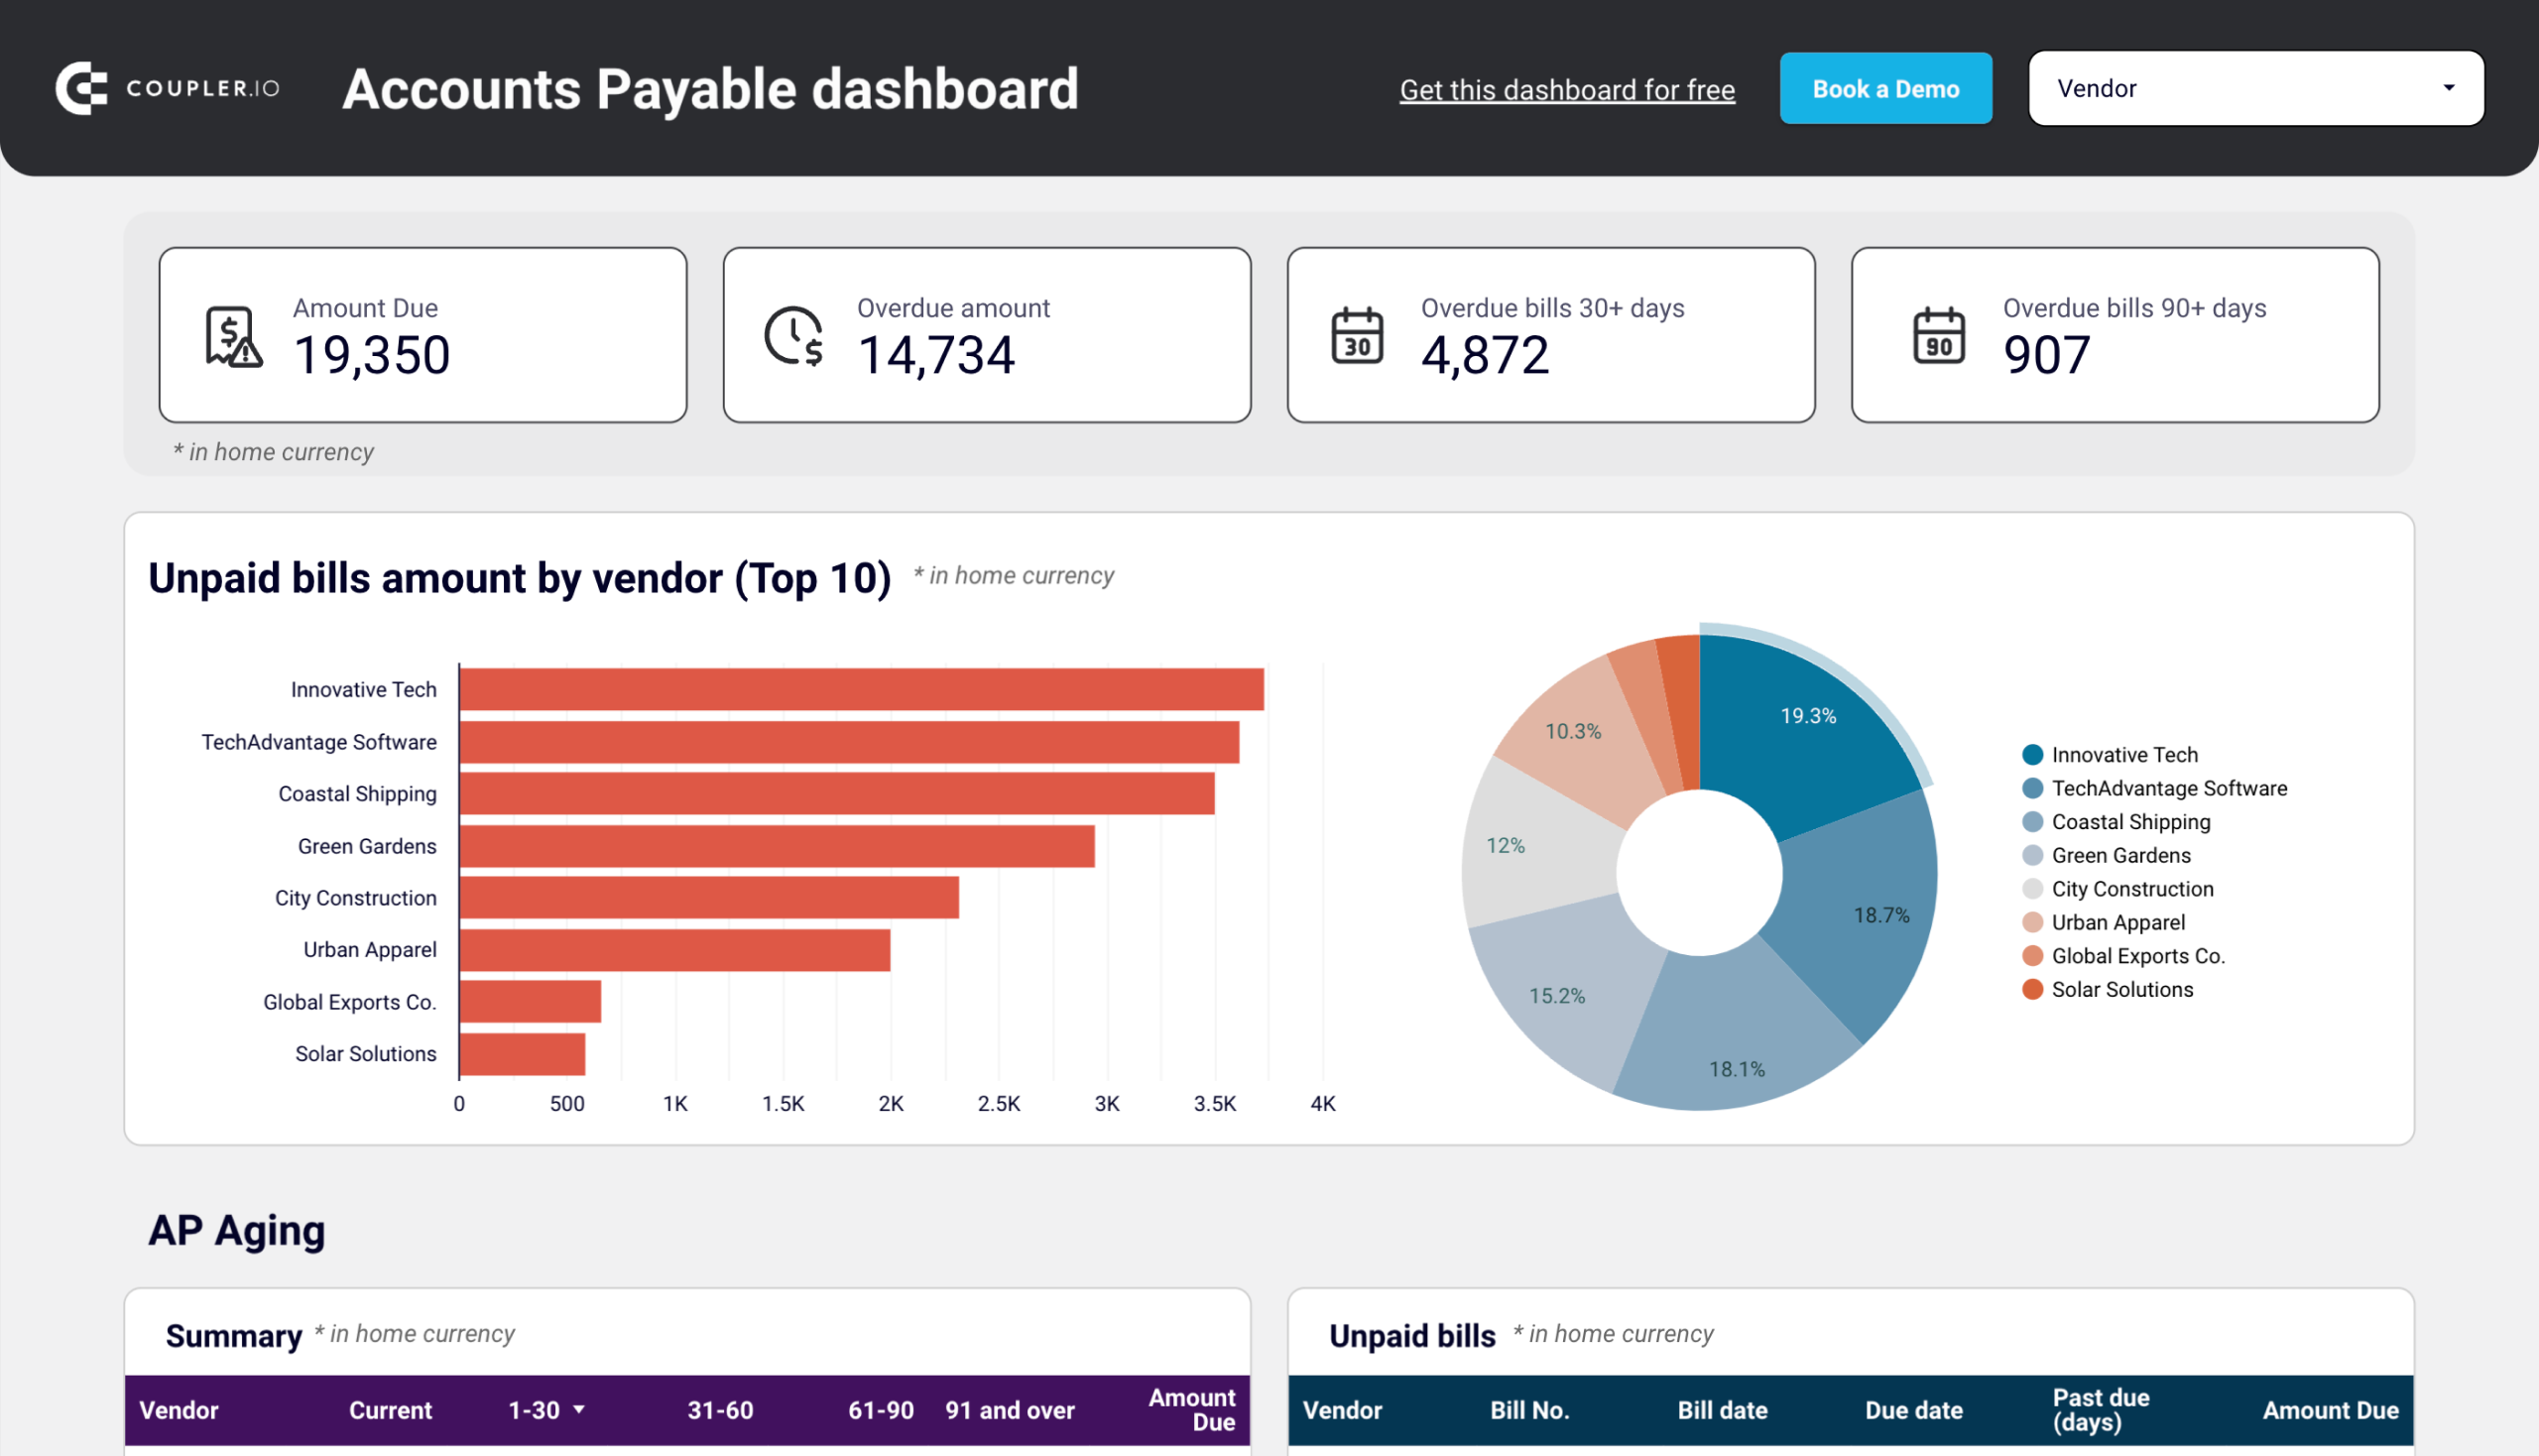
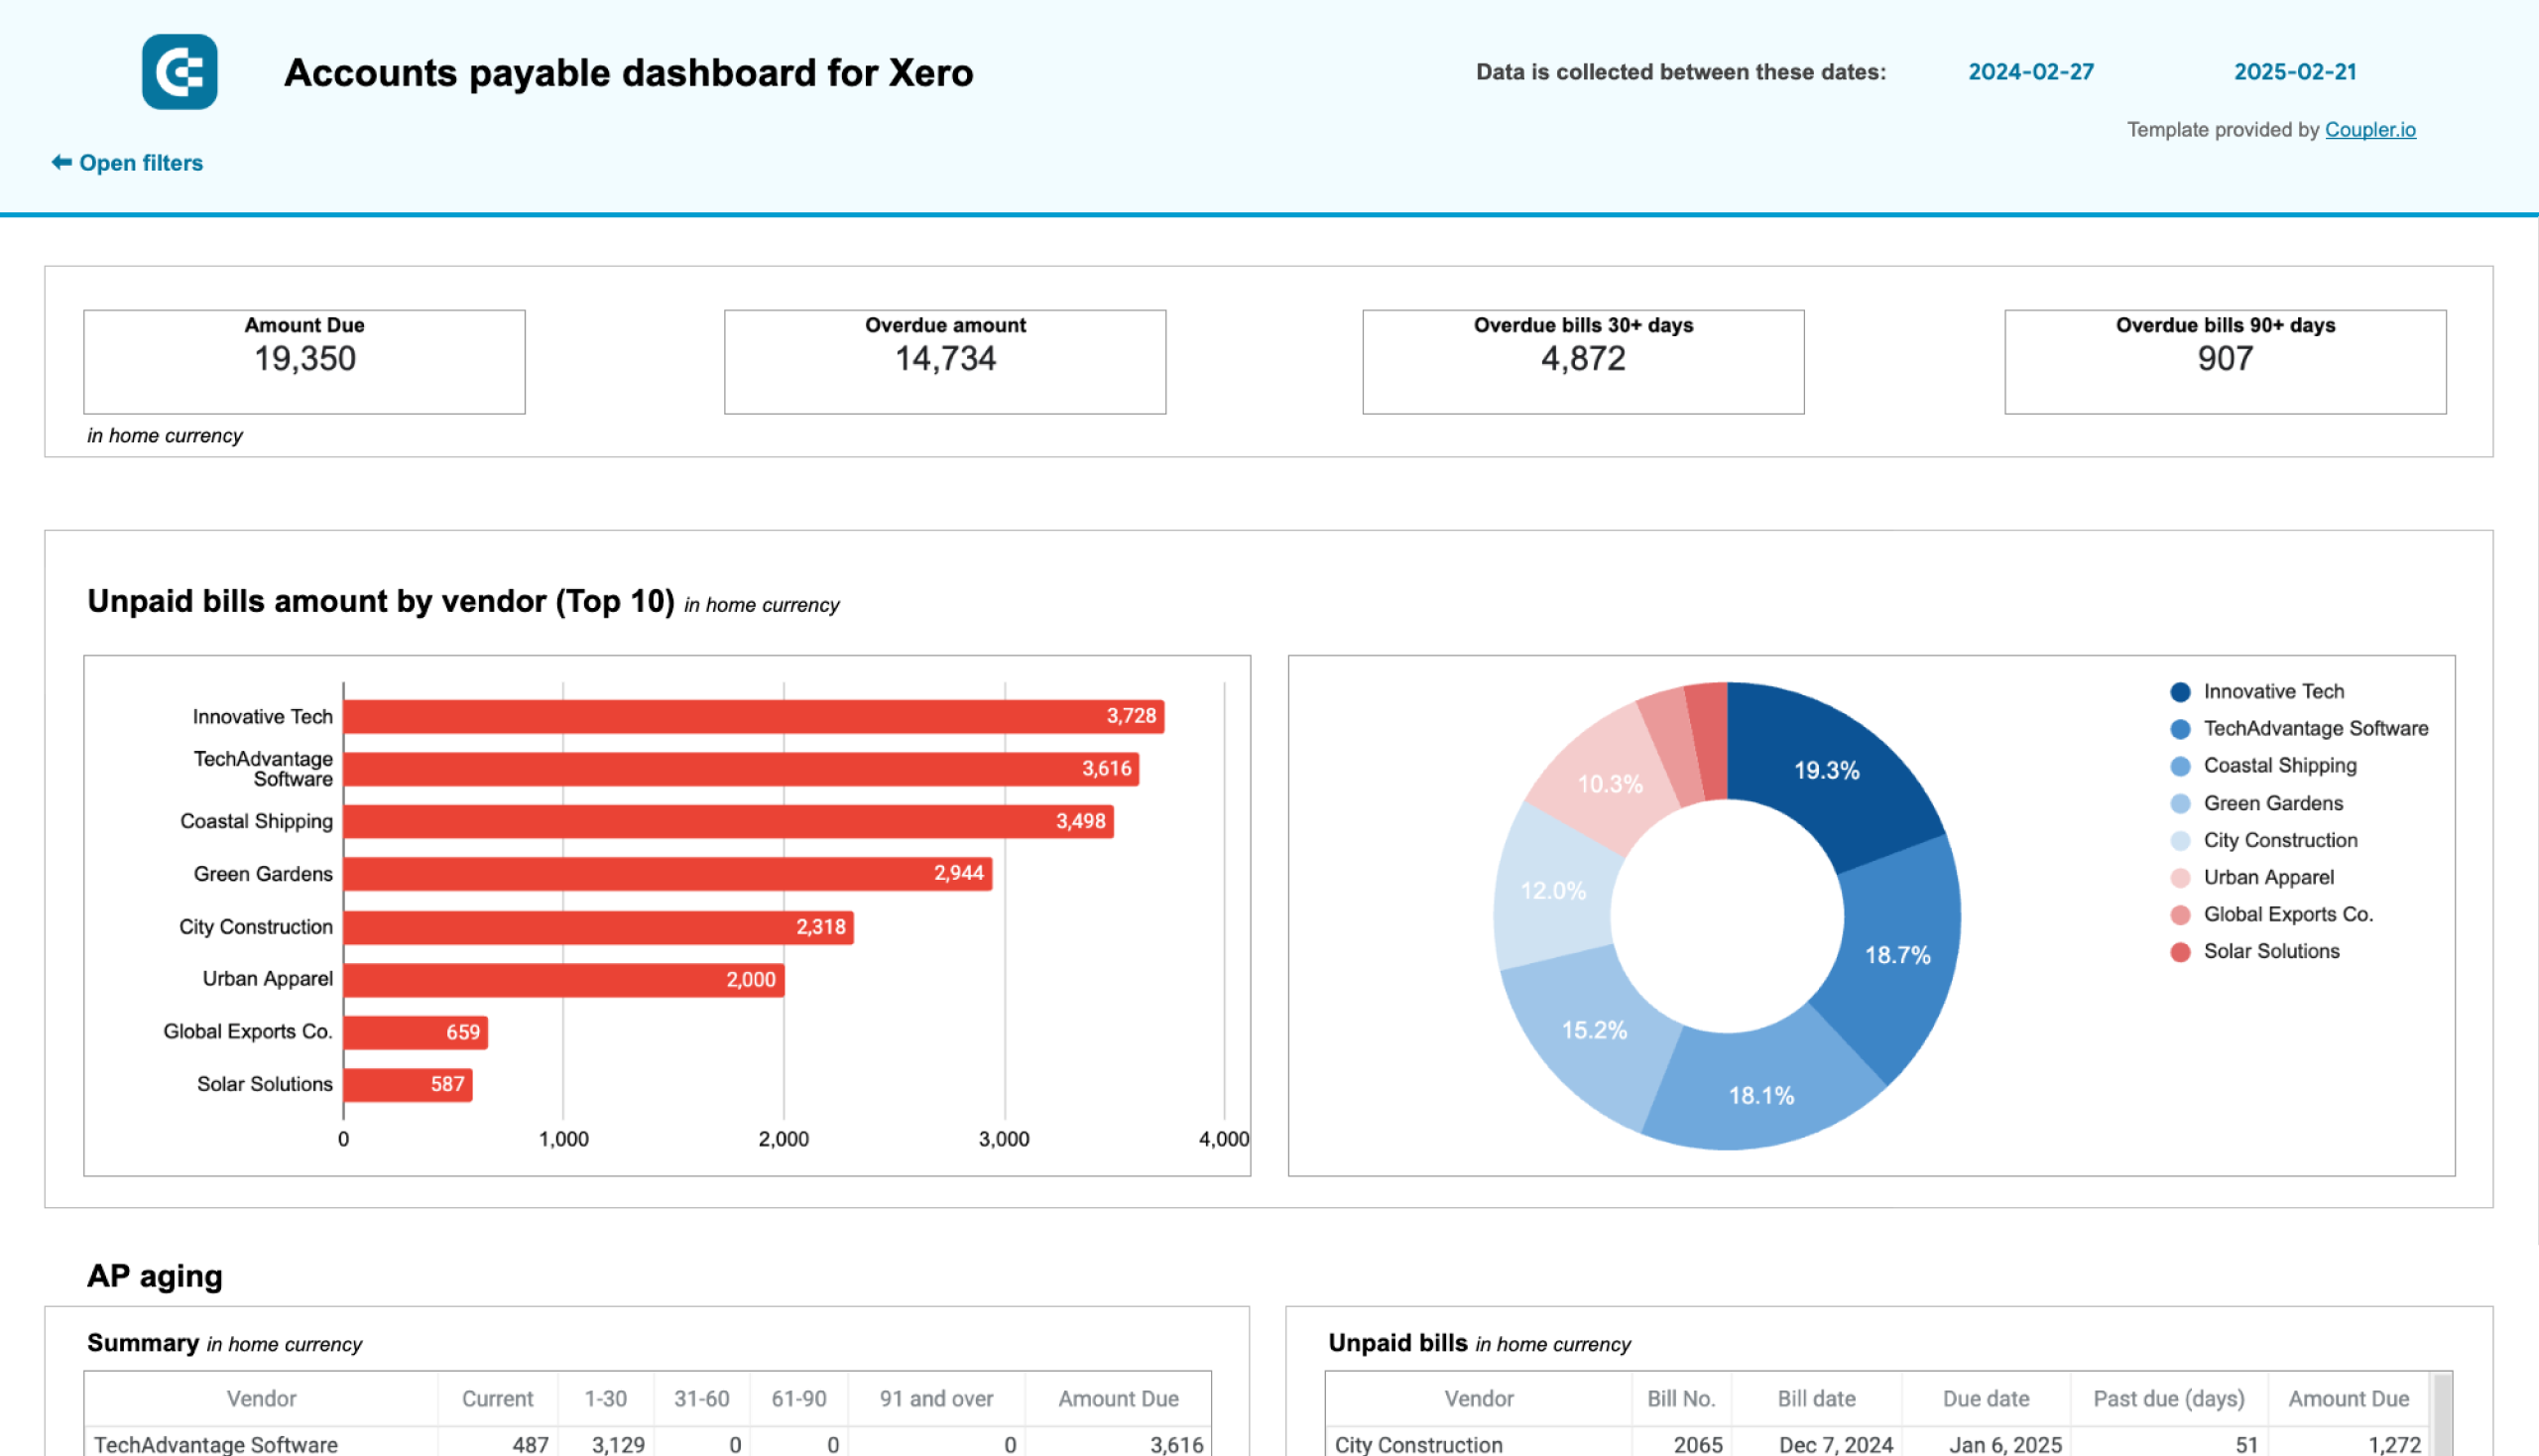
The accounts payable dashboard allows you to understand who your main creditors are and how much you owe them. With this data, it’s easier to prioritize payments to vendors.
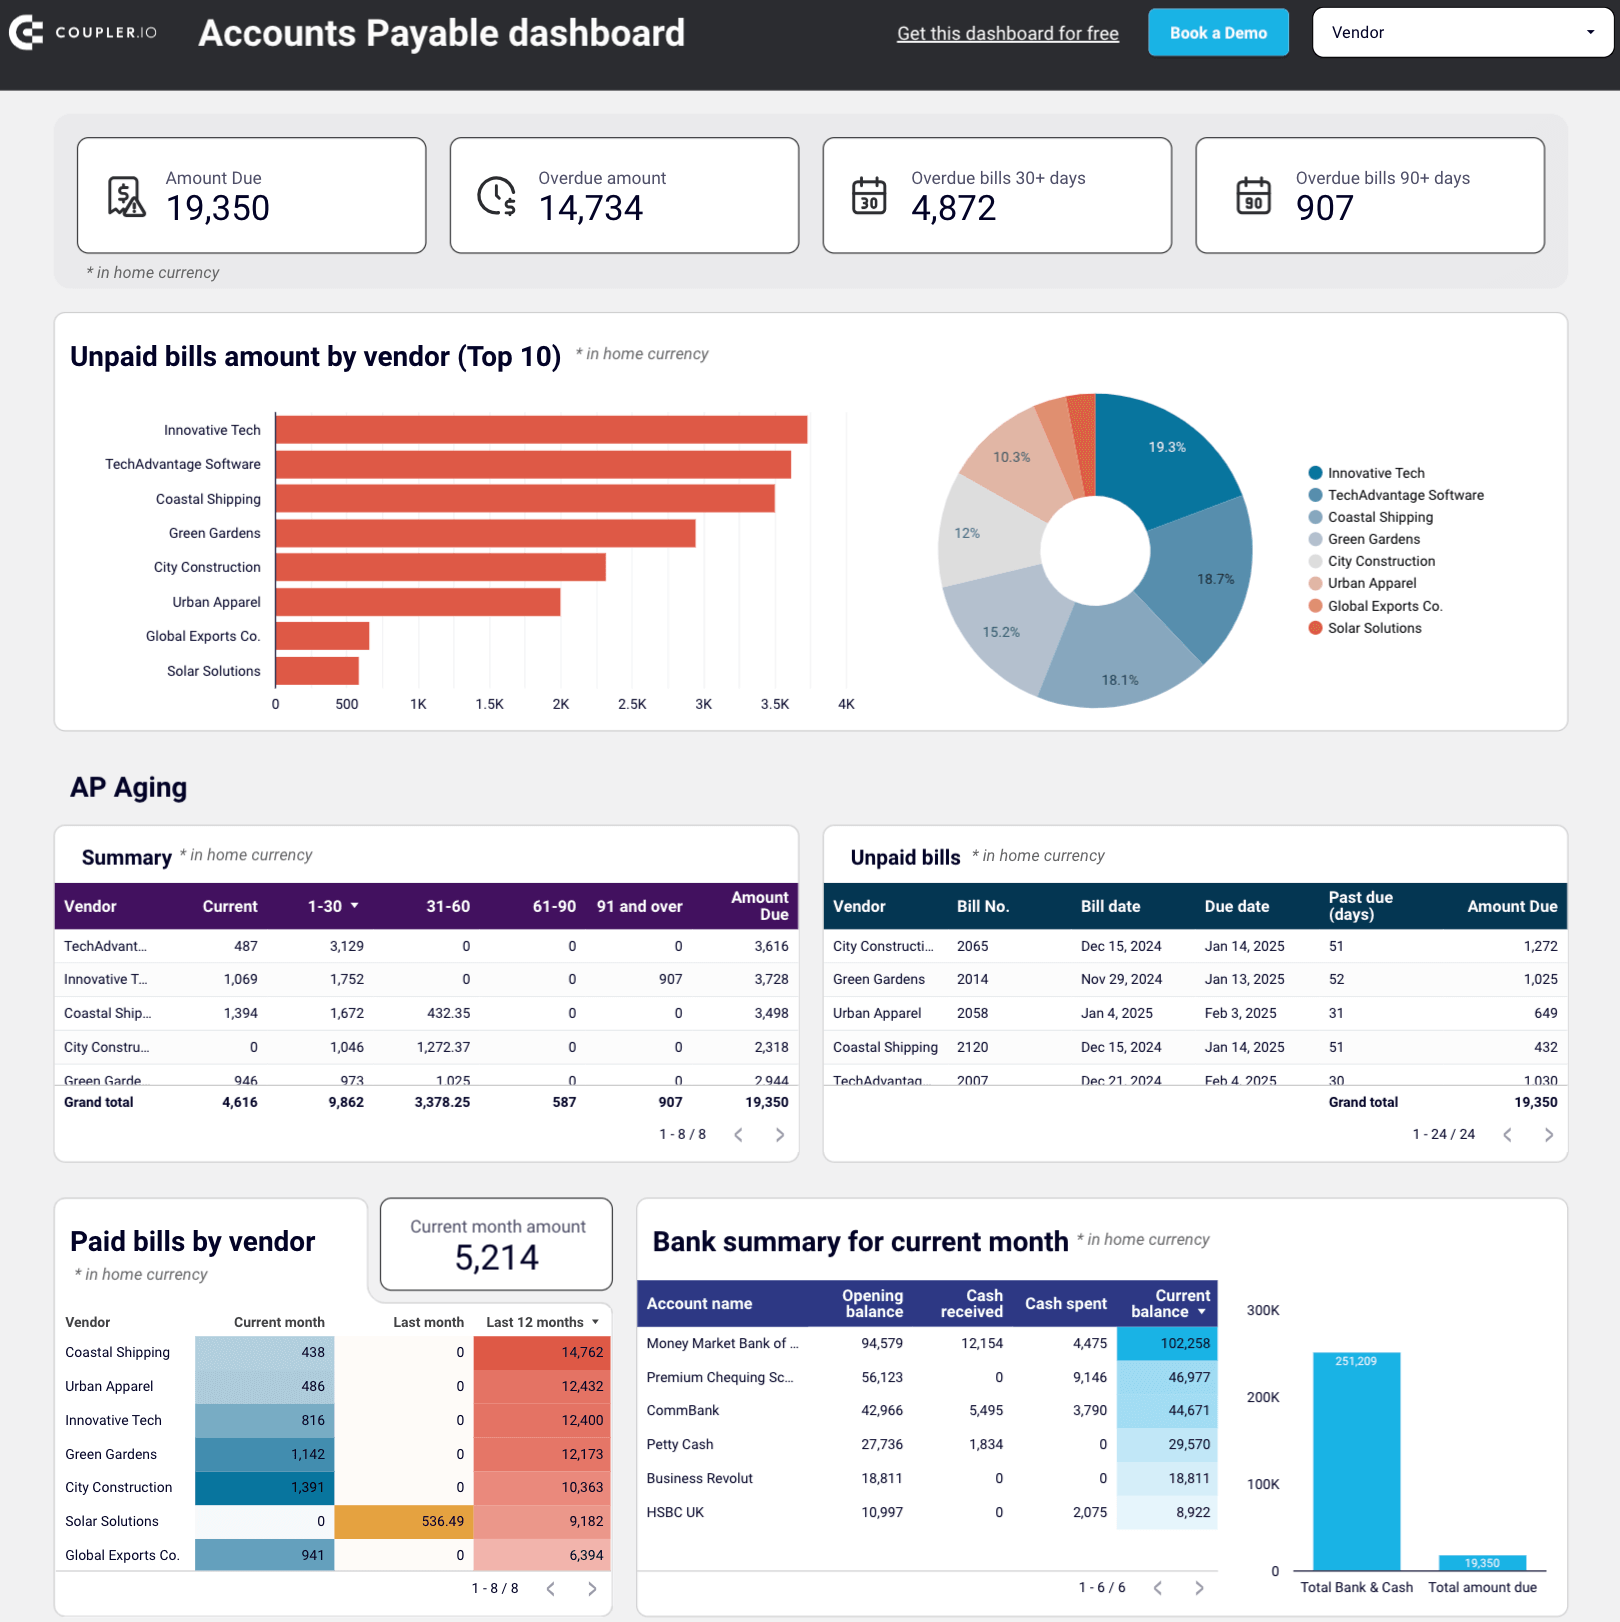
Using this dashboard, you’ll reveal the following:
- Unpaid bill amount by vendor: Check the amount of unpaid and overdue bills, with values displayed in the home currency. For unpaid bills, look at the top 10 vendors by credit debt. Additionally, see all the vendors and their share in your accounts payable, identify your major creditors, and prioritize payments to vendors.
- Paid bills by vendor: Go over bills from your vendors that were previously paid. Based on this data, evaluate your vendors by the amounts you have paid to them to decide on payment prioritization for specific creditors.
- Bank summary for the current month: Easily track your current balance by accounts to distribute your money correctly and prioritize payments.
- AP aging: Explore the distribution of overdue amounts by vendor and period: current, up to 30 days, 30 to 60 days, 60 to 90 days, and 90+ days. Look at the vendors’ overdue bills that constitute your accounts payable.
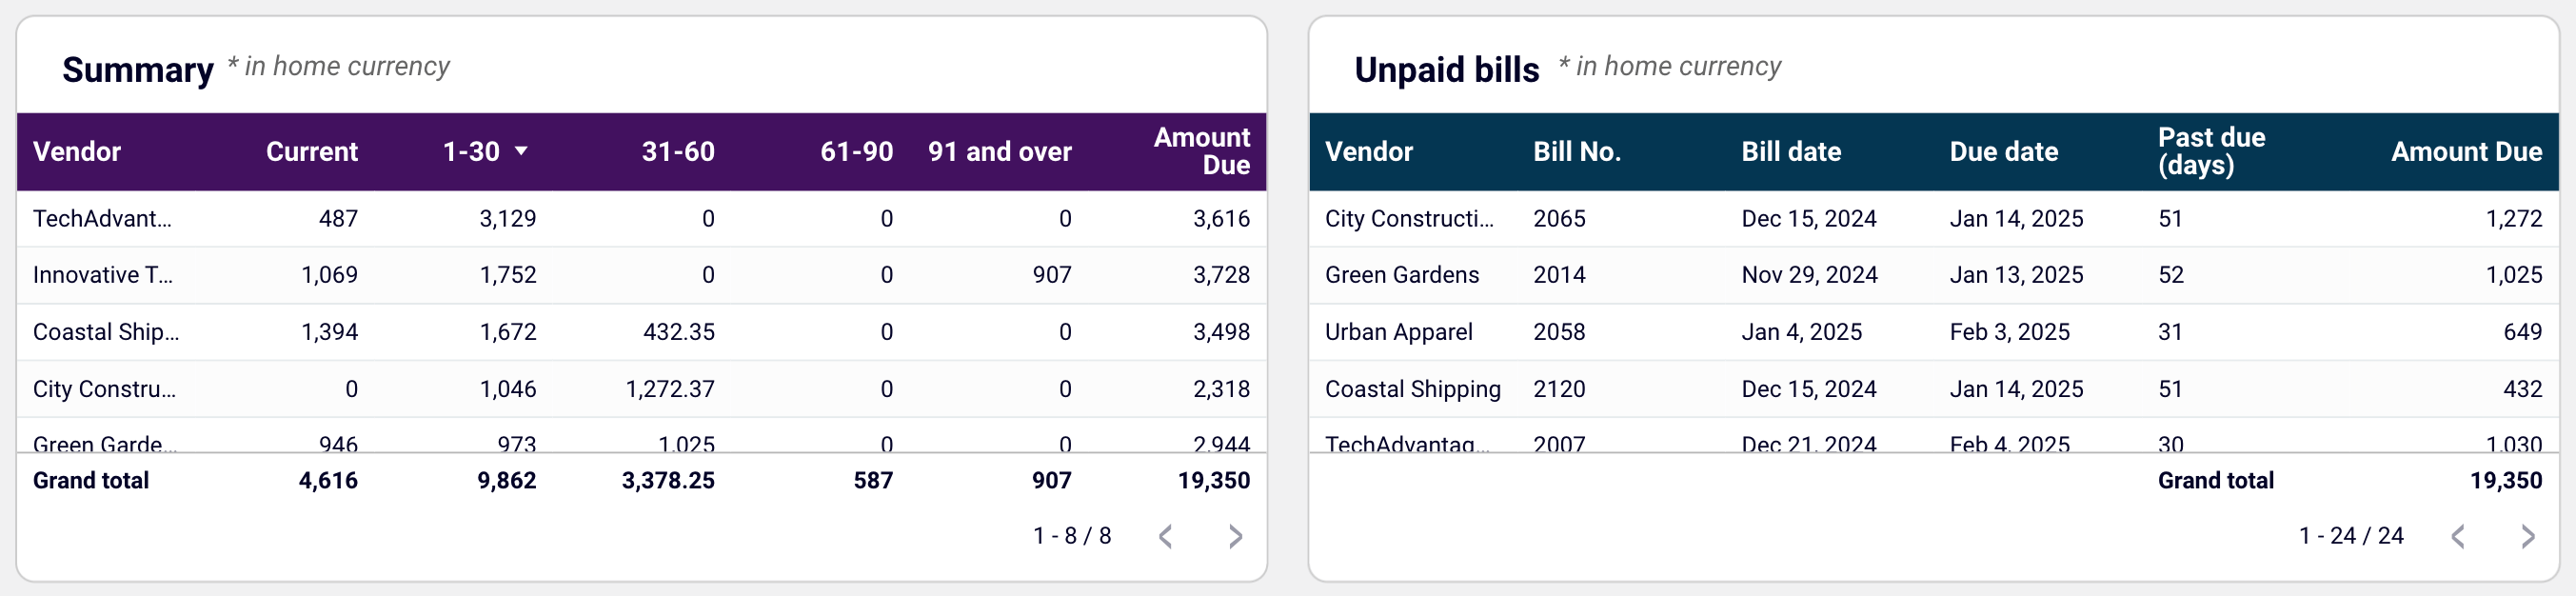
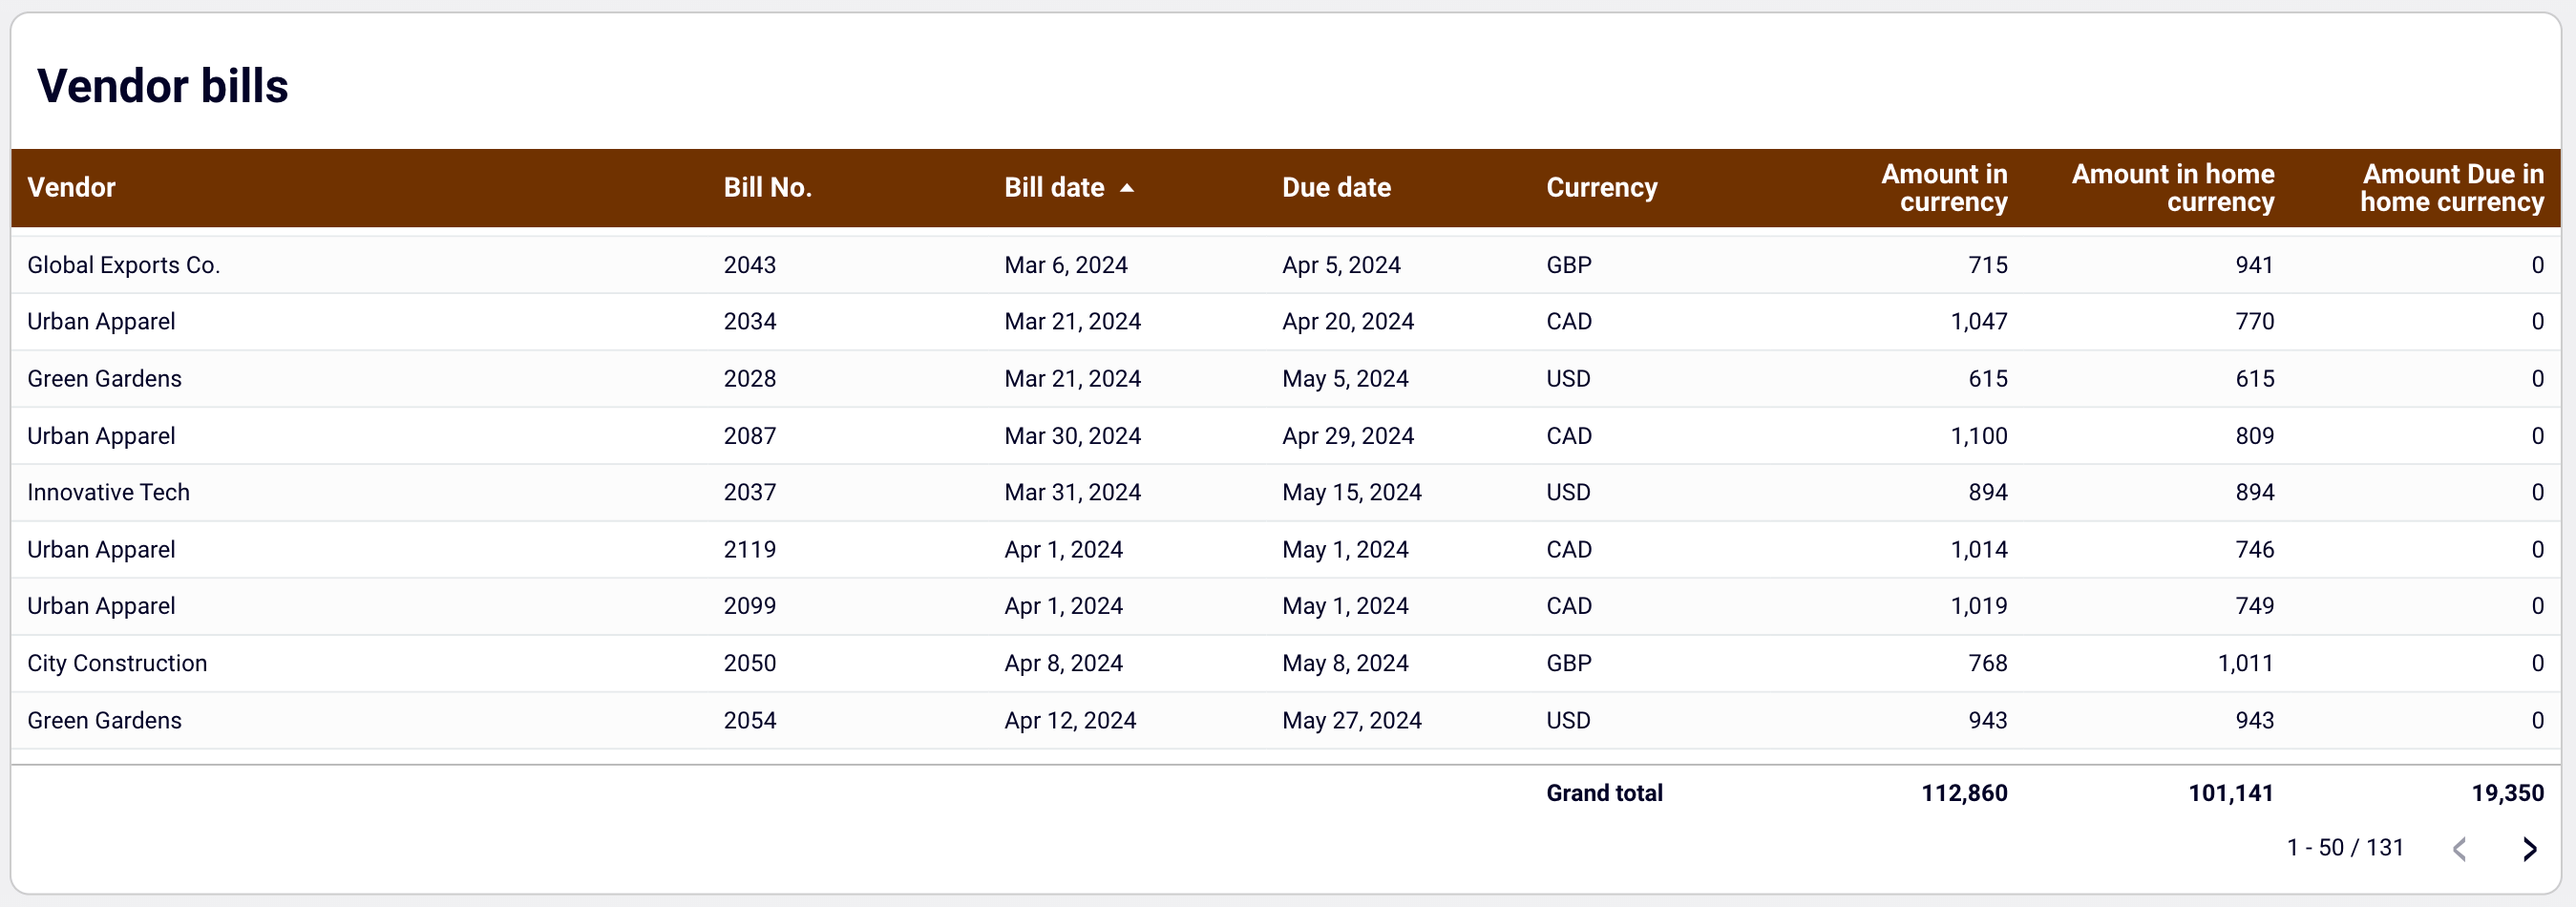
- Vendor bills: View the details of paid and unpaid vendor bills in all currencies.
The dashboard is available as a Looker Studio and Google Sheets template with a built-in connector by Coupler.io. To start using the dashboard, click the template’s Readme tab and follow the straightforward setup guide.
Accounts payable dashboard for Xero in Looker Studio
Track outstanding, overdue, and paid bills to optimize payment schedules, manage vendor relationships, and ensure smooth cash flow.
Accounts payable dashboard for Xero in Google Sheets
Monitor vendor payment deadlines, track aging bills, and analyze payment history to optimize cash flow management and maintain healthy supplier relationships.
AR automation for Xero: Self-updating dashboard
The accounts receivable dashboard shows who your primary customers (debtors) are and how much they owe you. This information lets you make decisions about communicating with customers and activities to settle debt and prevent a cash gap.
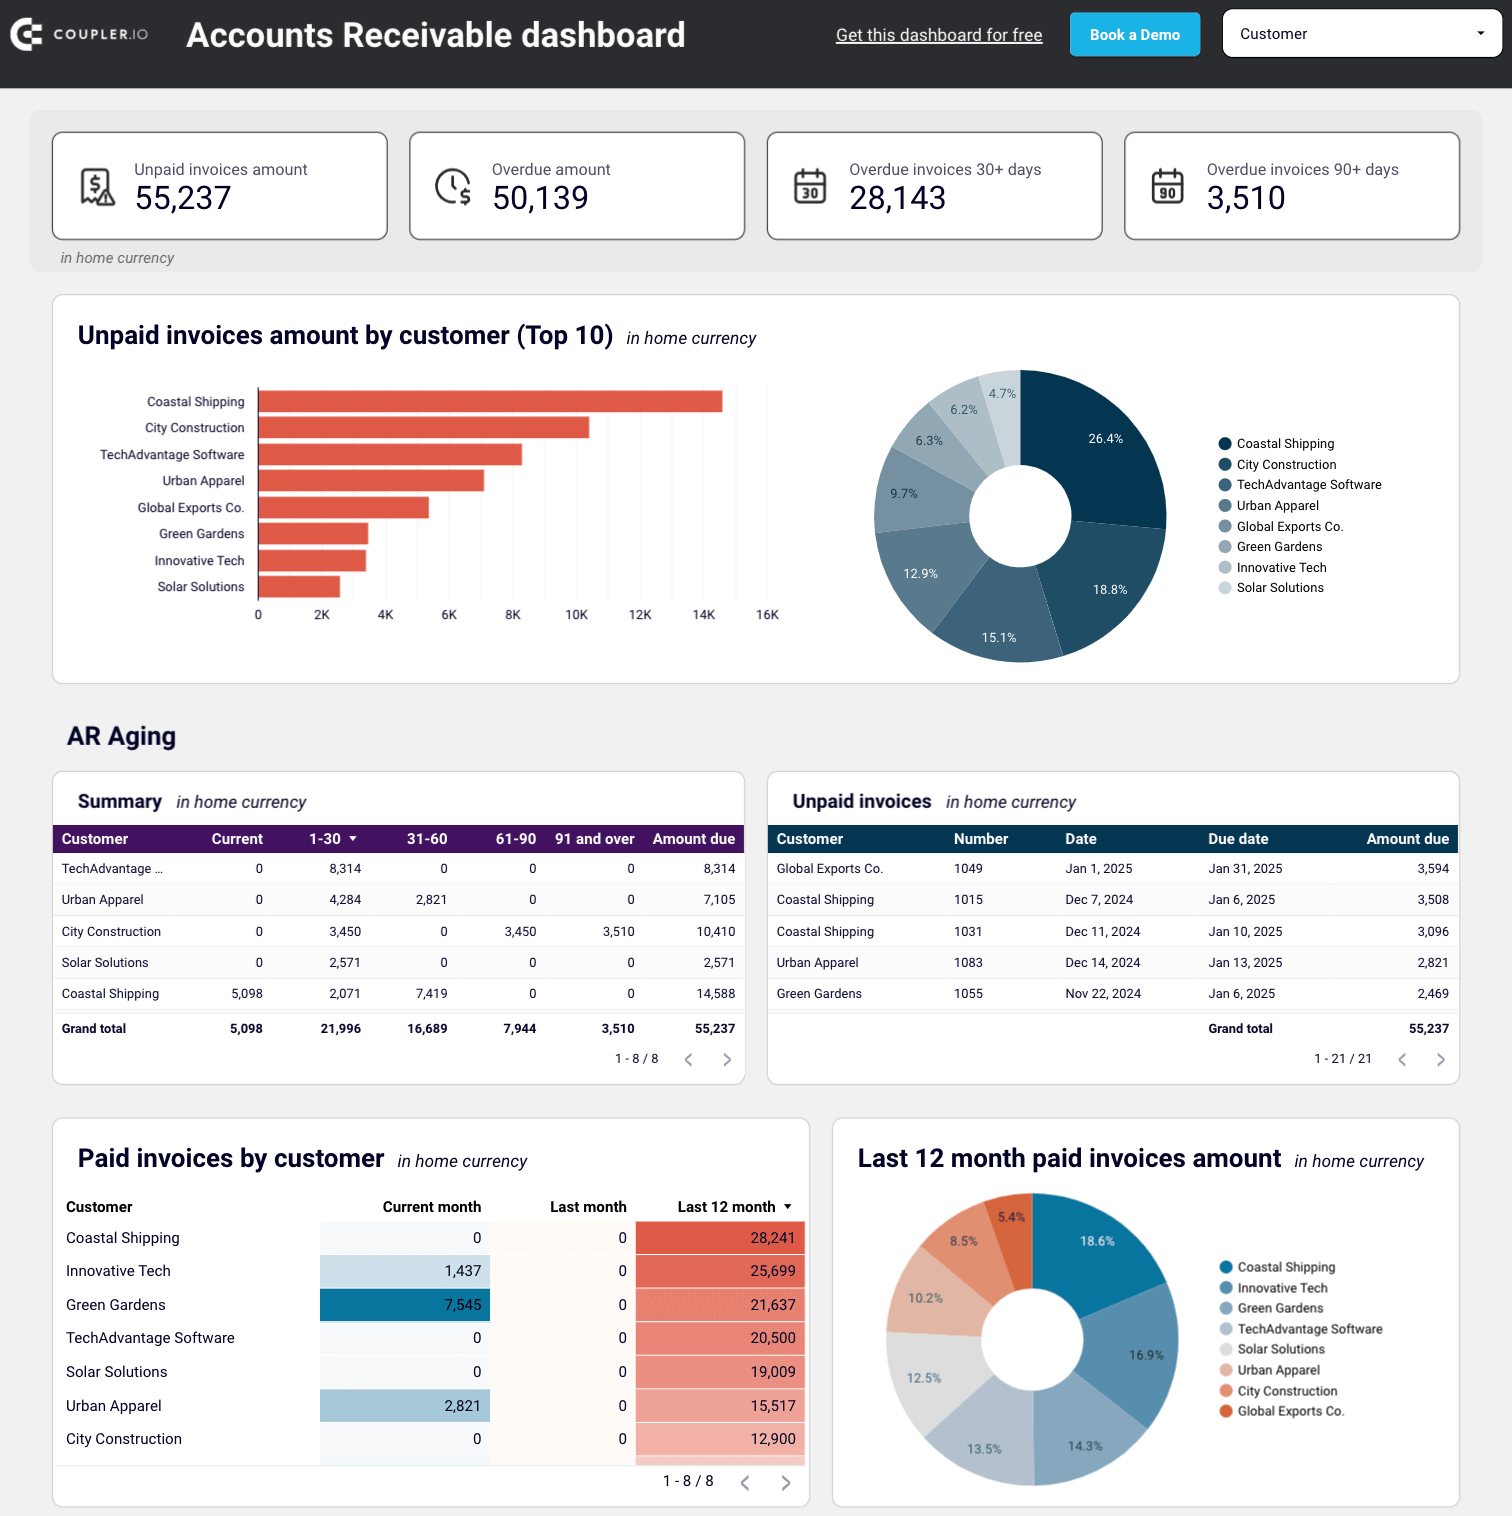
Here’s how you can drive AR automation for Xero using this dashboard:
- Unpaid invoices amount by customer: Check the amount of unpaid and overdue invoices in the home currency. For unpaid invoices, see a selection of the top 10 customers by debit debt. Additionally, view all the customers and their share of your accounts receivable. Based on this data, identify your major debtors and prioritize your activities to settle the debt.
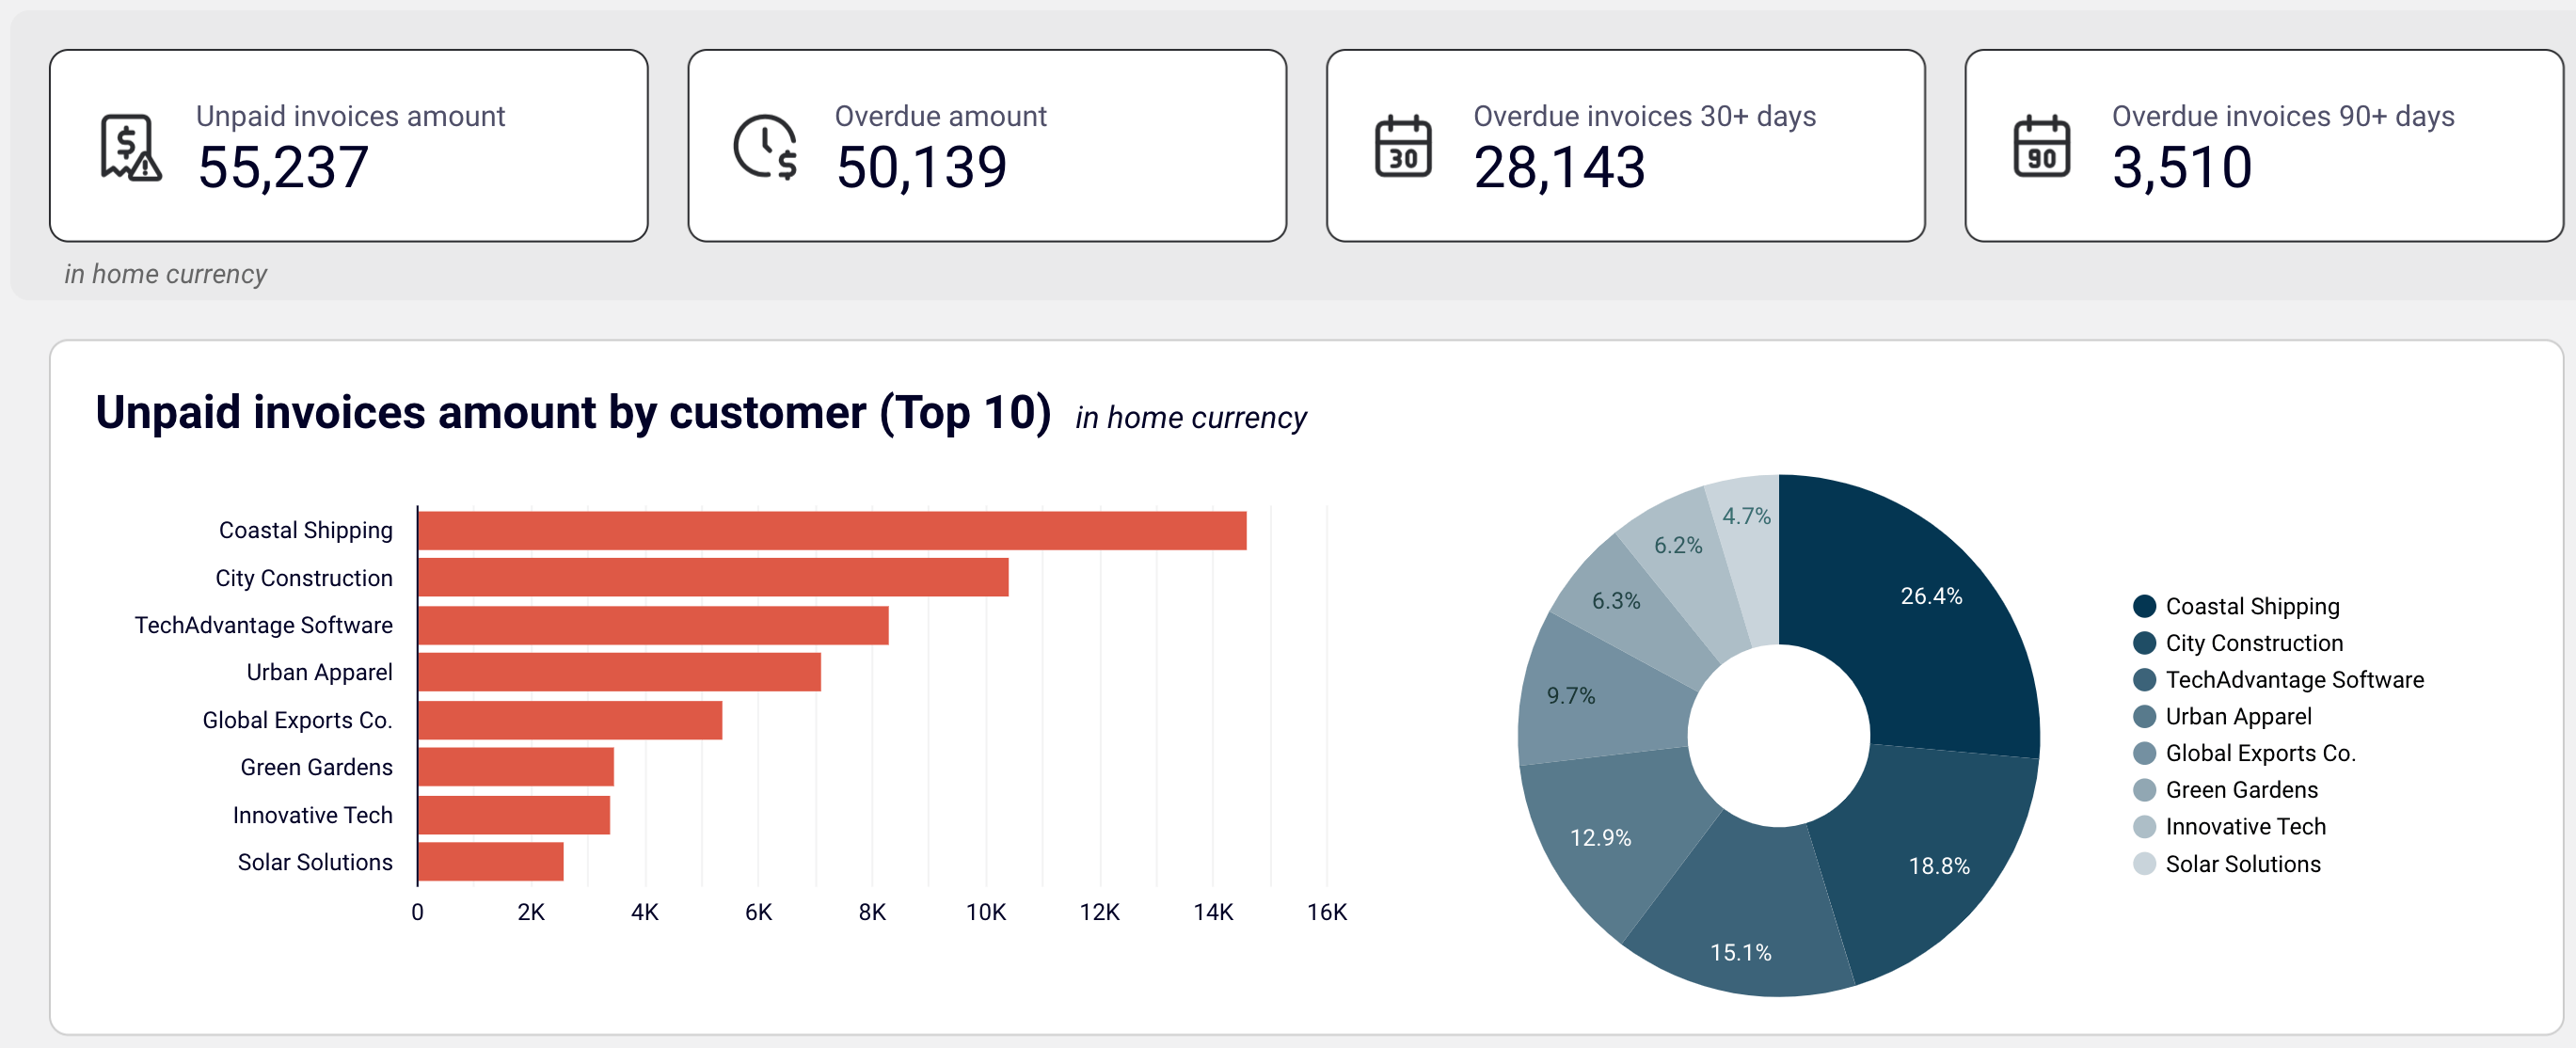
- Paid invoices by customer + last 12 months’ amount: Gain insights into invoices previously paid by your customers. Evaluate your customers based on the amount of paid invoices and decide on activities to ensure debts are settled.
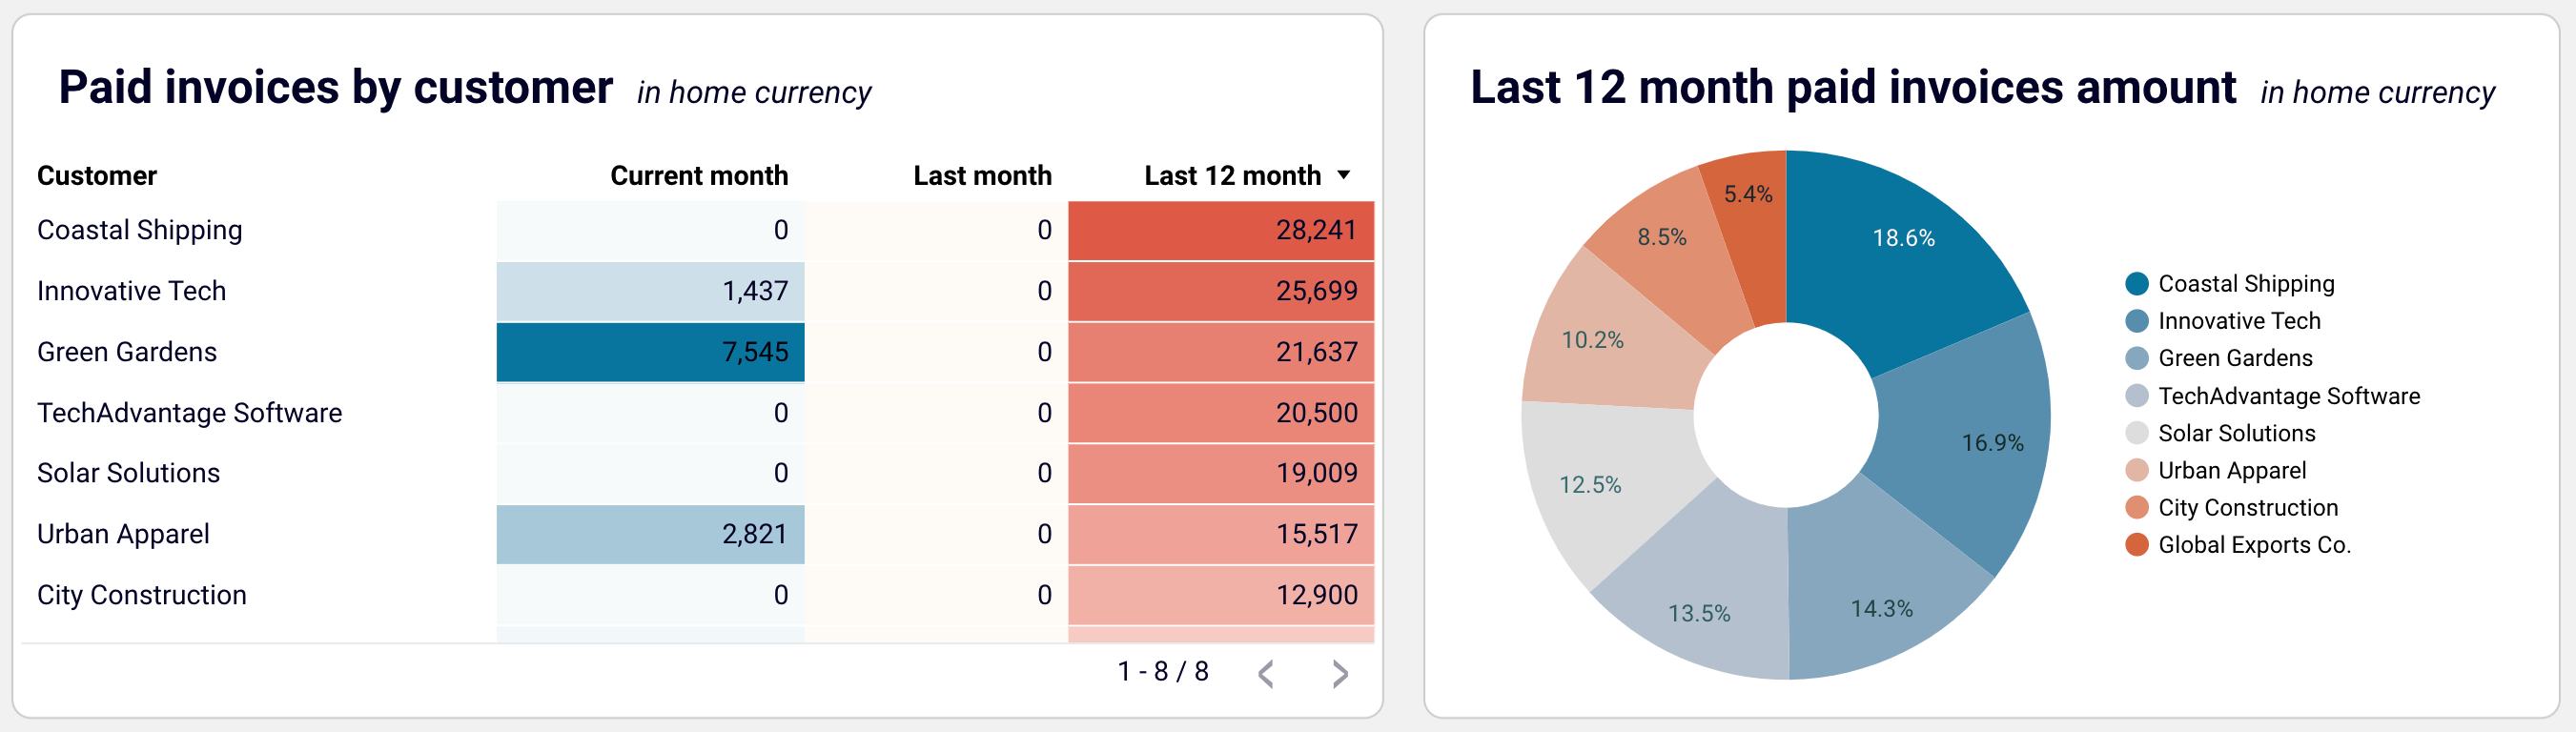
- Paid vs. unpaid invoices: Track the dynamics of paid and unpaid invoices from a monthly perspective.
- AR aging: Monitor the distribution of the overdue amounts by debtor and period: current, up to 30 days, 30 to 60 days, 60 to 90 days, and 90+ days. Discover the customer’s overdue invoices that constitute your accounts receivable.
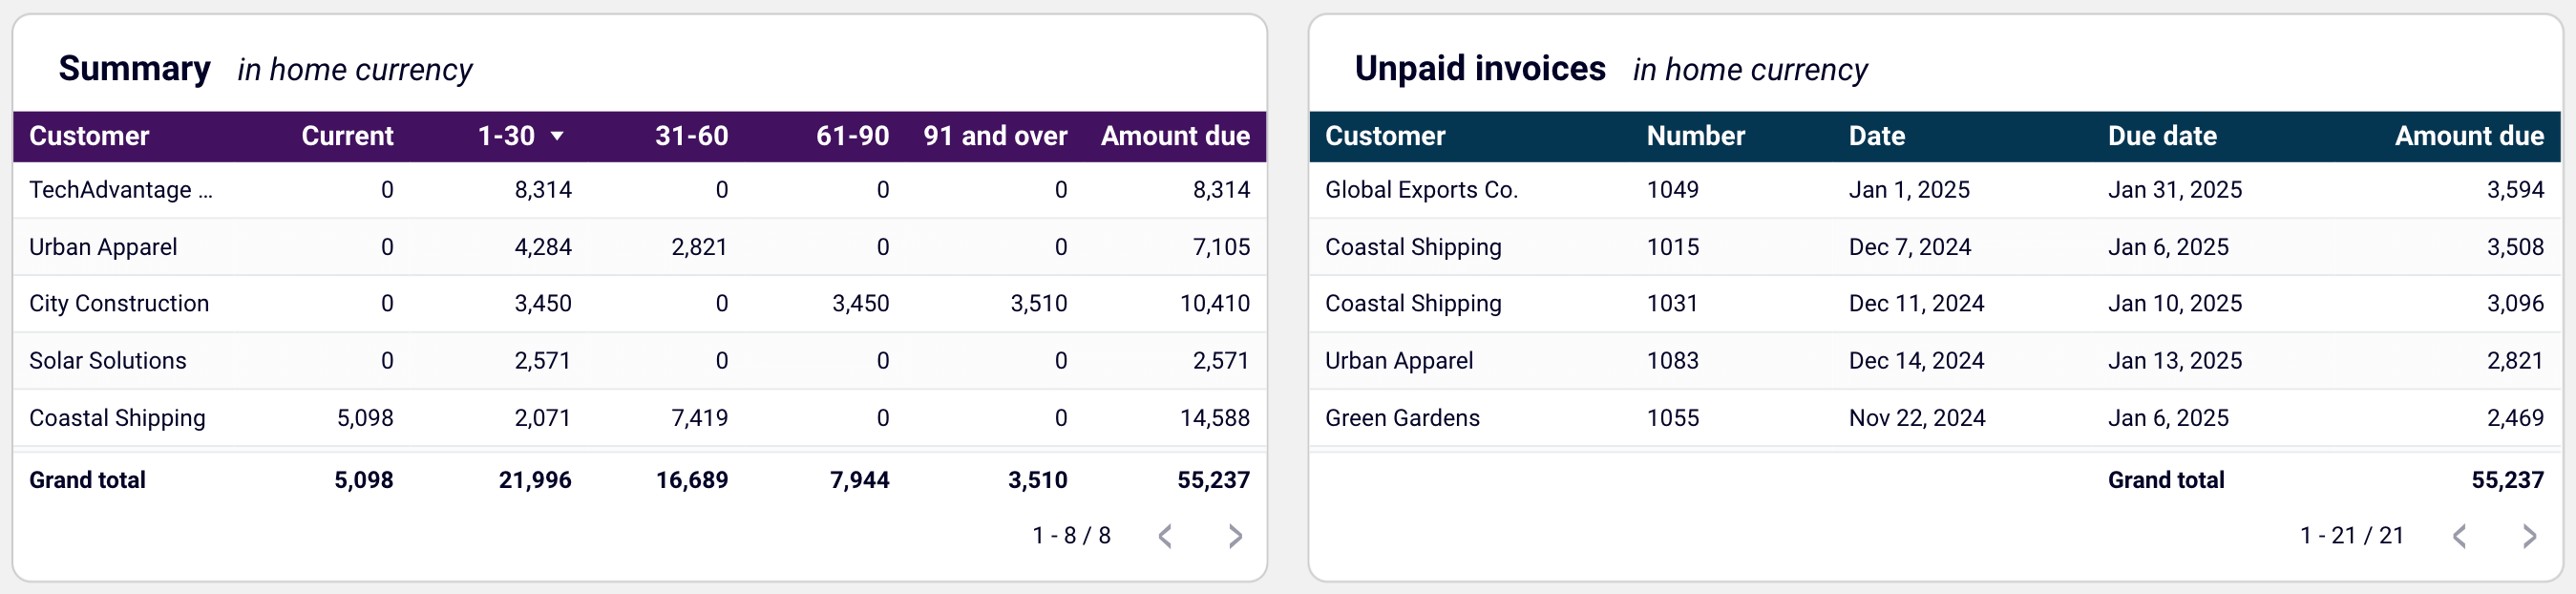
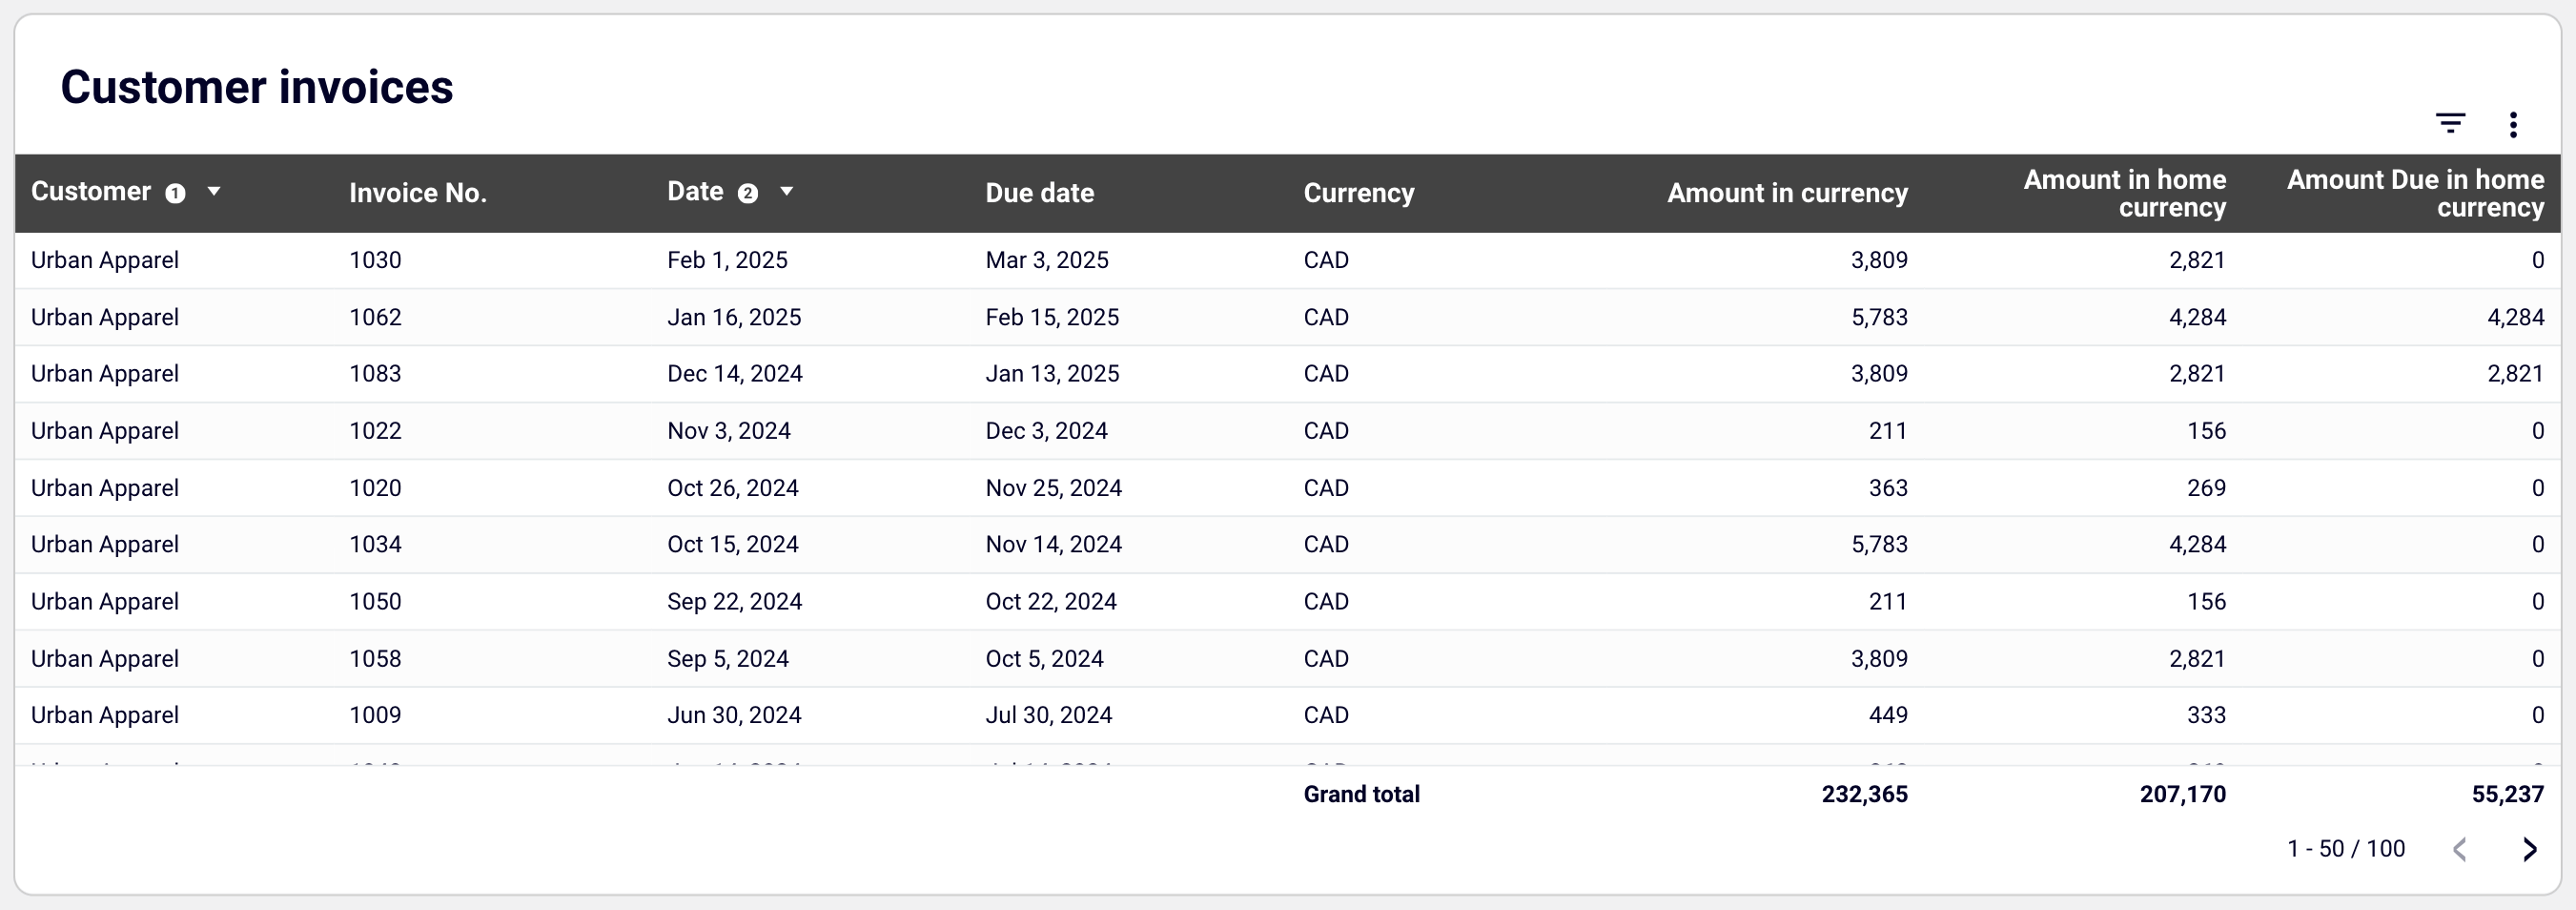
- Customer invoices: Unpack the details of invoices, both paid and unpaid, in all currencies.
The dashboard is available as a template in Looker Studio and Google Sheets with a built-in connector by Coupler.io. To get started with AR automation for Xero, follow the instructions in the Readme tab to have your data visualized in the dashboard.
Accounts receivable dashboard for Xero in Looker Studio
See which customers accumulate unpaid and overdue invoices, analyze AR aging, and track changes over time.
Accounts receivable dashboard for Xero in Google Sheets
Track outstanding customer payments, monitor aging receivables, and analyze the correlation between paid and unpaid invoices to improve cash flow management.
Set up Coupler.io’s financial dashboards for free and have your data transformed into actionable insights! If, however, you require a tailored dashboard solution for your reporting, contact our data experts.
Talk to our data experts
Get started for freeNative Xero automation features for accounting
Now, let’s delve deeper into the optimization of accounting activities available natively in Xero:
- Accounts payable automation – handling your bills with minimal manual effort.
- Bank reconciliations – matching your bank transactions with your Xero records.
- Invoicing – ensuring timely payment by customers for goods or services provided.
- Payroll and expense management – processing employee salaries, wages, and expenses for your business.
- Tax calculation – determining and applying the appropriate tax rate to transactions. ?
Xero accounts payable automation
To minimize manual errors in accounts payable, Xero allows you to automate bill entry by uploading files directly or forwarding bills from your email. Thanks to its AI capabilities, it extracts key details and creates draft bills that are ready for approval. You can also use Hubdoc, Xero’s data capture tool, to photograph and upload bills for paperless record-keeping.
Another possibility for Xero AP automation is to assign roles and permissions to control who can create and approve bills, achieving the following goals:
- Automatically detect and flag duplicate bills to prevent fraud and payment errors.
- Organize bills by status, add planned dates, and set up recurring bills to avoid manual data entry.
- Maintain strong relationships with suppliers by never missing a payment.
Additionally, AP automation for Xero saves you time on everyday admin by allowing you to pay multiple bills in one go. You can export a payment file from Xero and upload it directly to your online banking. Each supplier receives a single payment and reference, and the bills are marked as paid.
Bank reconciliations
Bank reconciliation is the process of ensuring that all transactions in your bank accounts are reflected in your business accounting records. It’s the best way to keep your books up to date.
For a complete understanding, let’s clarify a couple of terms:
| Term | Definition |
Statement lines | Transactions imported from your bank account. In your online banking, they’re called bank transactions, and when imported into Xero, they’re referred to as bank statement lines. |
| Transactions | Records created in Xero, such as invoices, bills, expense claims, or cash transactions. |
The aim of bank reconciliation is to match each statement line with an existing transaction or create a new transaction during the process. Xero accounting software automates this by notifying you when statement lines are ready to reconcile.
By regularly completing your bank reconciliations, you will:
- Ensure all business transactions are captured in Xero.
- Know whether an invoice or bill has been paid.
- Identify and correct any mistaken or unauthorized transactions.
- Maintain an up-to-date view of your cash flow to track profitability.
- Be prepared to file taxes with a complete record of your income and expenses.
Now, it’s time to explore how to configure Xero to automate your bank reconciliation process.
Setting up bank reconciliations in Xero
You need to complete three simple steps:
- Add your business bank accounts.
- Connect a bank feed.
- Enter your conversion date and opening balances.?
Add your business bank accounts
By adding your bank accounts, including credit cards and loans, you ensure Xero has all the data needed for reconciliation.
To do this, sign in to Xero, go to the Accounting menu, select Bank accounts, then click Add Bank Account.
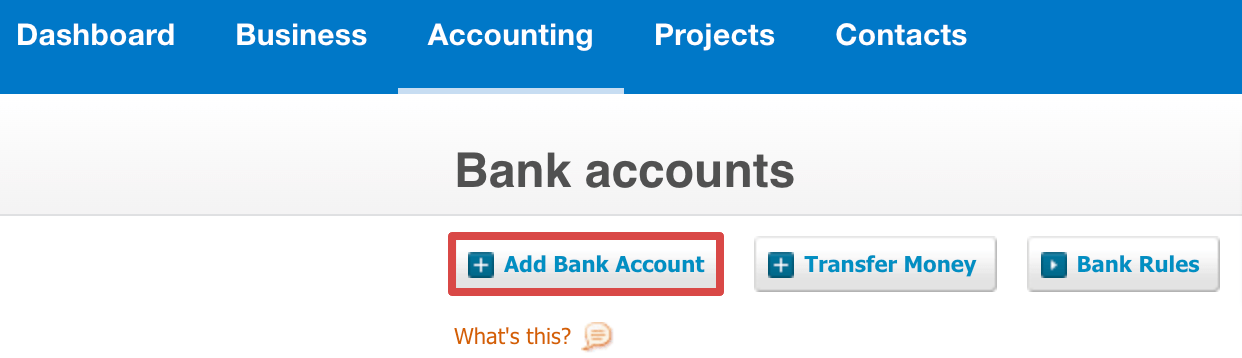
Next, type your bank’s name and select it from the list. If your bank isn’t listed, check the spelling, try a different country, or click Add without bank feed.
The following steps will vary depending on your bank’s specifics.
Tip: The process of adding accounts and feeds in Xero may vary depending on your country and bank. If you get stuck, click the help icon ? in the top-right corner of the screen.
Once you’ve added your accounts, automate the reconciliation process by connecting a bank feed to send transaction data directly to Xero.
Connect a bank feed
To set up your bank feed, find your account on the Xero dashboard and click Get bank feeds. These are available for most banks, but the steps to connect your feed may vary.
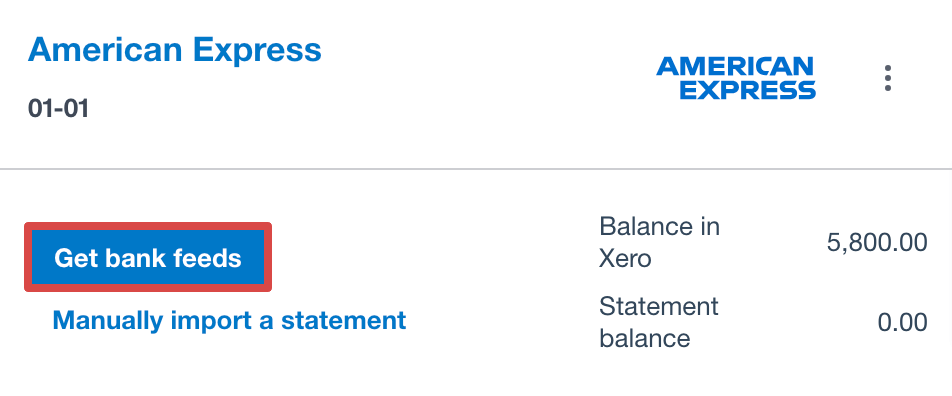
Once you’ve applied for a bank feed, your transactions typically appear in Xero within 10 working days.
Note: If a bank feed isn’t available, you can either set up a Yodlee feed (if supported in your region) to automatically push your transactions into Xero or manually import your bank statements. If you accept payments through an online service provider like Stripe or PayPal, you can automatically connect a feed to fetch these transactions into Xero.
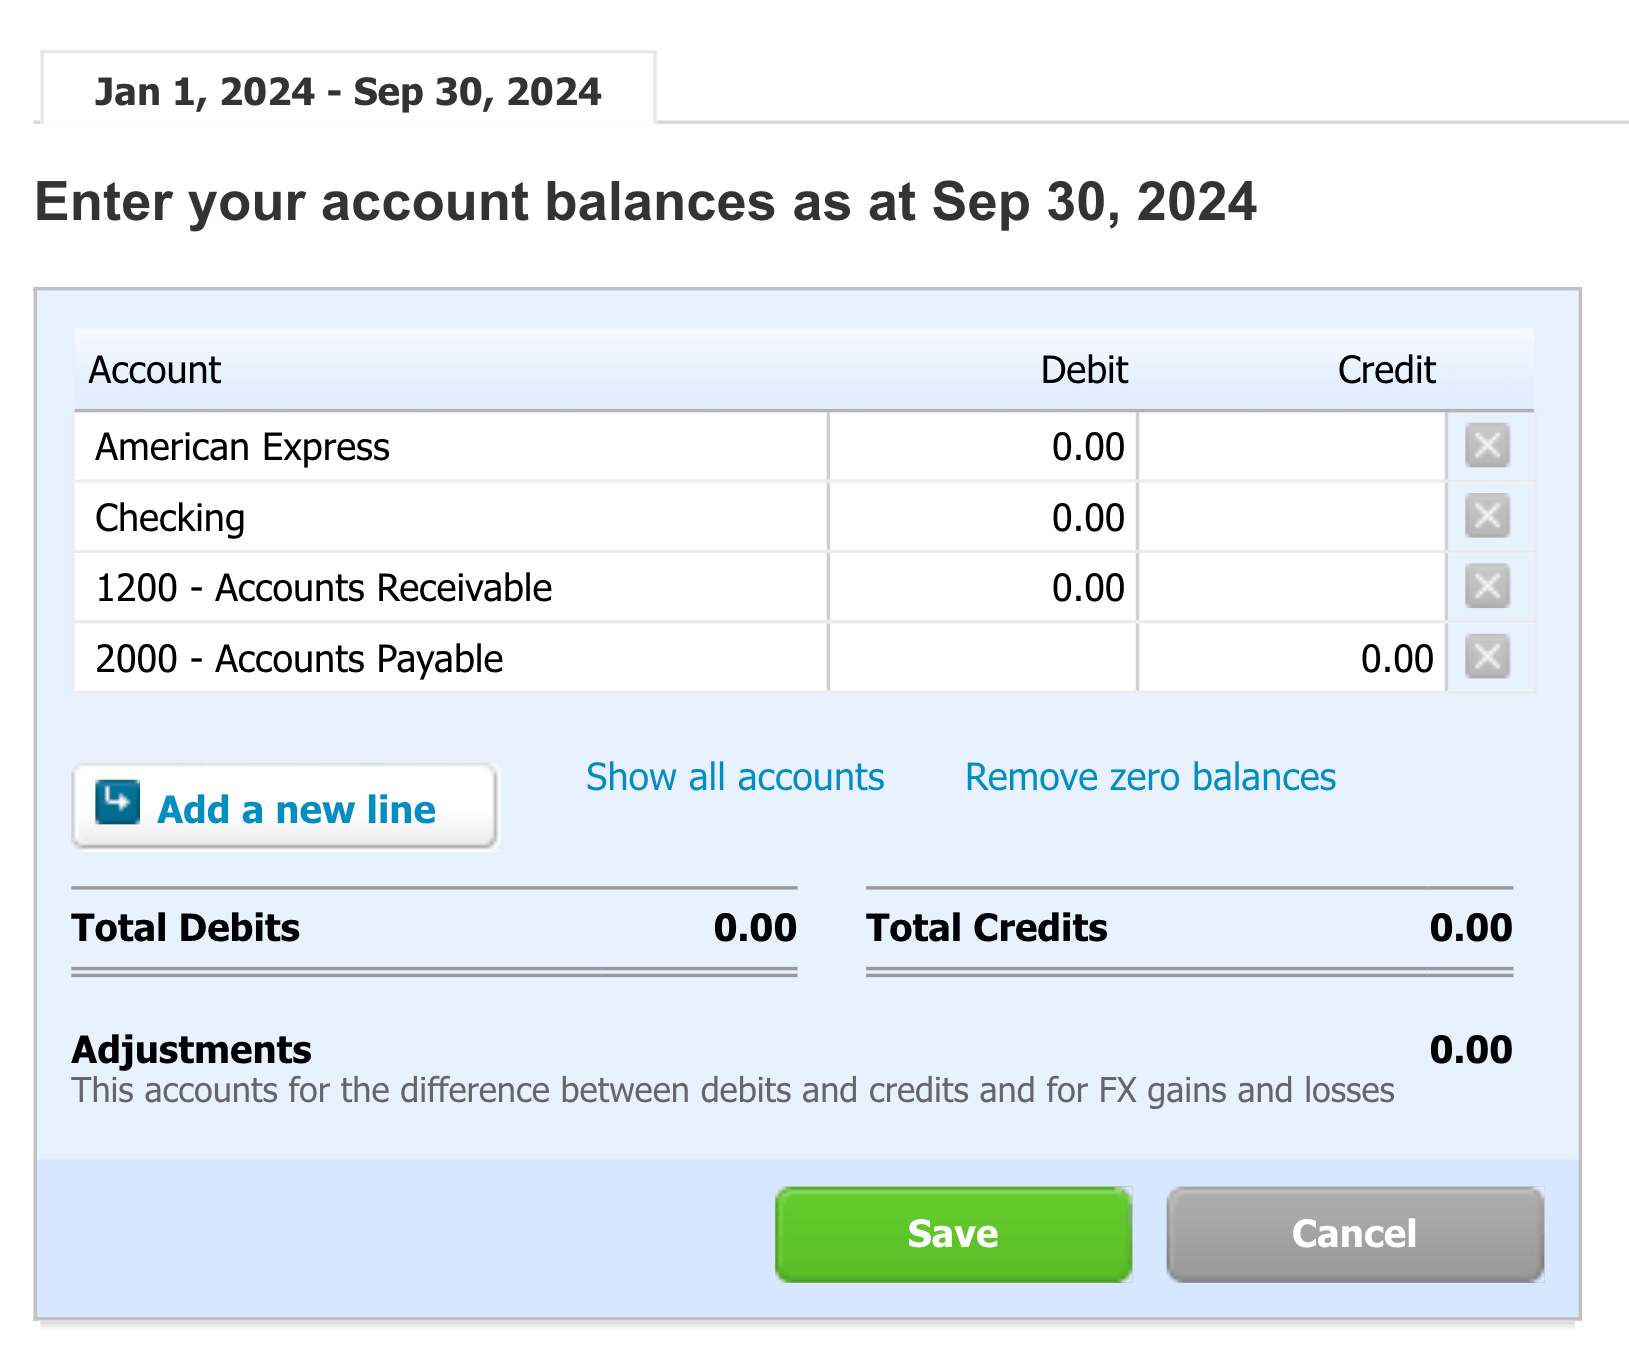
Enter your conversion date and opening balances
Your conversion date is the day you started using Xero, and your opening balances are the closing account balances from the day before. Both are found in your bank statements and serve to establish a starting point for reconciliation, ensuring that all your financial records in Xero match the state of your accounts at a specific time.
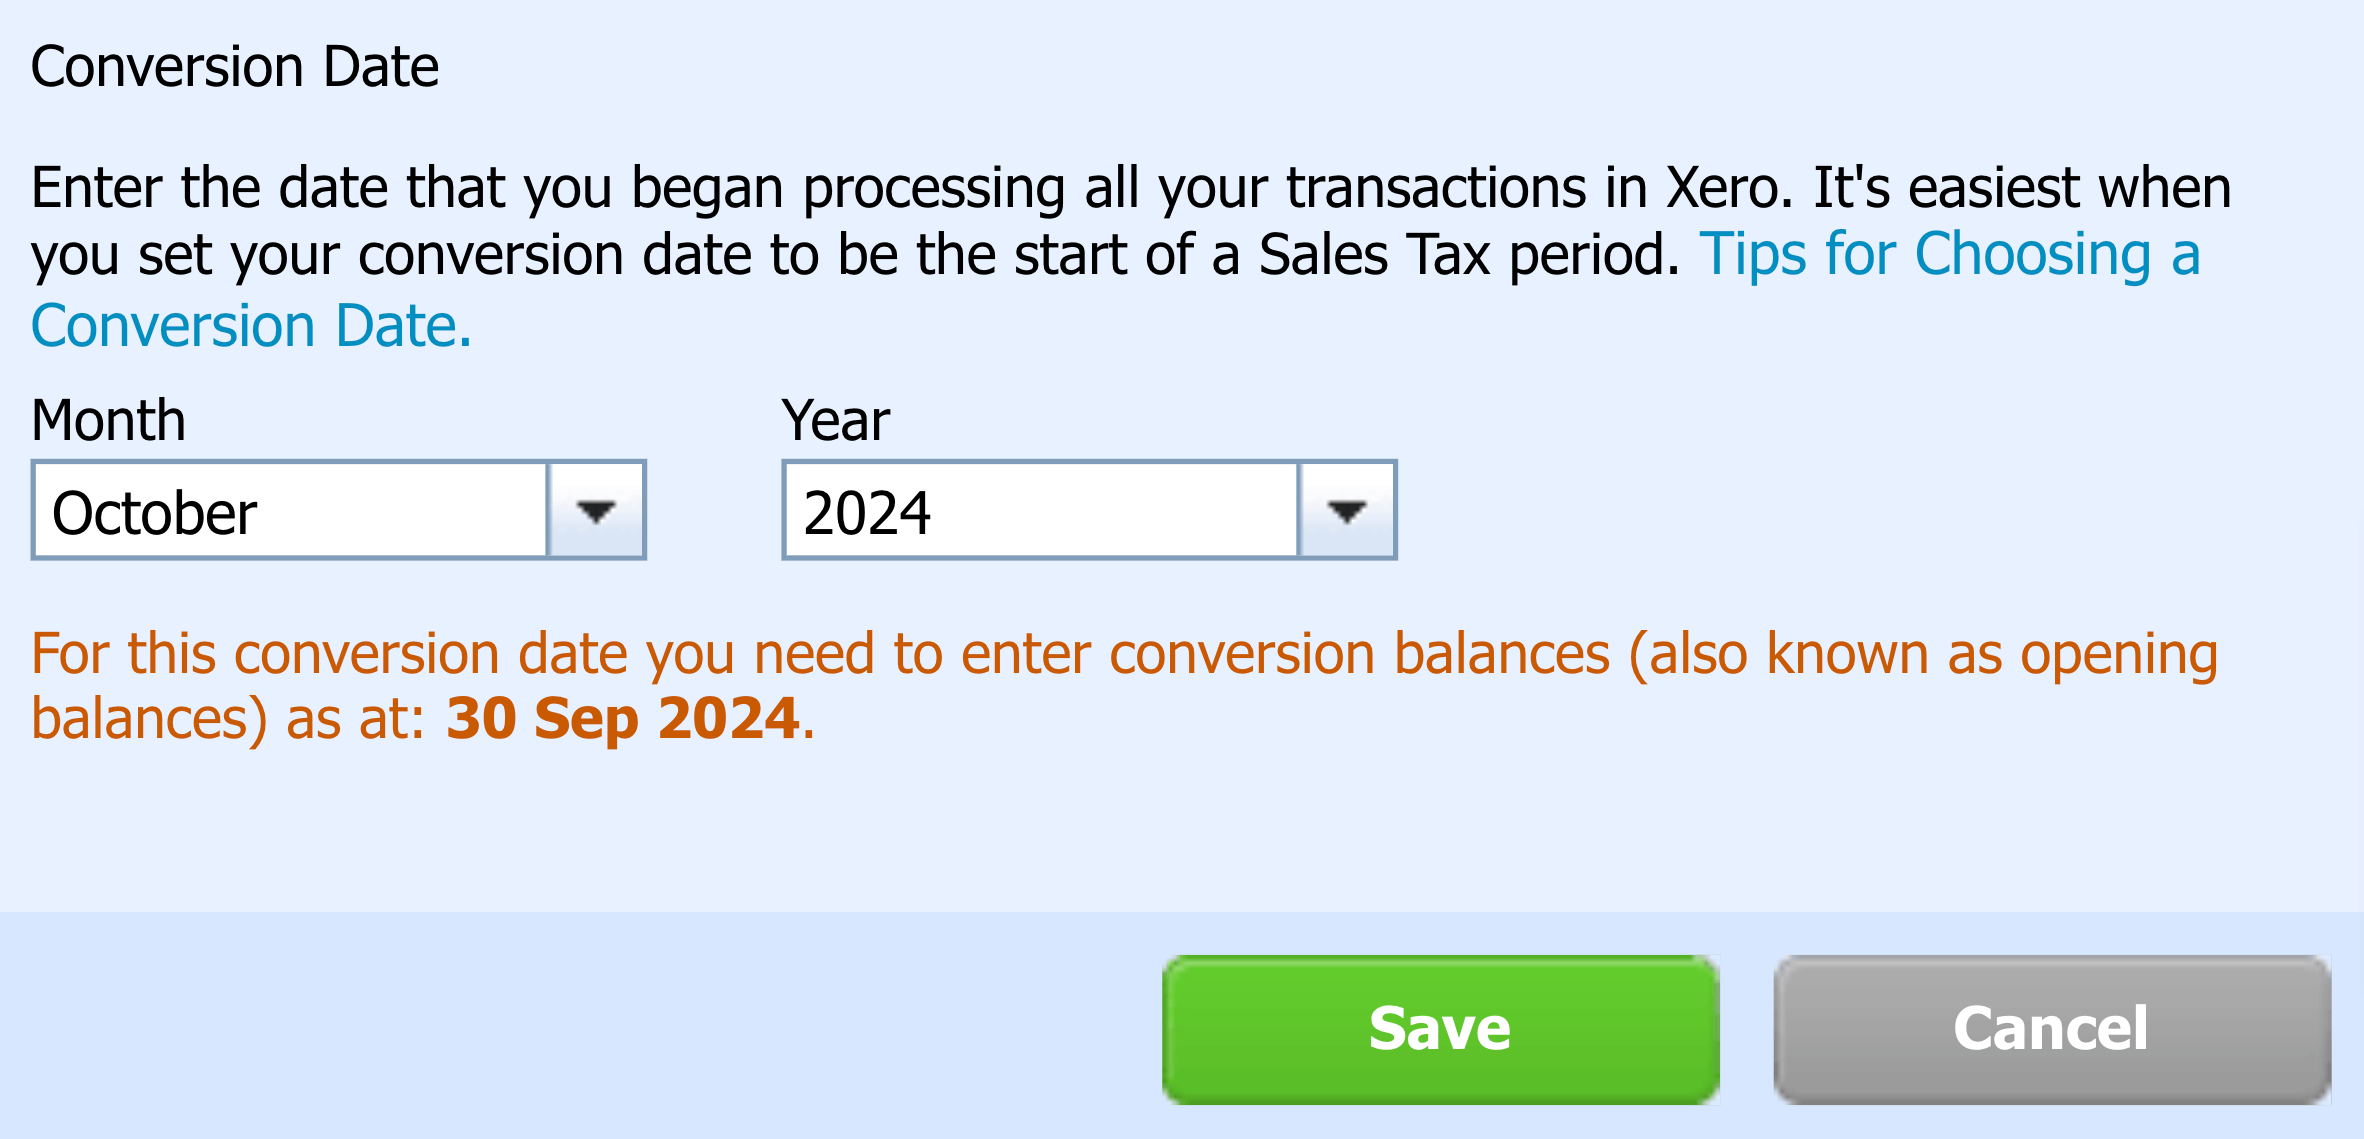
Set your conversion date by following these steps:
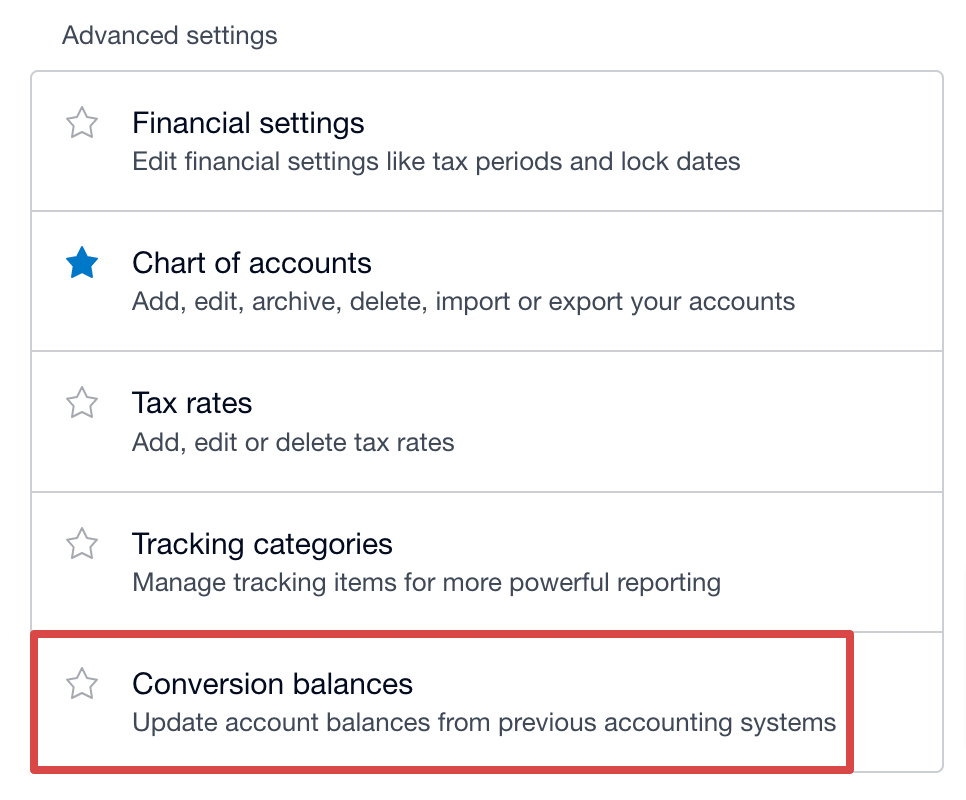
- In the Accounting menu, choose Advanced.
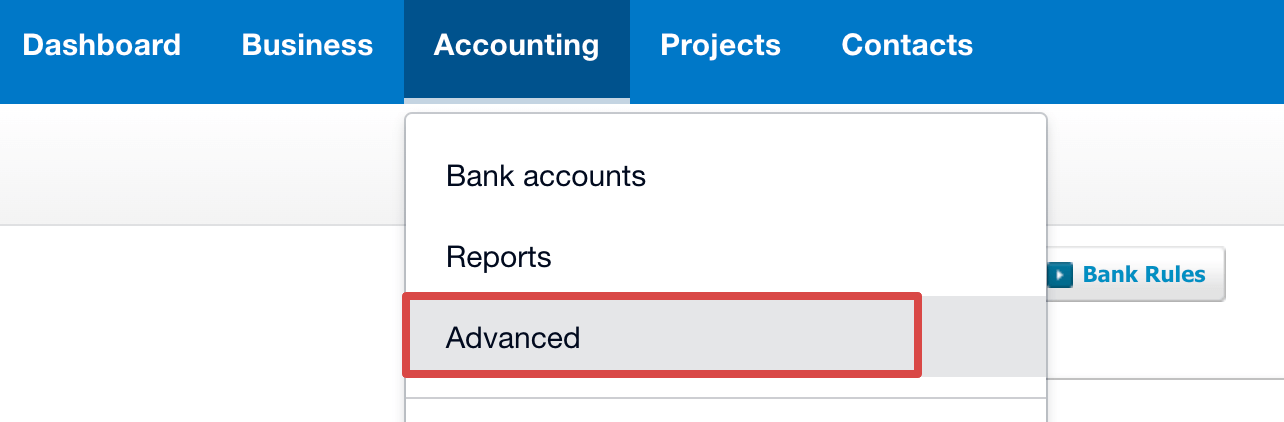
- Select Conversion balances.
- Click on Conversion Date, then enter the month and year. Select Tips for Choosing a Conversion Date if you need guidance.
- Save the settings.
- Enter your opening balance for each bank account. Start by adding your bank account balances from your online or paper statements. Input positive balances in the debit column and any overdrawn credit cards or bank accounts in the credit column. Then, select Save.
Sometimes, there’s a gap between your conversion date and when your bank feeds start. If this occurs, transactions made between these dates won’t show in Xero. You’ll need to manually import any bank statement lines from this period to ensure your data is accurate.
To fetch missing statement lines, follow the instructions below:
- Export your bank statement for the missing date range from your online banking portal. Xero accepts these formats: OFX, QBO, QFX, QIF, and CSV. We recommend using OFX, as you can push it into Xero without modifying the export file from your bank.
- In the Accounting menu, select Bank accounts, then find the account where you want to import bank statement lines.
- In the Manage Account dropdown, go to the Reconcile menu, then choose Import a Statement. Follow the prompts to complete the upload.
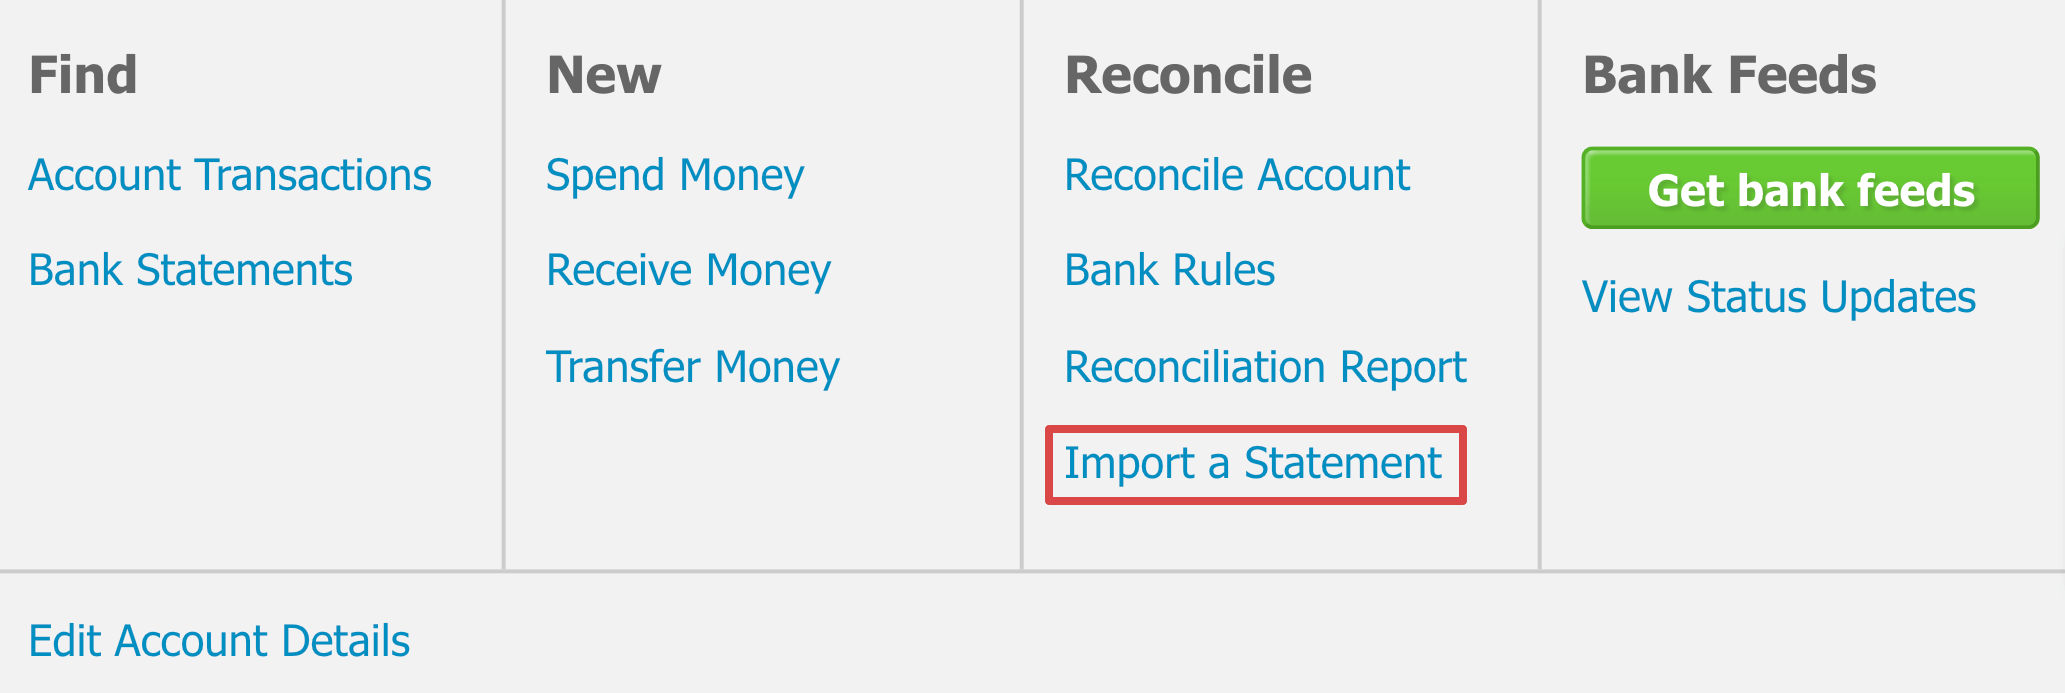
Note: If you can’t export the transactions in one of the mentioned formats, create a CSV statement file using a spreadsheet app like Google Sheets or Excel.
Now that you’ve added your bank feeds, conversion date, and opening balances to Xero, you’re ready to complete your first bank reconciliation.
Complete your bank reconciliation
Xero will use transaction details, such as the date and amount, to suggest matches between bank statement lines and your transactions for reconciliation. All you need to do is review the details and accept the match.
Do this step by step as follows:
- From your Xero dashboard, select the account you want to reconcile and click Reconcile ? items.
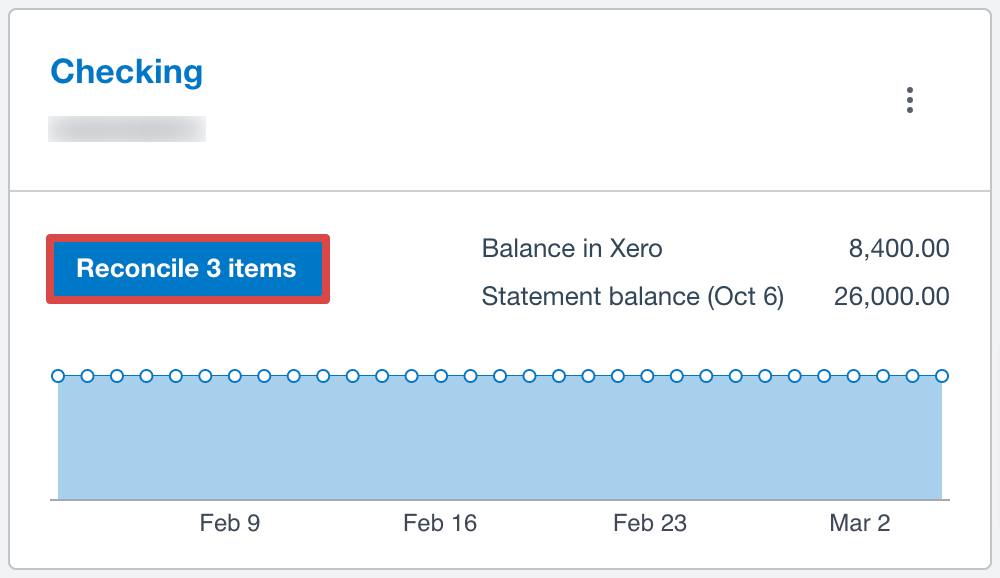
Note: If the Reconcile ? items button doesn’t display, it indicates that there are no bank statement lines to reconcile.
- On the Reconcile tab, you’ll see two lists of transactions: bank statement lines on the left and transactions you’ve recorded in Xero, such as invoices or bills, on the right. Suggested matches will be highlighted in green. Accept a match, and Xero will reconcile the statement line and mark the invoice or bill as paid.
Some bank statement lines won’t have suggested matches, such as when you pay a supplier one amount for several bills. In that case, use Find & Match to reconcile these transactions:
- Next to the transaction line, click Find & Match.
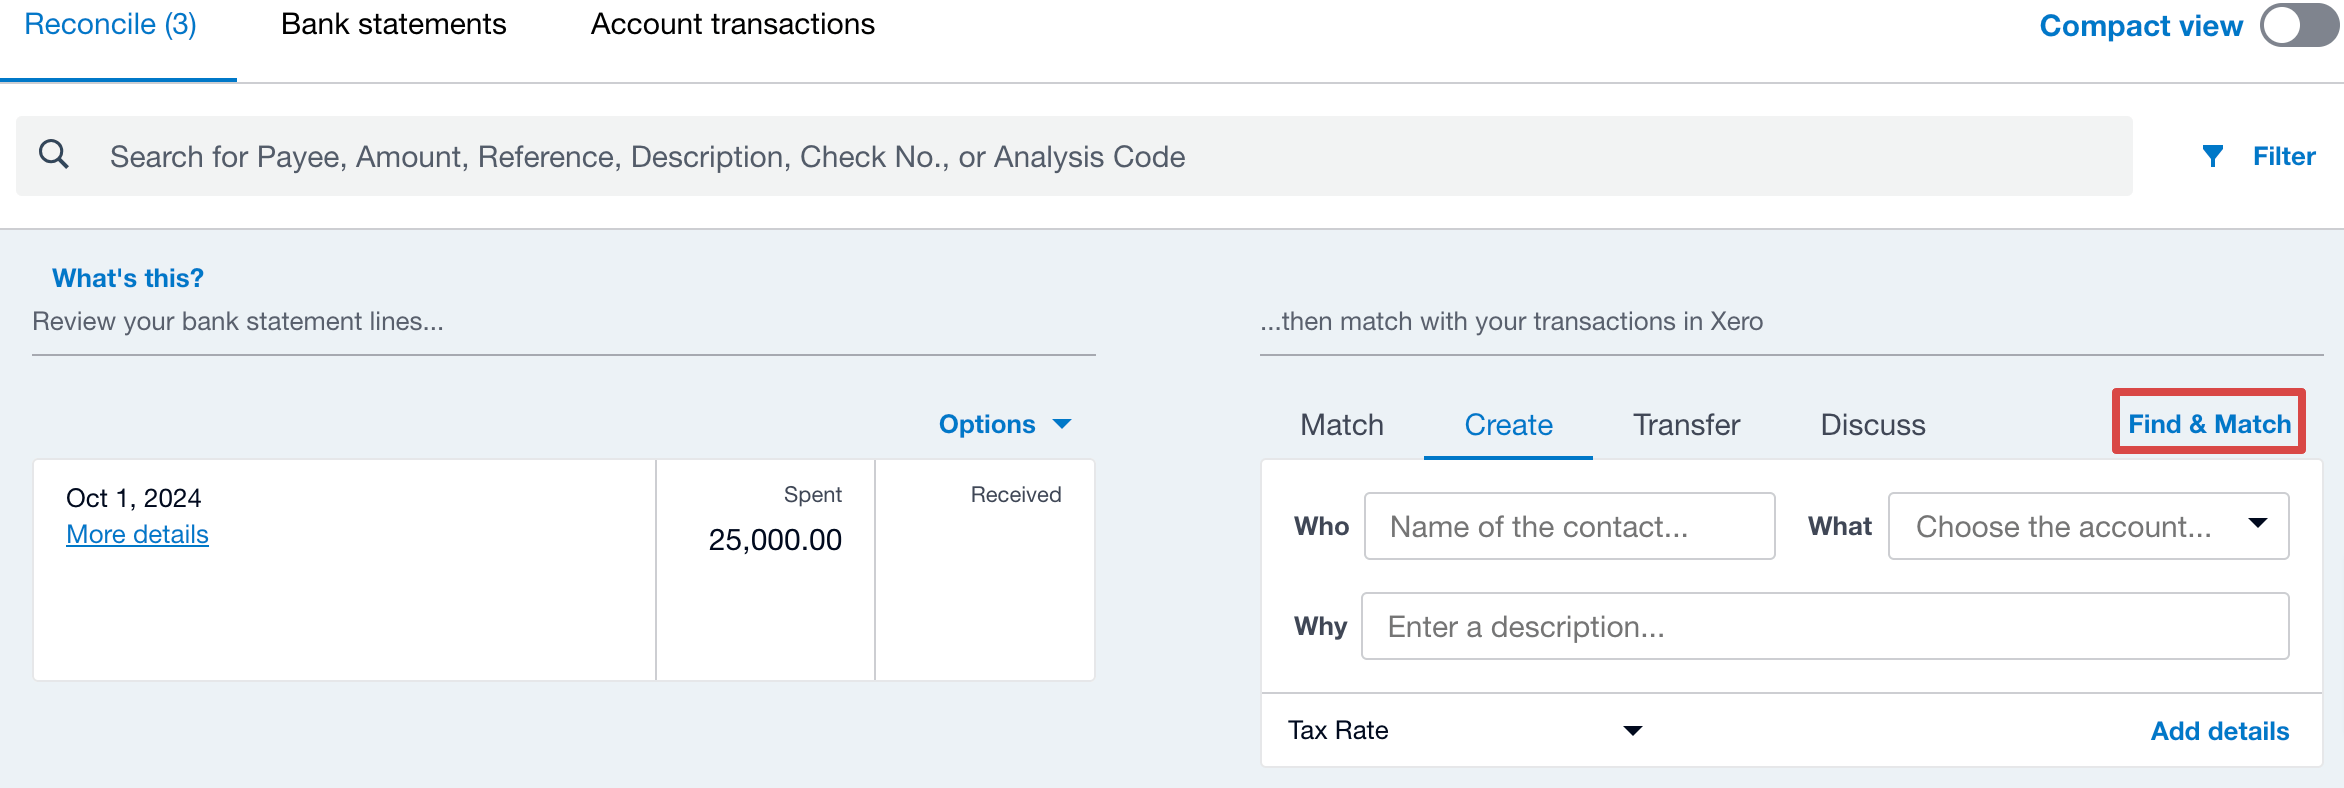
- Enter a name or amount, then click Go to search.
- Select each transaction line you want to reconcile with the statement line. Confirm that the details match those on your bank statement, then choose to reconcile.
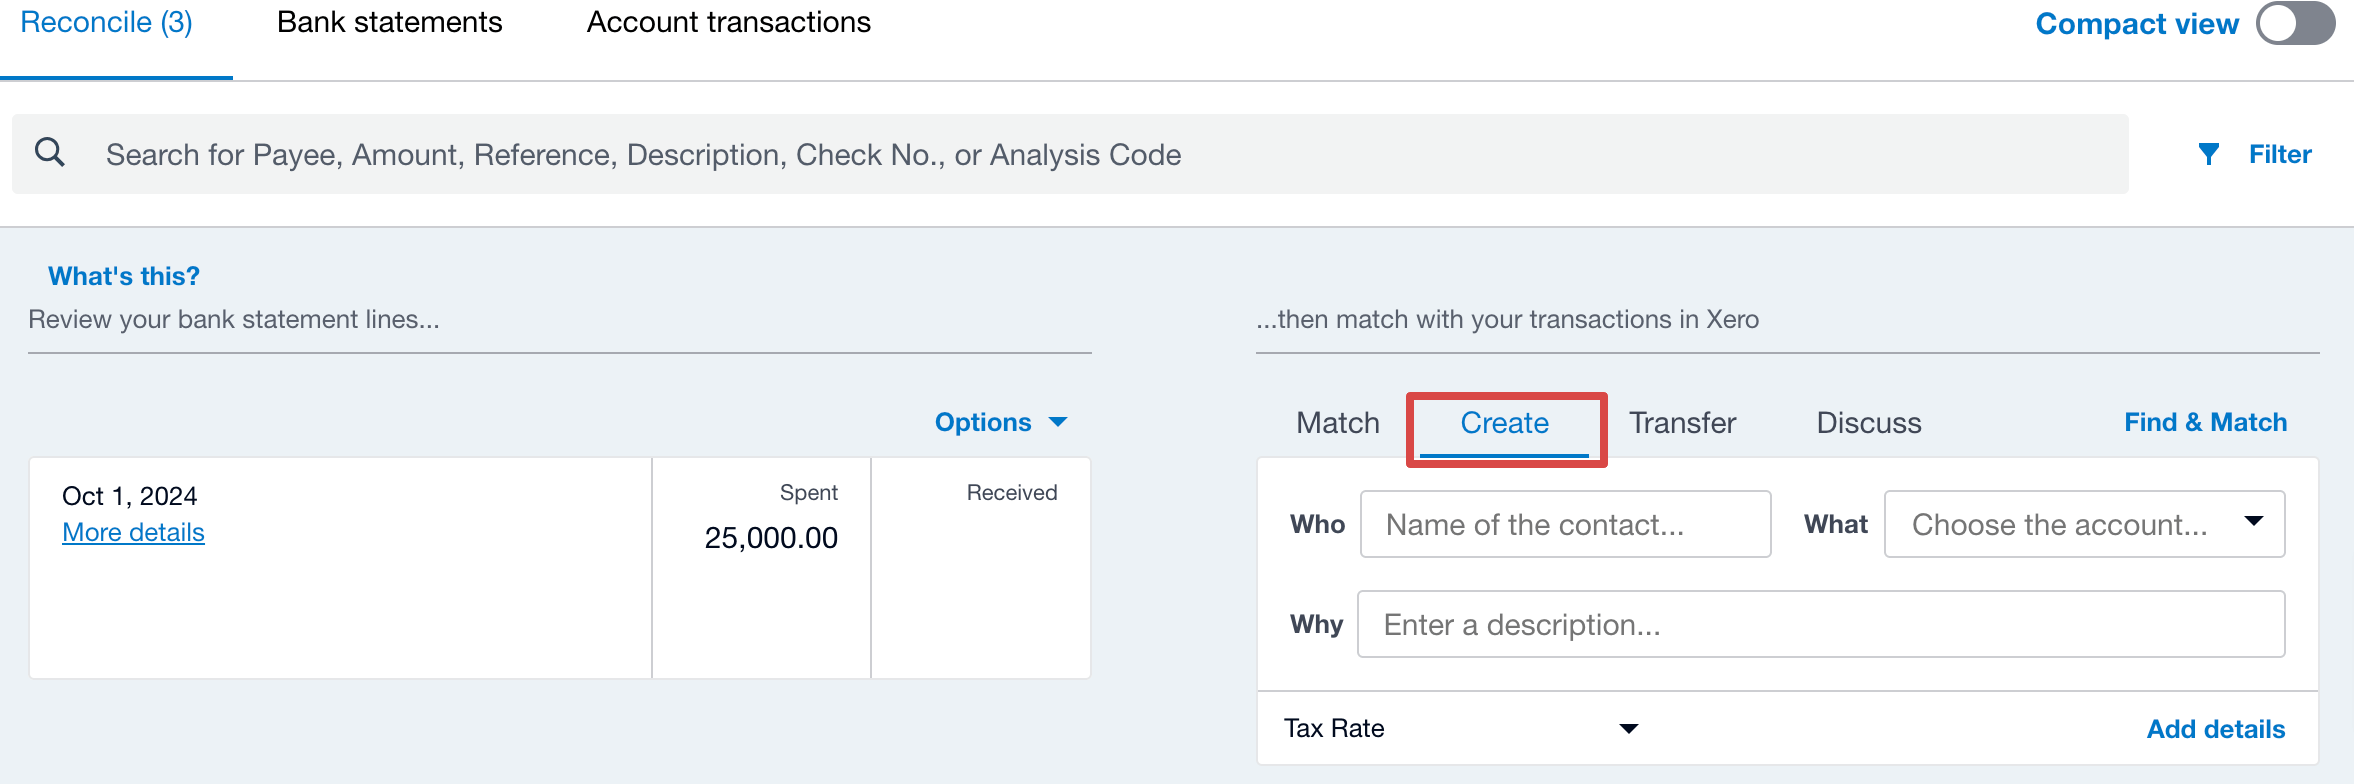
In some cases, there may not be a transaction to match a statement line, such as when you’ve spent or received money without entering an invoice or bill, transferred money between your bank accounts, or been paid too much or too little.
To reconcile these transactions, simply create a new transaction in Xero. On the Reconcile tab, select Create and enter the transaction details. Then, confirm to reconcile the transaction.
When you send money between bank accounts connected to Xero, make sure to record the transfer so your reconciliation remains accurate.
Do this by following these steps:
- Next to the bank statement line for the transfer, click Find & Match.
- Scroll down, click New Transaction, and select Transfer Money.

- Enter the transfer details, click Transfer, and then choose to reconcile.
If a customer pays you too much or too little, or if you accidentally overpay or underpay a supplier, you can fix these payments during reconciliation. Let’s see how to resolve this issue in both cases: overpayment and underpayment.
To reconcile an overpaid invoice or bill, do the following:
- Find the bank statement line you want to reconcile, then click Find & Match.
- Search for the overpaid invoice or bill in Xero, then select the transaction.
- Press New Transaction, then choose Spend Money if the transaction is a withdrawal or Receive Money if it’s a deposit.

- Next to Spent as or Received as, click Direct Payment, then select Overpayment.
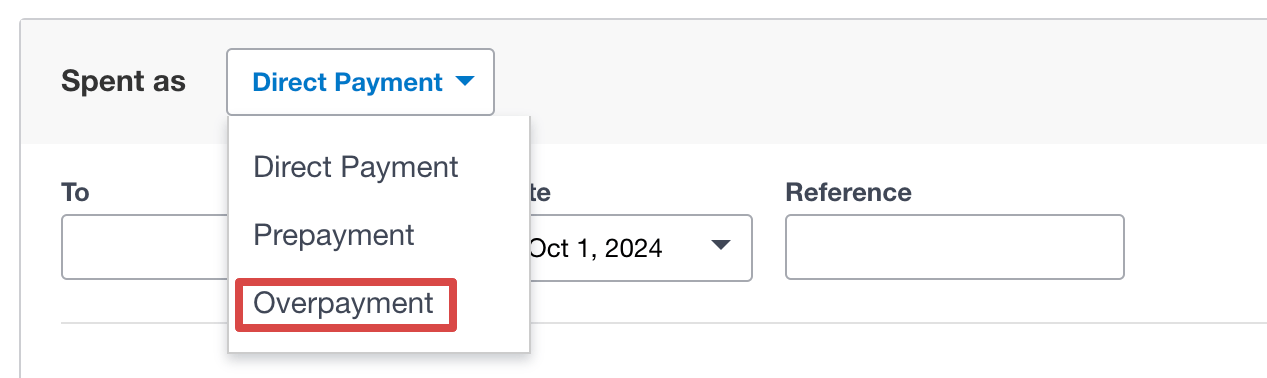
- Enter the amount that was overpaid, save the transaction, and reconcile.
If you, however, need to reconcile an underpaid invoice or bill, here’s what to do:
- Find the relevant bank statement line, then click Find & Match.
- Check the box for each invoice, bill, or expense you want to match with the bank statement line. Click Split.
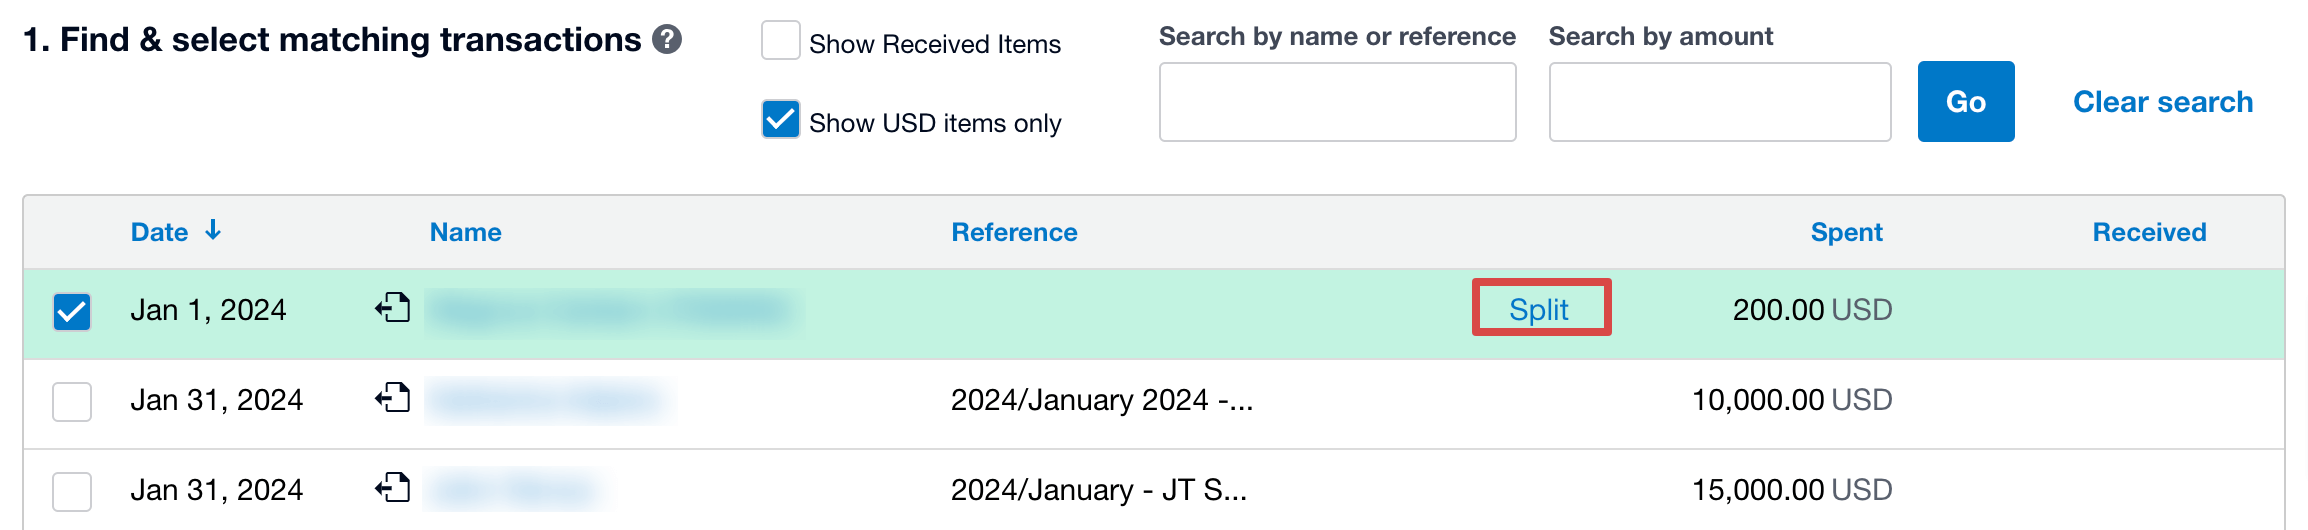
- Enter the underpaid amount, then split it and reconcile the transaction.
For recurring or similar transactions, create bank rules to avoid manual entry each time. For example, you can set up a “Software Subscription” rule for monthly software fees you pay regularly.
When you make or receive payments that fit the rule, Xero checks the details and suggests a match to reconcile the transaction.
Steps to create a bank rule:
- On the Reconcile tab, find the relevant bank statement line, click Options, and select Create bank rule.
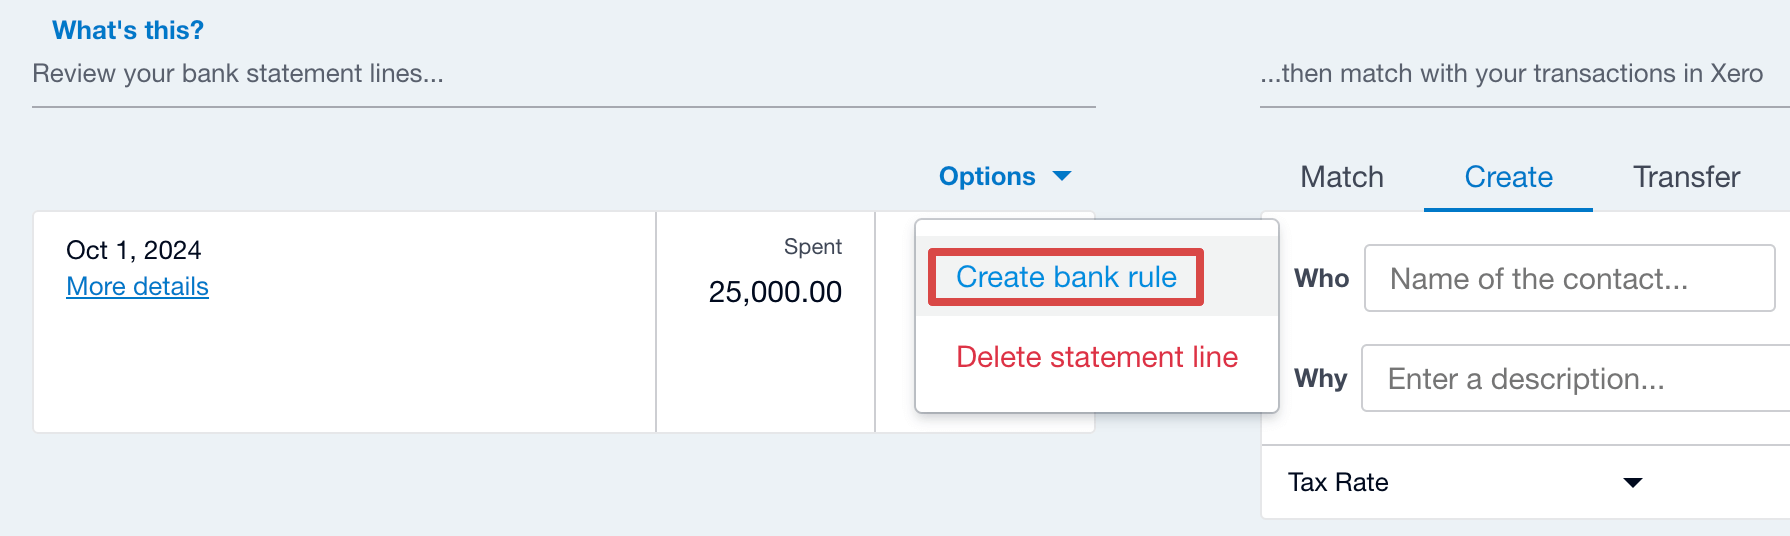
- Enter the conditions the bank statement line must meet, then complete the remaining fields.
- To apply the rule, click Save and confirm on the bank reconciliation screen.
Tip: Xero helps you troubleshoot by alerting you if you’ve reconciled a payment twice or entered an incorrect amount, for example. If you’re still unable to reconcile a transaction, click the search icon ?in the top right corner of the screen to find support articles.
Invoicing
To create an expert online invoicing process for your business, inspire customer confidence, and get paid without delays, Xero provides the following workflow automation capabilities:
- Add a “pay now” button, allowing customers to complete payments instantly. This speeds up transactions and minimizes the need for follow-ups.
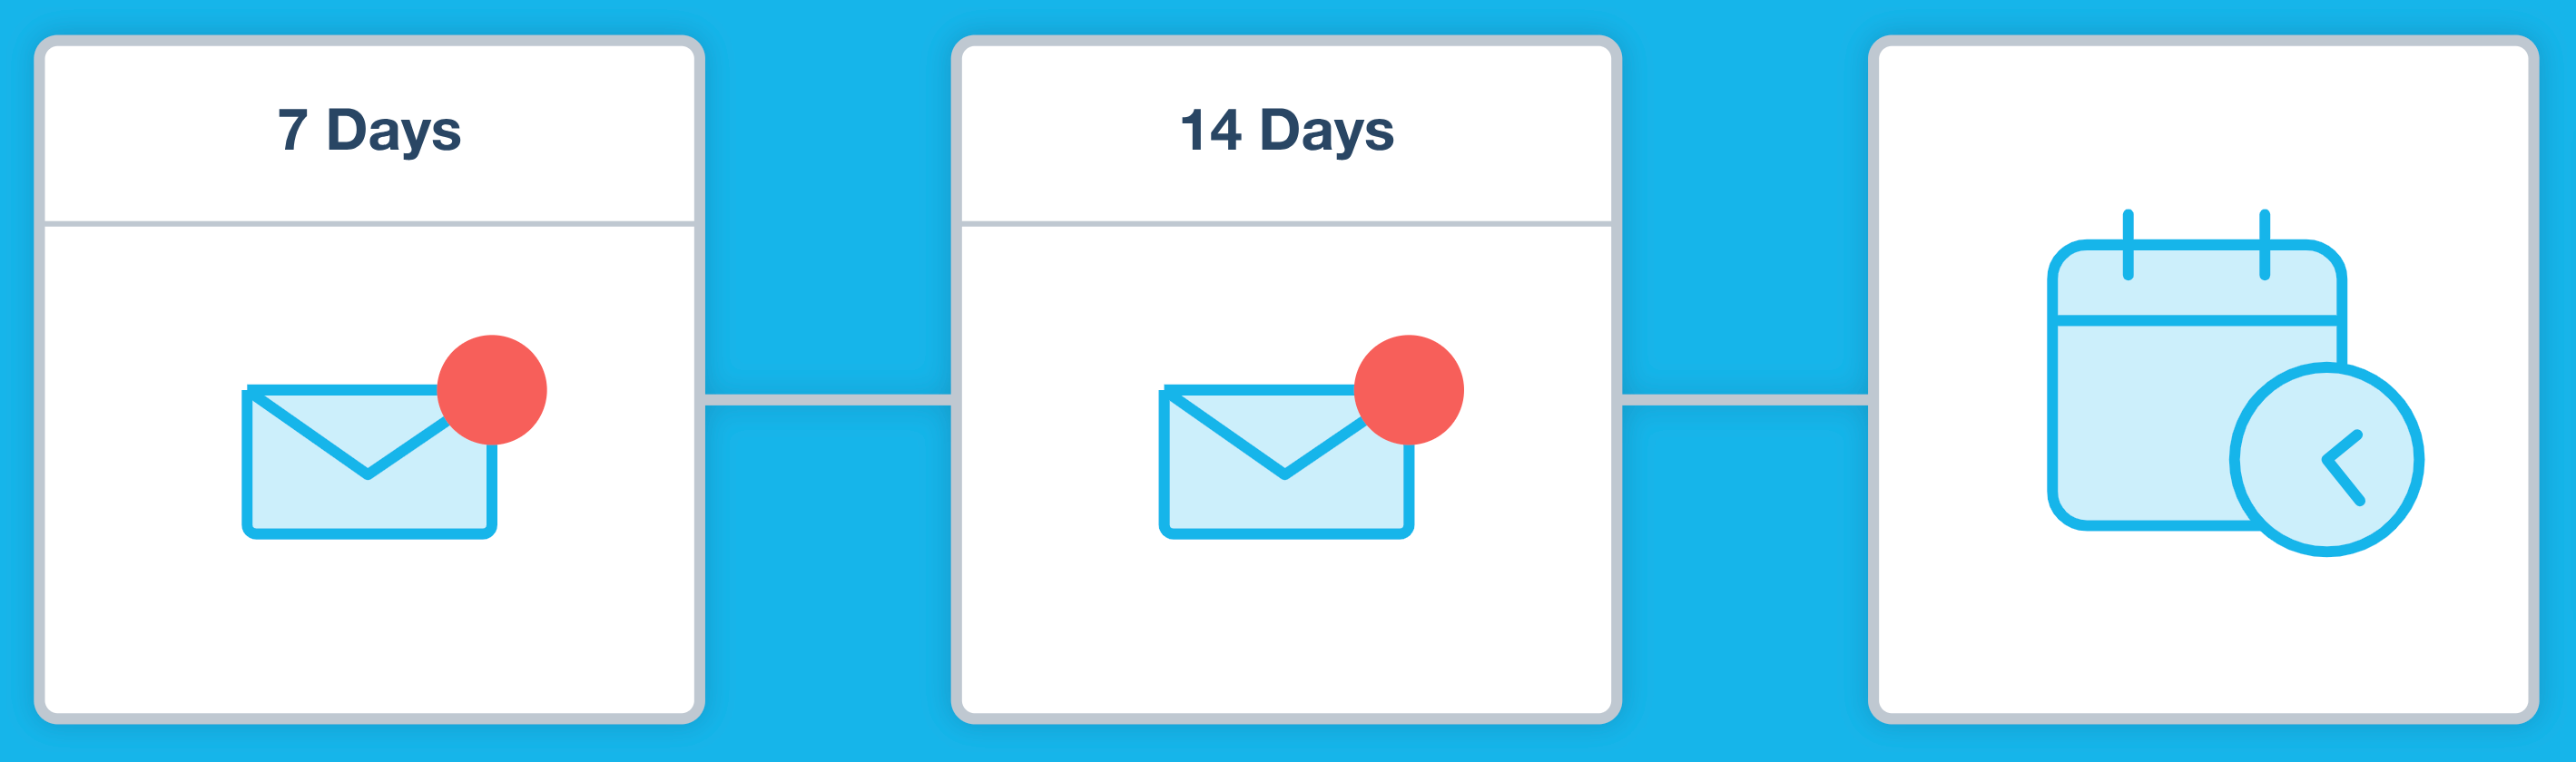
- Send payment reminders to customers to save time, reduce overdue invoices, and improve cash flow. You can choose the frequency of reminders, notify customers before or after the payment due date, and track reminders that have been delivered.
- Use the Xero Accounting app to keep your business on track when you’re out of the office. It instantly notifies you when a customer views an invoice or when you’ve been paid. You can also check for overdue invoices and send a reminder email immediately.
Payroll and expense management
To spend less time on payroll and expense management, turn to Xero Me, Xero’s employee self-service tool. It lets you keep employee data in one place, as well as review and approve expense claims. You can also grant each team member access based on their role and choose which app features they are allowed to use.
As a result, your employees will be able to self-serve administrative tasks:
- Check their information online whenever needed.
- View payslips, submit timesheets, leave requests, and more.
- Avoid manual forms, as everything is done digitally.
Note: To take advantage of Xero Me, choose a plan that includes Xero Expenses.
Tax calculation
Xero enables you to automatically calculate sales tax on transactions and makes it easy to prepare your tax returns:
- Customize sales tax rates: The default rates for tax on purchases, sales, imports, and tax exemption are initially set to 0%. You can add or amend these rates, set up as many rates and components as needed, and adjust the rate on any line item if necessary.
- Automate calculations: Determine tax on each line item in your invoices, quotes, purchase orders, and bills. The selected rate for each item is used to calculate sales tax, which can be tax-inclusive, exclusive, or non-taxable. You can also set default rates for contacts, inventory items, and accounts.
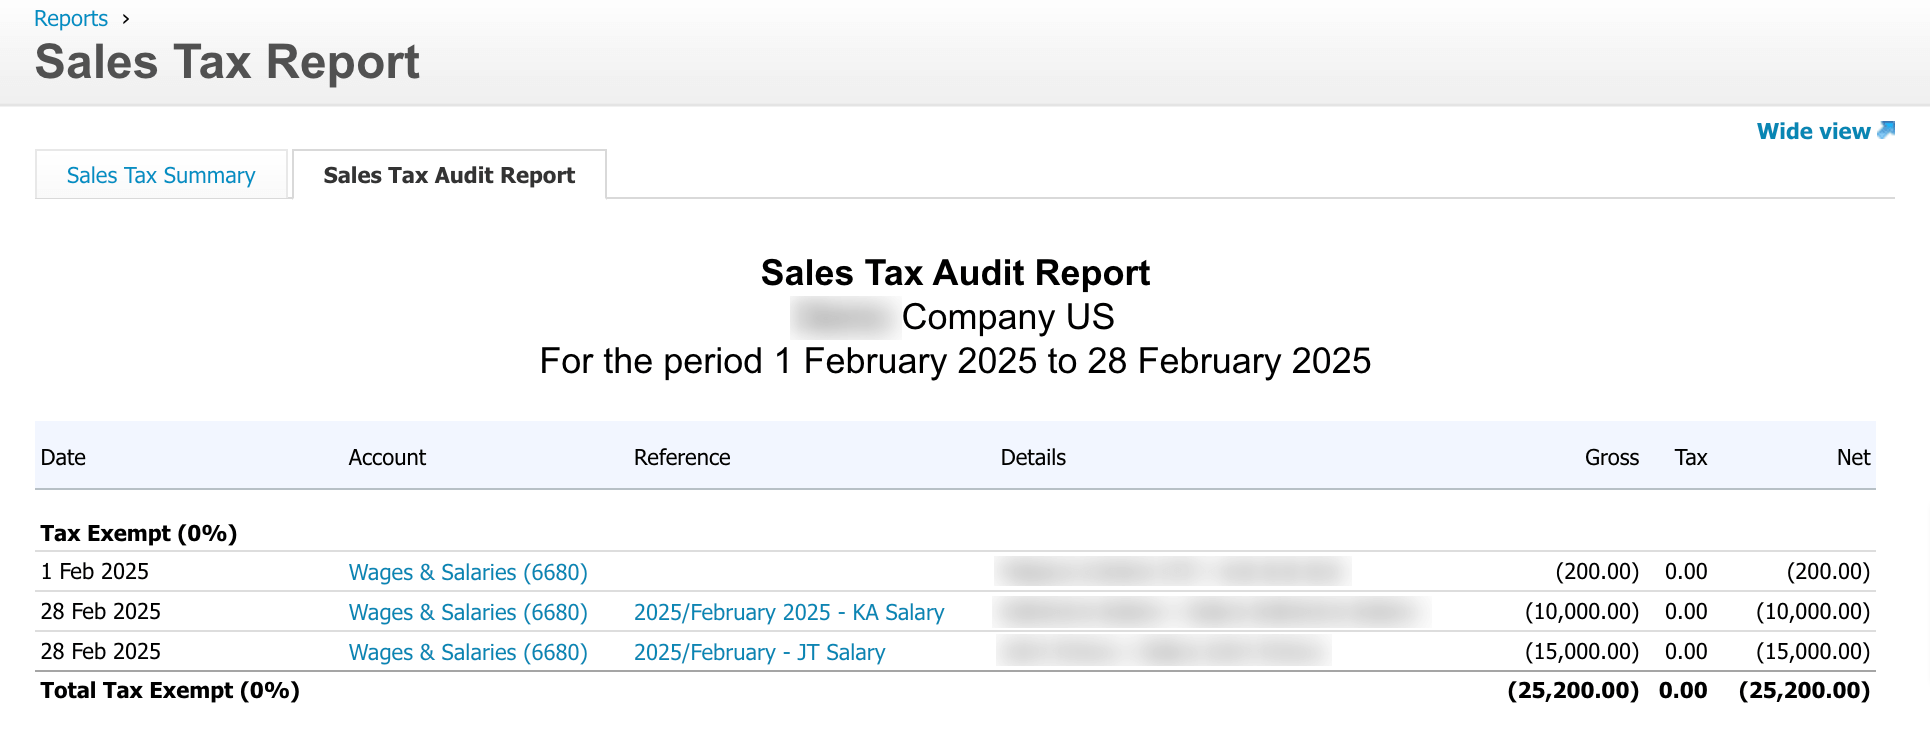
- Complete tax returns: Run the report to gather information for submitting sales tax forms for a selected period. You can obtain a summary of taxes by rate, component, or account type and view an audit report to see individual transactions. Tax figures can be generated on either a cash or accrual basis.
Next steps after native Xero automation
Once your accounting in Xero is optimized and runs like clockwork, move straight to automated reporting on your data with Coupler.io. It enables you to create custom reports based on Xero data or have them visualized with prebuilt dashboard templates to analyze financial results and make informed decisions for your business.
Try Coupler.io for free and let Xero automation work towards your financial health and, consequently, your business success!
Automate Xero reporting with Coupler.io
Get started for free