Do you need to create a backup of your Shopify products? Or, you probably want to share your data with external sub-contractors? No? You’re opening a new store and moving your Shopify data from the current store, right?
We won’t be guessing why you may need to export Shopify data anymore since every user has their own purposes. What we can do is explain the options you can go with to get this job done.
How you can automate data export from Shopify to 10+ destinations
Do you need to launch frequent reporting or schedule backups of your Shopify data? Luckily, you can automate data exports from Shopify to create dynamic reports or simply store data in a data warehouse. You can do this with Shopify integrations by Coupler.io that support 10+ destination apps:
- Data viz and BI tools (Looker Studio, PowerBI, Tableau, and Qlik)
- Spreadsheet apps (You can connect Shopify to Excel or Shopify to Google Sheets)
- Data warehouses (You can use the Shopify to Google BigQuery integration, or connect to Redshift or PostgreSQL)
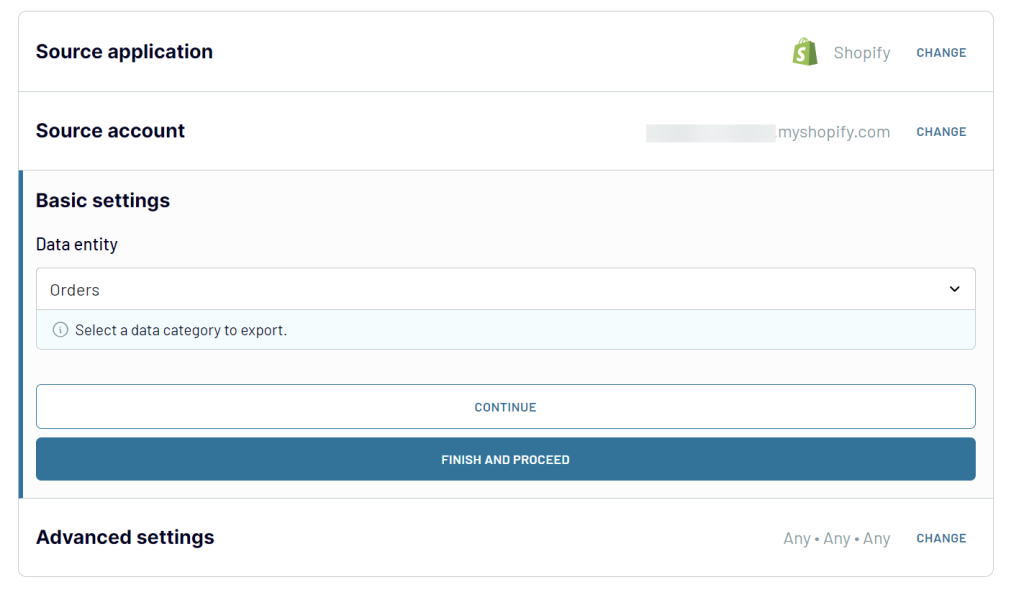
1. Extract your Shopify data automatically
Select the destination app for your Shopify data and click Proceed in the form below.
You’ll be offered to create a Coupler.io account for free. Proceed to the setup, connect your Shopify account, and select a data entity to export.
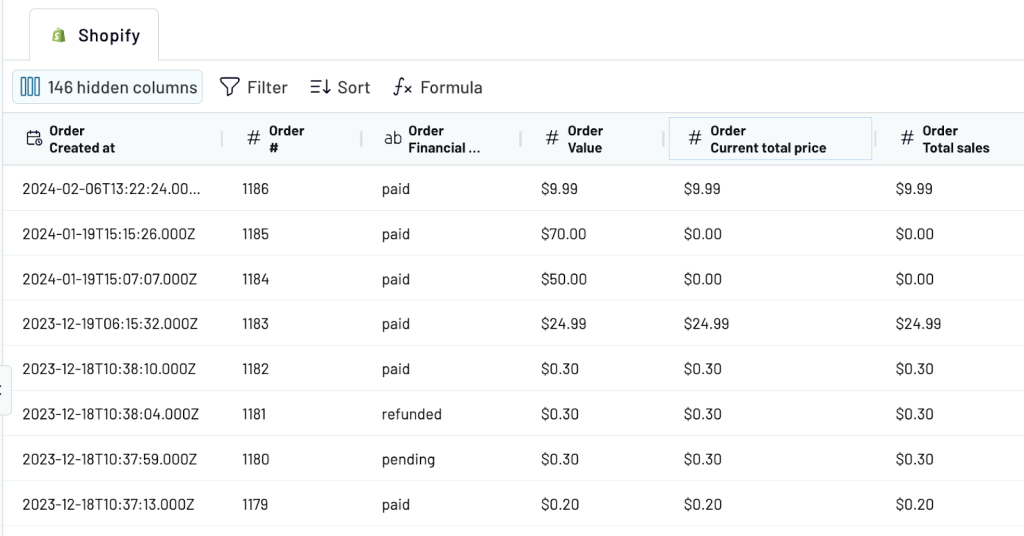
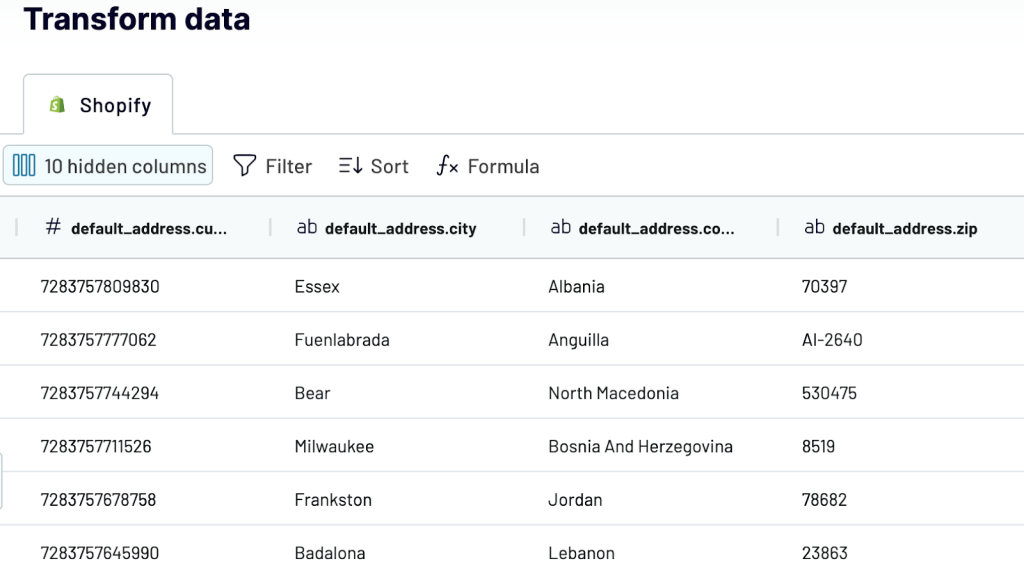
2. Preview and transform your Shopify data
Now, you can check and edit the data that you are going to export.
In particular, you can manage columns – hide those you don’t need, change their order, rename and rearrange columns. The dataset will be exported according to the edits you make. You can also sort and filter your data, as well as blend data from several Shopify accounts if you connect them as additional data sources.
Once this is done, follow the instructions to connect your destination app.
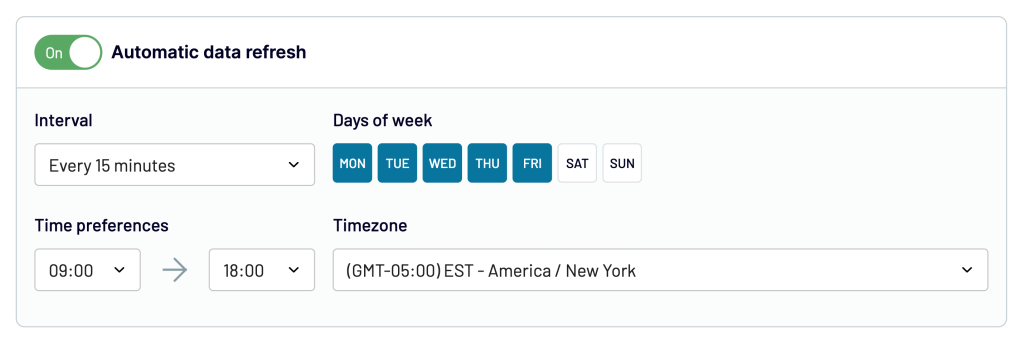
3. Schedule a refresh of your Shopify data
The last touch – let’s make sure that our Shopify report is self-updating. Toggle on Automatic data refresh and specify your preferences for the updates. After this, Coupler.io will refresh your Shopify data in the destination app according to your schedule.
Then, click Run importer to transfer data.
Yes, this is possible when using Coupler.io. For example, you can export Products and specify the list of the columns to import to the destination:
- product_id
- product_title
- product_body_html
- product_product_type
- price
- sku
- inventory_quantity

This will be enough for a meaningful report, and you won’t have to delete unnecessary columns after the import.
Can you automate Shopify export customer data?
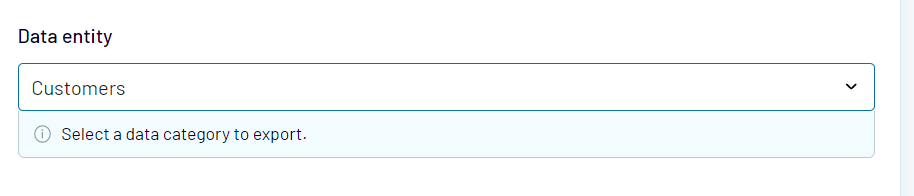
Let’s check out another case with exporting customer data. As you understand, the flow is mostly the same. The only difference is that you need to select Customers as a data entity when setting up the source.
You’ll get a preview of details of your Shopify store customers right in the app.
Complete the rest of the flow and run the importer.
Export Shopify data to dashboard templates
If you want to visualize your Shopify data, select one of the supported BI tools as a destination. Coupler.io lets you connect Shopify to Looker Studio, Power BI, Tableau, and Qlik. After that, you will be able to create your Shopify data visualization from scratch.
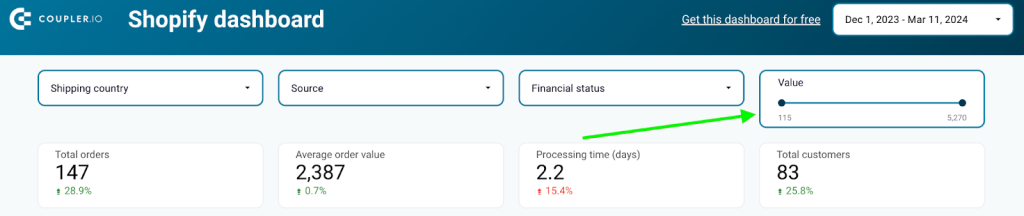
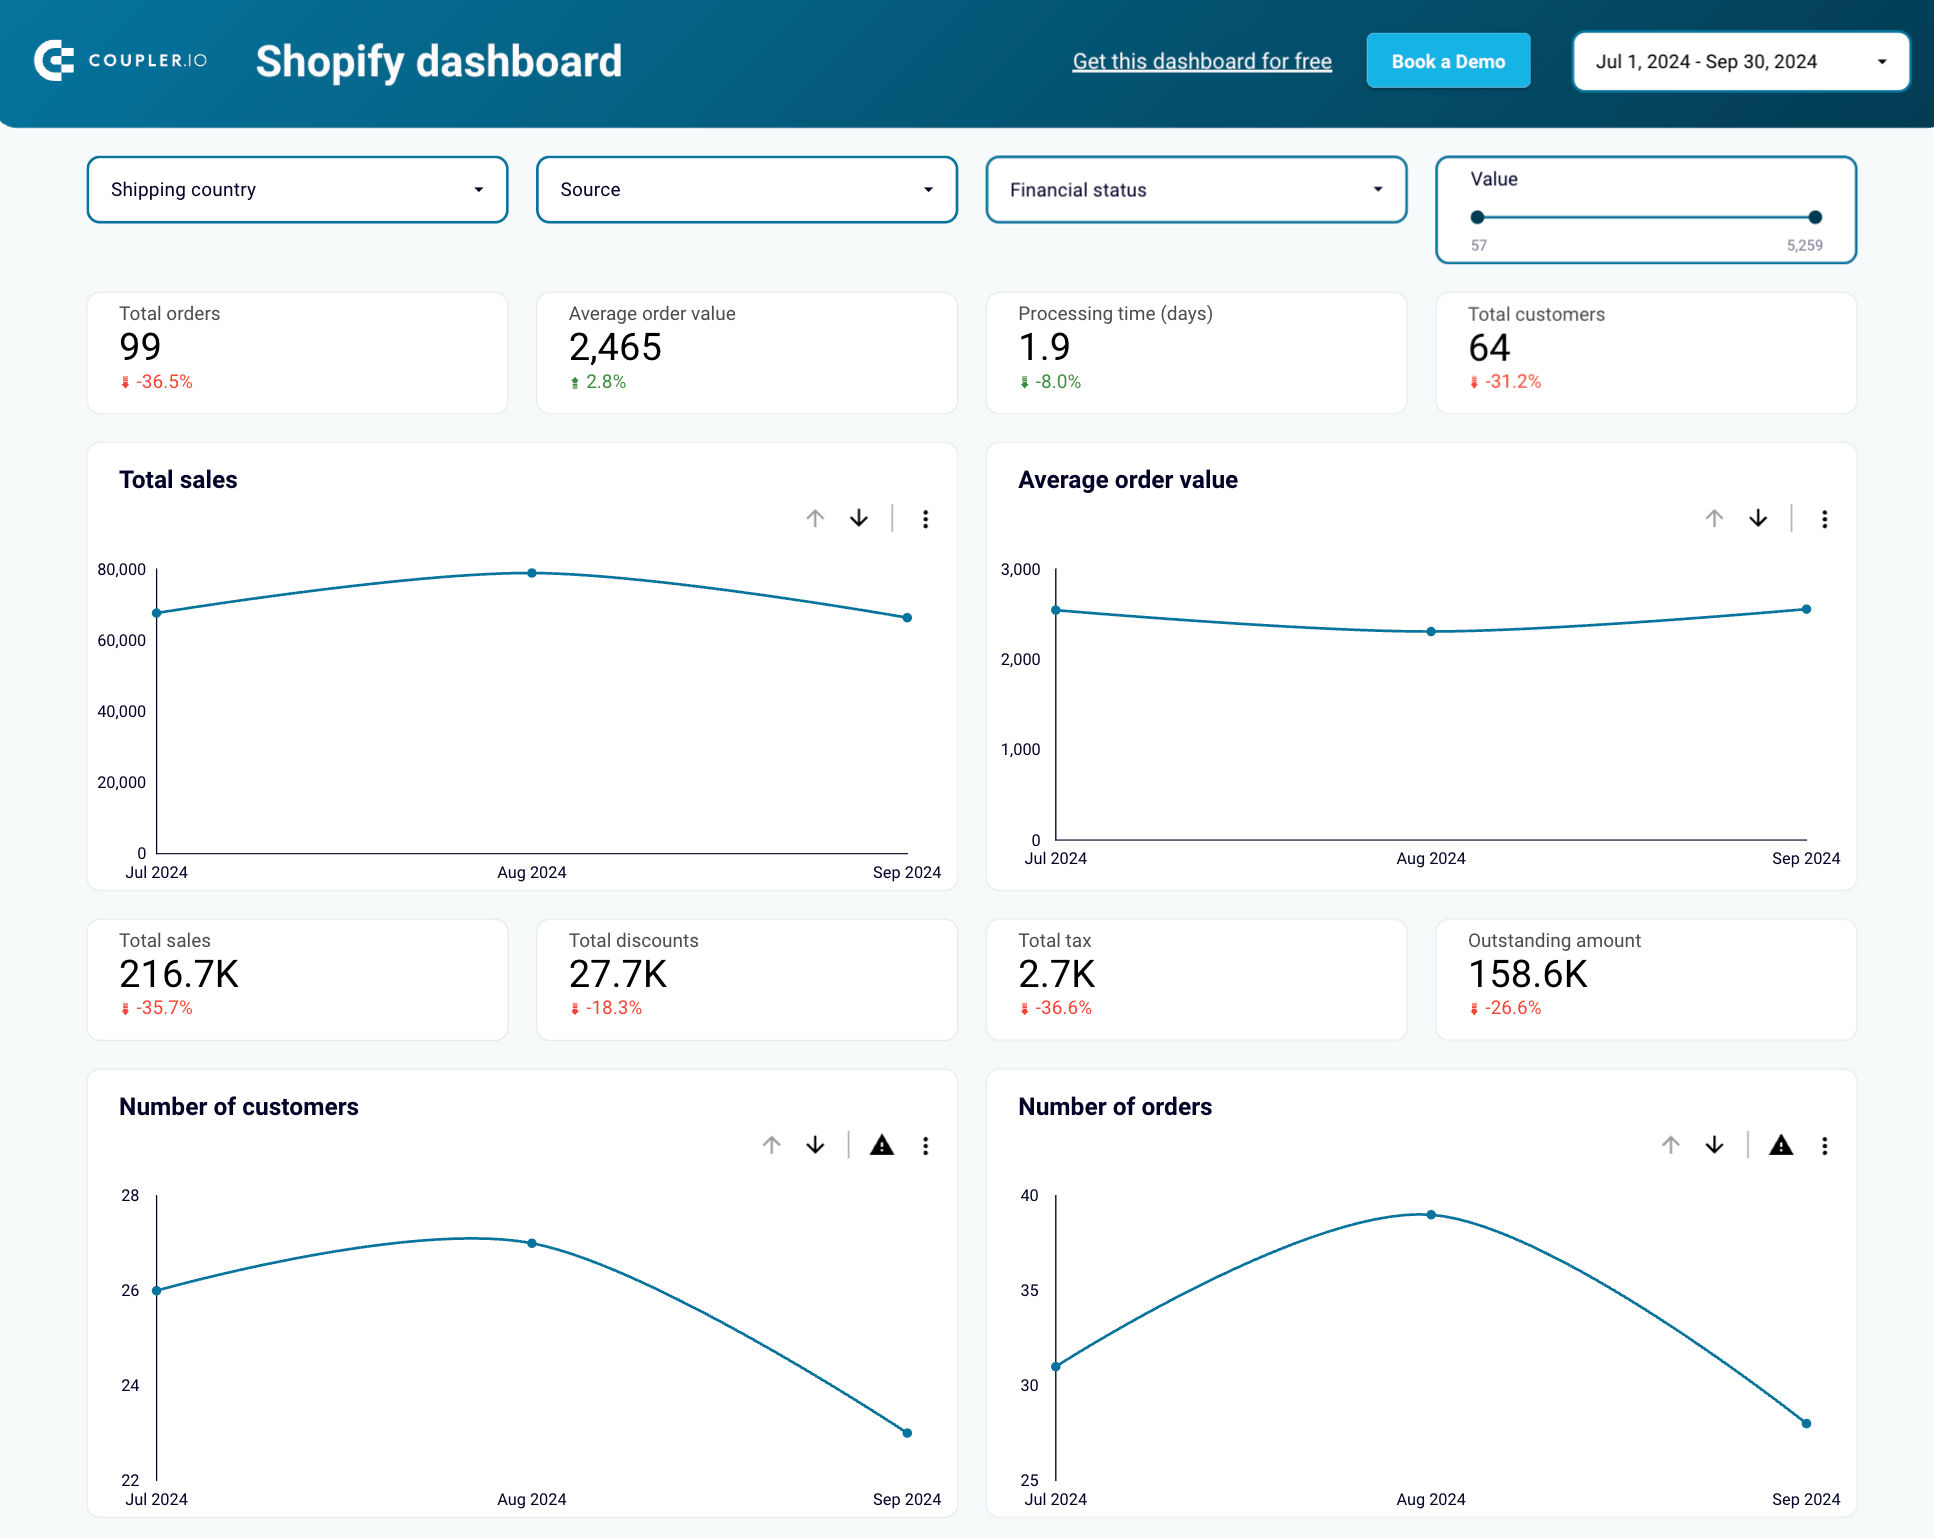
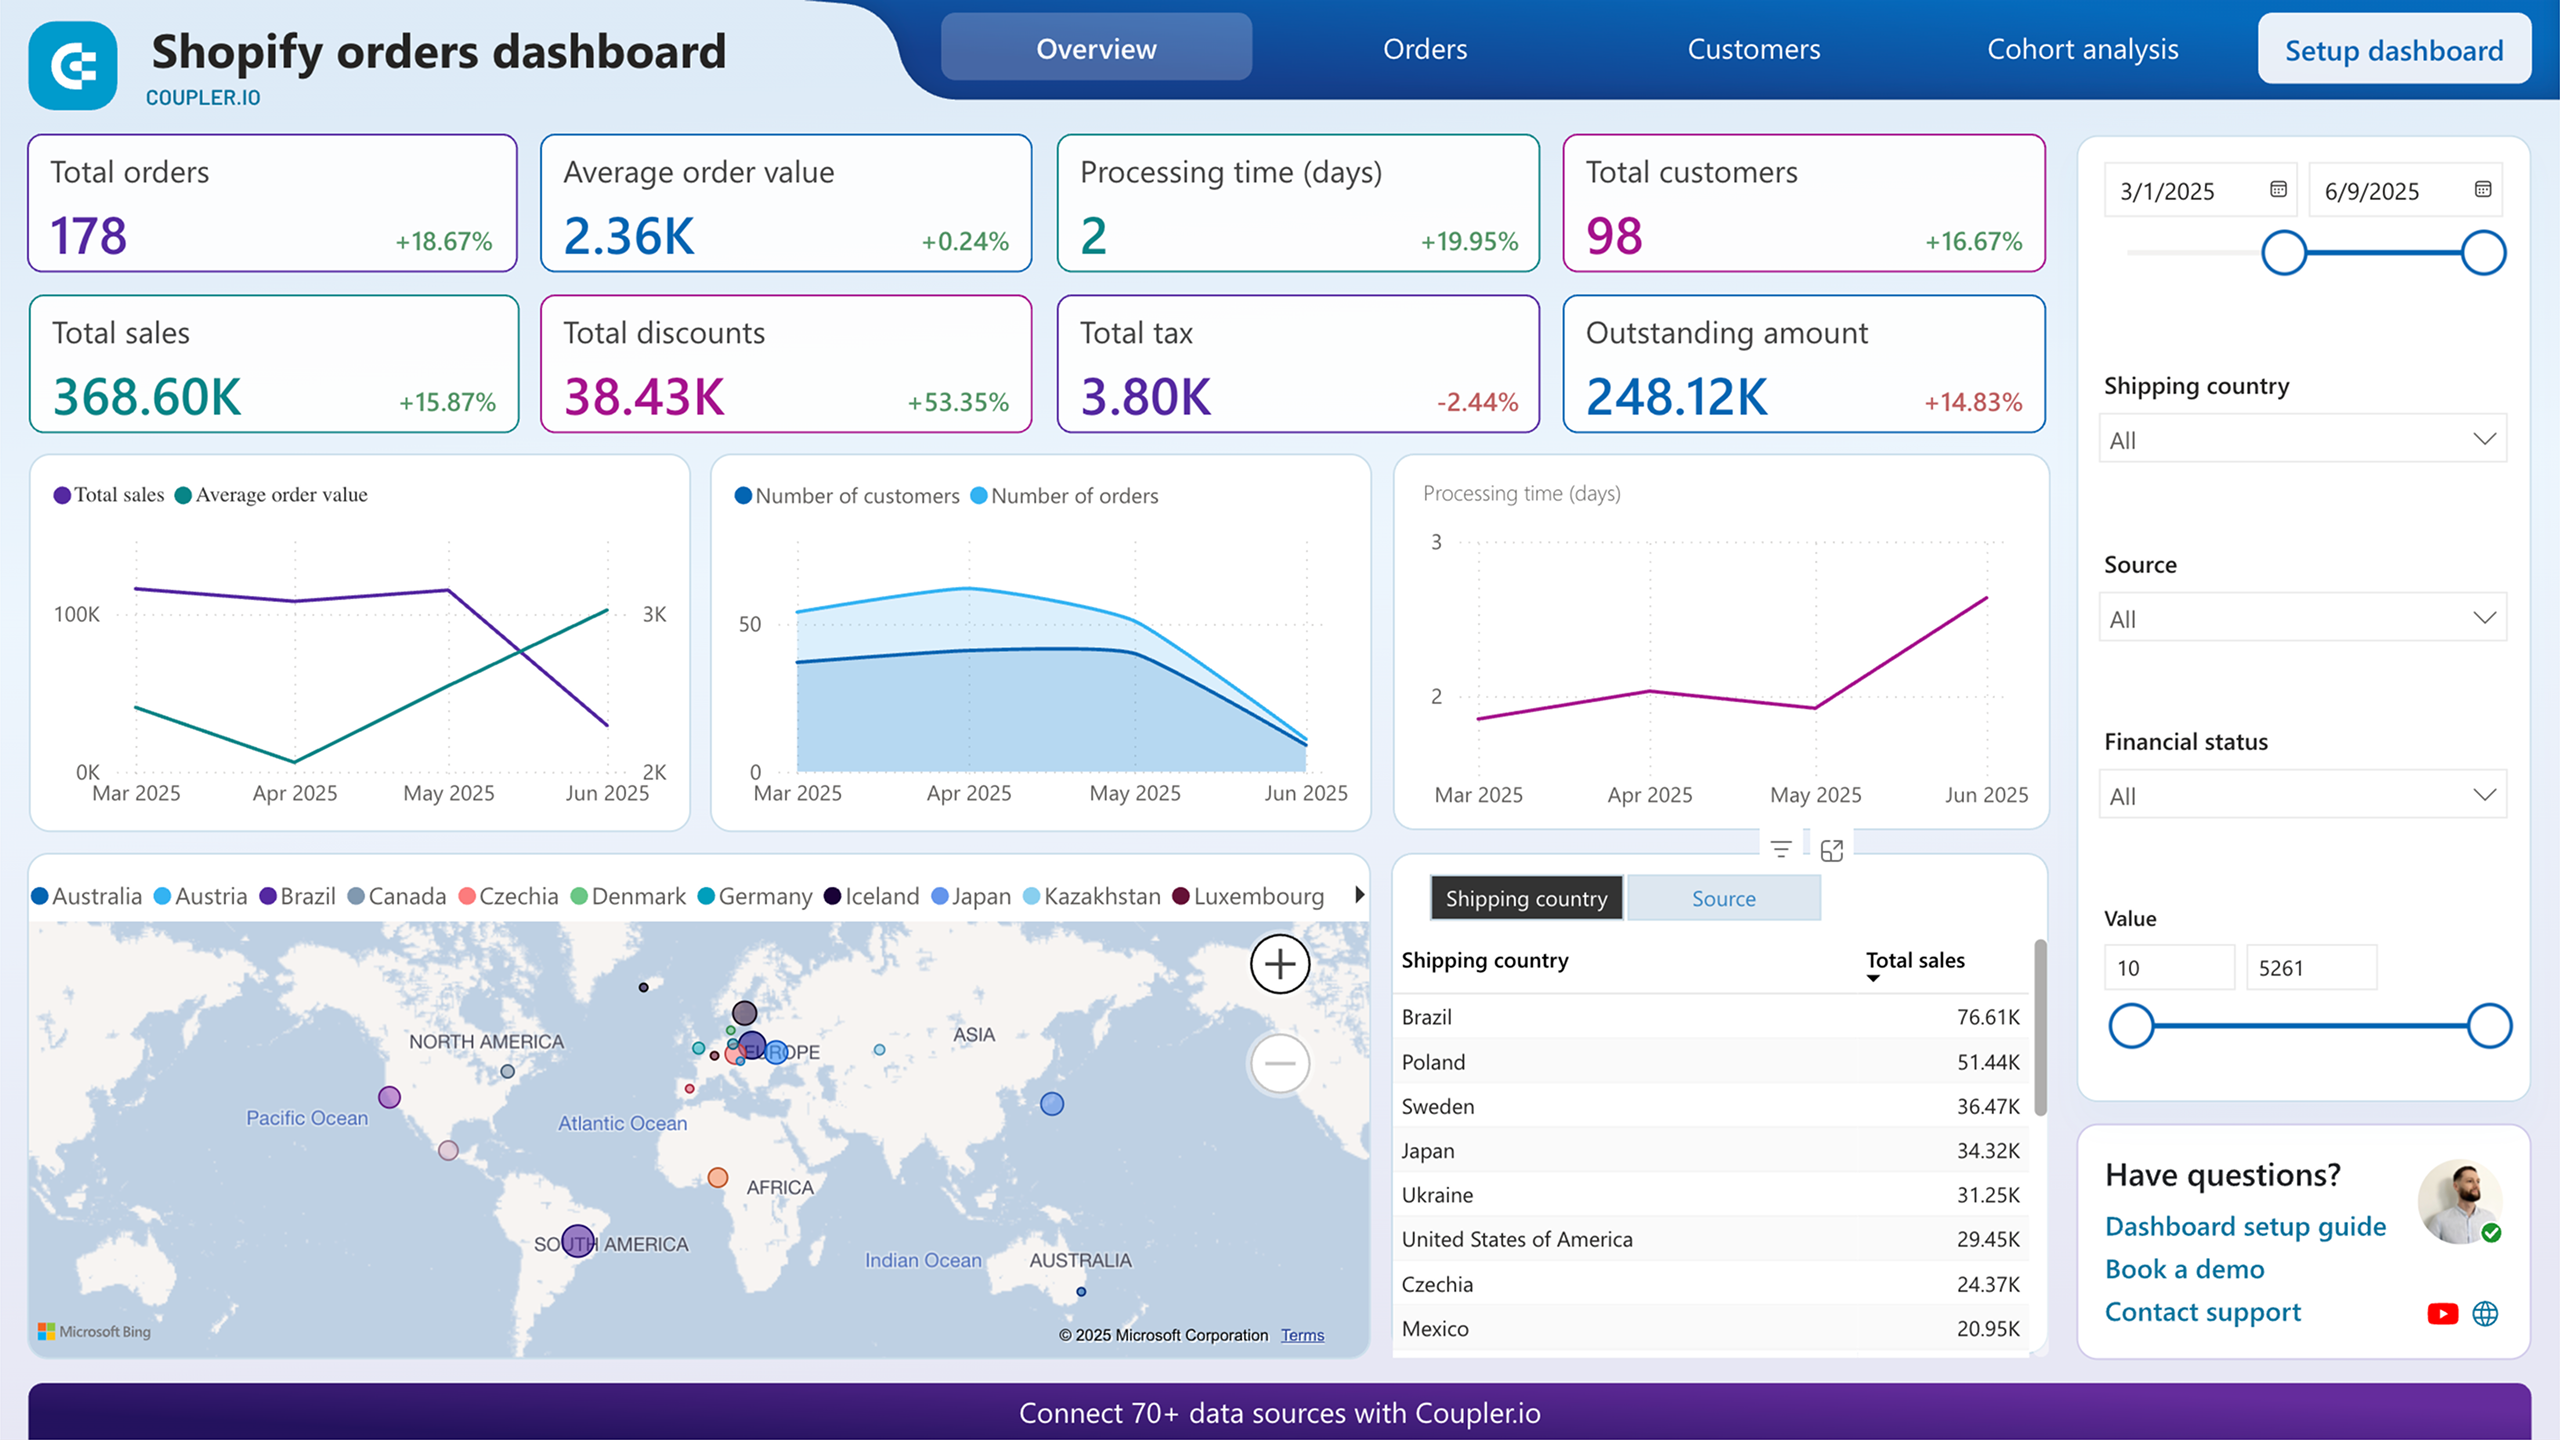
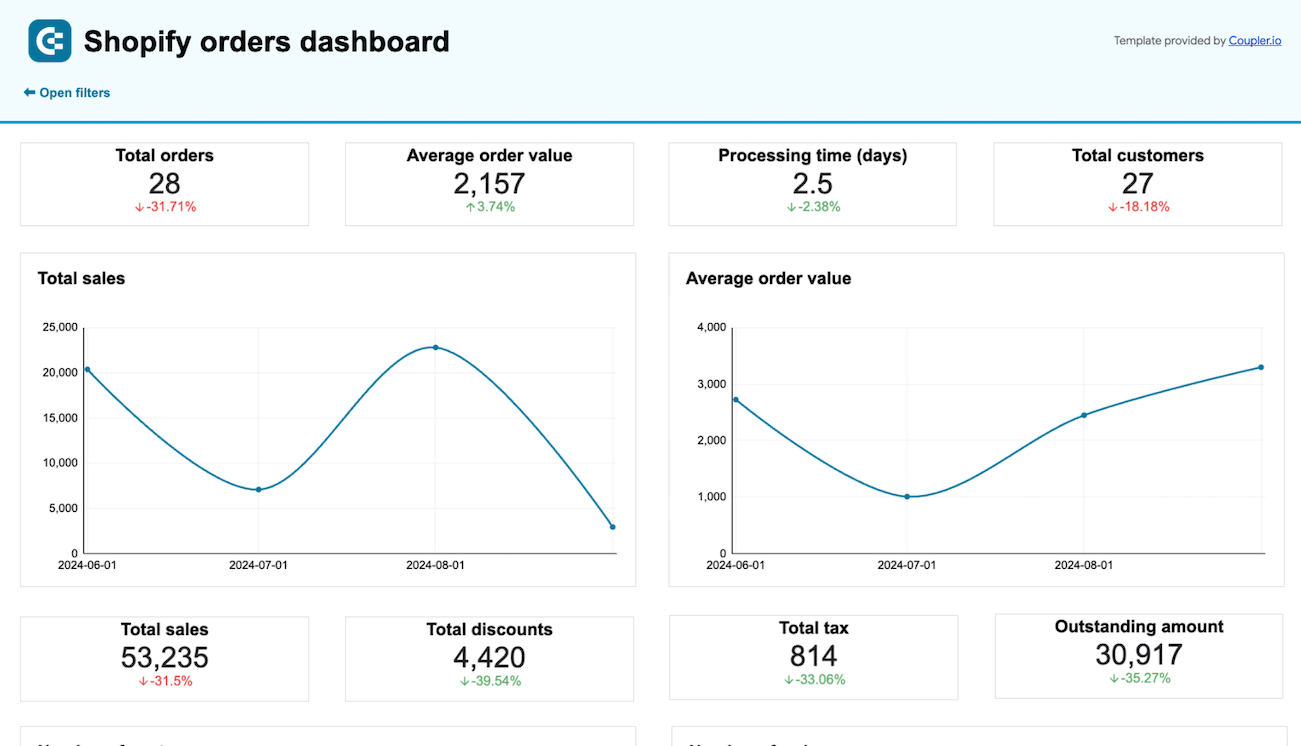
In addition to Shopify data export automation, Coupler.io offers free ready-to-use dashboard templates to track your store sales performance and traffic. For instance, here is a Shopify dashboard template to track your store sales performance.
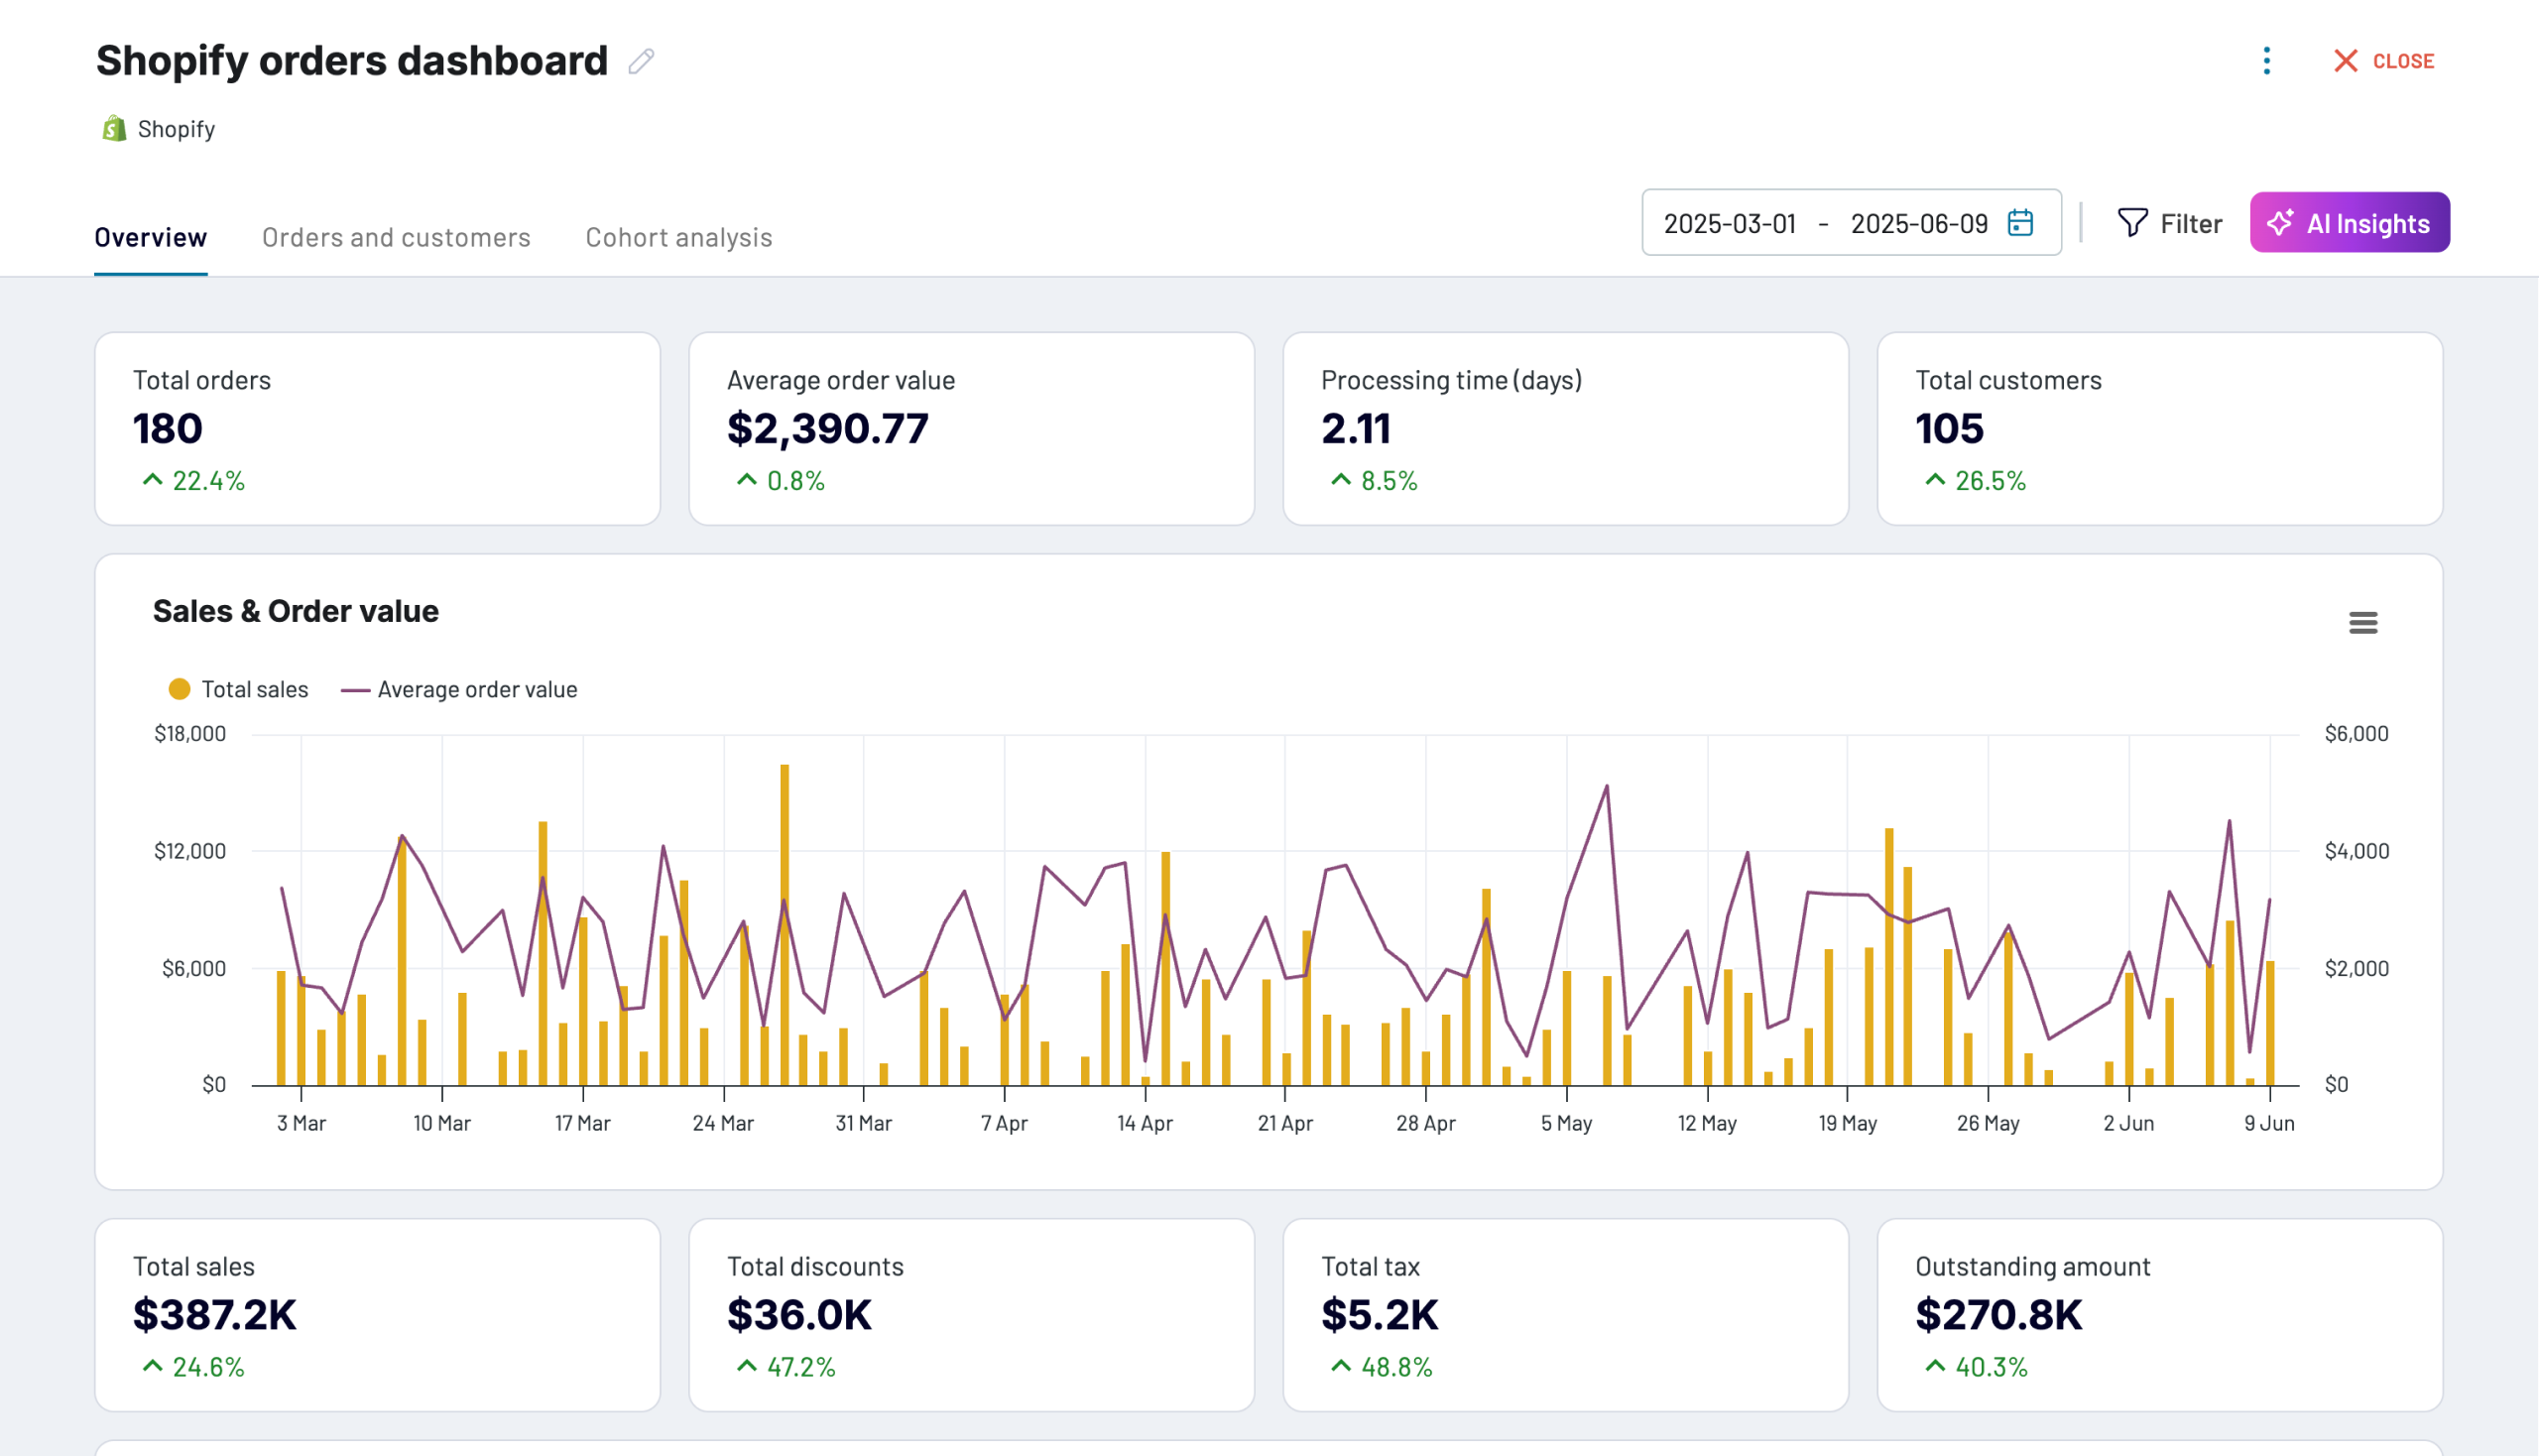
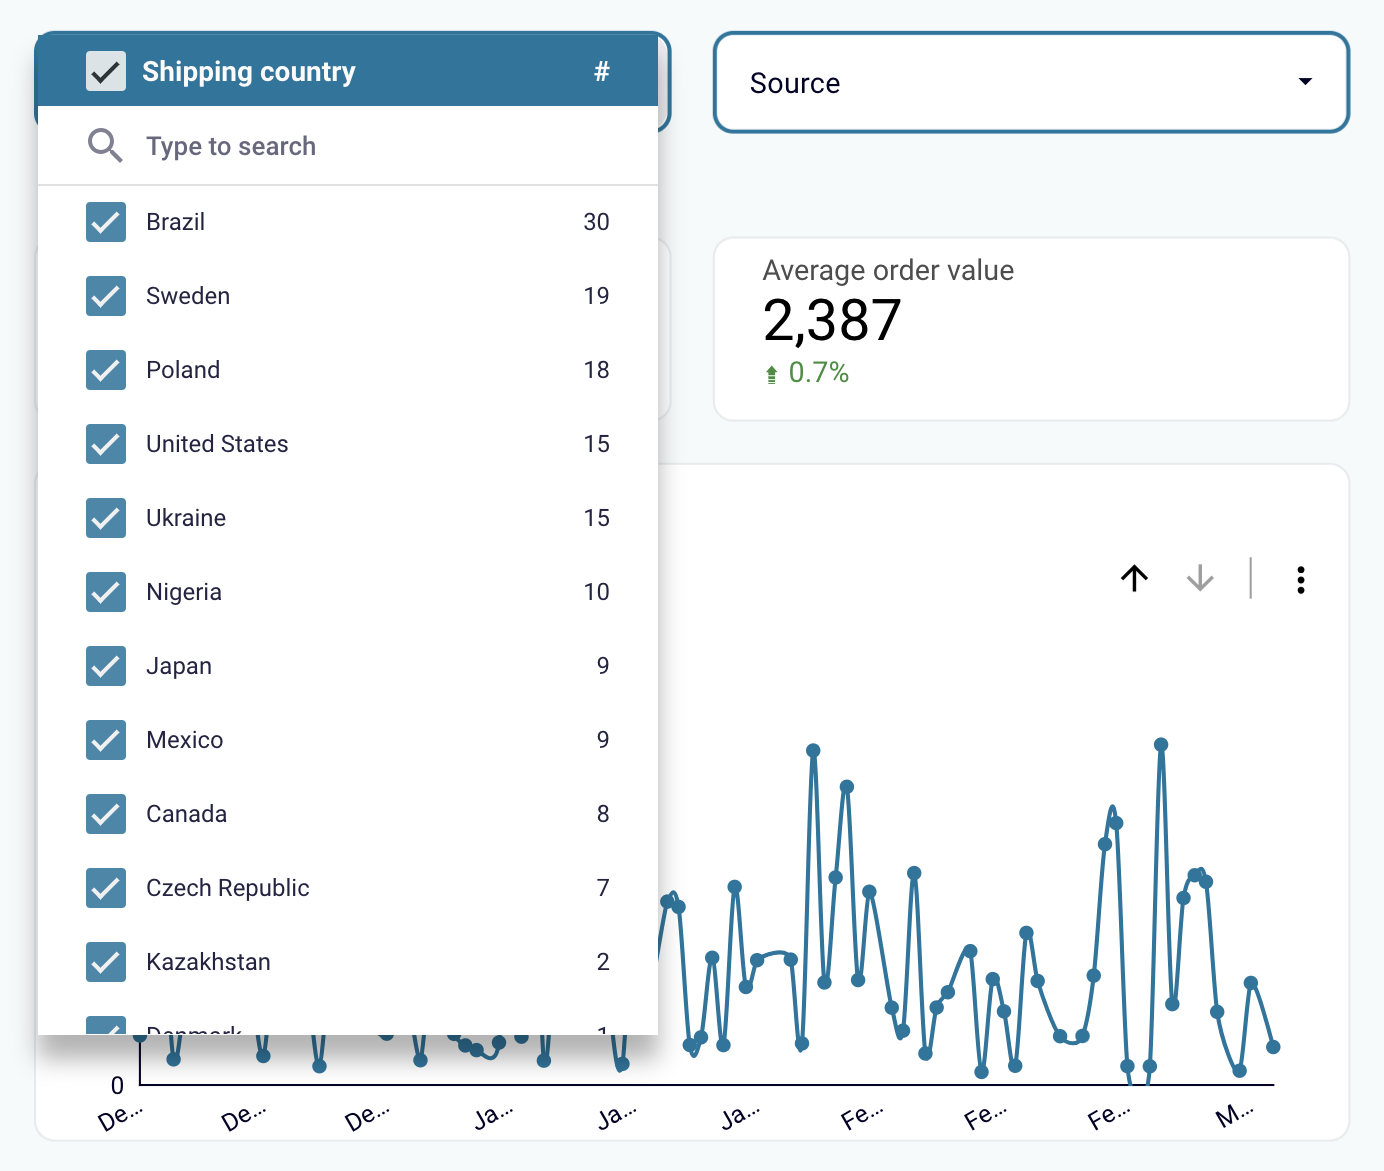
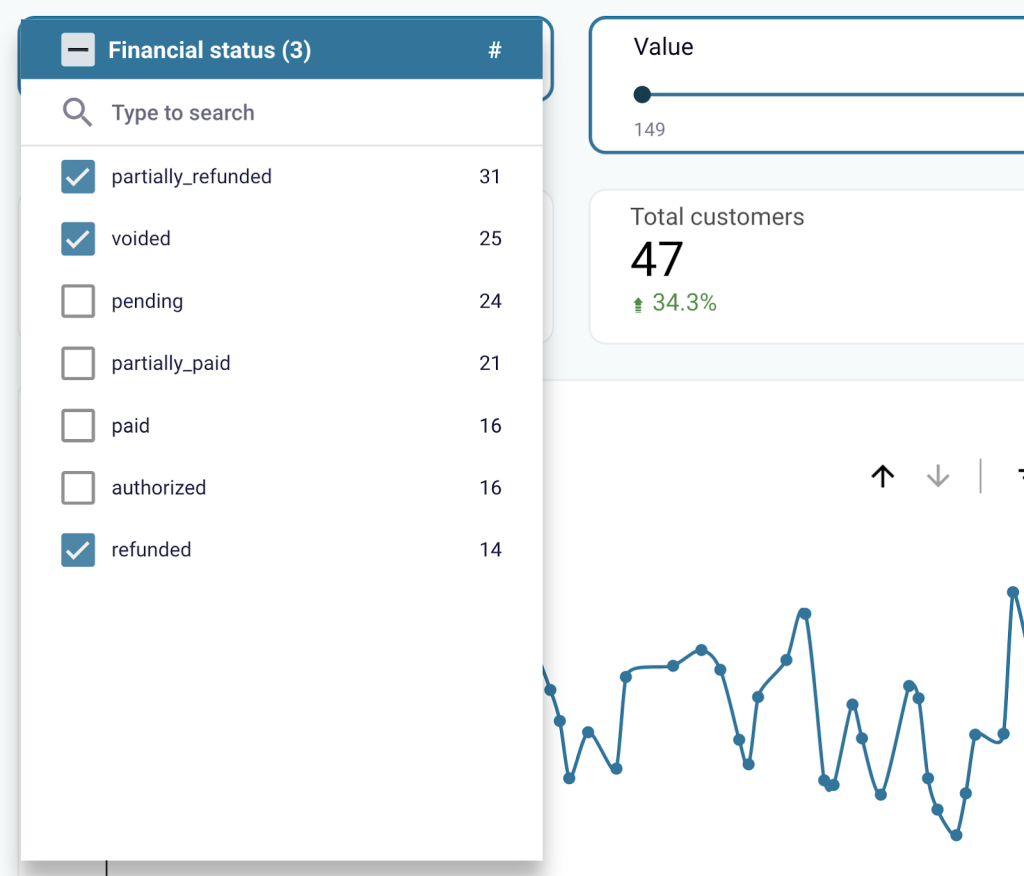
Use the dashboard to analyze your data by various parameters. For instance, you can apply filters like shipping country, financial status, value, or source, depending on your purpose.
You can break down your data by country to make informed decisions about shipping. This can be achieved in two ways:
- Check a specific country and view all the data related to it
- Filter orders by other criteria and see the geography report on them
- Also, you can check orders by financial status, for example, refunded and voided ones. This enables you to find a correlation between these kinds of orders and geography or specific products.
- If you filter orders by value, you can find dependencies like geography, number of orders, status, and total revenue from different price batches.
- To decide which marketing campaigns to scale, check how many orders or how much revenue each channel brings.
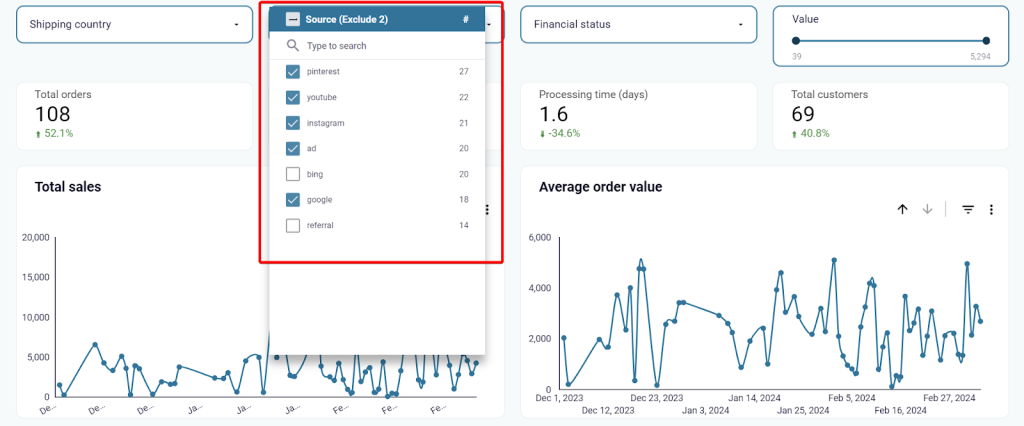
You will find more valuable information to monitor the performance of your sales process and identify potential bottlenecks. This Shopify dashboard template is designed in Coupler.io and is also available as a template in Looker Studio, Power BI, and Google Sheets. Both options are equipped with a Shopify connector by Coupler.io. You can start using it in less than 2 minutes by completing the steps described in the Readme tab. Try the dashboard for free right away!


In a moment, you will be redirected to the copy of the Shopify report with your data. The dashboard will be updated automatically every day by default. If you want to have a more frequent data refresh, go back to Coupler.io and tweak the schedule to your liking.
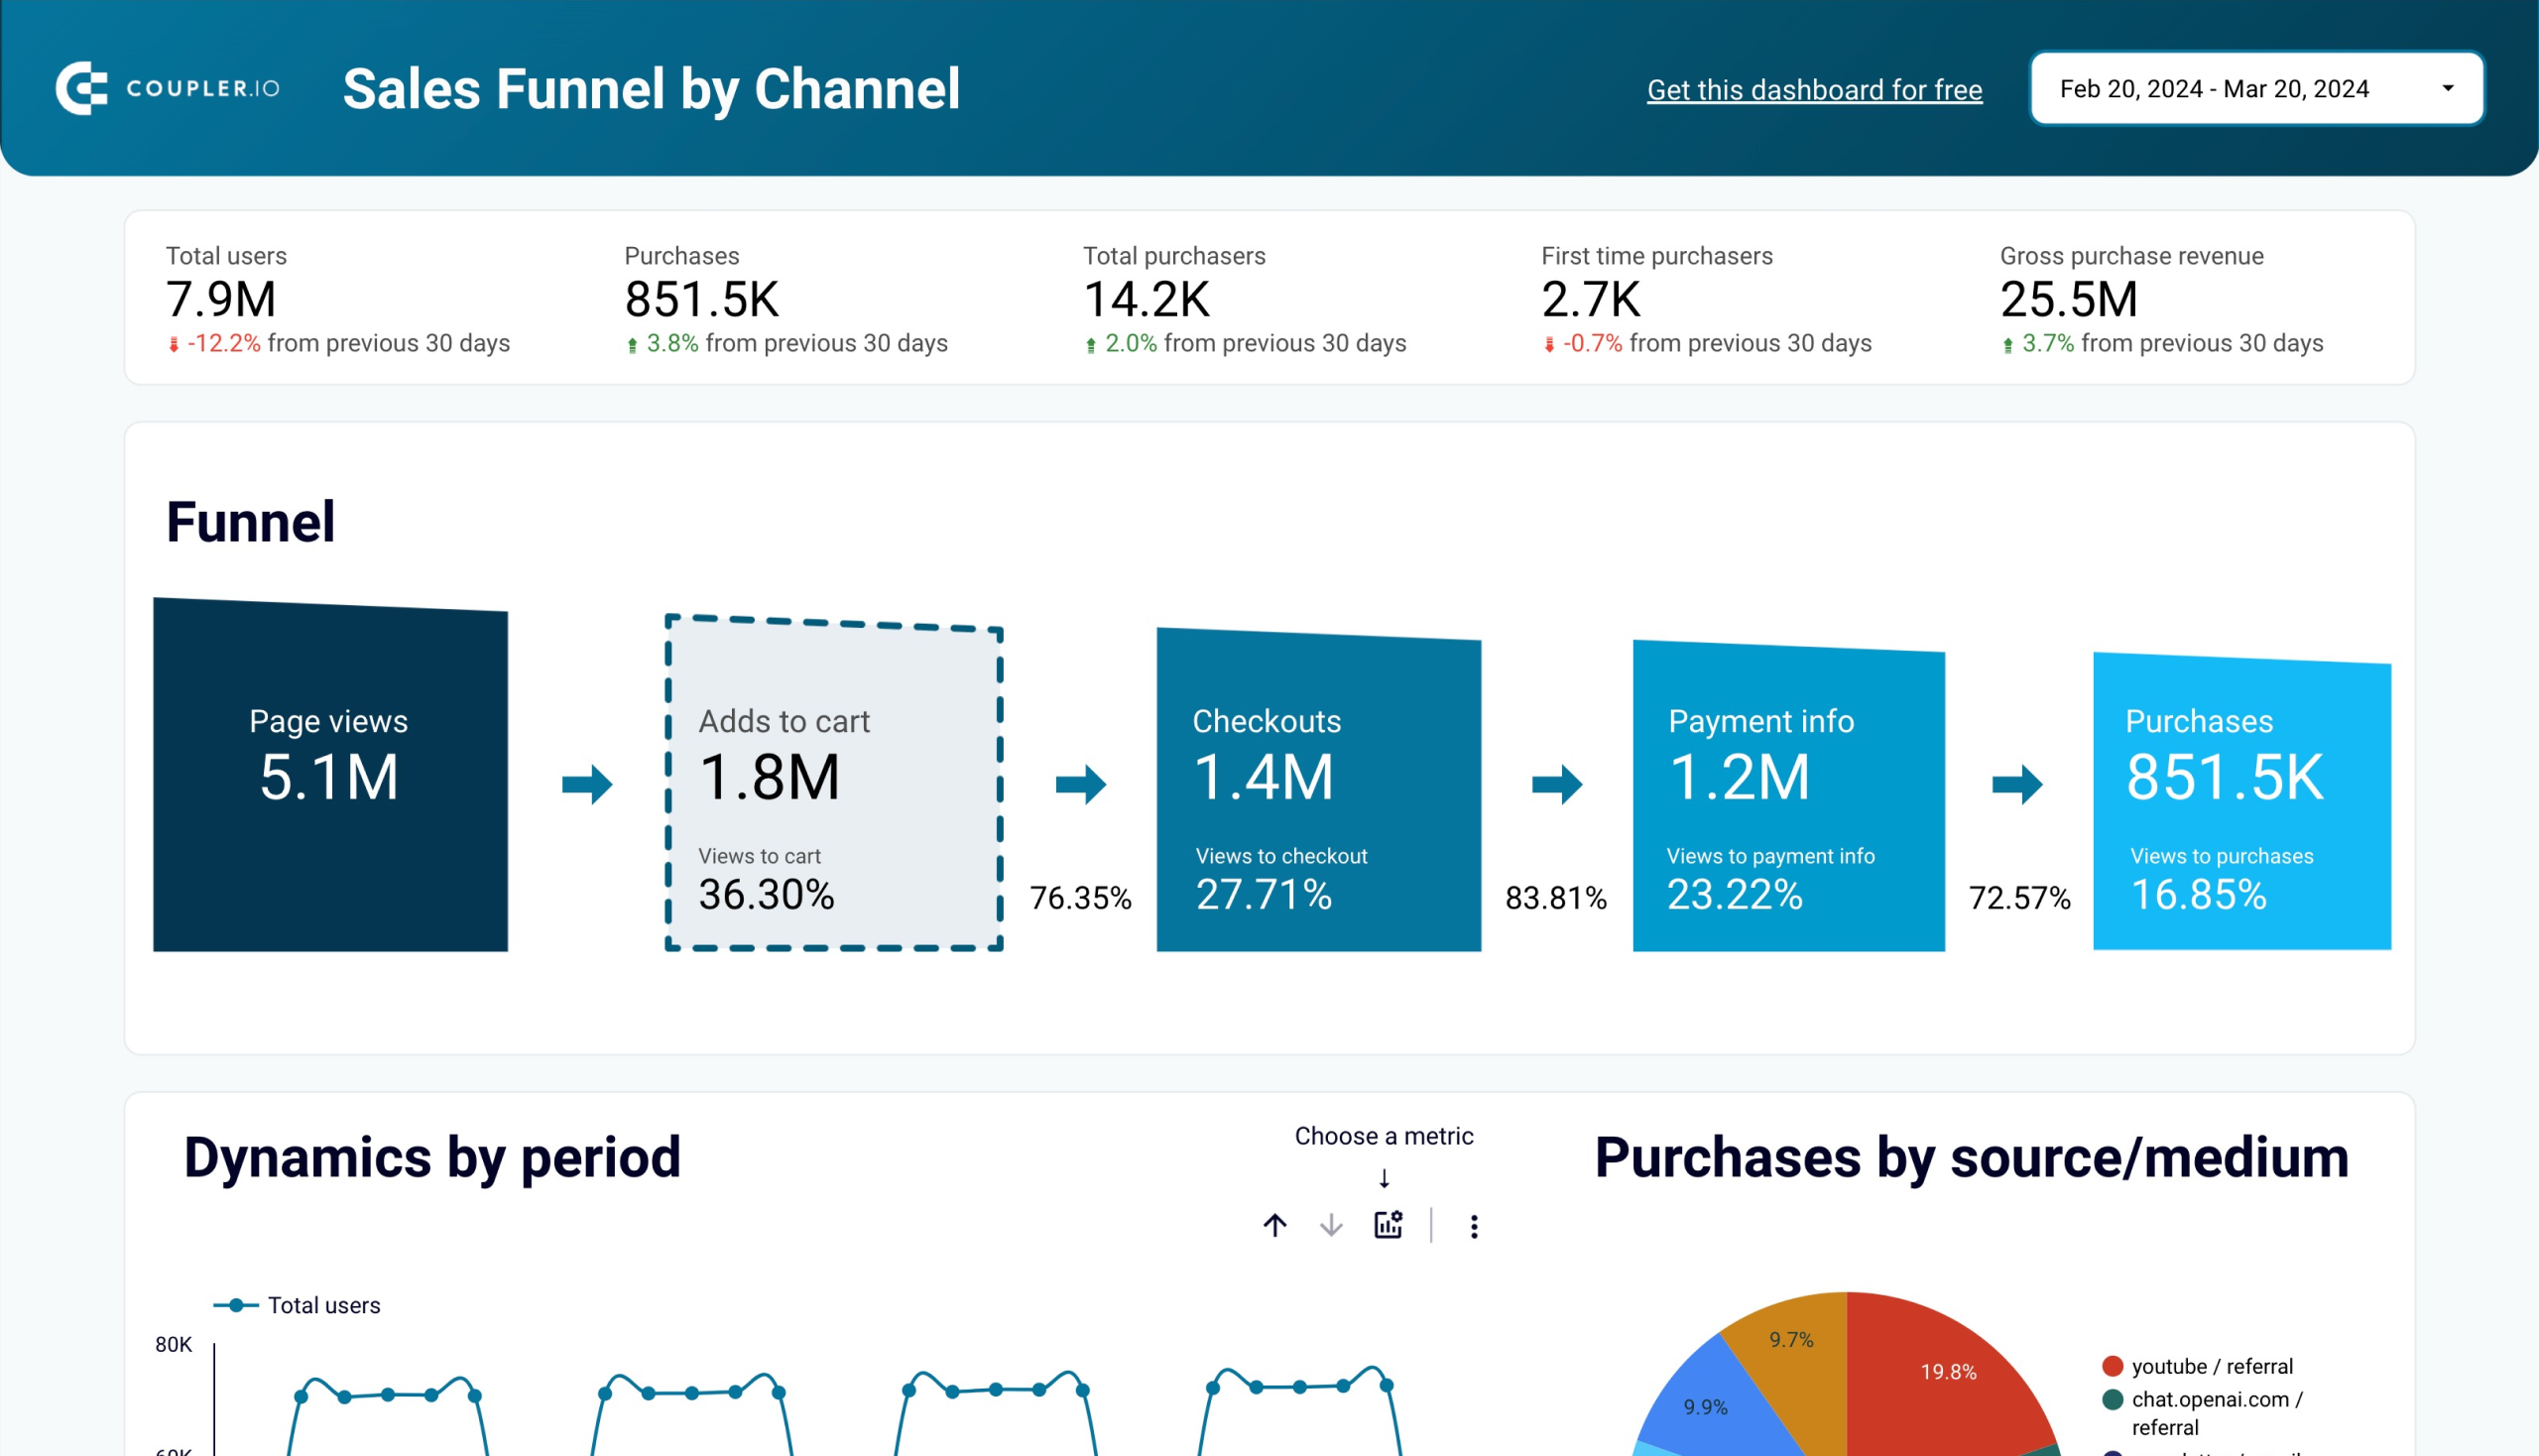
In addition to this Shopify dashboard, Coupler.io also offers other Shopify data analytics options to overview your traffic and acquisition funnel. Try our dashboard templates for free.


How you can export data from Shopify in other ways
1. Export Shopify data via API
To export implicit data like transactions and metafields from Shopify, you can use the Shopify API. Coupler.io offers a JSON API connector for this purpose, requiring a Shopify API token for configuration.
2. Export Shopify store data manually as a CSV file
With this option, you get your Shopify data downloaded as a CSV file to your device. This is well suited for rare or even one-time exports, for example, to migrate a store.
The flow is common: you need to go to the respective page (Products/Orders/Customers/etc.) and click the Export button. You can configure the export, and after that, the file will be either downloaded (for up to 50 records) or emailed to you (for more than 50 records).
3. Export data using apps from Shopify app store
The good thing about this option is that you can choose an app that is specific to your needs. The bad thing is that there are way too many apps to choose from.
Different apps provide different functionality such as “export your store’s data in customizable spreadsheet“, “automate your exports and ensure reliable order processing“, “grab the latest orders from your online store and format to CSV or XLSX file“, and so on.
However, you can search for a solution that suits your needs and maybe find a good fit.
What data can I export from Shopify?
The most in-demand Shopify data for export are Products, Orders, and Customers. You can pull this data manually as a CSV file or automate data export to the preferred destination using Coupler.io.
Beyond this, you can also pull reports, product reviews, gift cards, and much more. Some data is available for manual export as CSV, whereas most of the implicit data can be exported via REST API. But no worries, you don’t have to code to pull, for example, metafields. We’ll explain how you can do this with no code. Here is the table with Shopify exportable data:
| Type of data | CSV | Coupler.io | REST API |
|---|---|---|---|
| Products | ? | ? | ? |
| Product collects | ? | ||
| Product collections | ? | ||
| Product variants | ? | ||
| Product smart collections | ? | ||
| Gift cards | ? | ? | |
| Inventory items | ? | ? | ? |
| Inventory levels | ? | ||
| Orders | ? | ? | ? |
| Abandoned checkouts | ? | ? | |
| Order risks | ? | ||
| Refunds | ? | ||
| Transactions | ? | ||
| Customers | ? | ? | ? |
| Discount codes | ? | ? | |
| Price rules | ? | ||
| Reports | ? | ? | |
| Inventory items | ? | ? | |
| Inventory levels | ? | ||
| Marketing events | ? | ||
| Metafields | ? | ||
| Articles | ? | ||
| Assets for a theme | ? | ||
| Blogs | ? | ||
| Comments | ? | ||
| Pages | ? | ||
| URL redirects | ? | ||
| Script tags | ? | ||
| Themes | ? | ||
| Payments | ? | ||
| Fulfillments | ? | ||
| Balance | ? | ||
| Disputes | ? | ||
| Payouts | ? | ||
| Transactions | ? | ||
| Application charges | ? | ||
| Store properties | ? |
What other data you can export from Shopify via the Shopify API
For more information on other data entities available for export from Shopify, read the Shopify API documentation. Below, we introduced just a few examples.
https://{store_name}.myshopify.com/admin/api/2022-01/{resource}
| Data entity | {resource} for JSON URL | Path |
|---|---|---|
| List of products | …/products.json | products |
| List of customers | …/customers.json | customers |
| List of orders | …/orders.json?status=any | orders |
| Orders by customer | …/orders.json | orders |
| Reports (available to Shopify Advanced and Shopify Plus merchants only) | …/reports.json | reports |
| Application charges | …/application_charges.json | |
| Application credits | …/application_credits.json | |
| List of locations | …/locations.json | locations |
| List of blogs | …/blogs.json | blogs |
| Current balance* | …/shopify_payments/balance.json | |
| List of disputes* (initiated at the specified date) | …/shopify_payments/disputes.json?initiated_at={yyyy-mm-dd} | |
| List of all payouts* | …/shopify_payments/payouts.json | |
| List of all balance transactions paid out in the specified payout* | …/shopify_payments/balance/transactions.json?payout_id={payout-id} |
*If you get an error with the Shopify Payments endpoints, it’s most likely that the Shopify Payments module is not available in your region.
Important: Make sure that your Shopify has the required app permissions set to Read access.
How to export Shopify metafields and other data via API
Let’s say you need to export metafields or other implicit data from Shopify. You can get these via the Shopify API.
Coupler.io provides a JSON API connector that you can use to pull data using REST APIs from different apps. You’ll need to select the JSON as a source and configure it to connect to the Shopify API. The latter requires you to get a Shopify API token first.
How to get Shopify API token
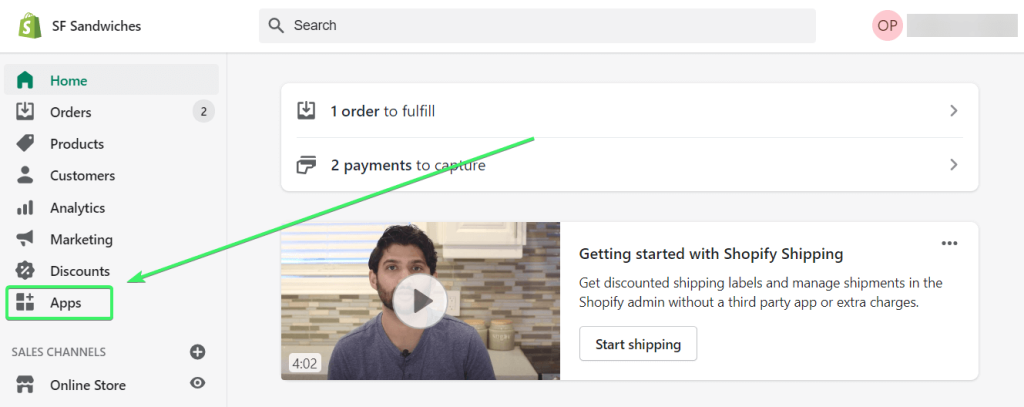
To access the Shopify API and export data from your store, you’ll need to create a Shopify custom app.
- Go to the Apps menu of your Shopify store.
- Click Develop apps for your store (former Private apps).
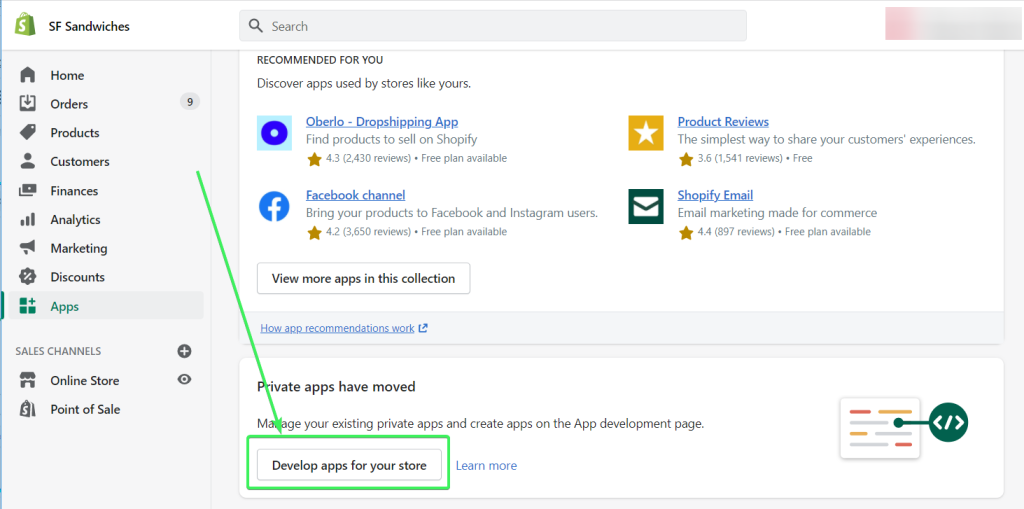
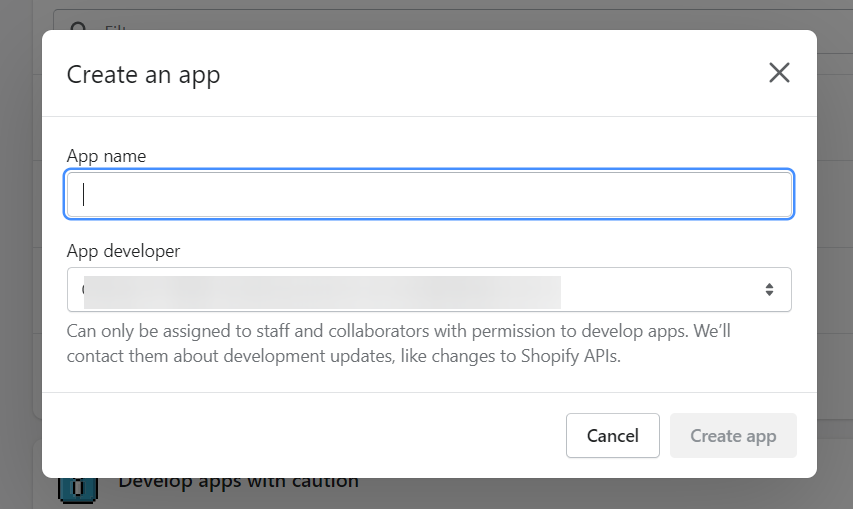
- Click Create an app.

Note: If you haven’t created any private or custom apps before, you may be asked to enable app development.
- Name your app. Then click Create app.
- Once the app is created, click Configure Admin API scopes.
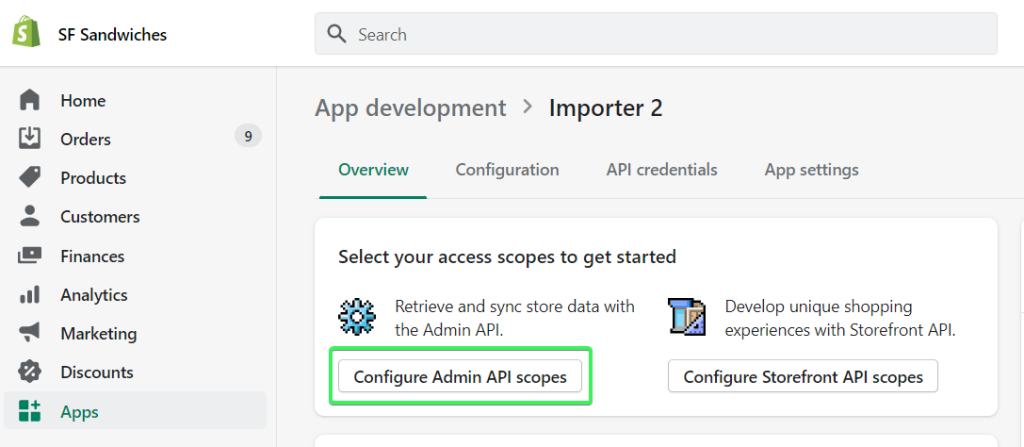
- Check the read scopes for:
- Customers –
read_customers - Inventory –
read_inventory - Orders –
read_orders - Products –
read_products
- Customers –
Then click Save.

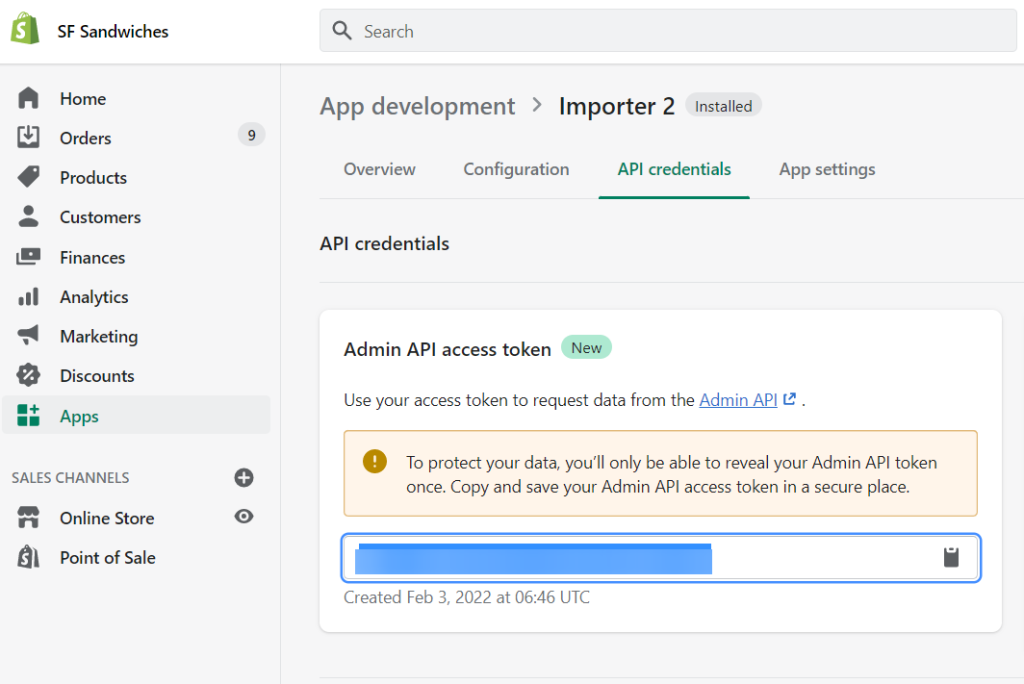
- Click Install app.
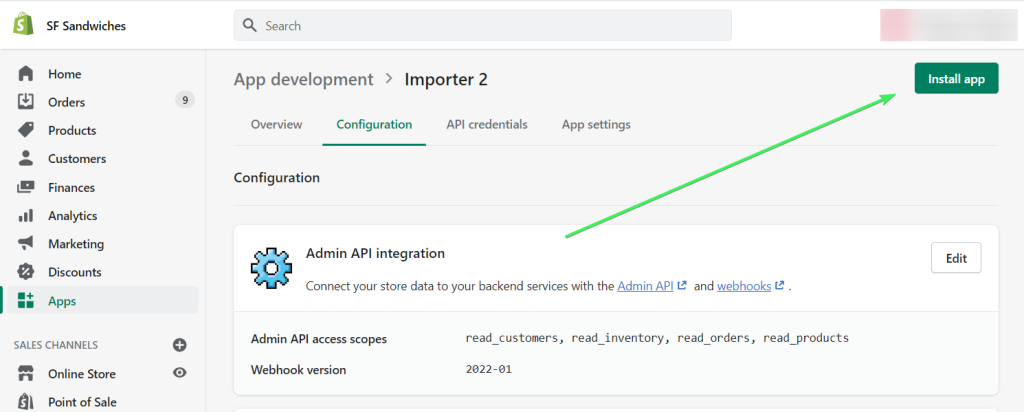
You’ll find your Shopify API token in the Admin API section.
Now you are ready to set up your Shopify integration to export metafields data. Let’s explore one use case to have some practice.
Use case: Shopify export metafields data
Here are the types that implement metafields in Shopify:
- Collection
- Customer
- DraftOrder
- Image
- Order
- Product
- ProductVariant
- Shop
In Shopify, you can’t export all the metafields for a chosen type. For example, you can’t get all the metafields of all the products. All you can do is export metafields of a single product. This is very frustrating, and Shopify users raised this issue some time ago. Nevertheless, let’s review an option we have.
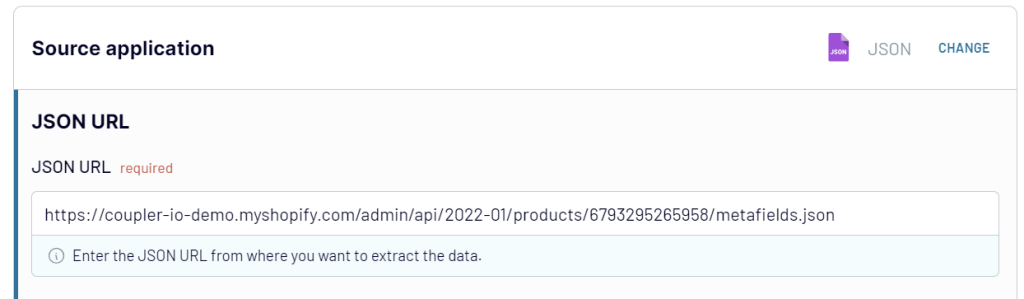
Click Proceed in the form below to create an automated JSON importer. We’ve preselected Google Sheets as a destination app, but you’re free to select your option.
Move on to the setup as follows:
- JSON URL – use the following URL:
https://{store_name}.myshopify.com/admin/api/2022-01/products/{product-id}/metafields.json
{store_name}– enter your shop name.{product-id}– enter the ID of a product for which you want to export metafields.
You can find the product ID in the URL bar of your browser when you select the product.
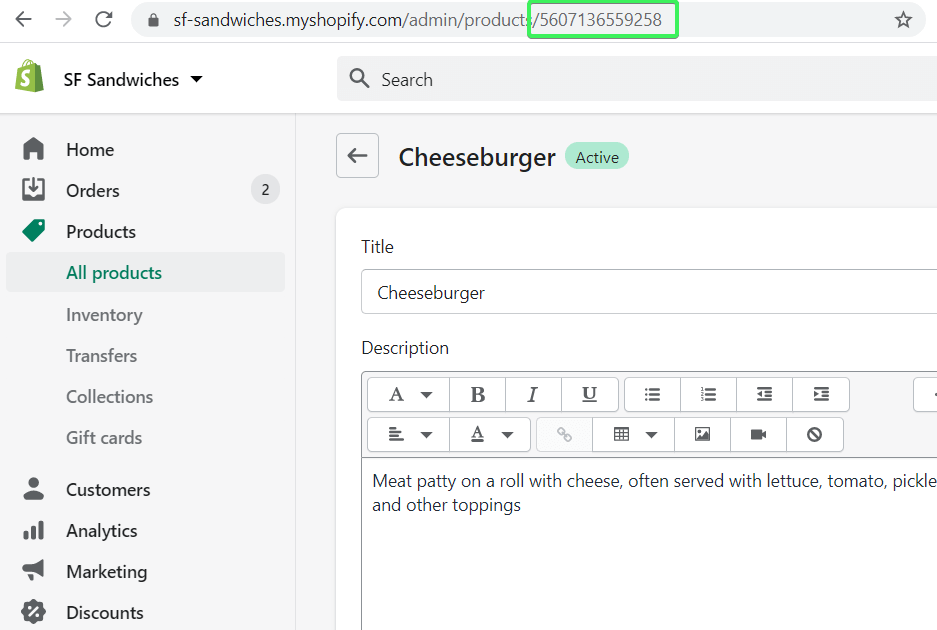
So, your JSON URL should look like this:
https://sf-sandwiches.myshopify.com/admin/api/2022-01/products/5607136559258/metafields.json
Note: If you’re exporting metafields for other types, make sure you modify your string accordingly – for example,
orders/{order-id}/metafields.json
- Request headers – specify your API access token using the following HTTP header:
X-Shopify-Access-Token:{your-api-access-token}
X-Shopify-Access-Token:{your-api-access-token}

- Path – Enter the
metafields
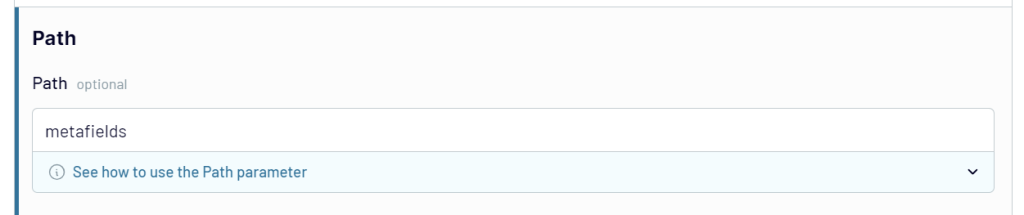
In the next step, you can preview, filter, and sort your data as well as rename, rearrange, hide, or add columns. Then, authorize your Google account and select the spreadsheet where you’d like to import your data.
Lastly, select the data refresh schedule and click Run importer to pull your Shopify metafields data to Google Sheets. Here is what it looks like for our example:

How to export Shopify sales data to CSV manually
CSV export is a go for those users who want either to migrate their data to another store or to make a backup manually. There is no “Export all” button in Shopify, so you’ll have to export each data entity separately.
If you’re exporting more than 50 records, the CSV file will be emailed to you and the store owner. For requests of up to 50 records, the CSV file will be downloaded right away. The time it takes to generate a CSV file depends on the number of orders for export. The estimate is around one hour per 100,000 orders. The exported CSV files are limited to 1 MB.
Export Shopify purchased data (orders) as CSV
In your Shopify admin, go to the Orders page and click Export. If you want to export data about specific orders, select those.
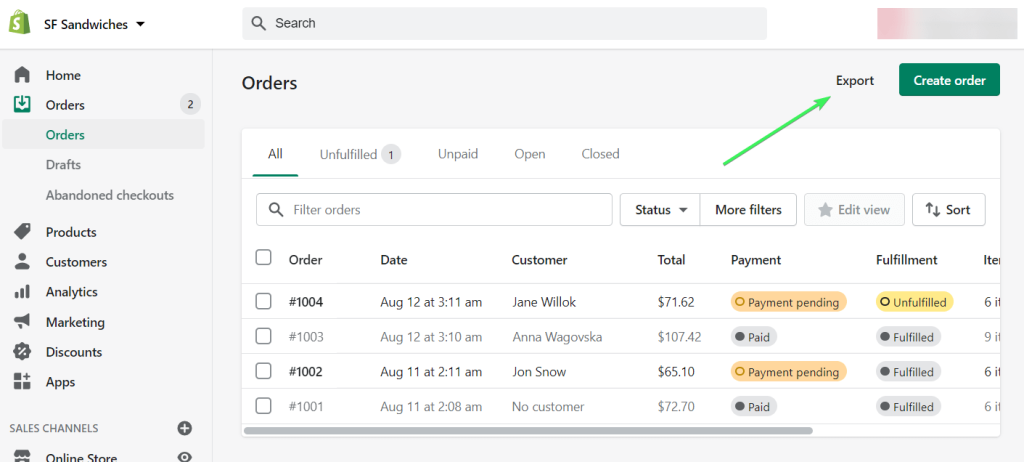
Then you need to select which orders you want to export, the CSV file format and whether you want to include transaction histories.
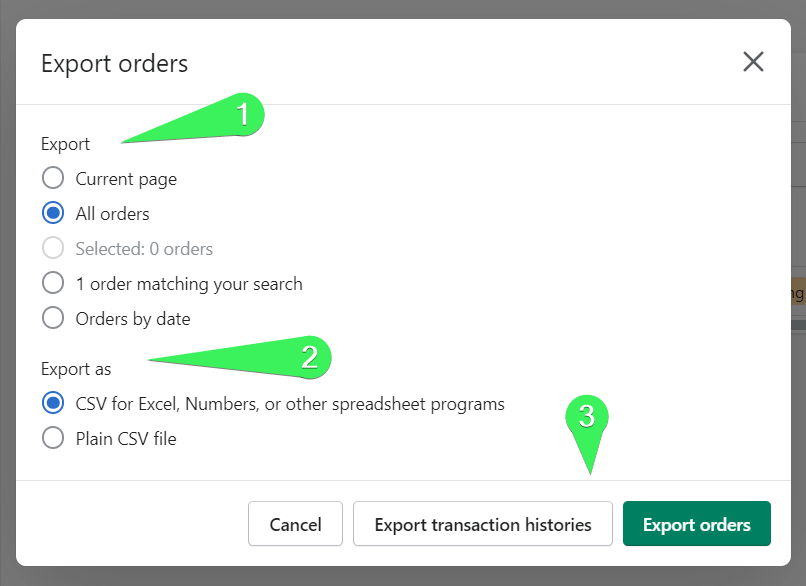
Read our guide for more about Shopify export orders.
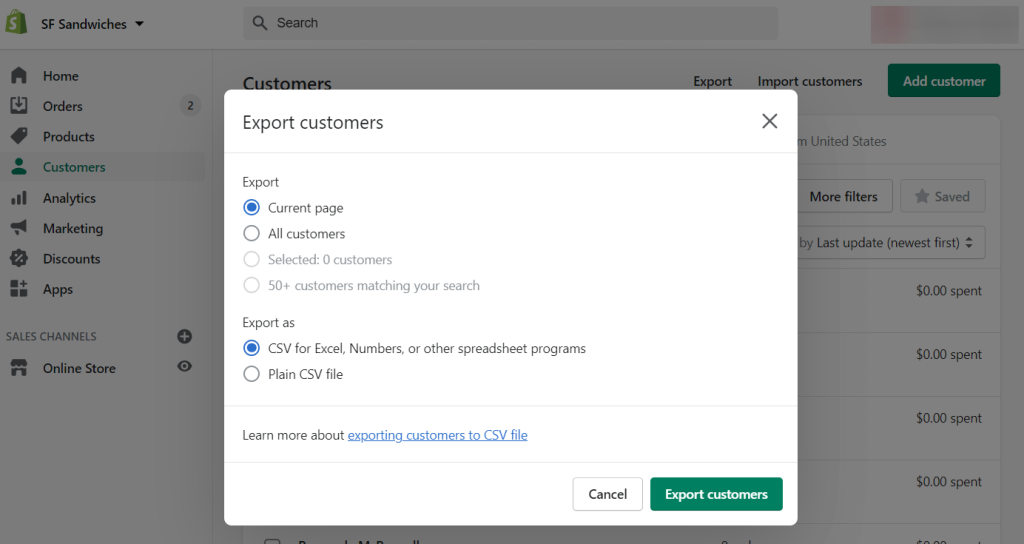
Export customer data from Shopify as CSV
The flow for exporting Shopify customer data is the same as for exporting orders:
- Go to the Customers page and click Export. If you want to export data about specific customers, select those.
- Select which customer you want to export, as well as the CSV file format. Click Export customers.
Shopify export products as CSV
Repeat the same steps if you want to export product data from Shopify:
- Go to the Products page and click Export. If you want to export data about specific products, select those.
- Select which products you want to export, as well as the CSV file format. Click Export products.
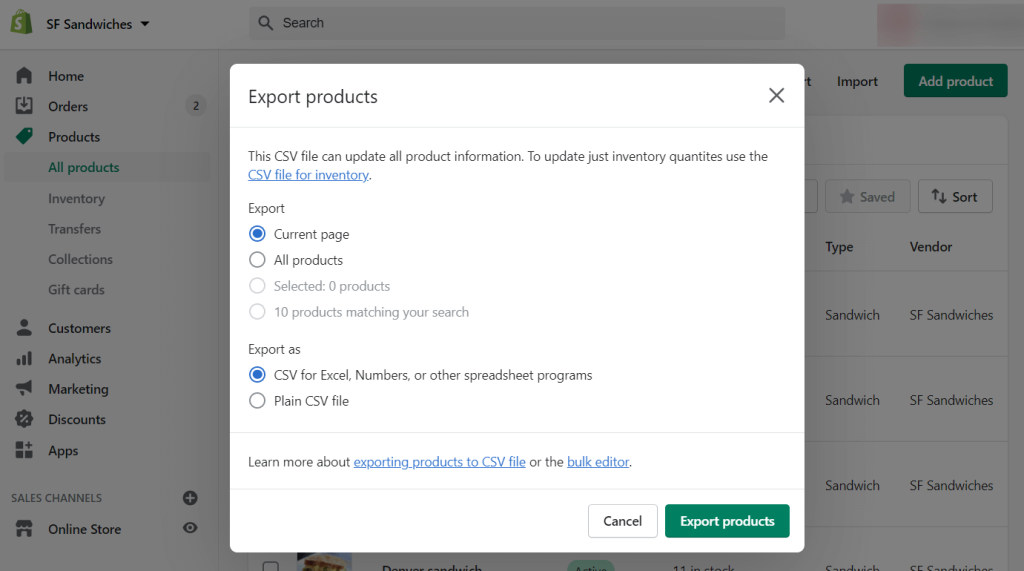
In the Products section, you can also find other data for export, including Collections, Gift Cards, and Inventory. The exporting flow for them is the same.
Export Shopify reports as CSV
You will find Shopify reports in Analytics => Reports.

Click on the report you want to export and configure it for export:
- Choose the data range
- Apply filters if needed
- Add or remove columns to include
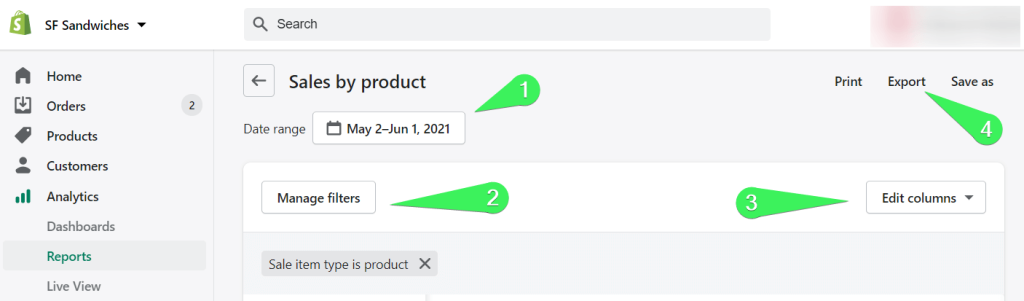
To download your report as a CSV file, click the Export button.
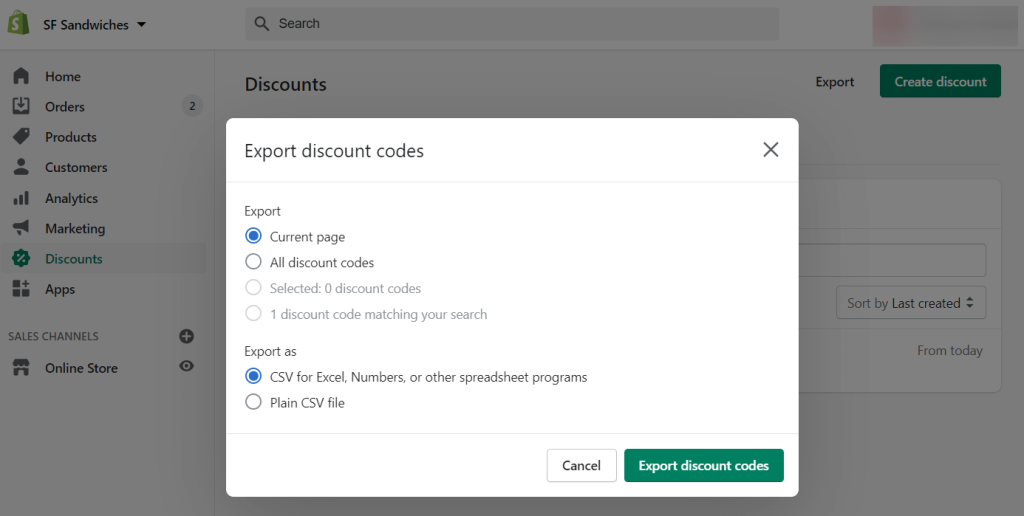
Export Shopify discount codes as CSV
To export discount codes data as CSV, do the following:
- Go to the Discounts page and click Export. If you want to export data about specific discounts, select those.
- Select which discount codes you want to export, as well as the CSV file format. Click Export discount codes.
That’s it for your CSV exporting experience. Now let’s check out the more advanced options that will let you automate data exports.
How to export Shopify data for taxes
First of all, do not forget that:
Shopify doesn’t report or remit your sales taxes for you.
This is on you, but you can configure the most common sales calculations in Settings => Taxes.
As for the reporting, you’ll have to export Shopify reports yourself for your local tax authorities. Usually, the data about Users, Products, and Orders is a common practice for tax legislation in many countries. You can export them as CSV from Shopify as described above.
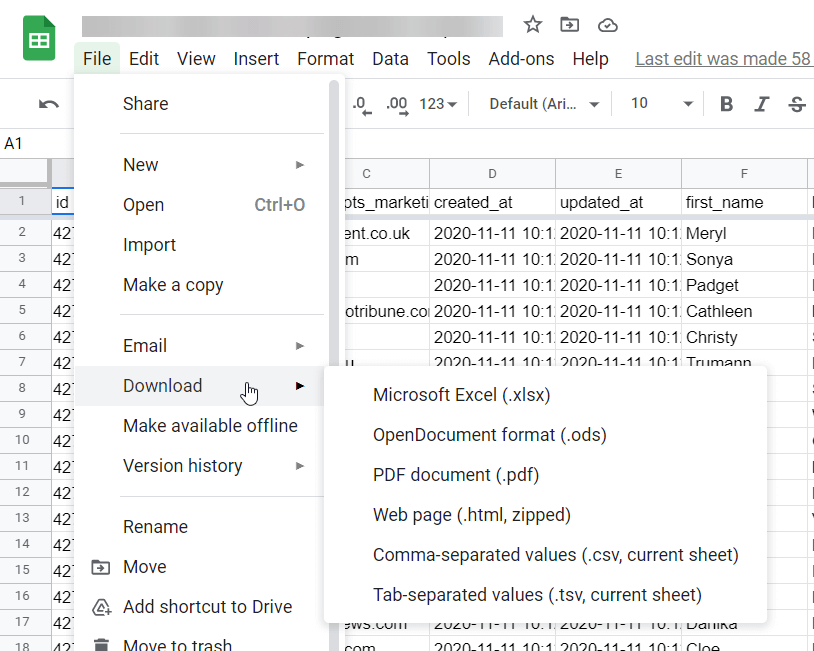
If you’ve integrated Shopify with Google Sheets for reporting or backup purposes, you can download this data as CSV as well – go to File => Download => Comma-separated values (.csv, current sheet).
Frequently asked questions about the Shopify integration
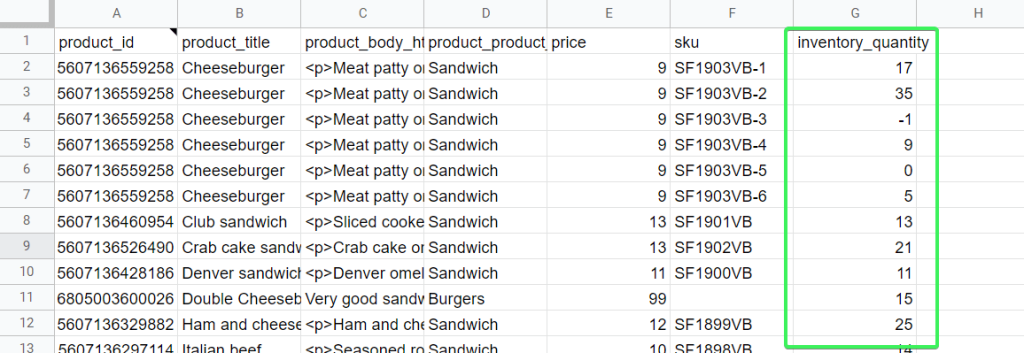
Will Shopify show stock level in the exported data set?
Sure it will! The column with the stock level data is called inventory_quantity. In the example above, we exported it along with other fields:
Can Shopify export products with collections?
To export data about products of a collection, you need to specify the ID of the collection in the Collection ID field when setting up the Shopify source.
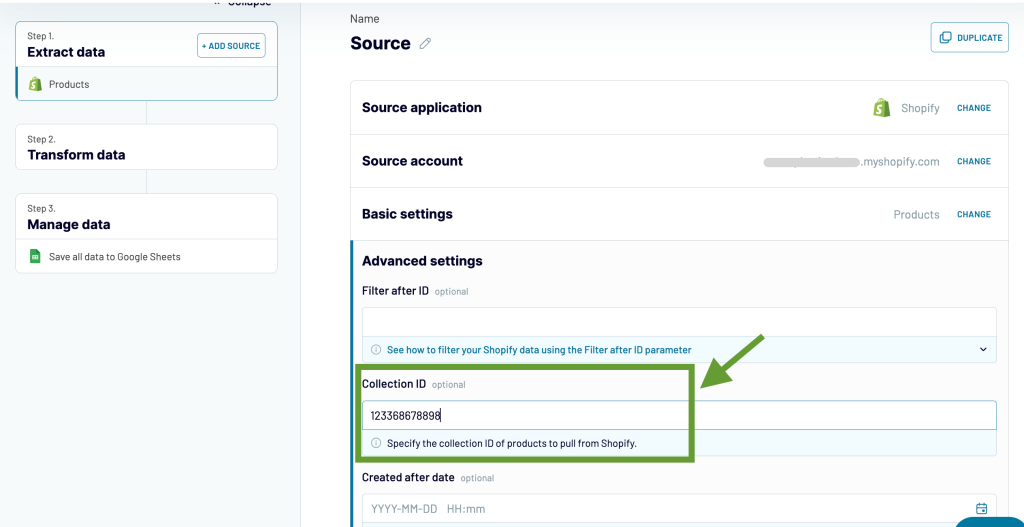
You can find the collection ID in the URL bar of your browser when you select the collection.
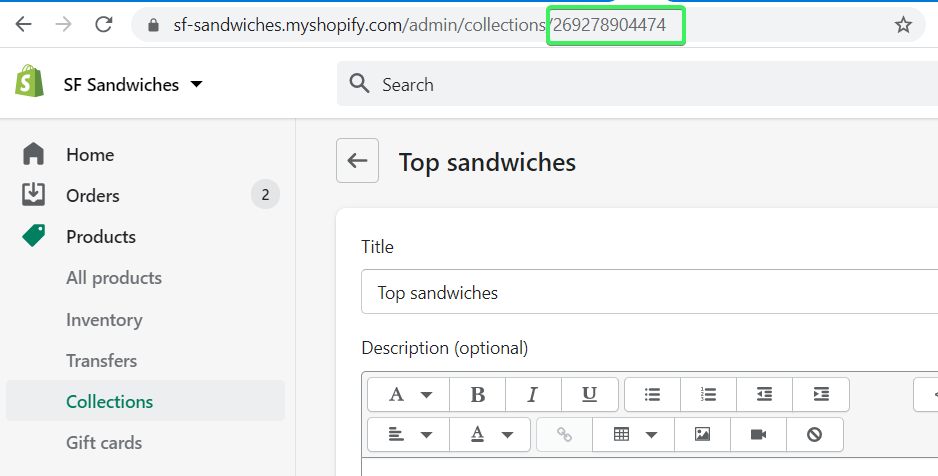
Now you can proceed to the configuration of the destination and schedule – the steps are the same.
Can Shopify export collections as Excel?
We mentioned that Coupler.io allows you to export data from Shopify to several destinations including Excel. So, to export a collection of products to Excel, you’ll need to complete the same three steps.
- Extract your data in the same way, but specify Excel as a destination
- Preview and transform your dataset if needed
- Schedule automated updates and manage the exported data
To get started, click Proceed in the form below:
Which is the best way to export financial data from Shopify?
We will be slightly biased in answering this question. ? But let’s be honest: the native exporting as CSV functionality in Shopify is rather shallow and inconvenient for recurring data manipulations. Besides, it won’t let you export much raw financial data, such as transactions, payouts, etc.
Coupler.io will let you do this from Shopify to Google Sheets (or another destination) and get almost any record you need. Moreover, you can set up your importer once and automate it on the schedule you want.
As for the apps on the Shopify store, they can do the job as well. However, their drawback is that most of the apps provide separate functionalities, so you’ll have to install a few apps instead of one. And this can be rather costly.
The final decision should rely on your goal. We’re sure that you’ll make the best choice for your needs. Good luck with your data!

Automate Shopify data export with Coupler.io
Get started for free